The Art of Neapolitan Pizza: A Michelin Chef’s Masterclass to Perfect Homemade Perfection
The Art of Neapolitan Pizza: A Michelin Chef’s Masterclass to Perfect Homemade Perfection
Greetings, fellow culinary explorers! As a chef who has had the distinct honour of earning Michelin Stars, I find immense joy in sharing the profound beauty and simplicity of exceptional food. Today, we embark on a journey to the very heart of Italian cuisine, a dish so universally beloved it transcends borders and generations: Pizza. But not just any pizza – we are talking about the soul-stirring, historically rich, and utterly sublime Neapolitan pizza, the true progenitor of them all.
Pizza’s story is as layered and comforting as its cheesy embrace. Its origins are deeply rooted in the working-class streets of Naples, Italy, a humble flatbread designed for quick consumption. For centuries, various forms of flatbread with toppings existed across the Mediterranean, but it was in Naples, around the late 18th and early 19th centuries, that pizza as we know it truly began to take shape. Vendors would sell these simple, affordable delights from open-air stands, catering to the bustling port city’s hungry populace. Early versions were often topped with garlic, lard, coarse salt, or a simple combination of olive oil and small fish.
The turning point, the moment pizza truly became a global icon, arrived in 1889. King Umberto I and Queen Margherita of Italy visited Naples, and seeking a change from their usual French haute cuisine, commissioned a local pizzaiolo, Raffaele Esposito of Pizzeria Brandi, to prepare some local specialties. Esposito created three different pizzas, but it was the one adorned with the colours of the Italian flag – red tomatoes, white mozzarella, and green basil – that captured the Queen’s heart and palate. This patriotic creation was named Pizza Margherita, and thus, a legend was born.
From its humble beginnings as street food for the common folk, pizza rocketed to culinary stardom. Italian immigrants carried their cherished recipes to the New World, particularly the United States, where it evolved and diversified, giving rise to countless regional styles. Yet, amidst this global metamorphosis, the original Neapolitan style – with its delicate, airy crust, vibrant tomato sauce, fresh mozzarella, and aromatic basil – remains a benchmark of authenticity and unparalleled taste. It is a testament to the fact that often, the simplest ingredients, handled with reverence and skill, can create the most extraordinary dishes.
The cultural impact of pizza is immeasurable. It is the quintessential comfort food, the go-to for celebrations, family dinners, and quiet nights in. It fosters community, sparks joy, and offers endless possibilities for culinary creativity. But today, we’re going back to basics, to the purest form, to understand the fundamental principles that make a truly great pizza. This masterclass isn’t just about following a recipe; it’s about understanding the ‘why’ behind each step, embracing the tradition, and learning to read your ingredients and your dough. Prepare to elevate your homemade pizza game from good to absolutely legendary.
Preparation & Cooking Time
- Active Preparation Time: 45 minutes (Dough mixing, stretching, topping)
- Inactive Preparation Time: 18-24 hours (Dough fermentation/proofing)
- Cooking Time: 3-5 minutes per pizza (in a very hot oven)
- Yields: 4 individual 25-30 cm (10-12 inch) pizzas
Ingredients List
The soul of Neapolitan pizza lies in the quality and simplicity of its ingredients. Source the best you can find.
For the Dough (The Foundation)
- “00” Flour: 500 grams (approximately 4 cups) – Italian “00” flour (Type 00) is crucial for its low protein content and fine grind, yielding a tender, airy crust.
- Water: 300 ml (1 ¼ cups) – Cold, filtered water.
- Fine Sea Salt: 15 grams (1 tablespoon) – Enhances flavour and controls yeast activity.
- Fresh Brewer’s Yeast: 1-3 grams (¼ to ½ teaspoon) – Or 0.5-1 gram (⅛ to ¼ teaspoon) active dry yeast, rehydrated. The smaller amount for longer, slower fermentation.
For the Sauce (The Heart)
- San Marzano D.O.P. Crushed Tomatoes: 400 grams (14 oz can) – These specific tomatoes from the Agro Sarnese-Nocerino region have a perfect balance of sweetness and acidity. Avoid chunky or seasoned sauces.
- Fresh Basil Leaves: 6-8 leaves – Hand-torn, not chopped.
- Extra Virgin Olive Oil: 2 tablespoons – High-quality, fruity and peppery.
- Pinch of Sea Salt: To taste – Balances the natural sweetness of the tomatoes.
For the Topping (The Crown)
- Fresh Mozzarella (Fior di Latte or Mozzarella di Bufala): 200-250 grams (7-9 oz) – Drained well and torn into small pieces. Avoid low-moisture, pre-shredded mozzarella.
- Parmigiano-Reggiano (Optional): 20 grams (2 tablespoons) – Freshly grated, for an extra layer of umami.
- Extra Virgin Olive Oil: Drizzle – For finishing.
- Fresh Basil Leaves: For garnish after baking.
Step-by-Step Masterclass Instructions
Step 1: Crafting the Perfect Dough (The Genesis)
The dough is the soul of your pizza. Patience and precision are key here.
- Activate the Yeast (if dry): If using dry yeast, dissolve it in 50ml (3 tablespoons) of the cold water and let it sit for 5-10 minutes until foamy. If using fresh yeast, you can dissolve it directly into the water.
- Combine Water and Salt: In a large mixing bowl, combine the remaining cold water with the sea salt. Stir until the salt is fully dissolved.
- Introduce Flour: Gradually add about two-thirds of the “00” flour to the water-salt mixture, stirring with a wooden spoon or your hand until a shaggy dough forms.
- Add Yeast Mixture: Pour in the activated yeast mixture (or the dissolved fresh yeast). Mix until incorporated.
- Knead: Transfer the dough to a lightly floured surface. Gradually incorporate the remaining flour, kneading for 15-20 minutes. The dough should be smooth, elastic, and no longer sticky. It’s a workout, but crucial for gluten development. Push, fold, turn. Your goal is a smooth, satiny ball.
- First Proof (Bulk Fermentation): Place the dough in a lightly oiled bowl, cover tightly with plastic wrap or a damp cloth, and let it rest at room temperature (around 20-22°C or 68-72°F) for 2 hours. The dough should visibly increase in size.
- Cold Fermentation (The Secret Weapon): After 2 hours, transfer the bowl to the refrigerator for 16-22 hours. This slow, cold fermentation develops incredible flavour and makes the dough much easier to handle and digest.
Step 2: Preparing the Sauce (Simplicity is Divinity)
Neapolitan pizza sauce is minimalist for a reason – to let the quality of the tomatoes shine.
- Drain and Crush Tomatoes: Open the can of San Marzano tomatoes. Gently crush them by hand or with a fork in a bowl. Do not blend or process; you want some texture.
- Season Simply: Add a pinch of sea salt, two tablespoons of good extra virgin olive oil, and the hand-torn fresh basil leaves to the crushed tomatoes. Gently mix. That’s it. No cooking necessary. The heat of the oven will meld the flavours beautifully.
Step 3: Preparing the Mozzarella (Moisture Management)
This step is often overlooked but critical for preventing a watery pizza.
- Drain Thoroughly: Remove your fresh mozzarella from its brine at least 1-2 hours before use. Tear it into small, bite-sized pieces.
- Pat Dry: Place the torn mozzarella on a paper towel-lined plate and pat it dry with more paper towels. This removes excess moisture that would otherwise make your pizza soggy.
Step 4: Shaping the Dough Balls (Portioning with Precision)
After cold fermentation, it’s time to divide and shape.
- Bring to Room Temperature: Take the dough out of the refrigerator 2-3 hours before you plan to bake. Let it come to room temperature, still covered, to relax the gluten.
- Divide and Shape: Gently turn the dough out onto a lightly floured surface. Divide it into four equal portions, about 200-220 grams (7-7.7 oz) each.
- Form Dough Balls: For each portion, create a smooth, tight ball by folding the edges underneath and gently rotating it against the surface. The goal is to create tension on the surface.
- Second Proof: Place the dough balls on a lightly floured tray or proofing box, leaving ample space between them. Cover loosely with plastic wrap or a damp cloth and let them proof at room temperature for another 1-2 hours. They should feel airy and slightly expanded.
Step 5: Stretching the Dough (The Gentle Touch)
This is where the artistry begins. NO ROLLING PIN for Neapolitan pizza!
- Flour Your Hands and Surface: Lightly flour your hands and your work surface.
- From Ball to Disc: Take one dough ball. Gently press it from the centre outwards with your fingertips, pushing the air to the edges to form the cornicione (crust).
- Stretch: Pick up the dough disc and gently stretch it over your knuckles or by rotating it between your hands, letting gravity do some of the work. Aim for a 25-30 cm (10-12 inch) disc, keeping the edge slightly thicker than the centre. Avoid tearing the dough.
- Prepare for Topping: Carefully transfer the stretched dough to a well-floured pizza peel (or parchment paper if you don’t have a peel). Ensure it can slide easily.
Step 6: Topping and Baking (The Grand Finale)
Speed and heat are your allies.
- Preheat Your Oven: This is paramount. If you have a pizza oven, follow its instructions. For a home oven, place a pizza stone or steel on the top rack (or as high as possible) and preheat your oven to its maximum temperature (usually 250-280°C / 480-550°F) for at least 60 minutes, preferably 90 minutes. You want the stone/steel screaming hot.
- Sauce the Base: Spoon 2-3 tablespoons of your prepared San Marzano sauce onto the centre of the stretched dough. Using the back of the spoon, gently spread it in a spiral motion, leaving a 1-2 cm (½-¾ inch) border for the crust.
- Add Mozzarella: Distribute the drained mozzarella pieces evenly over the sauce. Add a light dusting of Parmigiano-Reggiano if using.
- Slide into Oven: With a swift, confident motion, slide the pizza from the peel onto the preheated pizza stone/steel.
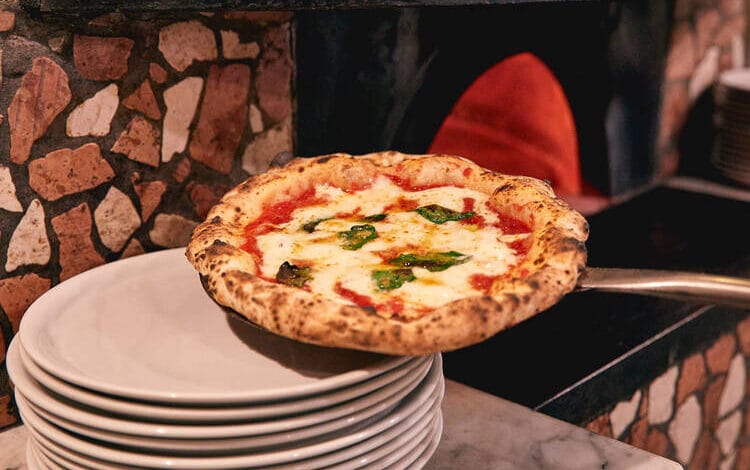
- Bake: Bake for 3-5 minutes, or until the crust is beautifully puffed, blistered, and lightly charred, and the cheese is melted and bubbling with some golden spots. The high heat cooks it incredibly fast.
- Garnish and Serve: Carefully remove the pizza from the oven using the peel. Drizzle with a little more extra virgin olive oil and scatter a few fresh basil leaves. Slice and serve immediately.
5 Secret Pro-Tips for the Perfect Taste
These are the nuances that elevate your pizza from good to extraordinary, straight from my kitchen to yours.
- The Hydration Sweet Spot: Aim for a dough hydration level between 60-65% (water weight relative to flour weight). This range provides a dough that is pliable enough to stretch beautifully but firm enough to handle without tearing, leading to a light, airy, and crisp crust with a perfect chew. Too little, and it’s tough; too much, and it’s sticky and hard to manage.
- Cold Fermentation is Non-Negotiable: While a quick 2-hour proof might yield pizza, an 18-24 hour cold fermentation in the refrigerator is transformative. It develops profound depth of flavour in the dough, makes it significantly easier to digest, and improves its workability. Think of it as a flavour infusion, allowing yeast to slowly create complex aromatic compounds.
- Master the Stretch, Shun the Pin: A rolling pin destroys the precious air bubbles that form in your dough during fermentation, leading to a dense, flat crust. Always stretch your dough by hand, using your fingertips to push air to the edges and letting gravity assist. This preserves the internal structure, giving you that iconic puffy, airy cornicione (crust).
- Less is More with Toppings: A true Neapolitan pizza is about balance. Overloading your pizza with toppings will weigh down the dough, inhibit proper cooking, and result in a soggy crust. A thin layer of sauce, a scattering of mozzarella, and a few basil leaves are all you need to allow the quality of each ingredient to shine.
- Extreme Heat is Your Best Friend: For the authentic Neapolitan experience, you need intense heat, typically upwards of 450°C (850°F) in a traditional wood-fired oven. For home ovens, preheat your pizza stone or steel at your oven’s maximum temperature for at least an hour (90 minutes is better). This extreme heat creates a rapid blast, cooking the crust quickly and achieving that desirable crisp exterior with a soft, chewy interior, often with leopard-spotted charring.
Nutritional Information (per 1/4 of a 25cm Margherita Pizza)
(Approximate values based on recipe ingredients, excluding additional toppings or oils beyond a light drizzle)
| Nutrient | Amount |
|---|---|
| Calories | 380 kcal |
| Protein | 17 g |
| Total Fat | 14 g |
| – Saturated Fat | 7 g |
| Carbohydrates | 47 g |
| – Sugars | 4 g |
| Fibre | 3 g |
| Sodium | 650 mg |
FAQ: Common Pizza Questions Answered
Q1: Why is my pizza crust so chewy and tough, not light and airy?
A: This is usually due to one of two main reasons. Firstly, insufficient kneading and gluten development: the dough wasn’t worked enough to create a strong, elastic network. Secondly, and very commonly, too short a fermentation time. The dough needs time to develop complexity and for the yeast to create the gas pockets that give the crust its airy structure. Cold fermentation is key for this. Lastly, using a rolling pin will deflate those precious air bubbles, so always stretch by hand.
Q2: My pizza is always soggy in the middle. How can I prevent this?
A: Soggy pizza is often a moisture problem. Ensure your fresh mozzarella is thoroughly drained and patted dry – this is crucial. Also, avoid overloading with sauce or toppings; ‘less is more’ applies here. Finally, your oven and pizza stone/steel must be screaming hot. High heat rapidly cooks the dough and evaporates moisture, preventing sogginess. If your oven isn’t hot enough, the pizza will steam rather than bake, leading to a wet centre.
Q3: Can I make the dough ahead of time and freeze it?
A: Yes, you can! After the bulk fermentation (the first proof at room temperature), divide the dough into individual balls. Lightly oil each ball, then place them in individual freezer-safe bags or airtight containers. They can be frozen for up to 2-3 months. To use, transfer the frozen dough ball to the refrigerator overnight to thaw, then let it come to room temperature for 2-3 hours before stretching and baking, as per the second proofing instructions.