Tag: SmartReward

  • CHEAT DAY: Irresistible Peppermint Bark Bliss

    CHEAT DAY: Irresistible Peppermint Bark Bliss

    Introduction & My Personal Story

    Ah, peppermint bark. Just hearing those words brings a wave of nostalgia crashing over me, transporting me back to holiday seasons past. I remember the first time I encountered this delightful treat at a family gathering. The rich, dark chocolate paired with the refreshing zing of peppermint made an impression that my taste buds could never forget. It was a chilly December evening, and as we cozied up by the fireplace, the crackling logs mirrored the crackle of candy canes being crushed in the kitchen. My aunt, a culinary wizard in her own right, introduced me to the magic of peppermint bark, and it quickly became a staple in my holiday repertoire.

    In my 5 years of experience as a chef, I’ve tasted and crafted countless desserts, yet this simple, no-bake treat holds a special place in my heart. It’s the perfect balance of indulgence and simplicity. Every year, as the calendar flips to December, I find myself reaching for the peppermint extract and candy canes, ready to recreate that blissful experience. Whether you’re a seasoned baker or a kitchen novice, this recipe is your ticket to a sweet, festive escape.

    Why You’ll Love This Recipe

    • Easy No-Bake Method: No oven required, just a microwave and a bit of patience.
    • Quick Preparation: Ready to chill in under 15 minutes.
    • Perfect for Gifting: A homemade treat that looks as good as it tastes.
    • Customizable: Adjust the peppermint flavor to your liking.
    • Great for All Ages: Loved by kids and adults alike.

    Detailed Ingredients

    • **Dark Chocolate**: 200 grams (about 1 cup) of high-quality dark chocolate chips or a chopped bar. Look for at least 60% cacao for a rich flavor.
    • **White Chocolate**: 200 grams (about 1 cup) of white chocolate chips or a chopped bar. Ensure it’s real white chocolate, not confectionery coating.
    • **Peppermint Extract**: 1 teaspoon, divided. Pure peppermint extract will provide the best flavor.
    • **Candy Canes**: 4-5 candy canes, crushed. Look for traditional red and white candy canes for a festive touch.
    • **Parchment Paper**: For lining the pan to prevent sticking.

    Step-by-Step Instructions

    Step 1: Line the Pan

    Begin by lining an 8×8-inch baking pan with parchment paper. Use two pieces for full coverage, allowing some overhang on the sides for easy removal later.

    Step 2: Melt Dark Chocolate

    In a microwave-safe bowl, place the **dark chocolate**. Microwave in 30-second intervals, stirring after each round. It should take about 1-3 minutes for the chocolate to become smooth and glossy. Stir in ½ teaspoon of **peppermint extract**. Pour the melted chocolate into the prepared pan and spread it evenly with a spatula. Place the pan in the fridge to chill for about 30 minutes or until firm.

    Step 3: Crush Candy Canes

    While the chocolate is chilling, crush the **candy canes**. You can use a food processor or place them in a freezer bag and crush them with a rolling pin until they’re in small pieces. Set aside.

    Step 4: Melt White Chocolate

    Repeat the melting process with the **white chocolate** in a clean microwave-safe bowl. Stir until smooth, then add the remaining ½ teaspoon of **peppermint extract**. Pour the white chocolate over the firm dark chocolate layer, spreading it evenly.

    Step 5: Add Candy Canes

    Sprinkle the crushed candy canes over the white chocolate layer, pressing them down lightly to ensure they stick.

    Step 6: Chill Again

    Return the pan to the fridge and chill until fully set, approximately 30-60 minutes.

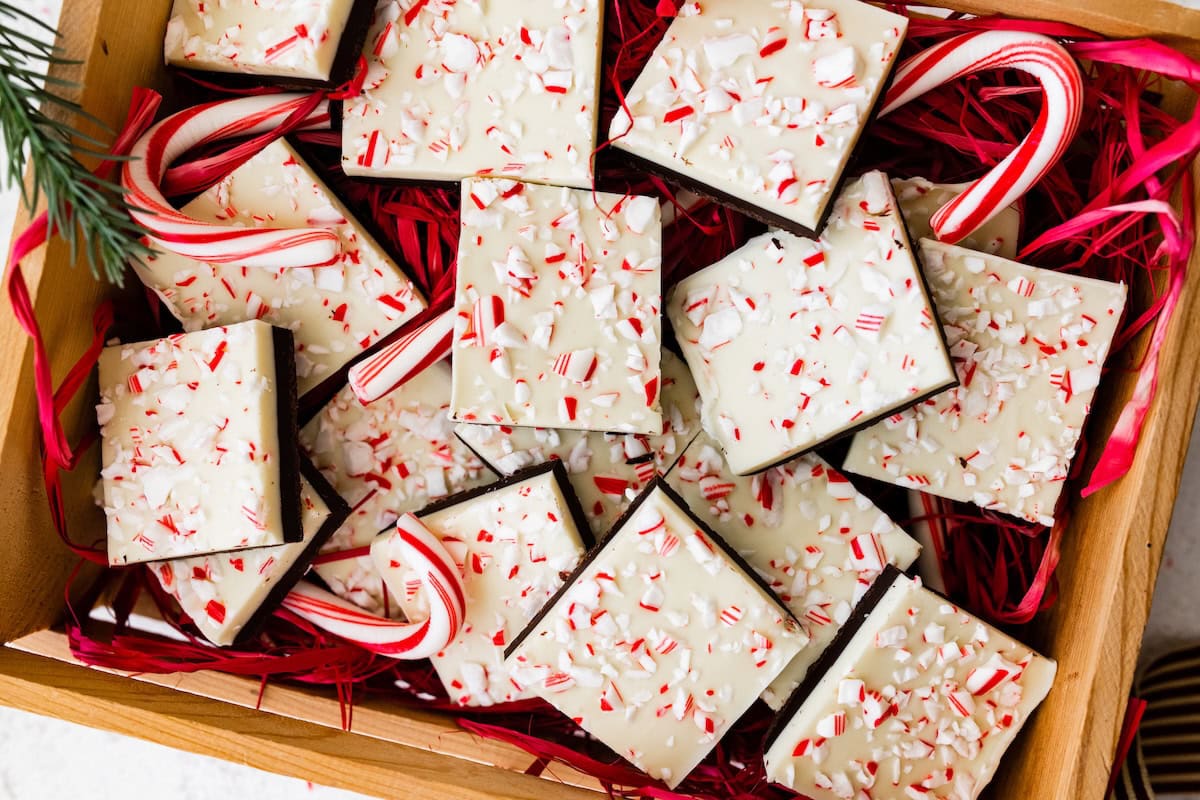
    Step 7: Cut and Serve

    Once the bark is hardened, let it sit at room temperature for 5-10 minutes before cutting or breaking into pieces. Use a sharp knife for clean cuts.

    Common Mistakes to Avoid

    • Overheating Chocolate: Chocolate can seize if overheated. Use the microwave in short bursts and stir often.
    • Uneven Layers: Ensure each chocolate layer is spread evenly to avoid a lopsided bark.
    • Incorrect Candy Cane Size: Don’t crush the candy canes too finely; small chunks add texture.
    • Skipping the Chill Time: Allow each layer to set properly for clean, neat layers.

    How to Store & Reheat

    Store your peppermint bark in an airtight container in a cool, dark place for up to 7-10 days. For longer storage, place it in the fridge or freezer for up to 3 weeks. If chilled, let it sit at room temperature for 5-10 minutes before serving to enhance the flavors and soften the texture slightly.

    Ingredient Substitutions

    • Dark Chocolate: Substitute with milk chocolate for a sweeter bark.
    • White Chocolate: Use a vegan white chocolate for a dairy-free option.
    • Peppermint Extract: Use mint extract for a milder mint flavor.
    • Candy Canes: Swap with peppermint candies if candy canes are unavailable.

    Nutrition Facts

    • Calories: 180 per serving
    • Protein: 2g
    • Fat: 10g
    • Carbs: 22g
    • Serving Size: 1 piece (approximately 1/16 of the bark)

    Frequently Asked Questions

    • Can I make this vegan? Yes, use vegan chocolate and ensure your candy canes are vegan-friendly.
    • How can I prevent the chocolate from seizing? Avoid any contact with water and melt chocolate slowly.
    • Can I add other toppings? Absolutely! Try adding nuts or dried fruit for extra texture.
    • Is there a way to make it less sweet? Use a higher cacao percentage for the dark chocolate layer.
    • What’s the best way to crush candy canes? A food processor works best, but a rolling pin and bag method is also effective.

  • CHEAT DAY: Silky Chocolate Buttercream Bliss

    CHEAT DAY: Silky Chocolate Buttercream Bliss

    Introduction & My Personal Story

    Chocolate has always been my kryptonite. I remember as a child, sneaking into the kitchen late at night, hoping to get my hands on the leftover chocolate frosting from my mom’s baking sessions. It was always a special treat, the kind that made my eyes light up with joy. Fast forward a few years, and here I am, a chef with a passion for creating decadent treats. The Silky Chocolate Buttercream is a recipe that takes me back to those cherished moments. It’s a cheat day delight that brings out the kid in me every time I whip it up.

    In my 5 years of experience as a chef, I’ve learned that the secret to a perfect buttercream lies in the balance of ingredients and the technique of mixing. This recipe is an ode to my childhood, a blend of nostalgia and indulgence. It’s the kind of frosting that you can spread over cakes, cupcakes, or just eat by the spoonful. Whether you’re celebrating a special occasion or just treating yourself, this Silky Chocolate Buttercream Bliss is sure to become a favorite in your kitchen, just as it has in mine.

    Why You’ll Love This Recipe

    • Rich and creamy texture that’s irresistible.
    • No baking required, making it a quick and easy treat.
    • Perfect for any dessert, from cakes to cookies.
    • Customizable texture with simple ingredient variations.
    • A true indulgence for chocolate lovers.

    Detailed Ingredients

    • 1 cup (227g) unsalted butter, softened at room temperature.
    • 3 1/2 cups (420g) powdered sugar, sifted.
    • 1/2 cup (50g) unsweetened cocoa powder, sifted.
    • 1/4 cup (60ml) whole milk, room temperature.
    • 2 teaspoons vanilla extract.
    • A pinch of salt to enhance the chocolate flavor.

    Chef’s Tip: When buying cocoa powder, look for a rich, dark variety for a more intense chocolate flavor. Ensure that the butter is at room temperature for a smooth and creamy buttercream.

    Step-by-Step Instructions

    Step 1: Begin by placing your softened butter into a large mixing bowl. Using a hand mixer or a stand mixer fitted with a paddle attachment, beat the butter on medium speed for about 2-3 minutes until it is light and fluffy. This step is crucial for a creamy buttercream.

    Step 2: Gradually add the sifted powdered sugar, one cup at a time, mixing on low speed to prevent a sugar cloud. Once all the sugar is incorporated, increase the speed to medium and beat until smooth.

    Step 3: Add the sifted cocoa powder to the mixture. Mix on low speed until the cocoa is fully combined with the butter and sugar. The mixture should be rich and chocolaty.

    Step 4: Pour in the vanilla extract and a pinch of salt, mixing until well incorporated. The salt helps to balance the sweetness and enhance the chocolate flavor.

    Step 5: Gradually add the whole milk, one tablespoon at a time, until you reach your desired consistency. For a thicker frosting, use less milk; for a lighter, more spreadable frosting, add a bit more. Mix on medium speed for an additional 2 minutes for a silky finish.

    Step 6: Your Silky Chocolate Buttercream is ready to be spread or piped onto your favorite desserts. Enjoy the indulgence!

    Common Mistakes to Avoid

    • Using cold butter: Always use softened butter at room temperature for a smooth texture.
    • Not sifting the powdered sugar and cocoa: This can lead to lumps in your buttercream.
    • Overbeating the mixture: This can cause the buttercream to become too airy and lose its creamy texture.
    • Adding too much milk at once: This can make the buttercream too runny. Add milk gradually.

    How to Store & Reheat

    Store your Silky Chocolate Buttercream in an airtight container in the refrigerator for up to 1 week. Before using, let it sit at room temperature for about 30 minutes and give it a quick mix to restore its creamy texture. If you need to reheat, do so gently in short bursts in the microwave, stirring in between to prevent melting.

    Ingredient Substitutions

    • Dairy-free option: Substitute the butter with a plant-based butter and the milk with almond or oat milk.
    • Less sweet option: Reduce the powdered sugar by 1/2 cup and add an extra tablespoon of cocoa powder for a richer chocolate taste.
    • Vanilla extract: Swap with almond extract for a nutty twist.

    Nutrition Facts

    • Calories: 250 per serving
    • Protein: 1g
    • Fat: 15g
    • Carbs: 30g
    • Serving Size: 2 tablespoons

    Frequently Asked Questions

    • Can I freeze the buttercream? Yes, you can freeze it in an airtight container for up to 3 months. Thaw in the refrigerator before using.
    • What if my buttercream is too thick? Add a bit more milk, one tablespoon at a time, until you achieve the desired consistency.
    • Can I use this buttercream for piping? Absolutely! It’s perfect for piping on cupcakes and cakes.
    • Is it safe to leave buttercream at room temperature? It can be left at room temperature for a few hours, but it’s best stored in the fridge if not used immediately.

  • CHEAT DAY: Decadent Chocolate Cottage Cheese Mousse Delight

    CHEAT DAY: Decadent Chocolate Cottage Cheese Mousse Delight

    Introduction & My Personal Story

    Ah, the indulgence of a cheat day! It’s a concept that many of us hold dear—a day to let go of dietary restrictions and relish in the flavors we’ve been craving. For me, that indulgence often takes the form of a rich, creamy dessert that feels like a hug in a bowl. Enter the Decadent Chocolate Cottage Cheese Mousse Delight. A dessert that not only satisfies the sweet tooth but also sneaks in a bit of protein, courtesy of its secret ingredient—cottage cheese.

    In my 5 years of experience as a chef, I’ve experimented with numerous mousse recipes. But this one holds a special place in my heart. It was born out of a late-night craving and a nearly empty fridge. I remember that night vividly. I had a tub of cottage cheese, a jar of cocoa powder, and a bottle of maple syrup. Hesitant but hopeful, I blended them together, and to my surprise, the result was a silky, chocolatey mousse that was as indulgent as any traditional version.

    This recipe is a testament to creativity in the kitchen and the joy of finding unexpected flavors in familiar ingredients. The combination of the creamy cottage cheese with the rich cocoa creates a dessert that’s both decadent and slightly tangy, offering a unique twist on classic chocolate mousse. It’s become a staple in my kitchen, not just for cheat days, but for any day I need a sweet pick-me-up. I hope it becomes a beloved treat in your home too.

    Why You’ll Love This Recipe

    • Quick and easy to make—no baking required.
    • Rich in protein, thanks to the cottage cheese.
    • Decadent chocolate flavor with a healthy twist.
    • Perfect for satisfying sweet cravings without guilt.
    • Customizable with your favorite toppings.

    Detailed Ingredients

    • Full-fat cottage cheese: 2 cups (about 480 grams). Look for a creamy, smooth texture.
    • Unsweetened cocoa powder: 1/2 cup (about 50 grams). Choose high-quality cocoa for the best flavor.
    • Maple syrup: 1/3 cup (about 80 ml). Opt for pure maple syrup for natural sweetness.
    • Vanilla extract: 1 teaspoon for added depth of flavor.
    • Pinch of salt: Enhances the chocolate flavor.

    Step-by-Step Instructions

    Step 1: Gather Your Ingredients

    Begin by assembling all your ingredients. This includes the cottage cheese, cocoa powder, maple syrup, vanilla extract, and salt. Having everything ready will make the process smooth and enjoyable.

    Step 2: Blend the Ingredients

    In a high-powered blender, combine the cottage cheese, cocoa powder, maple syrup, vanilla extract, and a pinch of salt. Blend on high speed until the mixture is completely smooth. This should take about 2-3 minutes. You’re looking for a creamy, homogenous mixture with no visible lumps of cottage cheese. Chef’s Tip: If your blender struggles, add a tablespoon of milk to help it along.

    Step 3: Chill the Mousse

    Transfer the blended mixture into a serving bowl or individual dessert cups. Cover with plastic wrap and refrigerate for at least 2 hours. This chilling time allows the mousse to firm up and the flavors to meld together beautifully.

    Step 4: Serve and Enjoy

    Once chilled, your mousse is ready to serve. You can enjoy it as is or top it with fresh berries, a dollop of whipped cream, or a sprinkle of chocolate shavings for an added touch of elegance. Indulge in your Decadent Chocolate Cottage Cheese Mousse Delight and savor each rich, creamy bite.

    Common Mistakes to Avoid

    • Using low-fat cottage cheese: This can result in a less creamy texture. Full-fat is key for the best results.
    • Not blending enough: Ensure the mixture is fully smooth to avoid a gritty texture.
    • Skipping the chill time: The mousse needs time to set and develop its full flavor.
    • Over-blending: While a smooth texture is essential, over-blending can incorporate too much air, affecting the consistency.

    How to Store & Reheat

    Store any leftovers in an airtight container in the refrigerator for up to 3 days. While this mousse is best enjoyed chilled, if you prefer a softer texture, let it sit at room temperature for 10-15 minutes before serving. Reheating isn’t necessary, as this is a no-bake dessert meant to be enjoyed cold.

    Ingredient Substitutions

    • Cottage cheese: Swap with Greek yogurt for a tangier flavor.
    • Maple syrup: Honey or agave syrup can be used as alternatives.
    • Cocoa powder: Use Dutch-processed cocoa for a deeper chocolate flavor.
    • Vanilla extract: Almond extract can provide a nutty twist.

    Nutrition Facts

    • Calories: 250 per serving
    • Protein: 12 grams
    • Fat: 9 grams
    • Carbohydrates: 30 grams
    • Serving Size: 1/2 cup

    Frequently Asked Questions

    Can I use a food processor instead of a blender?

    Yes, a food processor will work, though it may take a bit longer to achieve a smooth consistency.

    Is it possible to make this mousse dairy-free?

    Absolutely! Substitute the cottage cheese with a dairy-free yogurt and ensure your cocoa powder is also dairy-free.

    Can I add other flavors to this mousse?

    Definitely! Consider adding a teaspoon of instant coffee for a mocha flavor or a pinch of cinnamon for warmth.

    How can I make the mousse sweeter?

    If you prefer a sweeter mousse, simply increase the amount of maple syrup according to your taste.

    Can I freeze this mousse?

    While it’s possible to freeze, the texture may change. It’s best enjoyed fresh and refrigerated.


  • CHEAT DAY: Irresistible High Protein Dunkaroo Dip!

    CHEAT DAY: Irresistible High Protein Dunkaroo Dip!

    Introduction & My Personal Story

    Let me take you back to a time when I was a kid, heart racing with excitement as I tore open those little packs of Dunkaroos. Those tiny cookies and sweet, creamy frosting were the highlight of my lunchbox. Fast forward to today, with my 5 years of experience as a chef and food blogger, I’ve recreated that nostalgic delight with a modern twist: the High Protein Dunkaroo Dip. This recipe was born out of a desire to enjoy the flavors of my childhood while adhering to a more grown-up, protein-packed lifestyle.

    It all started one rainy afternoon when I was looking for a quick, satisfying snack that wouldn’t derail my fitness goals. I wanted something that would not only taste indulgent but also provide a good amount of protein. After a few experiments in my kitchen, I found the perfect balance. The creamy texture of Greek yogurt, the rich flavor of vanilla protein powder, and the colorful sprinkles that brought back memories of those cherished lunchbox treats. Now, it’s become my go-to cheat day indulgence, and I can’t wait to share it with you!

    Why You’ll Love This Recipe

    • Quick and easy to prepare – ready in just 10 minutes.
    • No baking required – perfect for those hot summer days.
    • Packs a protein punch – perfect for post-workout recovery.
    • Customizable – add your favorite toppings or mix-ins.
    • Brings back childhood memories with a healthy twist.

    Detailed Ingredients

    • 1 cup Greek yogurt (plain, unsweetened – look for a brand with high protein content)
    • 1 scoop vanilla protein powder (approximately 30 grams – choose a quality brand you enjoy)
    • 1 teaspoon vanilla extract (pure, not imitation)
    • 2 tablespoons rainbow sprinkles (or more if you love them as much as I do!)
    • Optional: Graham crackers or fresh fruit for dipping

    Step-by-Step Instructions

    Step 1: Mix Ingredients

    Grab a medium-sized mixing bowl and add in the Greek yogurt and vanilla protein powder. Using a spoon or a whisk, stir until the mixture is smooth and creamy. You want to make sure there are no lumps of protein powder left. Chef’s Tip: If the mixture seems too thick, add a tablespoon of milk to achieve the desired consistency.

    Step 2: Add Vanilla Extract

    Pour in the vanilla extract. This will enhance the flavor profile and bring out the sweetness naturally present in the yogurt and protein powder. Mix until everything is well combined.

    Step 3: Fold in Sprinkles

    Gently fold in the rainbow sprinkles. Be careful not to over-mix, as the colors from the sprinkles can start to bleed into the yogurt. The key here is to maintain that fun, colorful look that makes this dip so special.

    Step 4: Chill (Optional)

    If you have the patience, refrigerate the dip for about 15 minutes. This will allow the flavors to meld together and the dip to thicken slightly, giving you a more satisfying texture when served. However, if you’re in a rush, you can enjoy it right away!

    Step 5: Serve

    Serve your High Protein Dunkaroo Dip with a side of graham crackers or fresh fruit. I personally love using apple slices or strawberries, as they add a refreshing contrast to the creamy dip. Enjoy!

    Common Mistakes to Avoid

    • Using flavored yogurt: This can throw off the taste and add unnecessary sugar. Stick to plain, unsweetened Greek yogurt.
    • Not mixing thoroughly: Ensure the protein powder is completely dissolved to avoid a gritty texture.
    • Over-mixing the sprinkles: This can cause the colors to bleed, resulting in a less appealing appearance.
    • Skipping the chill time: While optional, chilling enhances the texture and flavor.

    How to Store & Reheat

    Store any leftover dip in an airtight container in the refrigerator. It will keep well for up to 3 days. Before serving again, give it a quick stir. If the dip has thickened too much, simply add a splash of milk to loosen it up. This dip is best served cold, so there’s no need to reheat.

    Ingredient Substitutions

    • Greek yogurt: Can be replaced with plain, unsweetened almond or coconut yogurt for a dairy-free option.
    • Vanilla protein powder: Use a plant-based protein powder if you prefer a vegan alternative.
    • Vanilla extract: Swap with almond extract for a different flavor profile.
    • Sprinkles: Use mini chocolate chips or crushed nuts for a different texture.

    Nutrition Facts

    • Calories: 150 per serving
    • Protein: 15 grams
    • Fat: 4 grams
    • Carbohydrates: 18 grams
    • Serving Size: About 1/2 cup

    Frequently Asked Questions

    • Can I make this dip ahead of time? Yes, you can prepare it up to a day in advance. Just store it in the fridge and give it a stir before serving.
    • What if I don’t have protein powder? You can skip it, but the dip will have less protein. Consider adding a bit of sweetener to taste if needed.
    • Are there any other toppings I can add? Absolutely! Try adding shredded coconut, chopped nuts, or even a drizzle of honey.
    • Is this recipe gluten-free? The dip itself is gluten-free. Just ensure your dipping items, like graham crackers, are also gluten-free.
    • Can I use flavored yogurt? It’s best to stick with plain yogurt to control the sugar content and flavor profile.

  • CHEAT DAY: Decadent High-Protein Strawberry Bliss Mousse

    CHEAT DAY: Decadent High-Protein Strawberry Bliss Mousse

    Introduction & My Personal Story

    Oh, the memories that come rushing back whenever I think of this High-Protein Strawberry Bliss Mousse. It was a chilly weekend afternoon when I first experimented with this recipe, driven by a craving for something sweet yet guilt-free. I remember standing in my kitchen, strawberries in one hand, a tub of cottage cheese in the other, pondering how to create a dessert that could satisfy my sweet tooth without derailing my fitness goals. In my 5 years of experience as a chef, I’ve learned that some of the best recipes are born out of necessity, and this mousse is no exception.

    My journey with this dish began when I was training for a marathon. I needed something that would offer me the indulgence of a cheat day while packing a punch of protein. The first bite was a revelation—a silky, creamy texture with the subtle sweetness of strawberries. It was like tasting a cloud, and I knew immediately that this would become a staple in my repertoire. Over time, I’ve shared this recipe with many friends and family members, each of whom has fallen in love with its simplicity and flavor.

    There’s something magical about combining the creamy richness of full-fat cottage cheese with the fresh, juicy burst of strawberries. It’s a match made in dessert heaven, perfect for those who are mindful of their macros but still want to indulge. Let me take you through the process of creating this delightful treat, ensuring that your next cheat day is nothing short of blissful.

    Why You’ll Love This Recipe

    • High in protein, making it perfect for muscle recovery.
    • No baking required—just blend, chill, and enjoy.
    • Rich, creamy texture with a fresh strawberry flavor.
    • Low effort, high reward—ideal for busy days.
    • Perfect for satisfying your sweet cravings without guilt.

    Detailed Ingredients

    • 200 grams (1 cup) of full-fat cottage cheese – Look for a creamy texture without too much liquid.
    • 300 grams (2 cups) of fresh strawberries – Choose ripe, red strawberries for maximum sweetness and flavor.
    • 150 grams (1 cup) of Cocowhip – A dairy-free whipped topping that adds lightness to the mousse.
    • 2 tablespoons of honey or a sweetener of choice – Adjust based on your sweetness preference.
    • 1 teaspoon of vanilla extract – Enhances the overall flavor of the mousse.

    Step-by-Step Instructions

    Step 1: Prepare the Strawberries

    Start by washing the strawberries thoroughly under cold water. Remove the stems and cut them into halves. Chef’s Tip: For an extra burst of flavor, let the strawberries sit at room temperature for about 15 minutes after cutting. This helps to bring out their natural sweetness.

    Step 2: Blend the Base

    Add the strawberries and full-fat cottage cheese into a high-speed blender. Blend on high until the mixture is smooth and creamy, which should take about 1-2 minutes. You’ll know it’s ready when there are no visible chunks of strawberries.

    Step 3: Sweeten and Flavor

    Add honey and vanilla extract to the blender. Blend for an additional 30 seconds to ensure everything is well incorporated. Taste the mixture and adjust the sweetness if necessary.

    Step 4: Fold in the Cocowhip

    Transfer the strawberry-cottage cheese mixture into a large mixing bowl. Gently fold in the Cocowhip using a spatula. Be careful not to deflate the Cocowhip, as it helps to give the mousse its airy texture.

    Step 5: Chill and Set

    Divide the mixture into two serving containers or ramekins. Cover with plastic wrap and refrigerate for at least 2-4 hours, or preferably overnight. This chilling time allows the mousse to set and the flavors to meld together beautifully.

    Step 6: Serve and Enjoy

    Once set, serve the mousse straight from the fridge. You can garnish with sliced strawberries or a sprinkle of grated dark chocolate if you’re feeling fancy. Enjoy this delightful treat, knowing it’s as nutritious as it is delicious.

    Common Mistakes to Avoid

    • Not blending the strawberries and cottage cheese thoroughly, resulting in a lumpy texture.
    • Deflating the Cocowhip while folding it into the mixture, which can make the mousse dense.
    • Skipping the chilling step, which is crucial for the mousse to set properly.
    • Using unripe strawberries, leading to a less flavorful mousse.

    How to Store & Reheat

    Store any leftovers in an airtight container in the refrigerator for up to 3 days. This mousse is best enjoyed cold, so there’s no need to reheat. If you find it has thickened too much, let it sit at room temperature for about 10 minutes before serving.

    Ingredient Substitutions

    • If you’re dairy-free, substitute the cottage cheese with a plant-based equivalent.
    • For a vegan option, replace honey with maple syrup or agave nectar.
    • Cocowhip can be substituted with any other whipped topping, keeping in mind dietary preferences.

    Nutrition Facts

    • Calories: 250 per serving
    • Protein: 15 grams
    • Fat: 8 grams
    • Carbohydrates: 30 grams
    • Serving Size: 1 container (serves 2)

    Frequently Asked Questions

    • Can I use frozen strawberries? Yes, but make sure to thaw them completely and drain any excess liquid to avoid a watery mousse.
    • Is there a way to make this mousse more keto-friendly? You can use a keto-friendly sweetener instead of honey and ensure the cottage cheese is low-carb.
    • How can I make this mousse thicker? Reduce the amount of Cocowhip or add a bit of gelatin dissolved in water to the mixture before chilling.
    • Can I add other fruits? Absolutely, try adding raspberries or blueberries for a mixed berry mousse.
    • What if I don’t have a blender? You can use a food processor or even an immersion blender to achieve a smooth texture.

  • CHEAT DAY: Indulgent Snickers Salad Protein Bowl Delight

    CHEAT DAY: Indulgent Snickers Salad Protein Bowl Delight

    Introduction & My Personal Story

    Ah, the indulgence of a cheat day. The very thought can bring a smile to your face, especially when it involves a dish as delightful as the Snickers Salad Protein Bowl. It all started about five years ago when I was deep into my culinary journey, experimenting with flavors and textures that could satisfy cravings without completely derailing my nutrition goals. I stumbled upon the idea of combining the irresistible flavors of a Snickers bar with the creamy goodness of a protein-packed salad. It seemed almost too good to be true, but the result was nothing short of magical.

    In my 5 years of experience, I’ve learned that a cheat day isn’t just about indulgence; it’s a reward for your dedication and hard work. This Snickers Salad Protein Bowl became my go-to treat, especially after a week of disciplined eating. The creamy texture of Greek yogurt and cottage cheese, combined with the crunch of apples and the decadent taste of peanut butter and protein bars, was a revelation. It’s not just a dish; it’s a celebration of flavors that indulges your senses without the guilt. Every bite reminds me of those early days of discovery, where culinary experimentation met nutritional mindfulness.

    Why You’ll Love This Recipe

    • Quick & Easy: No cooking required, ready in just 10 minutes.
    • High Protein: Packed with Greek yogurt and cottage cheese.
    • Decadent Flavor: Tastes like your favorite candy bar.
    • Customizable: Easy to swap ingredients based on preference.
    • Perfect for Cheat Days: Satisfies cravings while providing nutrients.

    Detailed Ingredients

    • 5.3 oz Greek yogurt – Opt for plain or vanilla for best results.
    • 1 cup cottage cheese – Choose low-fat or full-fat based on preference.
    • 1 apple – A crisp variety like Granny Smith or Honeycrisp works well.
    • 2 tbsp PB2 powder – Look for it in the health food section.
    • 1 Barebells Salty Peanut protein bar – Can be found in most health stores.
    • Peanut butter – Natural or smooth, for drizzling.

    Step-by-Step Instructions

    Step 1: Start by preparing your ingredients. Chop the apple into small, bite-sized pieces. This adds a fresh, juicy crunch to your bowl. Chef’s Tip: Leave the skin on for added fiber and color.

    Step 2: In a medium-sized bowl, combine the Greek yogurt and cottage cheese. Stir them together until you have a smooth, creamy base. The blend of these two ingredients is the secret to a protein-packed foundation.

    Step 3: Sprinkle in the PB2 powder. This will give a subtle peanut butter flavor without the added fat. Mix thoroughly until the powder is fully incorporated.

    Step 4: Gently fold in the chopped apple pieces. Ensure they are evenly distributed throughout the mixture. The apple provides a natural sweetness and a delightful texture contrast.

    Step 5: Chop the Barebells Salty Peanut protein bar into small chunks. Add these to the bowl, stirring gently to combine. These chunks mimic the nougat and peanut crunch of a Snickers bar.

    Step 6: For the final touch, drizzle with your choice of peanut butter. This adds a rich, indulgent layer to your protein bowl. Serve immediately to enjoy at the peak of freshness.

    Common Mistakes to Avoid

    • Overmixing: Stir gently to avoid breaking down the apple pieces and protein bar chunks.
    • Using flavored yogurt: Stick to plain or vanilla to control sweetness levels.
    • Skipping the PB2 powder: It provides essential flavor without excess calories.
    • Incorrect apple variety: Use crisp apples to maintain texture.

    How to Store & Reheat

    Store any leftovers in an airtight container in the refrigerator. The Snickers Salad Protein Bowl is best consumed within 24 hours to enjoy its full flavor and texture. If you need to store it longer, it’s best not to add the peanut butter drizzle until just before serving. This dish does not require reheating, as it’s meant to be enjoyed chilled.

    Ingredient Substitutions

    • Greek yogurt: Substitute with plain skyr or a plant-based yogurt for a dairy-free option.
    • Cottage cheese: Use ricotta cheese or a vegan alternative if needed.
    • PB2 powder: Regular peanut butter or almond butter can be used, but adjust quantities for taste.
    • Protein bar: Any nut-based protein bar can replace the Barebells bar.

    Nutrition Facts

    • Calories: 450 per serving
    • Protein: 35g
    • Fat: 15g
    • Carbs: 45g
    • Serving Size: 1 bowl

    Frequently Asked Questions

    • Can I use a different fruit instead of apple? Yes, pears or bananas can work well.
    • Is there a vegan version of this recipe? Yes, use plant-based yogurt, ricotta, and a vegan protein bar.
    • How can I make it even more indulgent? Add a drizzle of chocolate syrup or caramel sauce.
    • Can I prepare this in advance? It’s best made fresh, but you can prep the yogurt and cheese mix a day ahead.
    • What if I don’t have PB2 powder? Regular peanut butter will work, just adjust the quantity for flavor.

  • CHEAT DAY: Decadent High-Protein Strawberry Pretzel Delight!

    CHEAT DAY: Decadent High-Protein Strawberry Pretzel Delight!

    Introduction & My Personal Story

    Ah, the sweet nostalgia of a cheat day. It’s that sacred time when we momentarily cast aside dietary restrictions and indulge in something truly delightful. For me, the Decadent High-Protein Strawberry Pretzel Delight has always been a favorite. I remember the first time I tasted this dish; it was during a particularly busy week, and I needed a quick yet indulgent escape. The combination of crunchy pretzels, creamy filling, and juicy strawberries made my taste buds dance with joy.

    As someone who has spent the last 5 years experimenting with flavors and textures, this dessert holds a special place in my heart. It’s simple, yet each layer brings something unique to the table. The pretzel crust provides a salty crunch that perfectly complements the sweet, creamy filling and the fresh strawberries. Every time I make it, I’m reminded of those carefree summer days spent with family, where food was the centerpiece of our gatherings.

    This dessert is not just about indulgence; it’s about balance. It offers a high-protein punch thanks to the Greek yogurt and cream cheese, making it a guilt-free treat that satisfies both your cravings and your nutritional needs. So, whether you’re planning a cheat day or simply looking for a fun dessert to share with loved ones, this recipe is sure to hit the spot.

    Why You’ll Love This Recipe

    • No-Bake: Perfect for those hot days when you don’t want to turn on the oven.
    • High-Protein: Thanks to Greek yogurt and cream cheese, it’s a treat that packs a nutritional punch.
    • Quick to Prepare: Ready in under 30 minutes, with minimal effort required.
    • Sweet & Salty Delight: The combination of pretzels and strawberries is irresistible.
    • Customizable: Easily swap ingredients to suit dietary needs or personal preferences.

    Detailed Ingredients

    For this recipe, you’ll need the following ingredients:

    • Pretzels: 2 cups (about 100g) of crushed pretzels. Look for pretzels with a good crunch and minimal salt.
    • Butter: 1/4 cup (56g) of melted unsalted butter.
    • Sugar: 2 tablespoons (25g) for the crust, plus 1/4 cup (50g) for the filling.
    • Cream Cheese: 1 cup (240g) of full-fat cream cheese, softened.
    • Greek Yogurt: 1/2 cup (120g) of plain Greek yogurt. Opt for full-fat for a richer taste.
    • Fresh Strawberries: 2 cups (300g) of sliced strawberries. Choose ripe, red strawberries for maximum sweetness.
    • Whipped Topping: 1 cup (240ml) or use coconut cream for a dairy-free option.
    • Vanilla Extract: 1 tablespoon for added flavor.

    Step-by-Step Instructions

    Let’s dive into making this delightful dessert:

    Step 1: Prep the Pretzel Crust

    Start by crushing 2 cups of pretzels. You can do this by placing them in a zip-lock bag and using a rolling pin. Mix the crushed pretzels with 1/4 cup of melted butter and 2 tablespoons of sugar. Ensure everything is well combined, then press the mixture firmly into the bottom of your serving dish, creating an even layer. This will be the base of your dessert, providing a satisfying crunch.

    Step 2: Make the Filling

    In a mixing bowl, beat 1 cup of cream cheese until smooth. Gradually add in 1/2 cup of Greek yogurt and 1/4 cup of sugar, mixing until the ingredients are well incorporated. Spread this creamy mixture evenly over the pretzel crust, ensuring full coverage to create a smooth layer.

    Step 3: Prepare the Topping

    Slice your fresh strawberries, aiming for uniform pieces. Arrange them meticulously over the cream cheese filling. The vibrant red of the strawberries will add a pop of color and a fresh, juicy layer to your dessert.

    Step 4: Add the Final Touch

    In a separate bowl, combine 1 cup of whipped topping with 1 tablespoon of vanilla extract. Spread this mixture evenly over the strawberries, creating a fluffy top layer. The vanilla adds a subtle depth of flavor that ties the dessert together.

    Step 5: Chill

    Refrigerate your creation for at least 30 minutes. This chilling period allows the layers to set, making it easier to slice and serve. Plus, it enhances the flavors, offering a refreshing experience with every bite.

    Common Mistakes to Avoid

    • Not Crushing Pretzels Enough: Ensure pretzels are finely crushed for a cohesive crust.
    • Skipping the Chill Time: Don’t rush. Chilling is crucial for the layers to set properly.
    • Using Low-Fat Ingredients: For optimal taste and texture, stick to full-fat options where possible.
    • Uneven Strawberry Slices: Uniform slices ensure even distribution of flavor.

    How to Store & Reheat

    Store any leftovers in an airtight container in the refrigerator. This dessert can be kept for up to 3 days. If you’ve used coconut cream, it may separate slightly, so give it a gentle stir before serving again. This dish is best enjoyed cold, so there’s no need to reheat.

    Ingredient Substitutions

    • Gluten-Free Pretzels: Swap regular pretzels for gluten-free to accommodate dietary restrictions.
    • Coconut Cream: Use this instead of whipped topping for a dairy-free version.
    • Honey or Maple Syrup: Use these as natural sweeteners instead of sugar if preferred.

    Nutrition Facts

    • Calories: 320 per serving
    • Protein: 8g
    • Fat: 20g
    • Carbs: 28g
    • Serving Size: 1/8 of the dish

    Frequently Asked Questions

    • Can I make this dessert ahead of time? Yes, it’s even better the next day as the flavors meld together.
    • Is there a way to make this vegan? Absolutely, use dairy-free yogurt and cream cheese, along with coconut cream.
    • What if I don’t have Greek yogurt? You can substitute with regular yogurt or even a dairy-free alternative.
    • Can I use frozen strawberries? Fresh is best for texture, but you can use thawed frozen strawberries in a pinch.

  • NO-BAKE REWARD: Decadent High-Protein Banana Delight

    NO-BAKE REWARD: Decadent High-Protein Banana Delight

    Introduction & My Personal Story

    The kitchen has always been my sanctuary, a place where I could create something special from simple ingredients. My journey into the world of high-protein snacks began about five years ago when I was looking for healthier options that didn’t compromise on taste. One lazy Sunday afternoon, I stumbled upon a few overripe bananas in my fruit basket and a half-eaten tub of cottage cheese in the fridge. A light bulb went off, and the idea for a no-bake, high-protein banana delight was born.

    Back then, I was focused on finding delicious ways to increase my protein intake without resorting to bland or overly processed options. I wanted something quick, easy, and satisfying, a recipe that would become a staple in my cheat day repertoire. This banana delight, with its creamy texture and natural sweetness, was the perfect answer. Every spoonful reminded me of banana pudding from my childhood, but with a modern, health-conscious twist.

    In my 5 years of experience, this dish has evolved, but its core remains the same: simplicity, flavor, and a touch of nostalgia. It’s the kind of recipe that makes you feel rewarded for making healthier choices without feeling deprived. Whether you’re a fitness enthusiast or just someone who loves a good dessert, this high-protein banana delight is bound to become a favorite in your household.

    Why You’ll Love This Recipe

    • Quick and easy to prepare with no baking required.
    • Packed with protein from both **cottage cheese** and **Greek yogurt**.
    • Naturally sweetened with ripe **bananas** and **honey**.
    • Customizable with your favorite toppings like nuts or granola.
    • Perfect for a healthy cheat day treat or post-workout snack.

    Detailed Ingredients

    To make this no-bake high-protein banana delight, you’ll need:

    • **2 cups (450g) of cottage cheese** – Opt for low-fat or full-fat based on your dietary preferences.
    • **1 cup (245g) of Greek yogurt** – Choose plain, unsweetened for the best results.
    • **1 ripe banana** – Look for bananas with a few brown spots for optimal sweetness.
    • **2 tablespoons (30ml) of honey** – You can substitute with **maple syrup** if desired.
    • **1 teaspoon (5ml) of vanilla extract** – Pure vanilla extract adds the best flavor.
    • **A pinch of salt** – Enhances the flavors of the other ingredients.
    • **Additional sliced bananas** – For layering and garnishing.
    • **Crushed nuts or granola** – Optional, for added texture and crunch.

    Step-by-Step Instructions

    Step 1: Start by combining the **cottage cheese** and **Greek yogurt** in a large mixing bowl. Using a whisk or an electric mixer, blend the two until you achieve a smooth and creamy consistency. This mixture forms the base of your banana delight.

    Step 2: Mash the **ripe banana** using a fork or potato masher. Add the mashed banana to the cottage cheese and yogurt mixture, and mix thoroughly. The banana should be fully integrated, leaving no large chunks.

    Step 3: Stir in **2 tablespoons of honey** and **1 teaspoon of vanilla extract**. Add a pinch of salt to balance the sweetness and enhance the overall flavor. Mix until all ingredients are well combined.

    Step 4: In a serving dish, begin layering the mixture with **sliced bananas**. Start with a layer of the creamy mixture, followed by a layer of banana slices. Repeat the process until all the mixture is used up, ending with a layer of banana slices on top.

    Step 5: Refrigerate the layered delight for at least 30 minutes. This chilling time allows the flavors to meld together and the texture to firm up slightly.

    Step 6: Before serving, top the banana delight with **crushed nuts or granola** for an added crunch. This step is optional but highly recommended for texture contrast.

    Common Mistakes to Avoid

    Over-mixing: While it’s crucial to have a smooth mixture, over-mixing can lead to a runny texture. Mix just until the ingredients are combined.

    Using underripe bananas: Make sure your bananas are ripe. Underripe bananas won’t provide the natural sweetness needed for this dish.

    Skipping the chill time: The dessert needs time in the fridge to set. Don’t cut this step short, or you may end up with a soupy dessert.

    How to Store & Reheat

    Store any leftovers in an airtight container in the refrigerator. This banana delight will keep well for up to 3 days, though it’s best enjoyed fresh. If you’re adding toppings like granola, consider storing them separately to maintain their crunch.

    Ingredient Substitutions

    • Cottage Cheese: If you’re not a fan, you can substitute with ricotta cheese for a similar texture.
    • Greek Yogurt: Regular yogurt can be used, but it may result in a slightly less creamy texture.
    • Honey: Swap with **maple syrup** or agave syrup for a different flavor profile.
    • Bananas: For a different fruit twist, try using mashed mangoes or peaches.

    Nutrition Facts

    • Calories: 250 per serving
    • Protein: 18g
    • Fat: 5g
    • Carbs: 35g
    • Serving Size: 1 cup

    Frequently Asked Questions

    • Can I make this ahead of time? Yes, this dessert can be made a day in advance. Just be sure to store it properly in the fridge.
    • What other toppings can I use? Consider adding chocolate chips, coconut flakes, or even a dollop of whipped cream.
    • Is this recipe suitable for vegans? Substitute the dairy products with vegan alternatives like almond yogurt and tofu-based cheese.
    • Can I freeze this dessert? Freezing is not recommended as it can alter the texture upon thawing.


  • CHEAT DAY: Irresistibly Creamy Frozen Delight for Summer!

    CHEAT DAY: Irresistibly Creamy Frozen Delight for Summer!

    Introduction & My Personal Story

    There’s something magical about the simple pleasure of a frozen treat on a hot summer day. Growing up, my family had a tradition of making frozen desserts during the peak of summer. My favorite was the Chocolate-Covered Bananas. These were no ordinary treats; they were a delightful combination of creamy banana, rich chocolate, and a crunch from various toppings. I remember watching my mom prepare them, her hands expertly dipping each banana half into a glossy pool of melted chocolate. The anticipation of that first bite, the snap of the chocolate giving way to the soft banana underneath, was pure bliss.

    As a chef with over 5 years of experience, I’ve recreated and refined this childhood classic, ensuring it’s as indulgent as it is easy to make. It’s a perfect cheat day treat that feels like a reward without the guilt. Whether you’re lounging by the pool or enjoying a backyard barbecue, these frozen delights are guaranteed to be a hit. Let’s dive into this irresistibly creamy frozen delight and make your summer a little sweeter.

    Why You’ll Love This Recipe

    • Quick and easy to prepare with minimal ingredients.
    • No baking required – perfect for those hot summer days.
    • Customizable with your favorite toppings.
    • A healthy treat that satisfies your sweet tooth.
    • Great for kids and adults alike.

    Detailed Ingredients

    To make these Chocolate-Covered Bananas, you’ll need:

    • 4 medium ripe bananas (approximately 500g), peeled and halved.
    • 200g of dark chocolate chips (choose high-quality for best results).
    • 2 tablespoons of coconut oil (about 30ml) to help the chocolate set smoothly.
    • Optional toppings: crushed nuts, sprinkles, shredded coconut, or sea salt.
    • 8 bamboo skewers or popsicle sticks.

    When selecting bananas, opt for those that are ripe but not overly soft. The skin should be yellow with minimal brown spots, ensuring a sweet yet firm texture.

    Step-by-Step Instructions

    Step 1: Prepare Your Setup

    First, line a small baking sheet with parchment paper. This will prevent the bananas from sticking and make cleanup a breeze.

    Step 2: Prepare the Bananas

    Peel each banana and cut them in half. Insert a bamboo skewer or popsicle stick into the cut end of each banana half. Lay them out on the prepared baking sheet, ensuring they’re not touching each other. Place the tray in the freezer for about 1 hour or until the bananas are completely solid. This step is crucial as it allows the chocolate to set quickly upon dipping.

    Step 3: Melt the Chocolate

    In a microwave-safe bowl, combine the chocolate chips and coconut oil. Microwave on high for 1 minute, then stir. Continue heating in 30-second increments, stirring in between, until the chocolate is fully melted and smooth. Be cautious not to overheat as chocolate can burn easily. Chef’s Tip: If you prefer a stovetop method, melt the chocolate and coconut oil using a double boiler for more controlled heat.

    Step 4: Dip the Bananas

    Remove the bananas from the freezer. Working quickly, dip each frozen banana half into the melted chocolate, turning to coat evenly. Let any excess chocolate drip off. Immediately sprinkle your choice of toppings over the chocolate before it sets. Return each coated banana to the parchment-lined tray.

    Step 5: Set and Serve

    Once all bananas are coated, return the tray to the freezer for at least 15 minutes to allow the chocolate to set completely. Enjoy your Chocolate-Covered Bananas immediately for the best texture, or store them for later indulgence.

    Common Mistakes to Avoid

    Skipping the Freezing Step: Ensure the bananas are fully frozen before dipping. This helps the chocolate set quickly and prevents it from sliding off.

    Overheating Chocolate: Use gentle heat to melt the chocolate. Burnt chocolate is bitter and clumpy.

    Not Using Enough Coconut Oil: The oil helps the chocolate set smoothly. Without it, the chocolate may crack or become too thick.

    How to Store & Reheat

    To store your Chocolate-Covered Bananas, wait until the chocolate is fully set. Transfer them to a freezer-safe container lined with parchment paper. They will stay fresh for up to 3 months. To enjoy, simply take them out of the freezer and let them sit for a few minutes to soften slightly before biting in.

    Ingredient Substitutions

    If you need to make substitutions, here are some safe swaps:

    • Bananas: Try using strawberries or apple slices for a different fruit twist.
    • Dark Chocolate: Milk or white chocolate can be used, but keep in mind they are sweeter.
    • Coconut Oil: Substitute with butter or shortening if necessary, though the flavor and texture may vary slightly.

    Nutrition Facts

    • Calories: 180 per serving
    • Protein: 2g
    • Fat: 10g
    • Carbohydrates: 25g
    • Serving Size: 1 banana half

    Frequently Asked Questions

    Q: Can I use different fruits?

    A: Absolutely! Strawberries, apple slices, or even pineapple chunks work well.

    Q: How long can I keep these in the freezer?

    A: They can be stored for up to 3 months in a freezer-safe container.

    Q: What can I use instead of coconut oil?

    A: You can use butter or shortening, but it may alter the flavor slightly.

    Q: Can I make these vegan?

    A: Use vegan chocolate chips and ensure your toppings are also vegan-friendly.

    Q: Can I add spices to the chocolate?

    A: Yes, a pinch of cinnamon or cayenne pepper can add a delightful twist.

  • NO-BAKE REWARD: Indulge in Creamy Vegan Protein Ice Cream!

    NO-BAKE REWARD: Indulge in Creamy Vegan Protein Ice Cream!

    Introduction & My Personal Story

    There’s something magical about making a dessert that doesn’t require an oven. My journey with **vegan protein ice cream** began five years ago when I was looking for a guilt-free indulgence that could satisfy my sweet tooth without compromising my health goals. During a particularly hot summer, I was inspired to create a creamy, luscious treat that even my non-vegan friends would love. The first time I made this no-bake ice cream, it was like a revelation. I remember the delight on my friends’ faces as they tasted the rich, chocolaty flavors, complemented by the smooth, velvety texture. It quickly became a staple in my household, especially on those days when I wanted something sweet without the hassle. This recipe is a testament to the fact that indulgence and health can go hand in hand. So, join me as we dive into the world of creamy, dreamy vegan protein ice cream, a treat that’s as satisfying to make as it is to eat!

    Why You’ll Love This Recipe

    • Quick and easy to make, with no baking required.
    • Packed with protein to support fitness goals.
    • Vegan-friendly and dairy-free.
    • Customizable flavors to suit any palate.
    • Perfect for a refreshing treat on hot days.

    Detailed Ingredients

    To ensure the best results, it’s important to use high-quality ingredients. Here’s what you’ll need:

    • **4 ripe bananas**, sliced and frozen
    • **1 cup almond milk** (or any plant-based milk)
    • **2 tablespoons almond butter** (look for unsweetened)
    • **3 tablespoons cocoa powder** for the chocolate version
    • **1 scoop chocolate protein powder** (about 30g)
    • **1 teaspoon vanilla extract** for the vanilla version
    • **1 teaspoon ground cinnamon** for a hint of spice
    • Optional: **Cacao nibs or chocolate chips** for added texture

    Step-by-Step Instructions

    Chocolate Version

    Step 1: Start by placing your **frozen banana chunks** into a food processor or high-speed blender. Add in the **almond milk**, **almond butter**, **cocoa powder**, and **chocolate protein powder**.

    Step 2: Blend the ingredients on high until the mixture becomes smooth and creamy. This typically takes about 3-4 minutes. Be sure to pause occasionally to scrape down the sides of the blender to ensure everything is well-mixed.

    Step 3: If you like a bit of crunch, stir in some **cacao nibs** or **chocolate chips**. Pulse the blender a couple of times to incorporate them into the mixture.

    Step 4: You can enjoy the ice cream right away by spooning it into bowls. For a firmer texture, pour the mixture into a loaf pan lined with parchment paper and freeze for at least 2 hours before scooping.

    Vanilla Version

    Step 1: Place your **frozen banana chunks** into the blender, along with **almond milk**, **vanilla extract**, **ground cinnamon**, and **protein powder**.

    Step 2: Blend until smooth and creamy, again stopping to scrape down the sides as needed. This should take 3-4 minutes.

    Step 3: Spoon the mixture into bowls for immediate enjoyment, or pour it into a loaf pan lined with parchment paper. Freeze for at least 2 hours for a scoopable consistency.

    Common Mistakes to Avoid

    Even a simple recipe can have its pitfalls. Here’s how to avoid common mistakes:

    • **Not using ripe bananas**: Ensure your bananas are ripe before freezing them. This adds natural sweetness and a creamier texture.
    • **Over-blending**: Be careful not to over-blend the mixture, as it can become too runny. If this happens, simply freeze it longer.
    • **Skipping scraping**: Not scraping down the sides of the blender can lead to uneven mixing.

    How to Store & Reheat

    Store your vegan protein ice cream in an airtight container in the freezer. It can last for up to a week, but for the best texture, consume it within a few days. To serve, let it sit at room temperature for about 10 minutes to soften slightly before scooping.

    Ingredient Substitutions

    If you need to make substitutions, here are some safe swaps:

    • **Almond milk** can be replaced with any plant-based milk, such as soy or oat milk.
    • **Almond butter** can be swapped with peanut butter or sunflower seed butter for a nut-free option.
    • For a different flavor, try using **vanilla protein powder** instead of chocolate.

    Nutrition Facts

    • Calories: 250 per serving
    • Protein: 10g
    • Fat: 8g
    • Carbs: 35g
    • Serving Size: 1 cup

    Frequently Asked Questions

    Q: Can I use fresh bananas instead of frozen?

    A: For the best texture, use frozen bananas. Fresh bananas won’t give the same creamy consistency.

    Q: How can I make this recipe nut-free?

    A: Swap almond milk for oat milk and use sunflower seed butter instead of almond butter.

    Q: Can I add other flavors to the ice cream?

    A: Absolutely! Try adding a teaspoon of instant coffee for a mocha flavor or a handful of berries for a fruity twist.

    Q: What type of blender is best for this recipe?

    A: A high-speed blender or food processor works best to achieve a smooth, creamy texture.