Blog

  • CHEAT DAY: Sugar Cookie Protein Balls that Delight!

    CHEAT DAY: Sugar Cookie Protein Balls that Delight!

    Introduction & My Personal Story

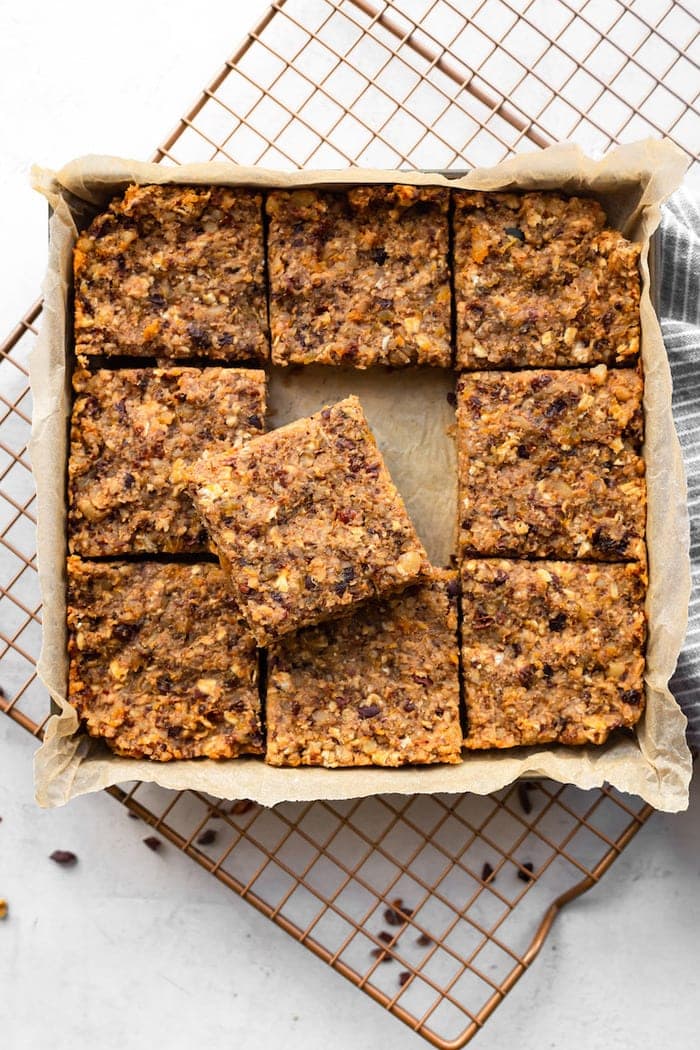
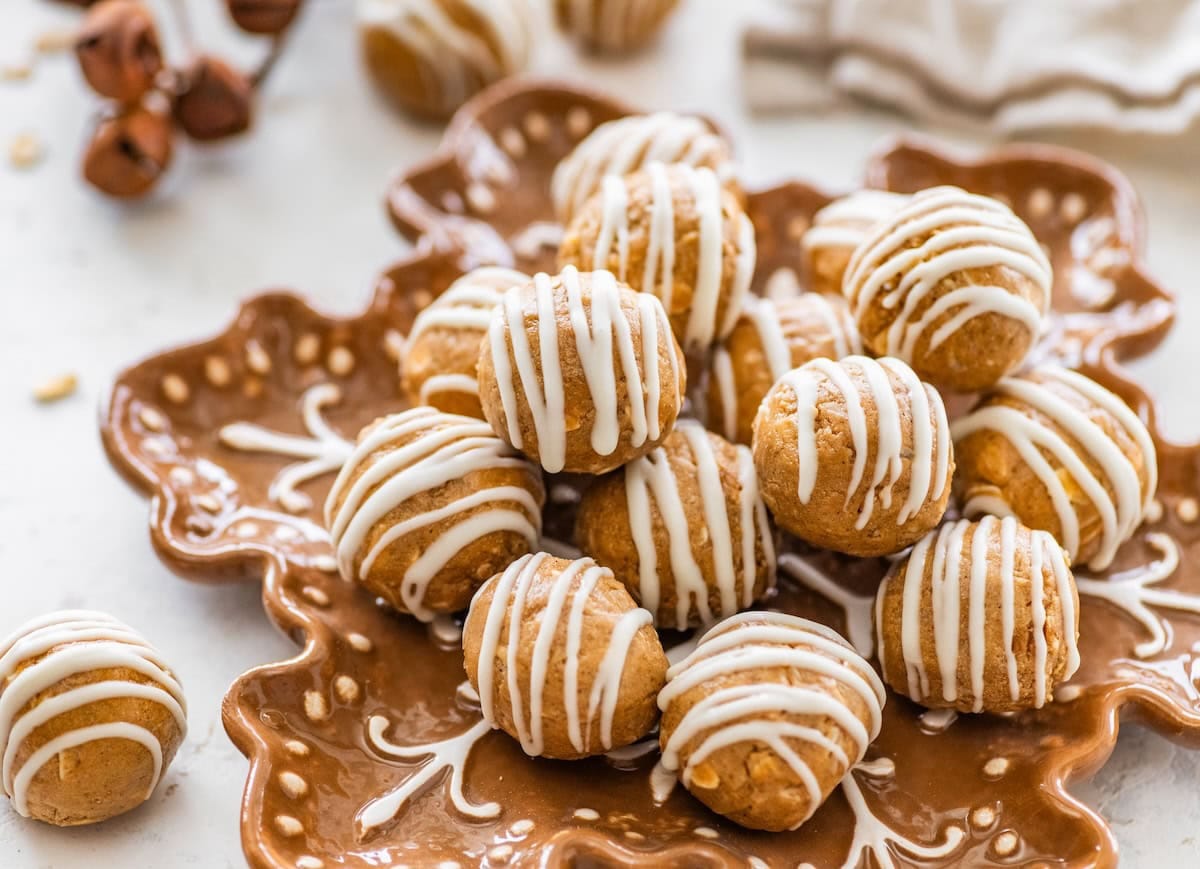
    Ah, sugar cookies! They take me back to the comforting aroma of my grandmother’s kitchen. Every Sunday after church, she’d bake a batch of the most delightful sugar cookies, filling the house with a sweet, buttery fragrance that could only be described as pure joy. Fast forward a few decades, and as a professional chef with a passion for health-conscious cooking, I’ve found a way to enjoy the nostalgia of those sugar cookies while keeping my fitness goals in check. Enter the **Sugar Cookie Protein Balls**! These little delights are the perfect cheat day treat that won’t derail your health journey. In my 5 years of experience crafting protein-packed snacks, these protein balls are a standout. They offer the same satisfying sweetness and buttery flavor of traditional sugar cookies, but with the added benefit of muscle-building protein. Whether you’re a fitness enthusiast or just someone who loves a guilt-free treat, these no-bake wonders are sure to become a staple in your kitchen.

    Why You’ll Love This Recipe

    • Quick and easy – no oven required!
    • Packed with protein to support muscle recovery.
    • Perfect for a cheat day without the guilt.
    • Customizable with your favorite add-ins.
    • Kid-friendly and great for on-the-go snacking.

    Detailed Ingredients

    For the best **Sugar Cookie Protein Balls**, you’ll need the following ingredients:

    • 1 cup of sugar cookie protein powder: Look for a high-quality protein powder that mimics the taste of sugar cookies.
    • 1/2 cup of almond flour: Provides a nutty flavor and a nice texture. Ensure it’s finely ground.
    • 1/4 cup of natural sweetener: Options include stevia, monk fruit, or erythritol.
    • 1/4 cup of almond butter: Choose a creamy variety for smooth consistency.
    • 1/4 cup of unsweetened almond milk: Adds moisture and helps bind the ingredients together.
    • 1/4 cup of mini chocolate chips: For a touch of indulgence. Dark chocolate works best.

    Step-by-Step Instructions

    Step 1: Start by grabbing a large mixing bowl. Add **1 cup of sugar cookie protein powder**, **1/2 cup of almond flour**, and **1/4 cup of natural sweetener**. Mix these dry ingredients together until they are evenly combined.

    Step 2: Next, incorporate the wet ingredients. Add **1/4 cup of almond butter** and **1/4 cup of unsweetened almond milk** into the bowl. Using a spatula or your hands, mix everything together until a dough begins to form. The consistency should be slightly sticky but firm enough to hold its shape.

    Step 3: Time to add a bit of fun! Gently fold in **1/4 cup of mini chocolate chips**. Make sure they’re evenly distributed throughout the dough for a bite of chocolate in every ball.

    Step 4: Roll the dough into small balls, about 1 inch in diameter. Chef’s Tip: Lightly dampen your hands with water to prevent the dough from sticking.

    Step 5: Place the rolled balls onto a parchment-lined tray. Ensure they are not touching, as this will help them chill evenly.

    Step 6: Refrigerate the protein balls for at least 30 minutes. This allows them to firm up and enhances the flavors.

    Common Mistakes to Avoid

    • Using the wrong protein powder: Not all protein powders are created equal. Make sure to use one specifically flavored like sugar cookies for the best taste.
    • Skipping the chilling step: This is crucial for the balls to hold their shape and achieve the right texture.
    • Overmixing: Mixing too vigorously can make the dough too dense. Stir just until combined.
    • Inadequate binding: If the dough is too crumbly, add a touch more almond milk.

    How to Store & Reheat

    These protein balls are best stored in an airtight container in the refrigerator. They will stay fresh for up to a week. If you want to keep them longer, they can be frozen for up to 3 months. Just thaw them in the fridge overnight before enjoying. Since these are no-bake treats, there’s no need to reheat them. Simply grab and enjoy!

    Ingredient Substitutions

    • Almond flour: Can be replaced with oat flour for a different texture.
    • Almond butter: Swap with peanut butter or sunflower seed butter if you have allergies.
    • Almond milk: Any plant-based milk like soy or coconut milk will work.
    • Chocolate chips: Use white chocolate chips or dried fruit for variation.

    Nutrition Facts

    • Calories: 150 per ball
    • Protein: 10g
    • Fat: 7g
    • Carbs: 12g
    • Serving Size: 1 ball

    Frequently Asked Questions

    Q: Can I make these protein balls vegan?

    A: Absolutely! Just ensure your protein powder is plant-based and use vegan chocolate chips.

    Q: How many protein balls should I eat for a snack?

    A: One to two balls make for a satisfying snack that can help curb hunger between meals.

    Q: Can I use a different type of flour?

    A: Yes, just keep in mind that the texture and taste might vary slightly with different flours.

    Q: What if my dough is too sticky?

    A: Add a bit more almond flour until the desired consistency is achieved.

  • 5-MIN FUEL: Quick & Creamy Hollandaise Sauce Made Simple!

    5-MIN FUEL: Quick & Creamy Hollandaise Sauce Made Simple!

    Introduction & My Personal Story

    Every chef has a few go-to recipes tucked in their back pocket, and for me, it’s the **Quick & Creamy Hollandaise Sauce**. My love affair with this luscious sauce began during my culinary school days. Picture this: a bustling kitchen filled with the aroma of warm butter and the sound of sizzling pans. I was a wide-eyed student, eager to master the classics. One morning, our instructor demonstrated the magic of Hollandaise. I remember the smooth, velvety texture, the perfect balance of rich butter and tangy lemon. It was love at first taste.

    Years later, in my 5 years of experience as a chef, I’ve churned out countless variations of this sauce, fine-tuning it to perfection. The beauty of this recipe lies in its simplicity. With just a handful of ingredients and a few minutes, you can transform any dish into something extraordinary. Whether it’s drizzled over poached eggs for a classic Eggs Benedict or served alongside grilled asparagus, this sauce never fails to impress. Trust me, once you try it, you’ll understand why it’s a staple in my kitchen and why it should be in yours too.

    Why You’ll Love This Recipe

    • Ready in just 5 minutes – perfect for busy mornings or quick dinners.
    • Uses simple, everyday ingredients you likely already have.
    • Rich, creamy texture that enhances any dish.
    • Perfect for impressing guests without breaking a sweat.
    • Customizable to your taste with easy ingredient swaps.

    Detailed Ingredients

    To create this quick and creamy Hollandaise sauce, you’ll need:

    • 1 egg yolk – Look for fresh, free-range eggs for the best flavor.
    • 1 tablespoon water – Helps in emulsifying the sauce.
    • ½ tablespoon lemon juice – Freshly squeezed for a bright, tangy kick.
    • 4 tablespoons unsalted butter (56 grams) – Cut into small cubes for easy melting.
    • ⅛ teaspoon cayenne pepper – Adds a subtle heat.
    • Salt to taste – Elevates the flavors.

    Step-by-Step Instructions

    Creating a perfect Hollandaise sauce is easier than you might think. Just follow these steps:

    Step 1: Prepare the Base

    Start by separating the egg yolk from the white. Place the yolk in a small saucepan. Chef’s Tip: Save the whites for another recipe, like a meringue or omelet. Add **1 tablespoon of water** and **½ tablespoon of lemon juice** to the yolk. Whisk until smooth. This mixture forms the base of your sauce and will help with the emulsification.

    Step 2: Add the Butter

    Cut **4 tablespoons of unsalted butter** into small cubes. This ensures it melts evenly and quickly. Add the butter to the saucepan with the yolk mixture.

    Step 3: Heat and Whisk

    Place the saucepan over medium-low heat. Continuously whisk the mixture as the butter melts. You’ll notice the mixture starting to froth. This is a good sign! Keep whisking to prevent the eggs from scrambling.

    Step 4: Thicken the Sauce

    Continue to cook the sauce for about 3-5 minutes. You’re looking for a consistency similar to gravy. It should coat the back of a spoon. Once you reach this stage, remove the saucepan from the heat.

    Step 5: Season

    Stir in **⅛ teaspoon of cayenne pepper** and salt to taste. The cayenne adds a gentle warmth without overpowering the sauce. Taste and adjust the seasoning as needed.

    Common Mistakes to Avoid

    Making Hollandaise can be tricky, but here are some pitfalls to watch out for:

    • **Overheating:** If the heat is too high, the eggs can scramble. Keep it at medium-low.
    • **Not whisking continuously:** This can lead to uneven cooking and separation.
    • **Adding butter too quickly:** Add it gradually to ensure a smooth emulsion.

    How to Store & Reheat

    If you have leftovers, store the Hollandaise sauce in an airtight container in the refrigerator for up to 2 days. To reheat, place the sauce in a heatproof bowl over a pot of simmering water. Whisk gently until warmed through. Avoid microwaving, as it can cause the sauce to separate.

    Ingredient Substitutions

    Here’s how you can tweak the recipe if needed:

    • **Butter:** Use ghee for a nuttier flavor or margarine for a vegan option.
    • **Lemon Juice:** Substitute with lime juice or white wine vinegar for a different tang.
    • **Cayenne Pepper:** Try smoked paprika for a milder, smoky taste.

    Nutrition Facts

    Here’s the nutritional breakdown per serving (approx. 2 tablespoons):

    • Calories: 238 kcal
    • Protein: 1.7 grams
    • Fat: 25 grams
    • Carbohydrates: 0.5 grams
    • Serving Size: 2 tablespoons

    Frequently Asked Questions

    Q: Can I make Hollandaise sauce ahead of time?

    A: Yes, but it’s best served fresh. If needed, make it up to a day in advance and reheat gently.

    Q: What dishes pair well with Hollandaise sauce?

    A: It’s classic with Eggs Benedict, but also great over vegetables, fish, or steak.

    Q: How can I fix a broken Hollandaise sauce?

    A: Whisk in a splash of hot water or lemon juice to bring it back together.

    Q: Is there a way to make it spicier?

    A: Add more cayenne pepper or a dash of hot sauce for extra heat.

    Conclusion

    There you have it, a quick and creamy Hollandaise sauce that’s both simple and satisfying. Whether you’re a seasoned chef or a kitchen newbie, this recipe is sure to become a favorite. With its rich flavor and silky texture, you’ll find yourself reaching for it time and again. Happy cooking!

  • Brain Fuel: Fruity Nut Bars

    Brain Fuel: Fruity Nut Bars

    Introduction & My Personal Story

    There’s something magical about the combination of fruits and nuts that transports me back to my grandmother’s kitchen. She was the type of woman who could whip up a feast without breaking a sweat, and her fruity nut bars were legendary in our family. I remember sitting on the counter, watching her mix and measure, the kitchen filled with the sweet aroma of dried fruits and the earthy scent of nuts. It was her secret weapon for family gatherings, hiking trips, and those days when we just needed an extra boost of energy.

    In my 5 years of experience as a chef, I’ve come to appreciate the simplicity and nutritional power packed into these bars. They’re a perfect balance of chewy and crunchy, sweet and nutty. Over the years, I’ve tweaked the recipe to enhance its brain-boosting capabilities, and now I’m excited to share my version of these Fruity Nut Bars with you. Whether you’re a busy professional, a student, or just someone who loves a good snack, these bars are sure to become a staple in your kitchen.

    Why You’ll Love This Recipe

    Detailed Ingredients

    • 1 cup (120g) Oat Flour: Look for whole grain oat flour or make your own by blending oats.
    • 1 cup (90g) Old Fashioned Rolled Oats: Choose organic for the best quality.
    • 1 cup (180g) Medjool Dates or Prunes: Ensure they are pitted and fresh.
    • 1/2 cup (80g) Raisins: Plump and juicy raisins add natural sweetness.
    • 1/2 cup (75g) Dried Apricots: Look for unsulfured apricots for a healthier option.
    • 1/2 cup (60g) Walnuts: Fresh, crunchy walnuts are key for texture and Omega-3s.
    • 1/4 cup (30g) Cacao Nibs: Offers a rich chocolate flavor and antioxidants.
    • 2/3 cup (160ml) Water

    Step-by-Step Instructions

    Step 1: Preheat and Prepare

    Start by preheating your oven to 325°F (160°C). Line an 8-inch x 8-inch baking pan with parchment paper, allowing some overhang for easy removal later. This step ensures that your bars won’t stick and will come out in perfect squares.

    Step 2: Chop the Fruits

    Using a food processor, chop the Medjool dates, raisins, and dried apricots until they are finely combined. The mixture should be sticky and hold together when pressed. This forms the sweet base of your bars.

    Step 3: Mix the Dry Ingredients

    In a large mixing bowl, combine the oat flour and rolled oats. Stir in the chopped fruit mixture, walnuts, and cacao nibs. Gradually add 2/3 cup of water and knead the mixture until a cohesive dough forms. The dough should be slightly sticky but manageable.

    Step 4: Shape and Cut

    Press the dough firmly into the prepared baking pan, ensuring an even thickness. Use a sharp knife to score the dough into squares before baking. This makes it easier to portion the bars once they’re baked.

    Step 5: Bake

    Bake the bars in the preheated oven for 20-25 minutes. Look for a firm yet slightly soft texture. Avoid overbaking, as this can dry out the bars. Chef’s Tip: If the edges start to brown too quickly, cover the pan loosely with aluminum foil.

    Common Mistakes to Avoid

    Overprocessing the Fruits: If the fruit mixture becomes too paste-like, the bars will be overly sticky. Pulse the fruits just until combined.

    Skipping the Scoring: Cutting the bars after baking can cause them to crumble. Score them beforehand for clean edges.

    Ignoring Oven Hot Spots: Rotate the baking pan halfway through to ensure even baking.

    How to Store & Reheat

    Store the bars in an airtight container in the refrigerator. They will remain fresh for 1-2 weeks. For longer storage, freeze the bars in a single layer on a baking sheet, then transfer to a freezer-safe bag. Thaw at room temperature or reheat in a microwave for 10-15 seconds for a warm treat.

    Ingredient Substitutions

    Oat Flour: Substitute with almond flour for a nutty flavor.

    Medjool Dates: Use dried figs for a different taste profile.

    Walnuts: Swap with pecans or almonds for varied textures.

    Cacao Nibs: Chocolate chips can be used for a sweeter bar.

    Nutrition Facts

    • Calories: 323 kcal per bar
    • Protein: 4g per bar
    • Fat: 12g per bar
    • Carbohydrates: 48g per bar
    • Serving Size: 1 bar

    Frequently Asked Questions

    Can I use fresh fruits instead of dried? Fresh fruits contain more moisture and could alter the texture of the bars. Stick to dried fruits for best results.

    Are these bars gluten-free? Yes, if you use certified gluten-free oats and oat flour.

    What’s a good nut-free alternative? Sunflower seeds can replace nuts for a similar crunch.

    Can I add spices? Absolutely! A pinch of cinnamon or nutmeg can add warmth and depth to the flavor.

    How do I make these vegan? The recipe is already vegan-friendly as it contains no animal products.

  • ZERO PREP: Upgraded Classic Tuna Salad in a Snap!

    ZERO PREP: Upgraded Classic Tuna Salad in a Snap!

    Introduction & My Personal Story

    Let me take you back to a time when I was just starting out in the culinary world. My first kitchen job was at a small, bustling deli in the heart of the city. Our menu was filled with classic sandwiches and salads, but the one dish that always seemed to fly off the shelves was our Tuna Salad. Now, there’s nothing groundbreaking about a Tuna Salad, but what set ours apart was the simplicity and the slight twist we added to the classic recipe. It became my go-to dish when life got hectic, and I needed something quick, nutritious, and satisfying. Fast forward to now, with more than 5 years of experience under my belt, I’ve refined this recipe into what I like to call the “Upgraded Classic Tuna Salad in a Snap!” It’s perfect for those who have zero time to prep but still want something delicious. This dish brings back warm memories of those early kitchen days and the joy of creating something delightful with minimal effort. I’m thrilled to share this with you, hoping it becomes your quick-fix favorite too.

    Why You’ll Love This Recipe

    • Ready in under 5 minutes with no cooking required.
    • Minimal cleanup means more time for you.
    • Packed with protein and healthy fats from tuna and walnuts.
    • Versatile: Enjoy it as a sandwich, salad, or with crackers.
    • Perfect for meal prep, stays fresh in the fridge for up to 4 days.

    Detailed Ingredients

    • 2 cans of tuna (in water or oil, 200g each): Look for firm chunks for the best texture.
    • 1 cup celery (diced, about 100g): Crisp and fresh, adding a nice crunch.
    • ¼ cup walnuts (chopped, about 30g): Adds a nutty flavor and healthy fats.
    • 2 green onions (sliced): For a subtle onion flavor without overpowering the dish.
    • ½ cup mayonnaise (120ml): Creamy base to hold everything together.
    • 1 tablespoon lemon juice (15ml): Freshly squeezed for a bright, tangy kick.
    • Salt and pepper to taste: Adjust according to your preference.

    Step-by-Step Instructions

    Step 1: Drain the Tuna – Open the cans of tuna and drain them thoroughly. Press down with the lid or use a strainer to ensure all the liquid is removed. This will prevent your salad from becoming soggy.

    Step 2: Mix the Ingredients – In a large mixing bowl, combine the drained tuna, diced celery, chopped walnuts, sliced green onions, mayonnaise, and lemon juice. Use a fork to flake the tuna and mix everything evenly.

    Step 3: Season – Add salt and pepper to taste. Start with a pinch and increase as needed. Remember, you can always add more, but you can’t take it out once it’s in!

    Step 4: Serve – Once everything is well combined, your tuna salad is ready to serve. Enjoy it in a sandwich, over a bed of greens, or with some crunchy crackers.

    Common Mistakes to Avoid

    Over-mixing: Be gentle when mixing the ingredients to maintain a good texture. Too much mixing can make the tuna mushy.

    Excess moisture: Ensure the tuna is well-drained to avoid a watery salad.

    Over-seasoning: Always start with less salt and pepper and adjust gradually.

    How to Store & Reheat

    Store your tuna salad in an airtight container in the refrigerator. It will stay fresh for up to 4 days. While this dish is typically served cold, if you prefer it warm, gently reheat it in a microwave-safe dish for 30 seconds to 1 minute. Be careful not to overheat, as this can alter the texture.

    Ingredient Substitutions

    If you’re missing an ingredient or need to make a swap, here are some safe substitutions:

    • Greek yogurt can replace mayonnaise for a lighter option.
    • Almonds or pecans can substitute walnuts if you prefer a different nut.
    • Lime juice can be used instead of lemon juice for a slightly different citrus flavor.
    • Red onion can replace green onions for a sharper taste.

    Nutrition Facts

    • Calories: 350 per serving
    • Protein: 25g
    • Fat: 22g
    • Carbohydrates: 8g
    • Serving Size: 1 cup

    Frequently Asked Questions

    • Can I make this tuna salad ahead of time? Yes, it’s perfect for meal prep and will last in the fridge for up to 4 days.
    • Is there a way to make it spicier? Add a pinch of cayenne pepper or some chopped jalapeños for a kick.
    • What if I’m allergic to nuts? Simply omit the walnuts or replace them with sunflower seeds for crunch.
    • Can I use fresh tuna instead of canned? Absolutely! Just cook and flake the fresh tuna before using it in the recipe.


  • GAINS: All-Week Juicy Chicken Breast Prep

    GAINS: All-Week Juicy Chicken Breast Prep

    Introduction & My Personal Story

    As a chef who has spent over five years in the kitchen, one of the most rewarding experiences has been crafting meals that not only taste great but also fuel the body. I remember the first time I perfected my **Juicy Chicken Breast Prep**. I was still a budding chef, determined to create a dish that was both nutritious and delicious for a friend who was training for a bodybuilding competition. After several trials and tweaks, I finally nailed the perfect balance of herbs and seasonings that made the chicken not just a source of protein, but a culinary delight.

    This recipe quickly became a staple in my kitchen and a favorite among my fitness-focused friends. It’s not just about the gains; it’s about enjoying the journey with every bite. This dish brings back memories of those early days in my culinary career, where every successful recipe was a stepping stone to mastering the art of cooking. Today, I’m excited to share this tried-and-true recipe with you, hoping it becomes as much a part of your meal prep routine as it has been in mine.

    Why You’ll Love This Recipe

    • High in **protein** – essential for muscle growth and recovery.
    • Perfect for meal prep – stays juicy and delicious all week long.
    • Simple ingredients – easily available at any grocery store.
    • Customizable with your favorite herbs and spices.
    • Low in calories but packed with flavor.

    Detailed Ingredients

    Here’s what you’ll need to create this protein-packed dish:

    • 4 large **chicken breasts** (about 800g total)
    • 3 tablespoons unsalted **butter**, room temperature
    • 2 cloves of **garlic**, minced
    • 1 teaspoon dried **basil**
    • 1 teaspoon dried **thyme**
    • 1 teaspoon dried **rosemary**
    • 1/2 teaspoon **salt**
    • 1/2 teaspoon freshly cracked **black pepper**

    When selecting your chicken breasts, look for ones that are plump and evenly sized to ensure even cooking. Fresh herbs can be substituted for dried ones if you prefer a more intense flavor.

    Step-by-Step Instructions

    Let’s get into the nitty-gritty of making this delicious dish.

    Step 1: Preheat & Prep

    Start by preheating your oven to 275ºF (135ºC). Allowing the chicken to sit out for about 5 minutes will help bring it to room temperature, which is crucial for even cooking.

    Step 2: Make the Herb Butter

    In a small bowl, mix together the room temperature butter, minced garlic, dried basil, thyme, rosemary, salt, and black pepper. This herb butter will infuse the chicken with flavor and keep it moist.

    Step 3: Pat Dry

    Place the chicken breasts on a cutting board and pat them dry with paper towels. This step is crucial for ensuring the seasoning adheres well and the skin crisps up nicely.

    Step 4: Season the Chicken

    Generously smear the herb butter mixture over both sides of the chicken breasts. Make sure every inch is covered for maximum flavor.

    Step 5: Bake

    Transfer the seasoned chicken into a deep casserole dish and cover it tightly with foil. Bake in the preheated oven for 90 minutes, basting halfway through with the juices from the dish.

    Step 6: Crisp the Skin

    After 90 minutes, remove the foil and baste the chicken again. Increase the oven temperature to 425ºF (220ºC) and bake for an additional 20 minutes, or until the skin is golden and crispy. The internal temperature should reach 165ºF (74ºC).

    Step 7: Rest & Serve

    Once done, take the chicken out of the oven and let it rest for 5-10 minutes. This resting period allows the juices to redistribute, ensuring every bite is juicy. Slice or shred the chicken and drizzle with the reserved juices before serving.

    Common Mistakes to Avoid

    • **Under-seasoning**: Don’t skimp on the herbs and spices. They are crucial for flavor.
    • **Overcooking**: Use a meat thermometer to ensure the chicken reaches 165ºF (74ºC).
    • **Skipping the rest period**: This is essential for juicy, tender chicken.

    How to Store & Reheat

    Store the cooked chicken breasts in an airtight container in the refrigerator for up to 5 days. To reheat, place the chicken in a preheated oven at 350ºF (175ºC) for about 10 minutes, or until warmed through. This method helps maintain moisture and texture.

    Ingredient Substitutions

    If you’re missing an ingredient, here are some safe swaps you can make:

    • **Butter**: Use olive oil for a different flavor profile.
    • **Herbs**: Swap dried herbs for fresh ones at a 3:1 ratio.
    • **Garlic**: Garlic powder can be used if fresh garlic is unavailable.

    Nutrition Facts

    • **Calories**: 235 kcal per serving
    • **Protein**: 19g
    • **Fat**: 11g
    • **Carbs**: 2g
    • **Serving Size**: 1 chicken breast

    Frequently Asked Questions

    Q: Can I freeze the cooked chicken?

    A: Absolutely! Freeze in a single layer on a baking sheet before transferring to a freezer-safe bag for up to 3 months.

    Q: What can I serve with this chicken?

    A: Pair it with roasted vegetables or a quinoa salad for a balanced meal.

    Q: Can I use bone-in chicken for this recipe?

    A: Yes, but cooking times will vary. Ensure the internal temperature reaches 165ºF (74ºC).

    Q: How can I tell if the chicken is done without a thermometer?

    A: Cut into the thickest part of the breast. The juices should run clear, not pink.

  • LATE NIGHT FUEL: My Homemade Teriyaki Sauce Outshines Store-Bought Every Time!

    LATE NIGHT FUEL: My Homemade Teriyaki Sauce Outshines Store-Bought Every Time!

    Introduction & My Personal Story

    There’s something magical about creating a sauce that can transform any dish into a mouthwatering masterpiece. My journey with homemade teriyaki sauce began during a late-night cooking session in my early culinary days. Picture this: it was a Friday night, and after a long week, I found solace in my kitchen. I had a craving for something savory and sweet but didn’t want to rely on the store-bought bottles that often left me wanting more. So, I decided to whip up my own version of teriyaki sauce. As I combined the ingredients, the familiar aroma of soy sauce, brown sugar, and freshly minced garlic filled the air. That’s when I realized the true power of homemade cooking.

    In my 5 years of experience, I’ve learned that the secret to an unforgettable teriyaki sauce lies in the balance of flavors. The ginger adds a zing, the garlic provides depth, and the brown sugar offers just the right amount of sweetness. That night, as I tasted my creation, I knew I had stumbled upon something special. It was a sauce that could outshine any store-bought version, and it has been my go-to ever since. Whether it’s for a quick stir-fry or as a glaze on grilled chicken, this sauce has become a staple in my kitchen, and I can’t wait to share it with you.

    Why You’ll Love This Recipe

    • Quick and easy to prepare, perfect for late-night cravings.
    • Uses simple pantry ingredients that you likely already have.
    • Customizable thickness with optional cornstarch.
    • Enhances the flavor of meat, tofu, or vegetables.
    • Free from preservatives and artificial flavors found in store-bought versions.

    Detailed Ingredients

    Here’s what you’ll need to make this fantastic teriyaki sauce:

    • 1/4 cup soy sauce (60 ml) – Opt for a low-sodium version if preferred.
    • 3 tablespoons brown sugar (45 grams) – Packed tightly.
    • 1 tablespoon water (15 ml) – To help dissolve the sugar.
    • 1 clove garlic, minced – Freshly minced for the best flavor.
    • 1 teaspoon grated ginger – Fresh ginger root for that zing.
    • Optional: 1 tablespoon cornstarch (8 grams) – For thickening the sauce.

    Step-by-Step Instructions

    Let’s dive into making this teriyaki sauce that will surely become a staple in your kitchen.

    Step 1: Mix the Marinade

    In a medium-sized bowl, combine 1/4 cup soy sauce, 3 tablespoons brown sugar, 1 tablespoon water, 1 clove of minced garlic, and 1 teaspoon grated ginger. Stir until the sugar is completely dissolved. Chef’s Tip: Use a whisk to ensure the ingredients are well combined and the sugar isn’t settling at the bottom.

    Step 2: Marinate Your Choice of Protein

    Pour the marinade over your choice of protein, such as chicken, tofu, or fish. Allow it to marinate for at least 15-30 minutes to let the flavors penetrate. If you’re short on time, even a quick 10-minute soak will do wonders. Chef’s Tip: For a deeper flavor, marinate overnight in the refrigerator.

    Step 3: Thicken the Sauce (Optional)

    If you prefer a thicker sauce, mix 1 tablespoon cornstarch with 1/2 cup water until smooth. Add this mixture to the marinade and transfer to a saucepan. Simmer over medium heat, whisking continuously until the sauce thickens and coats the back of a spoon. This should take about 5 minutes.

    Step 4: Use in Stir-Fry or as a Glaze

    Once your sauce is ready, add it directly to a hot pan of stir-fried vegetables or protein for an instant flavor boost. Alternatively, brush it onto grilled or baked items during the last few minutes of cooking for a delightful glaze.

    Common Mistakes to Avoid

    • Using too much cornstarch can make the sauce overly thick and gloopy. Stick to the recommended amount.
    • Over-marinating can result in a too-salty dish, especially with soy sauce. Keep marinating time under 24 hours.
    • Not simmering the sauce long enough can prevent proper thickening. Ensure you whisk continuously to avoid lumps.

    How to Store & Reheat

    Once your sauce is prepared, allow it to cool completely. Transfer it to an airtight container or jar and refrigerate. It will keep fresh for up to one week. To reheat, simply warm it in a saucepan over low heat, stirring occasionally. If it thickens too much in the fridge, add a splash of water to reach your desired consistency.

    Ingredient Substitutions

    Need to make some swaps? No problem! Here are some safe substitutions:

    • For a gluten-free version, use tamari instead of soy sauce.
    • Replace brown sugar with honey or maple syrup for a different sweetness profile.
    • If fresh ginger is unavailable, use 1/4 teaspoon of ground ginger.

    Nutrition Facts

    Here’s the nutritional breakdown per serving (approximately 2 tablespoons):

    • Calories: 40
    • Protein: 1g
    • Fat: 0g
    • Carbohydrates: 10g
    • Serving Size: 2 tablespoons

    Frequently Asked Questions

    • Can I make this sauce ahead of time? Yes, it stores well in the refrigerator for up to a week.
    • Is this sauce vegan? Yes, all the ingredients are plant-based.
    • Can I freeze the sauce? Absolutely! Freeze in a sealed container for up to 3 months. Thaw overnight in the fridge before use.
    • How can I make it spicier? Add a pinch of red pepper flakes or a dash of hot sauce to the marinade.
    • What can I use this sauce for? It’s perfect for stir-fries, marinades, glazes, or even as a dipping sauce.

  • CHEAT DAY: Holiday Cookie-Inspired Gingerbread Protein Balls!

    CHEAT DAY: Holiday Cookie-Inspired Gingerbread Protein Balls!

    Introduction & My Personal Story

    Ah, the holidays — a time when the air is filled with the comforting aroma of gingerbread and every corner of my kitchen seems to beckon with the promise of sweet indulgence. My journey with gingerbread protein balls started quite by accident during a particularly hectic December, about five years ago. The festive season was in full swing, and I was knee-deep in cookie dough, trying to balance a healthy lifestyle with the irresistible allure of holiday treats.

    One snowy afternoon, as I was preparing a batch of gingerbread cookies, it struck me — why not create a healthier, protein-packed version of these beloved treats? And just like that, the idea for these gingerbread protein balls was born. In my 5 years of experience, I’ve found that these little delights perfectly encapsulate the cozy, spicy flavors of traditional gingerbread, but with an added boost of protein to keep me energized through the holiday hustle. Every time I make them, I’m transported back to that snowy day, the kitchen filled with the warm, spicy scent of ginger and cinnamon. It’s a smell that feels like a hug from the past, reminding me of the joy of creating something both delicious and nourishing.

    Why You’ll Love This Recipe

    • Quick and easy to prepare — no baking required.
    • Packed with protein to keep you full and satisfied.
    • Perfect for a post-workout snack or a midday energy boost.
    • Combines the nostalgic flavors of gingerbread with a healthy twist.
    • Great for meal prep — make a batch and enjoy throughout the week.

    Detailed Ingredients

    Here’s everything you’ll need to whip up these festive gingerbread protein balls:

    • 1 cup (100 grams) rolled oats
    • 1/2 cup (60 grams) **vanilla protein powder**
    • 1/2 cup (125 grams) **cashew butter**
    • 1/4 cup (60 ml) **maple syrup**
    • 2 tablespoons (30 ml) **molasses**
    • 1 teaspoon **vanilla extract**
    • 1 teaspoon ground **ginger**
    • 1 teaspoon ground **cinnamon**
    • 1/4 teaspoon ground **nutmeg**
    • 1/4 teaspoon ground **cloves**
    • 1/4 teaspoon **salt**
    • 1/2 cup (90 grams) **white chocolate chips**
    • 1 tablespoon (15 ml) **coconut oil**

    When shopping, look for fresh spices and high-quality protein powder to ensure the best flavor and texture.

    Step-by-Step Instructions

    Let’s dive into the process of creating these delightful gingerbread protein balls, step by step.

    Step 1: Mix Ingredients

    In a medium bowl, combine 1 cup of rolled oats, 1/2 cup of vanilla protein powder, 1/2 cup of cashew butter, 1/4 cup of maple syrup, 2 tablespoons of molasses, and 1 teaspoon of vanilla extract. Add in the spices: 1 teaspoon each of ground ginger and cinnamon, along with 1/4 teaspoon each of ground nutmeg and cloves. Don’t forget the 1/4 teaspoon of salt to balance the sweetness. Stir these ingredients together until they form a cohesive, soft dough. It should have a sticky texture but be firm enough to hold its shape. If the dough feels too dry, add a splash more of maple syrup or water.

    Step 2: Form Balls

    With the dough ready, use a small cookie scoop or a tablespoon to portion it out. Roll each portion between your palms to form smooth, round balls. Aim for uniformity to ensure even chilling and a consistent bite. Place the formed balls on a plate or baking sheet lined with parchment paper to prevent sticking.

    Step 3: Melt Chocolate

    In a microwave-safe bowl, combine 1/2 cup of white chocolate chips with 1 tablespoon of coconut oil. Microwave in 15-second intervals, stirring in between, until the chocolate is fully melted and smooth. Be cautious not to overheat, as white chocolate can scorch easily.

    Step 4: Drizzle & Chill

    Drizzle the melted chocolate over the protein balls using a spoon for an artistic touch. If you’re feeling fancy, use a piping bag for precision. Once drizzled, transfer the plate to the refrigerator and allow the balls to chill for at least 30 minutes. This step is crucial for the chocolate to set and the flavors to meld together. Once firm, they’re ready to enjoy!

    Common Mistakes to Avoid

    Even the simplest recipes can have their pitfalls. Here are some common mistakes to watch out for:

    • Dry Dough: If your dough is too dry, add a bit more maple syrup or water to reach the right consistency.
    • Overheating Chocolate: Melt the chocolate slowly to avoid scorching. Stir frequently to ensure even melting.
    • Skipping Chill Time: Chilling is essential for the balls to hold their shape and for the chocolate to set properly.

    How to Store & Reheat

    To store your gingerbread protein balls, place them in an airtight container. They will keep well in the refrigerator for up to a week. If you’d like to enjoy them later, they can also be frozen for up to a month. To thaw, simply transfer them to the fridge overnight. There’s no need to reheat these treats — they’re best enjoyed chilled or at room temperature.

    Ingredient Substitutions

    Need to make a swap? Here are some safe substitutions:

    • Cashew Butter: Swap with almond butter or peanut butter for a different flavor profile.
    • Maple Syrup: Use honey or agave syrup as an alternative sweetener.
    • White Chocolate Chips: Dark chocolate or milk chocolate chips can be used if you prefer a less sweet option.

    Nutrition Facts

    Here’s a breakdown of the nutritional content per serving (based on a batch of 20 balls):

    • Calories: 120
    • Protein: 5 grams
    • Fat: 7 grams
    • Carbohydrates: 10 grams
    • Serving Size: 1 ball

    Frequently Asked Questions

    • Can I use another type of protein powder? Yes, any protein powder should work, but it may alter the flavor slightly.
    • Are these gluten-free? If you use certified gluten-free oats and protein powder, they can be.
    • Can I add extras like nuts or seeds? Certainly! Chopped nuts or seeds can add texture and extra nutrition.
    • How long can I store them? Up to a week in the fridge, or a month in the freezer.
    • What if I don’t like gingerbread spices? You can adjust the spice levels to your taste or try a different flavor combination.


  • 5-MIN FUEL: 17 Delicious Stir-Fry Recipes on a Budget!

    5-MIN FUEL: 17 Delicious Stir-Fry Recipes on a Budget!

    Introduction & My Personal Story

    Let me take you back to a time when I was just starting out in the bustling world of culinary arts. I was a novice chef, working my way through the ranks in a busy kitchen. It was during this period that I discovered the magic of the quick vegetable stir-fry. Picture this: a late night after a grueling shift, with only a handful of ingredients left in the pantry. I was hungry, tired, and in desperate need of a meal that would not only satisfy my hunger but also lift my spirits. That’s when I stumbled upon the idea of a simple stir-fry.

    Armed with a few bell peppers, some broccoli, and a carrot or two, I heated up a trusty skillet. I remember the sizzle of the oil as I tossed in the chopped vegetables, the vibrant colors coming to life in the pan. In just a few minutes, my kitchen was filled with the mouth-watering aroma of garlic and ginger mingling with soy sauce. That night, I learned the art of creating something extraordinary from the simplest of ingredients, and it was a revelation. The quick vegetable stir-fry became my go-to dish, a symbol of resourcefulness and culinary creativity. It’s a dish that has stayed with me over the years, and I’m thrilled to share it with you.

    Why You’ll Love This Recipe

    • Quick and easy: Ready in just 5 minutes.
    • Budget-friendly: Uses simple, affordable ingredients.
    • Healthy: Packed with vitamins and nutrients.
    • Versatile: Customize with your favorite vegetables.
    • Low-calorie: Perfect for those watching their intake, with an estimated 300 kcal.

    Detailed Ingredients

    Here’s what you’ll need for this delightful stir-fry:

    • **1 tablespoon vegetable oil** – Look for a neutral oil like canola or sunflower.
    • **1 cup bell peppers**, sliced – Choose a mix of red, yellow, and green for color.
    • **1 cup broccoli florets** – Fresh is best, but frozen works in a pinch.
    • **1/2 cup carrots**, julienned – Adds a touch of sweetness and crunch.
    • **2 tablespoons soy sauce** – Opt for low-sodium if preferred.
    • **2 cloves garlic**, minced – Fresh garlic enhances the flavor.
    • **1 teaspoon fresh ginger**, grated – Adds warmth and depth.

    Step-by-Step Instructions

    Let’s dive into the process of creating this vibrant stir-fry:

    Step 1: Prepare Your Vegetables

    Start by washing and slicing your **bell peppers**, **broccoli**, and **carrots**. Aim for uniform sizes to ensure even cooking. Chef’s Tip: Use a sharp knife to make prep quicker and safer.

    Step 2: Heat the Skillet

    Place a large skillet over medium-high heat and add **1 tablespoon of vegetable oil**. Allow the oil to heat up until it shimmers. This indicates it’s ready for the vegetables.

    Step 3: Stir-Fry the Vegetables

    Carefully add the sliced vegetables to the hot skillet. Stir them continuously for about 2-3 minutes. You’re looking for them to become slightly tender yet still vibrant in color.

    Step 4: Add Flavor

    In a small bowl, combine **2 tablespoons soy sauce**, **2 minced garlic cloves**, and **1 teaspoon grated ginger**. Pour this mixture over the vegetables in the skillet. Stir everything together for an additional minute, ensuring the vegetables are well-coated with the sauce.

    Step 5: Serve

    Transfer the stir-fry to a plate and serve it hot over a bed of cooked rice or quinoa for a complete meal. Chef’s Tip: Garnish with sesame seeds or chopped green onions for an added touch of flavor.

    Common Mistakes to Avoid

    • **Overcrowding the Pan:** This leads to steaming rather than stir-frying. Use a large enough skillet to allow the vegetables to cook evenly.
    • **Not Preheating the Oil:** Adding vegetables to cold oil results in a soggy texture. Ensure the oil is hot before adding your ingredients.
    • **Overcooking the Vegetables:** Stir-frying is quick. Keep an eye on the vegetables to maintain their crunch and color.

    How to Store & Reheat

    Store any leftovers in an airtight container in the refrigerator for up to 3 days. To reheat, simply place the stir-fry in a skillet over medium heat, stirring occasionally until warmed through. Alternatively, microwave it in a microwave-safe dish for 1-2 minutes.

    Ingredient Substitutions

    • **Vegetable Oil:** Swap with olive oil or sesame oil for a different flavor profile.
    • **Soy Sauce:** Tamari or coconut aminos are great gluten-free alternatives.
    • **Broccoli:** Cauliflower or snap peas can be used if you prefer.

    Nutrition Facts

    • Calories: 300 kcal
    • Protein: 5g
    • Fat: 10g
    • Carbohydrates: 45g
    • Serving Size: 1 cup

    Frequently Asked Questions

    Can I use frozen vegetables?

    Yes, frozen vegetables are a convenient option. Just be sure to thaw them before cooking to avoid excess moisture in the pan.

    What other vegetables can I add?

    Feel free to add mushrooms, zucchini, or snow peas for additional variety and flavor.

    Is this dish vegan?

    Yes, as long as you use a plant-based oil and soy sauce, this stir-fry is completely vegan.

    Can I add protein to the stir-fry?

    Absolutely! Tofu, chicken, or shrimp make excellent protein additions to this dish.

    How can I make it spicier?

    Add a dash of chili flakes or a splash of sriracha for a spicy kick.

  • Focus Win: Macro Mastery 101

    Focus Win: Macro Mastery 101

    Introduction & My Personal Story

    Welcome to the world of culinary delight and cognitive enhancement with our Omega-3 rich recipe, “Focus Win: Macro Mastery 101.” This dish isn’t just a meal; it’s a journey back to my early days as a chef, when I first learned the power of nutrition in enhancing mental focus and clarity. Picture me, a budding chef with a thirst for knowledge, discovering the profound impact that food has on our brain health. It was during a particularly intense culinary competition that I realized the importance of fueling my body and mind with the right nutrients.

    Back then, I was juggling late nights and early mornings, just like any other chef striving for excellence. Amidst the hustle, I stumbled upon a recipe that changed everything. It was a simple, yet powerful dish brimming with Omega-3s, known for their brain-boosting properties. As I prepared and savored each bite, I felt a surge of energy and focus that I had never experienced before. This recipe became my secret weapon, giving me the clarity and concentration needed to excel in my culinary pursuits.

    Fast forward to today, and I’m thrilled to share this recipe with you. Whether you’re a busy professional, a student, or simply someone who values mental acuity, this dish is your ticket to enhanced focus and performance. It’s a testament to the transformative power of food, and I can’t wait for you to experience it too.

    Why You’ll Love This Recipe

    • Boosts brain power with Omega-3 rich ingredients.
    • Quick and easy to prepare, perfect for busy schedules.
    • Packed with protein to keep you full and energized.
    • Versatile and customizable to suit dietary preferences.
    • Deliciously satisfying, making healthy eating enjoyable.

    Detailed Ingredients

    • **Salmon Fillets** – 500g (approximately 2 fillets), look for wild-caught for the highest Omega-3 content.
    • **Quinoa** – 1 cup (185g), a great source of protein and fiber.
    • **Spinach** – 2 cups (60g), fresh and vibrant green leaves.
    • **Cherry Tomatoes** – 1 cup (150g), juicy and ripe.
    • **Avocado** – 1 large, ripe but firm.
    • **Olive Oil** – 2 tablespoons, extra virgin for the best flavor.
    • **Lemon Juice** – 2 tablespoons, freshly squeezed.
    • **Garlic** – 2 cloves, minced.
    • **Salt and Pepper** – to taste.
    • **Fresh Dill** – 1 tablespoon, chopped, for garnish.

    Step-by-Step Instructions

    Step 1: Prepare the Quinoa

    Rinse 1 cup of quinoa under cold water to remove its natural coating, which can make it taste bitter. In a medium saucepan, combine the quinoa with 2 cups of water and a pinch of salt. Bring to a boil over high heat, then reduce the heat to low, cover, and simmer for about 15 minutes, or until the quinoa is tender and the water is absorbed. You’ll know it’s done when you see tiny spirals (germ) separating from and curling around the quinoa seeds.

    Step 2: Cook the Salmon

    Heat 1 tablespoon of olive oil in a large non-stick skillet over medium heat. Season the **salmon fillets** with salt and pepper on both sides. Place the fillets skin-side down in the pan and cook for about 4-5 minutes, or until the skin is crispy and the flesh is opaque about halfway up the sides. Flip the fillets and cook for another 3-4 minutes, until the salmon is opaque throughout and flakes easily with a fork. Remove from the pan and set aside.

    Step 3: Sauté the Vegetables

    In the same skillet, add another tablespoon of olive oil. Add the minced **garlic** and sauté for about 30 seconds, until fragrant. Toss in the **spinach** and **cherry tomatoes**, cooking for about 2-3 minutes until the spinach is wilted and the tomatoes are just starting to blister. Season with a pinch of salt and pepper.

    Step 4: Assemble the Dish

    In a large bowl, combine the cooked quinoa, sautéed vegetables, and half of the **lemon juice**. Slice the **avocado** and arrange it on top, along with the cooked salmon fillets. Drizzle with the remaining lemon juice and garnish with chopped **fresh dill**. Serve warm and enjoy the brain-boosting benefits!

    Common Mistakes to Avoid

    • **Overcooking the Salmon**: Keep an eye on the salmon as it cooks. Overcooking can result in dry, tough fish. Aim for a flaky texture.
    • **Skipping the Quinoa Rinse**: Make sure to rinse the quinoa to remove its bitter coating. This step is crucial for the best flavor.
    • **Using Low-Quality Olive Oil**: Opt for extra virgin olive oil for its superior flavor and health benefits.
    • **Neglecting Seasoning**: Proper seasoning at each step enhances the overall flavor of the dish.

    How to Store & Reheat

    To store leftovers, place the salmon and quinoa mixture in airtight containers in the refrigerator. It will keep for up to 3 days. When reheating, use a skillet to gently warm the salmon over low heat, or microwave on a low setting to avoid drying out the fish. The quinoa can be microwaved or reheated on the stove with a splash of water to restore moisture.

    Ingredient Substitutions

    • **Salmon**: Swap with trout or mackerel for similar Omega-3 benefits.
    • **Quinoa**: Use brown rice or farro if preferred.
    • **Spinach**: Kale or arugula can be used as alternatives.
    • **Avocado**: Substitute with sliced almonds or walnuts for a nutty crunch.

    Nutrition Facts

    • Calories: 550 per serving
    • Protein: 35g
    • Fat: 30g
    • Carbohydrates: 40g
    • Serving Size: 1 plate

    Frequently Asked Questions

    Can I make this recipe vegan?

    Yes, you can substitute the salmon with tofu or tempeh for a vegan version. Ensure you season and cook them well to enhance flavor.

    What if I don’t have fresh dill?

    You can use dried dill instead, though fresh is preferred for its vibrant flavor. Alternatively, fresh parsley or cilantro work well too.

    Is this dish suitable for meal prep?

    Absolutely! This dish is ideal for meal prep as it stores well in the fridge and can be easily reheated.

    Can I add more vegetables?

    Of course! Feel free to add any vegetables you like, such as bell peppers or zucchini, to increase the nutrient content.

    What’s the best way to ensure my salmon is perfectly cooked?

    Chef’s Tip: Use a meat thermometer to check that the internal temperature reaches 145°F (63°C) for perfectly cooked salmon.

  • ZERO PREP: Studio-Approved Cold Brew in a Flash!

    ZERO PREP: Studio-Approved Cold Brew in a Flash!

    Introduction & My Personal Story

    Ah, cold brew coffee. Just the thought takes me back to those early mornings in my cozy little kitchen, where the sun barely peeked through the windows, and the world was still asleep. In my 5 years of experience as a chef and food blogger, I’ve come to appreciate the magic of a well-made cold brew. It’s not just coffee; it’s a ritual, a moment of peace before the hustle and bustle of the day begins.

    I remember the first time I attempted to make cold brew at home. I was skeptical, thinking it was going to be a complicated process, but I was pleasantly surprised by its simplicity. The rich aroma of freshly ground coffee filled the air as I mixed it with cold water, and I couldn’t help but feel a sense of accomplishment. It was a drink that not only woke me up but also became a cherished part of my morning routine.

    Over time, I’ve perfected the art of making cold brew, and it’s become a staple in my kitchen. Whether it’s a hot summer day or a chilly winter morning, a glass of cold brew never fails to bring comfort and joy. Now, I’m excited to share my studio-approved, zero-prep cold brew recipe with you. Let’s dive in!

    Why You’ll Love This Recipe

    • No heat required – perfect for hot days.
    • Minimal cleanup – less time washing, more time sipping.
    • Zero prep – just mix, shake, and wait.
    • Customizable strength – dilute as you like.
    • Rich, smooth flavor – no bitterness.

    Detailed Ingredients

    To make the perfect cold brew, you’ll need the following ingredients:

    • 1 cup coarsely ground coffee (about 85 grams): Look for a medium to dark roast for a robust flavor. If buying pre-ground, ensure it’s coarsely ground.
    • 5 cups cold water (about 1.2 liters): Filtered water is best for a clean taste.

    Step-by-Step Instructions

    Step 1: Grind Your Beans

    If you’re using whole beans, grind them to a coarse consistency. You want the grounds to be similar in texture to sea salt. This ensures a smooth brew without over-extraction. Chef’s Tip: Use a burr grinder for consistent results.

    Step 2: Mix and Shake

    Grab a large mason jar and add 1 cup of coarsely ground coffee. Pour in 4 cups of cold water. In a smaller jar, combine ¼ cup ground coffee with 1 cup cold water. Secure the lids and shake well to ensure all grounds are saturated.

    Step 3: The Waiting Game

    Place the jars in the refrigerator and let them steep for 24 hours. This slow brewing process extracts the rich flavors without the bitterness you get from hot brewing.

    Step 4: Strain and Store

    After 24 hours, strain the coffee through a fine mesh strainer or a nut milk bag to remove the grounds. Be patient and let gravity do the work for the best clarity. Pour the filtered coffee back into the jars for storage. Chef’s Tip: Double strain if you prefer a cleaner brew.

    Step 5: Serve It Up

    To enjoy, pour over ice. You can dilute with water or milk according to your taste. Add a splash of vanilla or a sprinkle of cinnamon for a little extra flavor.

    Common Mistakes to Avoid

    • Using fine grounds: This can lead to over-extraction and a bitter taste.
    • Not shaking enough: Ensure all grounds are saturated to avoid uneven brewing.
    • Steeping too long: More than 24 hours can result in a harsh flavor.
    • Skipping the strain: Always strain thoroughly to avoid gritty coffee.

    How to Store & Reheat

    Store your cold brew in an airtight container in the refrigerator. It will stay fresh for up to two weeks. If you prefer your coffee warm, gently heat it on the stove, but avoid boiling to preserve the flavor profile.

    Ingredient Substitutions

    • Decaf coffee: For a caffeine-free version, simply use decaf coffee beans.
    • Flavored coffee: Try hazelnut or vanilla-flavored beans for a twist.
    • Non-dairy milk: Substitute with almond, oat, or coconut milk for a creamy finish.

    Nutrition Facts

    • Serving Size: 1 cup
    • Calories: 2
    • Protein: 0g
    • Fat: 0g
    • Carbs: 0g

    Frequently Asked Questions

    • Can I use pre-ground coffee? Yes, but ensure it’s coarsely ground for best results.
    • How long can I keep cold brew in the fridge? Up to two weeks in an airtight container.
    • Is cold brew stronger than regular coffee? It can be, depending on the brew ratio. Dilute to your preference.
    • Can I sweeten my cold brew? Absolutely! Add simple syrup or your choice of sweetener.
    • Does cold brew have less acidity? Yes, it’s typically smoother and less acidic than hot-brewed coffee.