Tag: Sweet

  • Brain Fuel: Sizzling Sweet Potatoes

    Brain Fuel: Sizzling Sweet Potatoes

    Introduction & My Personal Story

    Sweet potatoes have always held a special place in my heart, and this recipe for Sizzling Sweet Potatoes is no exception. I remember the first time I tasted roasted sweet potatoes; it was a chilly autumn evening, and I was visiting my grandmother. She had just pulled a tray of perfectly roasted sweet potatoes from the oven, their caramelized edges glistening in the dim kitchen light. The aroma was intoxicating, a sweet and earthy scent that wrapped around me like a warm blanket.

    In my 5 years of experience as a chef, I’ve come to appreciate the versatility and nutritional benefits of sweet potatoes. They’re not only delicious but also packed with nutrients that are essential for brain health. This recipe has become a staple in my kitchen, not just for its taste but for the energy and focus it provides. Whether you’re preparing for a busy workday or looking for a side dish that complements any meal, these Sizzling Sweet Potatoes are sure to become your go-to recipe.

    Why You’ll Love This Recipe

    • Rich in Omega-3 fatty acids for enhanced brain function.
    • Easy to prepare with minimal ingredients.
    • Perfectly roasted for a crispy outside and tender inside.
    • A versatile side dish that pairs well with any meal.
    • Great for meal prep and stays fresh for up to a week.

    Detailed Ingredients

    • 2 medium-sized sweet potatoes (approximately 500 grams)
    • 1-2 tablespoons of avocado oil or olive oil
    • 1 teaspoon of sea salt
    • 1/2 teaspoon of ground black pepper
    • Optional: 1/2 teaspoon of cinnamon for a sweet twist

    When shopping, look for firm, smooth-skinned sweet potatoes without any blemishes or soft spots.

    Step-by-Step Instructions

    Step 1: Preheat Your Oven

    Begin by preheating your oven to 400°F (200°C). This is the ideal temperature to ensure your sweet potatoes achieve that perfect balance of crispy exterior and soft interior.

    Step 2: Prepare the Sweet Potatoes

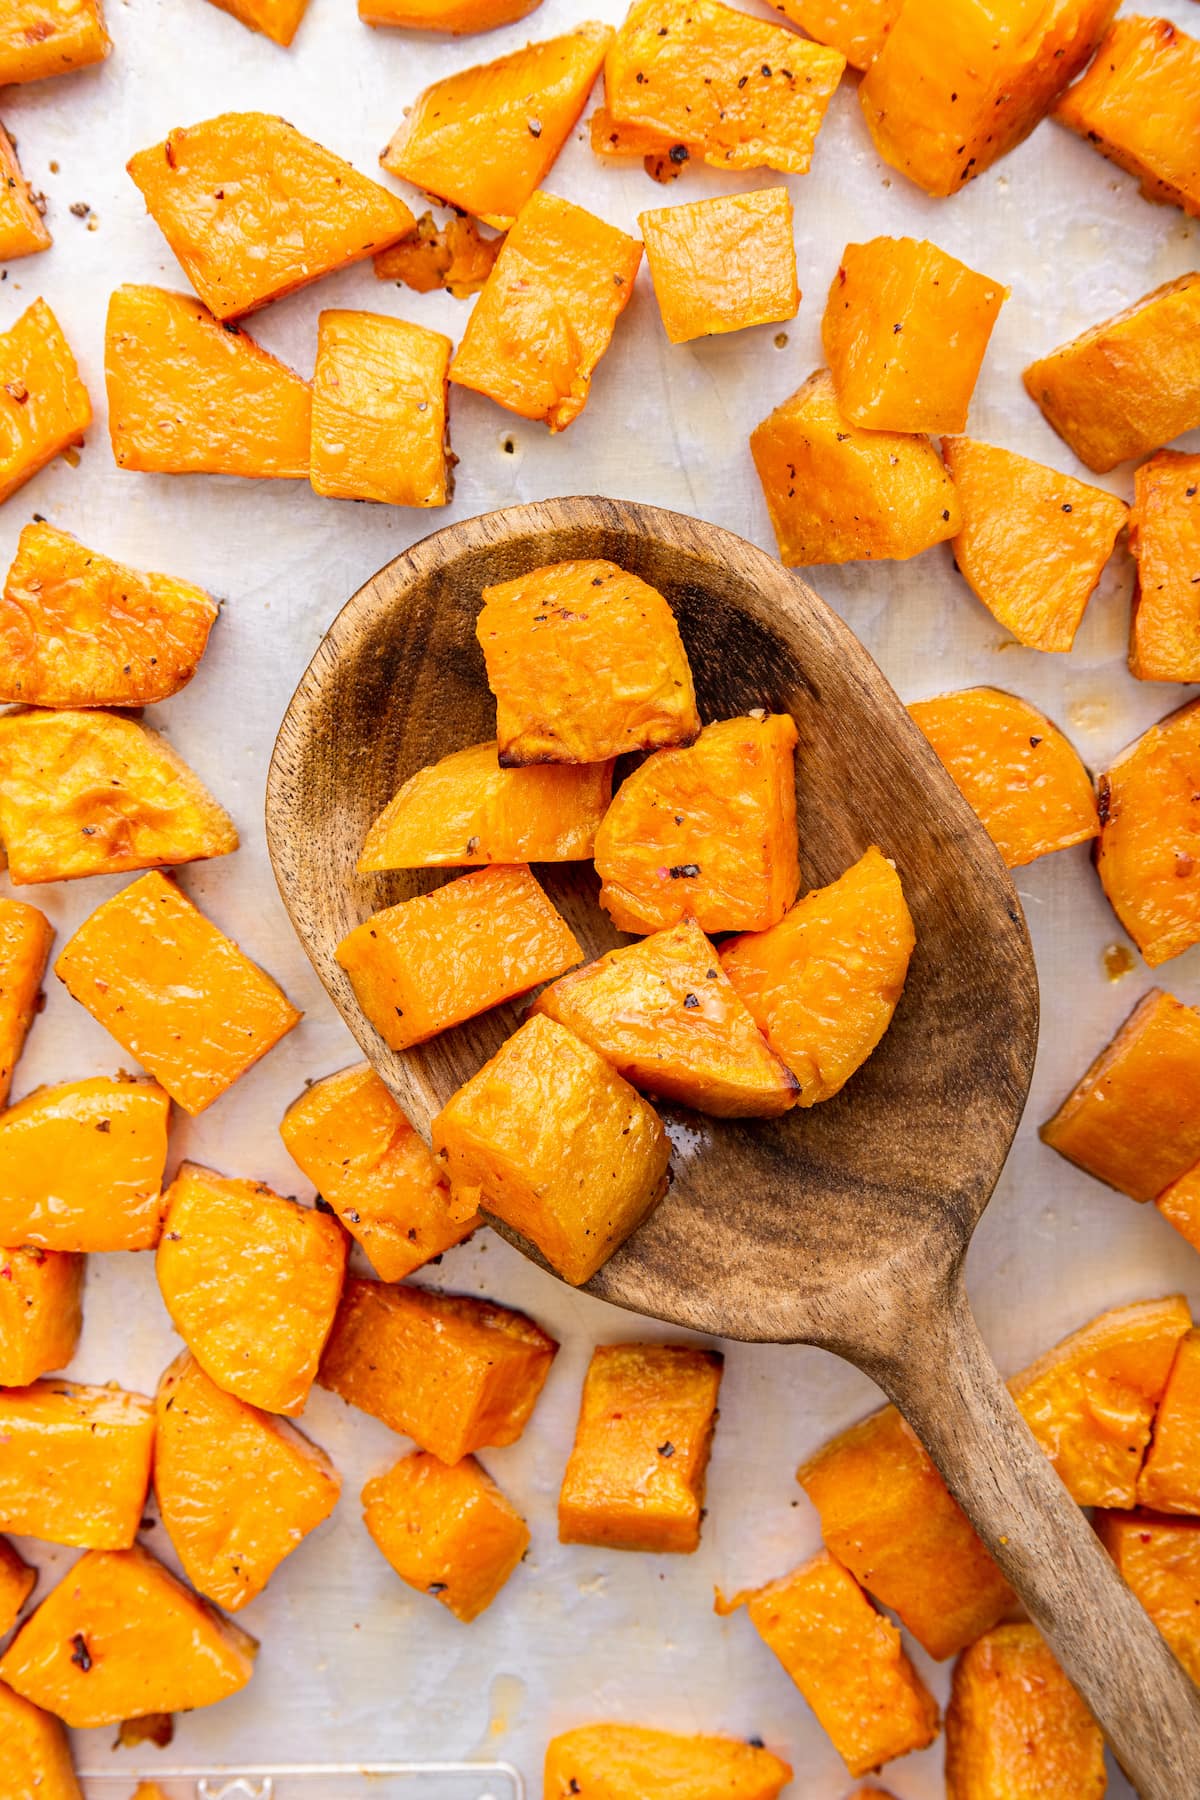
    Peel your sweet potatoes using a vegetable peeler. Cut them into evenly-sized chunks, about 1-inch in size. This ensures they cook evenly. Chef’s Tip: Consistent sizing is key to even roasting.

    Step 3: Season the Potatoes

    In a large mixing bowl, combine the sweet potato chunks with 1-2 tablespoons of avocado or olive oil. Add the sea salt and ground black pepper. For a hint of sweetness, sprinkle in some cinnamon. Toss the mixture thoroughly until each piece is well-coated.

    Step 4: Roast to Perfection

    Line a baking sheet with parchment paper for easy cleanup. Spread the seasoned sweet potatoes in a single layer on the sheet. Roast in the preheated oven for 30-45 minutes. Halfway through, toss the potatoes to ensure even cooking. You’ll know they’re done when they’re fork-tender and golden brown on the edges.

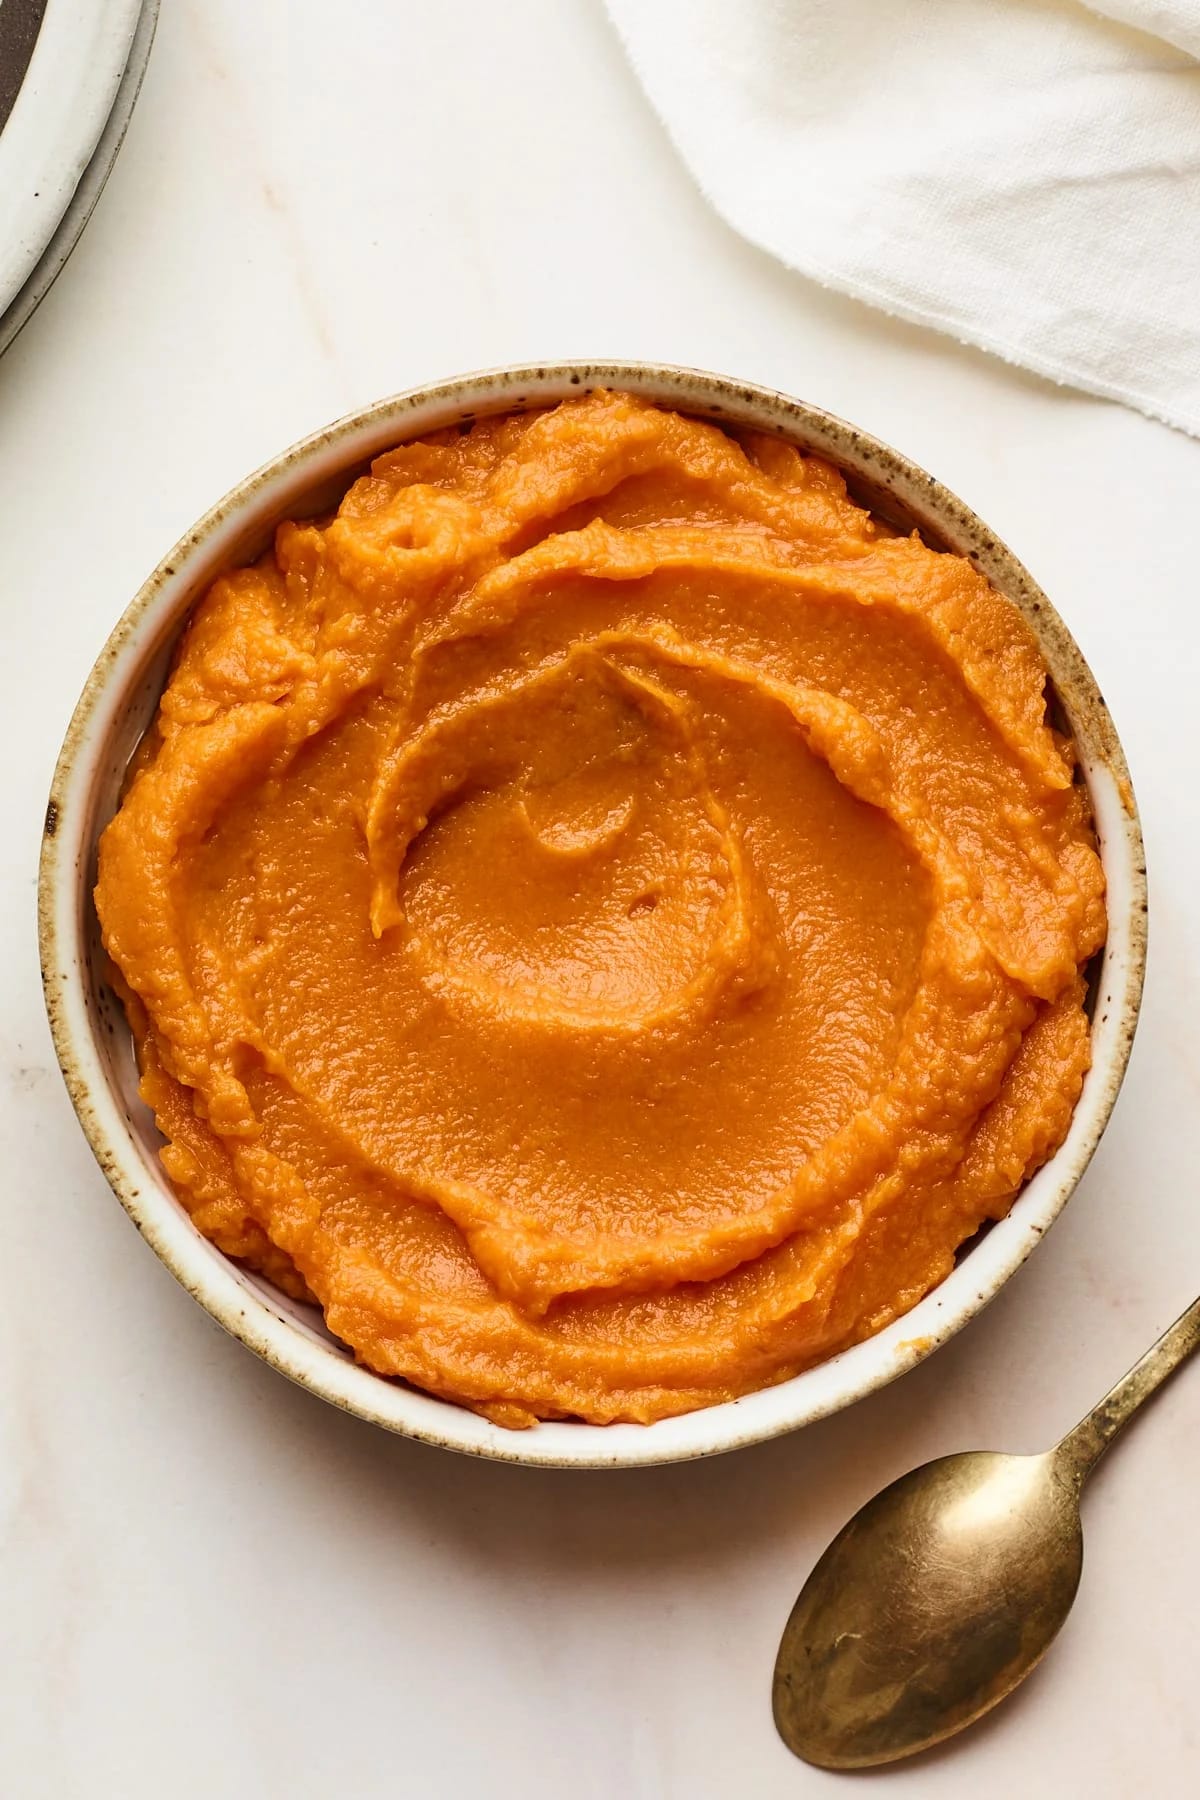
    Step 5: Serve and Enjoy

    Remove the sweet potatoes from the oven and let them cool slightly. Adjust the seasoning if necessary. Serve them warm as a side dish, or let them cool completely before storing.

    Common Mistakes to Avoid

    One common mistake is overcrowding the baking sheet, which can lead to steaming rather than roasting. Make sure there’s enough space between each piece for air to circulate. Another pitfall is not tossing halfway through roasting, which ensures even cooking and browning.

    How to Store & Reheat

    Store any leftovers in an airtight container in the refrigerator. They will stay fresh for up to one week. To reheat, spread them on a baking sheet and warm in a 350°F (175°C) oven for about 10 minutes. This helps maintain their crispiness.

    Ingredient Substitutions

    If you’re out of avocado or olive oil, coconut oil works as a great alternative. For a spicy kick, try adding a pinch of cayenne pepper. If you’re avoiding salt, consider using a salt-free seasoning blend.

    Nutrition Facts

    • Calories: 115 kcal per serving
    • Protein: 1g
    • Fat: 5g
    • Carbohydrates: 20g
    • Serving Size: 1/2 cup

    Frequently Asked Questions

    Q: Can I leave the skin on the sweet potatoes?

    A: Absolutely! The skin adds extra fiber and nutrients. Just make sure to wash them thoroughly.

    Q: How can I make these sweet potatoes spicier?

    A: Add a pinch of cayenne pepper or smoked paprika for a spicy twist.

    Q: Can I use this recipe for meal prep?

    A: Yes, these sweet potatoes are perfect for meal prep and can be stored in the fridge for up to a week.

    Q: What other dishes pair well with these sweet potatoes?

    A: They pair beautifully with grilled chicken, fish, or even as a topping for salads.

  • Brain Fuel: Sweet Potato Blueberry Cookies

    Brain Fuel: Sweet Potato Blueberry Cookies

    Introduction & My Personal Story

    Ah, sweet memories of my grandmother’s kitchen, where the aroma of freshly baked cookies filled the air. It was a sanctuary of warmth and love, and among the many treats she baked, one stood out—her Sweet Potato Blueberry Cookies. These weren’t just any cookies; they were little bites of nostalgia, packed with the goodness of sweet potatoes and the burst of blueberries. As a child, I would watch in awe as she mashed the sweet potatoes, carefully folded in the blueberries, and worked her magic. Fast forward to today, and I’ve put my own spin on this classic, adding a modern twist with oatmeal for an extra boost of fiber and heartiness.

    In my 5 years of experience as a chef, I’ve learned that food is not just about taste; it’s about the memories and emotions it evokes. These cookies are a perfect example. They’re the kind of treat that takes me back to those carefree days, where a cookie could solve any problem. Now, I share this recipe with you, hoping it brings a bit of comfort and joy to your kitchen, just as it did in mine.

    Why You’ll Love This Recipe

    • Nutrient-packed: Loaded with **sweet potatoes** and **blueberries**, these cookies are a powerhouse of vitamins and antioxidants.
    • Easy to make: Simple steps and common ingredients make this a go-to recipe for any skill level.
    • Diet-friendly: Naturally gluten-free and can be made vegan by swapping a few ingredients.
    • Great for meal prep: Make a batch and enjoy throughout the week as a quick snack or breakfast option.

    Detailed Ingredients

    • 1 cup mashed **sweet potato** (approx. 200g) – Look for firm and smooth sweet potatoes at the market.
    • 1/2 cup **maple syrup** (120ml) – Opt for pure maple syrup for the best flavor.
    • 1/4 cup melted **coconut oil** (60ml) – Provides a subtle coconut flavor; can be replaced with another oil.
    • 1 teaspoon **vanilla extract** – Enhances the overall flavor profile of the cookies.
    • 1 cup rolled **oats** (90g) – For making oat flour, choose old-fashioned oats for a better texture.
    • 1/2 cup **almond flour** (50g) – Adds a nutty flavor and light texture.
    • 1 teaspoon **cinnamon** – Adds warmth and spice to the cookies.
    • 1 teaspoon **baking powder** – Helps the cookies rise slightly.
    • 1/2 teaspoon **sea salt** – Balances the sweetness.
    • 1/4 teaspoon ground **ginger** – Optional, for a hint of spice.
    • 1 cup frozen **blueberries** (150g) – Frozen berries help maintain their shape during baking.

    Step-by-Step Instructions

    Step 1: Preheat your oven to 350°F (175°C). Line a baking tray with parchment paper to prevent sticking.

    Step 2: Make Oat Flour by blending 1 cup of rolled oats in a food processor until it resembles a fine flour. This will be the base for your cookie dough.

    Step 3: Mix Wet Ingredients in a large bowl. Combine 1 cup of mashed sweet potato, 1/2 cup of maple syrup, 1/4 cup of melted coconut oil, and 1 teaspoon of vanilla extract. Whisk until smooth and well combined.

    Step 4: Combine Dry Ingredients by adding the oat flour, remaining rolled oats, 1/2 cup of almond flour, 1 teaspoon of cinnamon, 1 teaspoon of baking powder, 1/2 teaspoon of sea salt, and 1/4 teaspoon of ground ginger. Stir into the wet mixture until just combined. Be careful not to overmix.

    Step 5: Fold in Blueberries gently to maintain their shape. This ensures that you get a burst of blueberry goodness in every bite.

    Step 6: Scoop & Shape the dough onto the prepared baking tray using a cookie scoop or tablespoon. Flatten each dough ball slightly with your fingers, making sure some blueberries are visible on the surface.

    Step 7: Bake for 25-30 minutes, or until the cookies are golden brown and firm around the edges. Allow them to cool on the baking sheet for a few minutes before transferring to a wire rack to cool completely.

    Common Mistakes to Avoid

    Overmixing the dough is a common mistake, leading to tough cookies. Mix until just combined. Another issue is using fresh blueberries, which can release too much moisture, making the cookies soggy. Always opt for frozen blueberries. Lastly, ensure your sweet potatoes are fully mashed to prevent chunks, which can affect the cookie’s texture.

    How to Store & Reheat

    Store these cookies in an airtight container in the refrigerator for up to 5 days. For longer storage, freeze them for up to 3 months. To reheat, simply let them thaw overnight in the fridge or at room temperature. Enjoy them slightly warm by microwaving for 10-15 seconds.

    Ingredient Substitutions

    • If you’re out of **almond flour**, use all-purpose gluten-free flour for a similar result.
    • **Coconut oil** can be replaced with vegetable oil or unsalted butter for a richer flavor.
    • For a vegan version, swap **maple syrup** with agave nectar.

    Nutrition Facts

    • Calories: 116 kcal per cookie
    • Protein: 2g
    • Fat: 4g
    • Carbohydrates: 18g
    • Serving Size: 1 cookie

    Frequently Asked Questions

    Q: Can I use fresh blueberries instead of frozen?
    A: Fresh blueberries can release more moisture, making the cookies soggy. It’s best to stick with frozen berries.

    Q: Are these cookies gluten-free?
    A: Yes, they are naturally gluten-free, as long as you use certified gluten-free oats and almond flour.

    Q: How can I make these cookies vegan?
    A: Use agave nectar instead of honey and ensure all other ingredients are vegan-friendly.

    Q: Can I add nuts to the recipe?
    A: Absolutely! Chopped walnuts or pecans would add a nice crunch and complement the flavors well.

  • Brain Fuel: Sweet Potato Bliss Bites

    Brain Fuel: Sweet Potato Bliss Bites

    Introduction & My Personal Story

    There’s something magical about the way a simple sweet potato can transform into a delightful snack that not only satisfies your sweet tooth but also fuels your brain. I remember the first time I stumbled upon the idea of combining sweet potatoes with a hint of sweetness and the creamy texture of almond flour. It was during a weekend when I was experimenting in the kitchen, looking for a snack that was both nutritious and delicious. My goal was to create a treat that would not only taste good but also provide my family with a boost of energy and mental clarity. After a few trials and errors, the Sweet Potato Bliss Bites were born, and they quickly became a household favorite.

    In my 5 years of experience as a chef, I’ve learned that the best recipes often come from a place of love and necessity. These bliss bites are no exception. They remind me of cozy autumn days, with the aroma of cinnamon wafting through the house, and the satisfaction of knowing that each bite is packed with ingredients that are good for the body and the mind. Sharing this recipe with you feels like sharing a piece of my kitchen and my passion for creating food that nourishes both the body and the soul.

    Why You’ll Love This Recipe

    • Quick and easy to make, perfect for busy schedules.
    • Packed with nutrients to boost brain health.
    • Gluten-free and refined sugar-free options available.
    • Perfect for meal prep and on-the-go snacking.
    • Kid-friendly and great for lunchboxes.

    Detailed Ingredients

    • 2 cups of cooked and mashed **sweet potatoes** (around 450 grams).
    • 1/2 cup of **almond flour** (about 60 grams).
    • 1/2 cup of **oat flour** (60 grams) – you can blend oats to make your own.
    • 1/4 cup of pure **maple syrup** (60 ml) for natural sweetness.
    • 1/4 cup of **coconut oil**, melted (60 ml).
    • 1/2 cup of unsweetened **almond milk** (120 ml).
    • 2 large **eggs**.
    • 1 teaspoon of pure **vanilla extract**.
    • 1 teaspoon of **cinnamon**.
    • 1 teaspoon of **baking powder**.
    • 1/2 teaspoon of **baking soda**.
    • 1/4 teaspoon of **sea salt**.

    Step-by-Step Instructions

    Step 1: Preheat your oven to 350°F (175°C) and line a baking sheet with parchment paper or a silicone mat. This will ensure your bites don’t stick and makes for easy cleanup.

    Step 2: In a large bowl, combine the mashed **sweet potatoes**, **almond milk**, **eggs**, **maple syrup**, melted **coconut oil**, and **vanilla extract**. Whisk these ingredients until they are well combined and the mixture is smooth.

    Step 3: In another bowl, mix the **oat flour**, **almond flour**, **cinnamon**, **baking powder**, **baking soda**, and **sea salt**. Make sure there are no lumps in your dry ingredients.

    Step 4: Gradually add the dry ingredients to the wet ingredients. Stir gently until just combined. Chef’s Tip: Avoid overmixing to prevent the bites from becoming dense. A few lumps are perfectly fine.

    Step 5: Using a spoon or a small ice cream scoop, portion out the batter onto the prepared baking sheet. Aim for each bite to be about a tablespoon in size.

    Step 6: Bake in the preheated oven for 15-18 minutes, or until the bites are golden brown and a toothpick inserted into the center comes out clean.

    Step 7: Allow the bites to cool on the baking sheet for a few minutes before transferring them to a wire rack to cool completely.

    Common Mistakes to Avoid

    One common mistake is overbaking, which can result in dry bites. Keep an eye on them and start checking for doneness at the 15-minute mark. Another mistake is not mashing the sweet potatoes thoroughly, which can lead to an uneven texture. Ensure they’re smooth before incorporating them into the batter.

    How to Store & Reheat

    Store the Sweet Potato Bliss Bites in an airtight container at room temperature for up to 3 days. For longer storage, keep them in the refrigerator for up to a week. To reheat, simply pop them in a microwave for about 10-15 seconds or enjoy them at room temperature.

    Ingredient Substitutions

    • For a nut-free version, replace **almond flour** with additional **oat flour**.
    • Swap **maple syrup** with honey or agave nectar for a different sweetness profile.
    • Use **flax eggs** (1 tablespoon flaxseed meal + 2.5 tablespoons water, per egg) to make the recipe vegan.
    • Substitute **coconut oil** with melted butter or any neutral oil if preferred.

    Nutrition Facts

    • Calories: 120 per bite
    • Protein: 3g
    • Fat: 6g
    • Carbs: 15g
    • Serving Size: 1 bite

    Frequently Asked Questions

    • Q: Can I freeze these bites? A: Yes, you can freeze them for up to 2 months. Thaw overnight in the fridge before enjoying.
    • Q: Can I add nuts or chocolate chips? A: Absolutely! Feel free to fold in 1/2 cup of your favorite nuts or chocolate chips before baking.
    • Q: How can I make them sweeter? A: Increase the **maple syrup** to 1/3 cup or add a tablespoon of brown sugar to the dry ingredients.
    • Q: Are these bites gluten-free? A: Yes, as long as you use certified gluten-free oats for the **oat flour**.
    • Q: What’s the best way to mash sweet potatoes? A: Boil or bake them until soft, then use a potato masher or fork to mash until smooth.

  • Brain Fuel: Sweet Potato Bliss Hummus

    Brain Fuel: Sweet Potato Bliss Hummus

    Introduction & My Personal Story

    There’s something magical about the first time you taste a dish that feels both nourishing and indulgent. My journey with Sweet Potato Bliss Hummus began in a small, sunlit kitchen in my grandmother’s home. She had a knack for turning humble ingredients into culinary masterpieces, and her sweet potato hummus was no exception. I remember the aroma of sweet potatoes steaming, mingling with the earthy scent of cumin and the sharp tang of freshly squeezed lemon juice. As a child, I would eagerly watch her blend everything into a velvety hummus, my mouth watering in anticipation.

    Fast forward to my adult life, and this dish remains a staple in my kitchen. In my 5 years of experience as a chef, I’ve learned that food is not just about sustenance; it’s about experience, memories, and sometimes, a little bit of magic. Sweet Potato Bliss Hummus is my go-to when I need a brain boost or a comforting snack that feels like a warm hug. It’s a dish that not only nourishes the body but also fuels the soul, reminding me of those cherished moments in my grandmother’s kitchen.

    Why You’ll Love This Recipe

    • Rich in Omega-3 fatty acids, perfect for enhancing cognitive function.
    • Low in calories, making it a guilt-free snack.
    • Simple ingredients that are easy to find and budget-friendly.
    • Versatile dish that pairs well with a variety of dippers like veggies, pita chips, or crackers.
    • Can be made ahead of time, perfect for meal prep and busy weeks.

    Detailed Ingredients

    • Sweet Potato – 1 medium (about 200g), peeled and cubed. Look for firm, unblemished potatoes.
    • Tahini – ¼ cup (60g). Opt for a smooth, creamy variety.
    • Lemon Juice – 2 tablespoons (30ml), freshly squeezed for the best flavor.
    • Salt – ½ teaspoon.
    • Garlic – 1 clove, minced. Fresh garlic provides the best punch.
    • Cumin – ½ teaspoon. Adds warmth and depth.
    • Cayenne Pepper – Optional, for a spicy kick.
    • Olive Oil – For drizzling. Use extra virgin for a rich flavor.
    • Paprika – For garnish, adds a pop of color and flavor.

    Step-by-Step Instructions

    Step 1: Steam the Sweet Potatoes

    Place the cubed sweet potatoes in a steamer basket over boiling water. Cover and let them steam for about 15 minutes. You’ll know they’re ready when a fork easily pierces through them. This step is crucial as it ensures the sweet potatoes are soft enough to blend smoothly.

    Step 2: Blend the Ingredients

    Transfer the steamed sweet potatoes to a food processor. Add the tahini, lemon juice, salt, minced garlic, cumin, and cayenne pepper if you’re using it. Blend on high for 3-4 minutes. You’re aiming for a smooth, creamy consistency, so scrape down the sides of the processor as needed.

    Step 3: Serve

    Spoon the hummus into a serving bowl. Drizzle with a bit of olive oil and sprinkle with paprika. This not only enhances the flavor but also makes your dish visually appealing.

    Step 4: Enjoy

    Pair your hummus with fresh veggies, pita chips, or crackers. It’s a perfect snack for any time of the day, offering a delicious way to boost your energy and focus.

    Common Mistakes to Avoid

    • Overcooking the Sweet Potatoes: Steaming them for too long can make them mushy and waterlogged, affecting the texture of the hummus.
    • Using Bottled Lemon Juice: Freshly squeezed lemon juice provides a much brighter and fresher flavor.
    • Not Blending Long Enough: To achieve that creamy texture, ensure you blend for the full 3-4 minutes, scraping down the sides as needed.
    • Skipping the Olive Oil Drizzle: It adds a richness and depth to the final dish that shouldn’t be missed.

    How to Store & Reheat

    Transfer any leftover hummus to an airtight container. Store it in the refrigerator for up to 7 days. When you’re ready to enjoy it again, let it sit at room temperature for a few minutes and give it a good stir. If you prefer warm hummus, gently reheat it in a microwave-safe bowl for about 20 seconds, but be cautious not to overheat as it can alter the texture.

    Ingredient Substitutions

    • Sweet Potatoes: You can substitute with butternut squash for a slightly different flavor profile.
    • Tahini: If you’re out of tahini, almond butter can be used, though it will alter the taste.
    • Lemon Juice: Lime juice can be used in a pinch, offering a unique twist.
    • Garlic: Garlic powder can be substituted, but use sparingly as it’s more concentrated.

    Nutrition Facts

    • Calories: 114 kcal per ¼ cup
    • Protein: 2 g
    • Fat: 6 g
    • Carbs: 14 g
    • Serving Size: ¼ cup

    Frequently Asked Questions

    • Can I freeze sweet potato hummus? Yes, you can freeze it in an airtight container for up to 3 months. Thaw in the refrigerator before serving.
    • How can I make the hummus spicier? Add more cayenne pepper or a dash of hot sauce to increase the heat.
    • Is this recipe vegan? Absolutely, it’s completely plant-based and vegan-friendly.
    • What can I pair with sweet potato hummus? It’s great with fresh vegetables like carrots and bell peppers, or with pita chips and whole-grain crackers.
    • Can I make this hummus without a food processor? A high-powered blender can work as an alternative, though you may need to process in batches.

  • LATE NIGHT FUEL: Irresistible Grilled Teriyaki Chicken Kebabs—Juicy, Sticky, and Sweet!

    LATE NIGHT FUEL: Irresistible Grilled Teriyaki Chicken Kebabs—Juicy, Sticky, and Sweet!

    Introduction & My Personal Story

    Ah, the memories of late-night study sessions and work marathons. In my 5 years of experience as a chef, few things have been as comforting and energizing as a plate of Grilled Teriyaki Chicken Kebabs. I remember my college days vividly, burning the midnight oil with a group of friends in a cramped apartment. We needed something quick, easy, and delicious to keep us going, and these kebabs were the answer. The smell of chicken grilling and the sweet, sticky aroma of teriyaki sauce wafting through the kitchen was all it took to lift our spirits.

    Not only did these kebabs provide the sustenance we needed, but they also became a symbol of camaraderie. Each skewer was a burst of flavor, a perfect mix of juicy chicken and sweet teriyaki glaze, providing the right balance of protein and carbs to fuel our brains. It was a dish that turned mundane study nights into memorable gatherings. Even now, whenever I grill these kebabs, I’m transported back to those nights filled with laughter, friendship, and the promise of future success.

    Why You’ll Love This Recipe

    • Quick and easy to prepare, perfect for late-night cravings.
    • Packed with protein to keep energy levels high.
    • The perfect balance of sweet, savory, and umami flavors.
    • Minimal cleanup with simple ingredients.
    • Customizable to suit different tastes and dietary needs.

    Detailed Ingredients

    Here’s what you’ll need to make these irresistible kebabs:

    • 2 lbs boneless, skinless chicken breasts, diced into 1-inch cubes
    • ½ cup soy sauce – Look for low-sodium options if preferred.
    • ⅓ cup brown sugar – Packed tightly for sweetness.
    • 2 cloves garlic, minced
    • 2 teaspoons fresh ginger, grated
    • 1 cup water
    • 2 tablespoons cornstarch
    • Wooden skewers, soaked in water for 30 minutes

    Step-by-Step Instructions

    Step 1: Preheat the Grill

    Set your grill to 375°F. This moderate heat ensures the chicken cooks evenly without burning. If you’re using wooden skewers, remember to soak them in water for at least 30 minutes to prevent them from catching fire.

    Step 2: Make the Teriyaki Sauce

    In a small saucepan, combine ½ cup soy sauce, ⅓ cup brown sugar, 2 cloves minced garlic, and 2 teaspoons grated ginger. Bring the mixture to a simmer over medium heat. In a separate bowl, mix 1 cup water with 2 tablespoons cornstarch to create a slurry. Slowly whisk the slurry into the simmering sauce until it thickens and turns glossy, about 2-3 minutes. Allow it to cool.

    Step 3: Marinate the Chicken

    Place the diced chicken in a large ziplock bag. Pour in two-thirds of your cooled teriyaki sauce, seal the bag, and massage the chicken to ensure all pieces are coated. Marinate for at least 30 minutes in the refrigerator. Reserve the remaining sauce for basting later.

    Step 4: Prepare the Skewers

    Thread the marinated chicken onto the soaked wooden skewers, leaving a small gap between each piece to ensure even cooking.

    Step 5: Grill the Kebabs

    Place the skewers on the preheated grill. Cook each side for about 4-5 minutes, basting with the reserved sauce as you turn them. The chicken is done when it reaches an internal temperature of 165°F and the juices run clear.

    Step 6: Cook the Rice

    While the chicken is grilling, prepare 1 cup of rice according to the package instructions. Fluff with a fork before serving.

    Step 7: Serve and Enjoy

    Plate the grilled teriyaki chicken skewers alongside the rice. Chef’s Tip: Garnish with chopped green onions or sesame seeds for an added pop of flavor and color.

    Common Mistakes to Avoid

    • Overcooking the Chicken: Keep an eye on your grill temperature and use a meat thermometer to ensure the chicken doesn’t dry out.
    • Skipping the Skewer Soak: If you forget to soak your skewers, they might burn. Always soak them in water for at least 30 minutes.
    • Not Marinating Long Enough: The longer the chicken marinates, the more flavorful it becomes. Aim for at least 30 minutes.

    How to Store & Reheat

    Store any leftover kebabs in an airtight container in the refrigerator for up to 3 days. To reheat, place them in a preheated oven at 350°F for 10-12 minutes or until warmed through. Alternatively, you can reheat them in a microwave, but be aware this may slightly change the texture.

    Ingredient Substitutions

    • Soy Sauce: For a gluten-free option, use tamari or coconut aminos.
    • Brown Sugar: Substitute with honey or maple syrup for a different sweetness profile.
    • Chicken Breasts: Thighs can be used for a juicier texture.

    Nutrition Facts

    • Calories: 250 per skewer
    • Protein: 26g
    • Fat: 5g
    • Carbohydrates: 25g
    • Serving Size: 2 skewers

    Frequently Asked Questions

    Q: Can I make these kebabs in advance?

    A: Yes, you can marinate the chicken and prepare the skewers a day in advance. Grill them just before serving for best results.

    Q: Can I use a different protein?

    A: Absolutely! These kebabs can be made with beef, pork, or even tofu for a vegetarian option.

    Q: How can I make the sauce thicker?

    A: If you prefer a thicker sauce, add more cornstarch to the slurry until you reach your desired consistency.

    Q: What sides go well with these kebabs?

    A: Steamed vegetables or a simple green salad make excellent accompaniments.

  • Brain Fuel: Sweet Potato Bliss!

    Brain Fuel: Sweet Potato Bliss!

    Introduction & My Personal Story

    Ah, sweet potatoes! Just saying the name takes me back to my childhood kitchen, where the aroma of these starchy jewels roasting in the oven would fill the air with warmth and comfort. My grandmother, a culinary wizard in her own right, had a knack for transforming simple ingredients into something extraordinary. It was in her cozy kitchen that I first learned the art of making the perfect sweet potato puree, a dish that not only nourishes the body but also fuels the mind.

    In my 5 years of experience as a chef, I’ve come to appreciate the versatility of sweet potatoes. They’re not just a side dish; they’re a powerhouse of nutrition, especially when it comes to brain health. I vividly remember one particular Sunday afternoon, standing beside my grandmother, as she explained how the natural sugars in sweet potatoes release slowly, providing sustained energy and focus. “A chef’s secret weapon,” she whispered, winking as she mashed the tender flesh into a creamy puree.

    Fast forward to today, and sweet potatoes remain a staple in my kitchen. Whether I’m whipping up a quick snack or preparing a gourmet meal, I often turn to my trusty sweet potato puree recipe. It’s not just about the taste; it’s about the feeling of being grounded, connected to my roots, and knowing I’m putting something wholesome and beneficial on the table. Let’s dive into how you can recreate this sweet potato bliss in your own kitchen!

    Why You’ll Love This Recipe

    • Boosts brain power with essential nutrients.
    • Provides sustained energy without sugar crashes.
    • Easy to prepare with minimal ingredients.
    • Versatile: perfect as a side dish or ingredient in other recipes.
    • Kid-friendly and packed with natural sweetness.

    Detailed Ingredients

    • Sweet Potatoes: 2 large, approximately 600 grams (look for firm, smooth skin without blemishes).
    • Olive Oil: 1 tablespoon, for baking (optional).
    • Salt: 1/2 teaspoon, to taste.
    • Butter: 2 tablespoons, unsalted, for added creaminess (optional).
    • Cinnamon: 1/2 teaspoon, for a warm, spicy note (optional).

    Step-by-Step Instructions

    Step 1: Preheat the Oven

    Set your oven to 400°F (200°C). This temperature is perfect for roasting sweet potatoes, ensuring they become tender and caramelized.

    Step 2: Prepare the Sweet Potatoes

    Wash the sweet potatoes thoroughly under running water to remove any dirt. Dry them with a clean towel. Using a fork, poke about 4-5 holes in each potato. This allows steam to escape during baking, preventing them from bursting.

    Step 3: Bake the Sweet Potatoes

    Place the sweet potatoes directly on a baking sheet lined with parchment paper. For added flavor, you can brush them lightly with olive oil and sprinkle a pinch of salt. Bake for about 60 minutes, or until the skins are wrinkled and a fork easily pierces the flesh. Chef’s Tip: The longer you bake, the sweeter they become, as the natural sugars caramelize beautifully.

    Step 4: Cool Down

    Once baked, remove the sweet potatoes from the oven and let them cool on the baking sheet for about 10-15 minutes. This makes them easier to handle and peel.

    Step 5: Peel the Sweet Potatoes

    Gently peel away the skin using your hands or a small knife. The skin should come off easily. If you’re feeling adventurous, save the skins—they’re nutrient-rich and can be crisped up in the oven for a tasty snack!

    Step 6: Puree the Sweet Potatoes

    Transfer the peeled sweet potatoes to a food processor or blender. Add the butter and cinnamon, if using, and blend until smooth. You can also use an immersion blender in a large bowl. For a chunkier texture, mash the potatoes with a fork or potato masher.

    Step 7: Serve

    Transfer the smooth puree to a serving bowl. Taste and adjust the seasoning with salt if needed. Serve immediately, or store in the refrigerator for up to 3 days.

    Common Mistakes to Avoid

    Undercooking: Ensure the sweet potatoes are fully cooked before mashing. They should be soft and tender.

    Over-blending: While a smooth puree is desirable, over-blending can make it gummy. Blend just until smooth.

    Skipping the cooling step: Peeling hot sweet potatoes can be a painful experience. Allow them to cool slightly first.

    How to Store & Reheat

    Store any leftover sweet potato puree in an airtight container in the refrigerator. It will keep for up to 3 days. To reheat, place the puree in a saucepan over low heat, stirring occasionally until warmed through. You can also reheat in the microwave for 1-2 minutes, stirring halfway through. Chef’s Tip: Add a splash of milk or water when reheating to restore the creamy texture.

    Ingredient Substitutions

    If you’re missing some ingredients, don’t worry! Here are a few substitutions:

    • Olive Oil: Substitute with coconut oil for a hint of tropical flavor.
    • Butter: Use ghee or margarine for a dairy-free option.
    • Cinnamon: Nutmeg or pumpkin spice can offer a similar warmth.

    Nutrition Facts

    • Calories: 150 per serving
    • Protein: 2g per serving
    • Fat: 5g per serving
    • Carbohydrates: 27g per serving
    • Serving Size: 1/2 cup

    Frequently Asked Questions

    Q: Can I use sweet potato puree in other recipes?

    A: Absolutely! It’s fantastic in soups, stews, baked goods, or mixed into oatmeal.

    Q: Can I freeze sweet potato puree?

    A: Yes, freeze it in an airtight container for up to 3 months. Thaw overnight in the fridge before using.

    Q: What can I add for extra flavor?

    A: Try adding ginger, nutmeg, or a splash of vanilla extract for a unique twist.

    Q: Is this recipe vegan?

    A: It can be! Simply omit the butter or use a vegan substitute.