Tag: Fuel

  • LATE NIGHT FUEL: Irresistibly Delicious Dan Dan Noodles

    LATE NIGHT FUEL: Irresistibly Delicious Dan Dan Noodles

    Introduction & My Personal Story

    Ah, Dan Dan Noodles. Just the thought of them takes me back to my late-night culinary adventures in bustling night markets of Chengdu. There’s something magical about the combination of spicy, savory, and nutty flavors that come together in this dish. During my travels in China, I found myself drawn to these aromatic bowls of noodles as the perfect remedy for those long days and even longer nights. In my 5 years of experience as a chef, I’ve learned that Dan Dan Noodles are more than just food; they’re a story in a bowl, a testament to the rich culinary heritage of Sichuan province. One chilly evening, after a particularly exhausting day of exploring, I stumbled upon a small street vendor. The vendor served me a steaming bowl of Dan Dan Noodles that were so delicious, they instantly revived my spirits. That experience stayed with me, and ever since, I’ve been on a mission to recreate that perfect bowl. Today, I’m excited to share my version of this dish, perfect for fueling those late-night grinds without the heavy food coma aftermath.

    Why You’ll Love This Recipe

    • Quick and easy to prepare – perfect for a late-night snack.
    • Packed with bold flavors and a satisfying kick of spice.
    • Versatile dish that can be enjoyed warm or cold.
    • High in protein and energy-boosting ingredients.
    • Light on the stomach, avoiding the dreaded food coma.

    Detailed Ingredients

    Here’s what you’ll need to make these irresistible Dan Dan Noodles:

    • Spaghetti Noodles: 200g, or any long pasta of your choice.
    • Ground Pork: 250g, look for well-marbled pieces for extra flavor.
    • Garlic: 3 cloves, minced finely.
    • Ginger: 1 tablespoon, freshly grated.
    • Soy Sauce: 4 tablespoons, opt for low-sodium to control saltiness.
    • Brown Sugar: 2 teaspoons, to balance the spice.
    • Spinach: 100g, fresh leaves washed and dried.
    • Rice Vinegar: 1 tablespoon, for a tangy punch.
    • Peanut Butter: 2 tablespoons, creamy or chunky based on preference.
    • Chili Crisp: 1 tablespoon, adjust to taste for heat preference.
    • Dry Roasted Peanuts: 50g, crushed for topping.
    • Green Onions: 2 stalks, sliced thinly.
    • Vegetable Oil: 2 tablespoons, for cooking.

    Step-by-Step Instructions

    Step 1: Prepare the Ingredients
    Before you start, gather all your ingredients. This will make the cooking process smooth and efficient. Chef’s Tip: Keep your workspace organized to maintain the momentum.

    Step 2: Cook the Noodles
    Bring a large pot of salted water to a boil. Add the **spaghetti noodles** and cook until just al dente, which is usually about 2 minutes less than the package directions suggest. Reserve 1 cup of the pasta water before draining the noodles. This starch-rich water is crucial for the sauce’s consistency.

    Step 3: Brown the Pork
    In a skillet, heat 2 tablespoons of **vegetable oil** over medium-high heat. Add the **ground pork** and let it brown without stirring for about 3 minutes. This allows a caramelized crust to form, enhancing the flavor. Once browned, stir to break it up into smaller pieces.

    Step 4: Add the Aromatics and Veggies
    To the browned pork, add the **minced garlic** and **grated ginger**. Stir in 2 tablespoons of **soy sauce**, 2 teaspoons of **brown sugar**, and the **spinach**. Cook for another 2 minutes until the spinach is wilted and the aromatics are fragrant.

    Step 5: Make the Sauce
    In a mixing bowl, combine the remaining 2 tablespoons of **soy sauce**, **rice vinegar**, **peanut butter**, **chili crisp**, **brown sugar**, and half of the reserved pasta water. Whisk until smooth. Chef’s Tip: Adjust the chili crisp according to your spice tolerance.

    Step 6: Combine Everything
    Toss the cooked noodles with the sauce, adding more pasta water if needed to achieve your desired consistency. Ensure the noodles are well-coated with the sauce for maximum flavor.

    Step 7: Serve
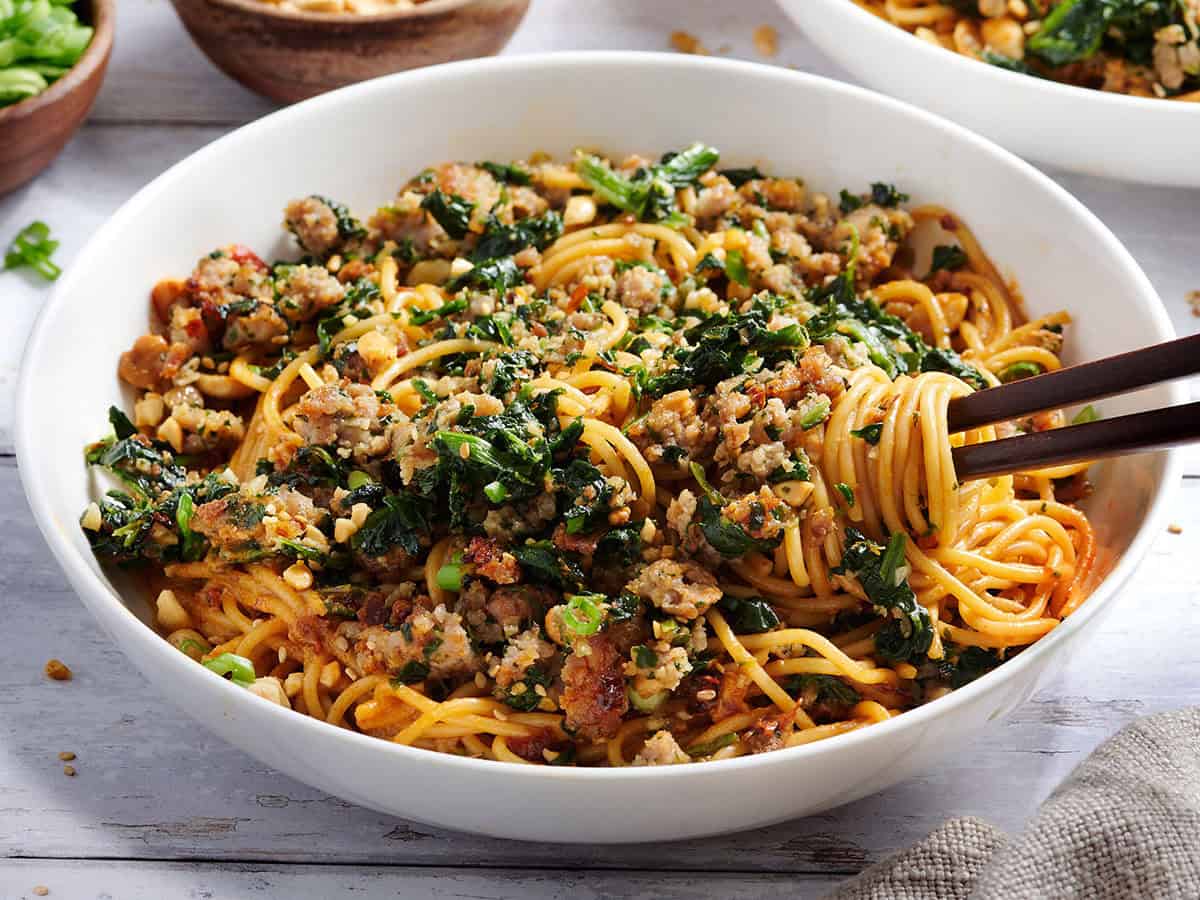
    Divide the noodles into bowls. Top with the pork mixture, sliced **green onions**, and **crushed peanuts**. Serve warm, or refrigerate for a refreshing cold noodle salad.

    Common Mistakes to Avoid

    • Overcooking the Noodles: Remember, the noodles will continue to cook slightly when mixed with the sauce, so undercook them slightly in the pot.
    • Not Reserving Pasta Water: This starchy water is key to achieving a creamy sauce consistency.
    • Skipping the Browning Step: Browning the pork adds depth to the flavor, so don’t skip this crucial step.
    • Overloading on Chili Crisp: Start with a small amount and adjust to avoid overpowering the dish with heat.

    How to Store & Reheat

    Once cooled, store any leftover noodles in an airtight container in the refrigerator. They should last for up to 3 days. To reheat, you can gently warm them in a skillet over medium heat, adding a splash of water to loosen the sauce. Alternatively, enjoy them cold as a noodle salad.

    Ingredient Substitutions

    • Ground Pork: Swap with ground chicken or turkey for a leaner option.
    • Spinach: Use kale or bok choy if spinach isn’t available.
    • Peanut Butter: Almond butter or tahini can be used for a different flavor profile.
    • Soy Sauce: Tamari is a great gluten-free alternative.

    Nutrition Facts

    • Calories: 550 per serving
    • Protein: 25g
    • Fat: 30g
    • Carbohydrates: 50g
    • Serving Size: 1 bowl

    Frequently Asked Questions

    • Can I make this dish vegetarian? Yes, simply omit the pork and increase the amount of spinach or add tofu for protein.
    • What type of noodles work best? While spaghetti works great, you can also use ramen or udon for a more traditional touch.
    • How spicy is this dish? The spice level is moderate but can be adjusted by altering the amount of chili crisp.
    • Can I freeze Dan Dan Noodles? It’s best enjoyed fresh, but you can freeze the pork mixture separately for up to a month.

  • 5-MIN FUEL: Delicious & Versatile Homemade Hummus!

    5-MIN FUEL: Delicious & Versatile Homemade Hummus!

    Introduction & My Personal Story

    Ah, hummus. Every time I whip up a batch, I’m transported back to my childhood kitchen, where the comforting aroma of garlic and tahini would dance through the air. My mother, a culinary genius in her own right, would often prepare this creamy delight as a snack for our bustling family gatherings. It was her go-to dish, not only because of its simplicity but because it brought everyone together around the kitchen table, each of us dipping our pita bread or crunchy veggies into the communal bowl. In my 5 years of experience as a chef and food blogger, I’ve come to realize that this humble dish is much more than a simple snack—it’s a bridge that connects people through taste and tradition. Whether you’re a seasoned cook or a kitchen novice, this 5-minute homemade hummus recipe is a testament to the fact that great food doesn’t have to be complicated. Let’s dive into how you can bring this delicious and versatile dish into your own home.

    Why You’ll Love This Recipe

    • Ready in just 5 minutes, perfect for busy schedules.
    • Rich in protein and fiber, making it a nutritious snack.
    • Versatile base that can be customized with various flavors.
    • Uses simple pantry ingredients you likely already have.
    • Vegan and gluten-free, catering to a wide range of dietary needs.

    Detailed Ingredients

    To make this delicious homemade hummus, gather the following ingredients:

    • 1 can (15 oz) of chickpeas (also known as garbanzo beans). Look for ones without added preservatives for the best flavor.
    • 2 tablespoons of olive oil. Extra virgin is preferred for its robust flavor.
    • ¼ cup of lemon juice, freshly squeezed for a bright, tangy kick.
    • ¼ cup of tahini. Opt for a smooth, high-quality brand to avoid a bitter taste.
    • 1 clove of garlic, peeled. Fresh garlic is key for that spicy undertone.
    • ½ teaspoon of salt. Adjust according to taste.
    • ¼ teaspoon of cumin. Adds a warm, earthy depth to the hummus.
    • Optional: A splash of water to adjust consistency.

    Step-by-Step Instructions

    Step 1: Start by draining and rinsing the can of **chickpeas**. This removes excess sodium and helps to achieve that smooth texture in your hummus. Chef’s Tip: For an extra creamy texture, you can peel the skins off the chickpeas, although it’s not necessary if you’re short on time.

    Step 2: In a food processor, combine the drained **chickpeas**, **olive oil**, **lemon juice**, **tahini**, **garlic**, **salt**, and **cumin**. Pulse the mixture for about 30 seconds to start breaking everything down.

    Step 3: Scrape down the sides of the food processor and continue to pulse until the mixture is smooth and creamy. This should take about 1-2 minutes. If the hummus is too thick, add a splash of water or more **olive oil** and pulse again until you reach your desired consistency.

    Step 4: Taste the hummus and adjust the seasoning as needed. You might want to add more **salt**, **lemon**, or **garlic** depending on your preference.

    Step 5: Serve immediately with pita bread, fresh vegetables, or as a spread for sandwiches. Feel free to customize with flavor variations like roasted red pepper or sun-dried tomato for a unique twist.

    Common Mistakes to Avoid

    • **Using canned chickpeas without rinsing:** This can lead to an overly salty hummus.
    • **Over-processing the mixture:** This can make the hummus too fluffy rather than creamy. Pulse until just smooth.
    • **Skipping the tahini:** Tahini is essential for that authentic hummus flavor. Don’t skip it!
    • **Not tasting as you go:** Always taste and adjust seasonings before serving.

    How to Store & Reheat

    Store your homemade hummus in an airtight container in the refrigerator. It will keep well for up to 5 days. If the hummus separates over time, just give it a good stir before serving. While hummus is best enjoyed fresh, if you need to reheat it, gently warm it in the microwave for 30 seconds, stirring halfway through. However, it’s typically served cold or at room temperature.

    Ingredient Substitutions

    • If you’re out of **tahini**, try using almond butter or sunflower seed butter for a nutty flavor.
    • No **lemon juice**? Lime juice can work in a pinch, though it will alter the flavor slightly.
    • To make it oil-free, replace **olive oil** with a bit of aquafaba (the liquid from the chickpea can) or water.

    Nutrition Facts

    Here’s a quick look at the nutrition profile for a serving size of 2 tablespoons:

    • Calories: 166 kcal
    • Protein: 5 grams
    • Fat: 13 grams
    • Carbs: 9 grams
    • Serving Size: 2 tablespoons

    Frequently Asked Questions

    Q1: Can I use dried chickpeas instead of canned?

    A1: Absolutely! Just be sure to soak and cook them thoroughly before using. It does add extra time but can enhance the flavor.

    Q2: Is it possible to make hummus without a food processor?

    A2: Yes, you can use a blender, though it may require more liquid to achieve the same smoothness. Alternatively, mash with a fork for a chunkier texture.

    Q3: How can I make the hummus spicier?

    A3: Add a pinch of cayenne pepper or a few dashes of hot sauce to the mixture before processing.

    Q4: What are some serving suggestions for hummus?

    A4: Serve with pita bread, fresh veggies, or use as a spread in wraps and sandwiches.

    Q5: Can I freeze hummus?

    A5: Yes, hummus freezes well. Store in an airtight container and freeze for up to 4 months. Thaw in the fridge before serving.


  • LATE NIGHT FUEL: Dive into Filipino Chicken Adobo Tonight!

    LATE NIGHT FUEL: Dive into Filipino Chicken Adobo Tonight!

    Introduction & My Personal Story

    Growing up in a bustling Filipino household, our kitchen was always the heart of the home, especially late at night when the world outside had quieted down. My mother, a true culinary artist, would often prepare a pot of Filipino Chicken Adobo as the clock struck midnight. The aroma of garlic, soy sauce, and vinegar would fill the air, creating a sense of anticipation and comfort. It was during these late-night cooking sessions that I learned the art of creating a dish that was both simple and deeply satisfying. In my 5 years of experience as a professional chef, I’ve come to appreciate the simplicity and depth of flavors this dish offers. It’s not just a meal; it’s an experience that brings people together, even in the wee hours of the night. Today, I’m excited to share this recipe with you, hoping it will become a staple in your own late-night kitchen adventures.

    Why You’ll Love This Recipe

    • Easy to Prepare: Minimal ingredients and straightforward steps.
    • Rich Flavors: Bold and tangy, perfect for a satisfying meal.
    • Versatile: Pairs well with rice or noodles.
    • Great for Meal Prep: Tastes even better the next day.
    • Comfort Food: Brings warmth and nostalgia.

    Detailed Ingredients

    • 1 kg (2.2 lbs) of chicken pieces (thighs and drumsticks work best)
    • 1/2 cup (120 ml) of soy sauce
    • 1/2 cup (120 ml) of white vinegar
    • 2 tablespoons of honey
    • 2 tablespoons of vegetable oil
    • 6 cloves of garlic, minced
    • 3 bay leaves
    • 1 teaspoon of whole black peppercorns
    • Salt to taste (optional)

    Step-by-Step Instructions

    Step 1: Prepare the Marinade
    In a large bowl, whisk together the soy sauce, vinegar, honey, and garlic. Add the bay leaves and peppercorns. This will form the base of the adobo’s signature flavor. Chef’s Tip: For a deeper flavor, let the marinade sit for about 10 minutes before using it.

    Step 2: Marinate the Chicken
    Place the chicken pieces in a large resealable bag or shallow dish. Pour the marinade over the chicken, ensuring each piece is well coated. Seal the bag or cover the dish, then refrigerate for at least 2 hours or overnight for maximum flavor absorption.

    Step 3: Cook the Chicken
    Transfer the marinated chicken with the marinade into a large pot. Add just enough water to cover the chicken. Bring to a boil over medium-high heat, then reduce the heat to low. Cover and simmer for about 30 minutes, or until the chicken is tender and cooked through. Stir occasionally to prevent sticking.

    Step 4: Broil the Chicken
    Preheat your broiler. Transfer the cooked chicken pieces to a broiler pan, reserving the sauce in the pot. Broil the chicken for 5-10 minutes, turning once, until the skin is golden brown and crispy. Chef’s Tip: Keep a close eye on the chicken to prevent burning.

    Step 5: Reduce the Sauce
    While the chicken is broiling, bring the reserved sauce to a boil over medium heat. Let it simmer until it reduces by half, thickening and intensifying in flavor. This will be your glaze.

    Step 6: Glaze the Chicken
    Remove the broiled chicken from the oven and brush generously with the reduced sauce. Alternatively, you can toss the chicken in the sauce to coat it thoroughly.

    Step 7: Serve and Enjoy
    Serve your Filipino Chicken Adobo hot over steamed rice or noodles, letting the sauce soak into the grains for an extra burst of flavor.

    Common Mistakes to Avoid

    • Skipping the Marination: Don’t rush this step; it’s crucial for flavor.
    • Overcooking the Chicken: Keep an eye on the time to ensure the chicken remains juicy.
    • Too Much Vinegar: Balance is key; adjust to your taste preference.
    • Not Reducing the Sauce: This step is essential for a rich, concentrated glaze.

    How to Store & Reheat

    To store leftovers, place the chicken and sauce in an airtight container and refrigerate for up to 3 days. For freezing, store in a freezer-safe container for up to 2 months. To reheat, warm in a skillet over medium heat until heated through, adding a splash of water if necessary to loosen the sauce.

    Ingredient Substitutions

    • Soy Sauce: Use tamari or coconut aminos for a gluten-free option.
    • White Vinegar: Substitute with apple cider vinegar for a milder taste.
    • Honey: Replace with brown sugar or maple syrup for a different sweetness profile.
    • Chicken Pieces: Use boneless chicken thighs for quicker cooking.

    Nutrition Facts

    • Calories: 320 per serving
    • Protein: 28g
    • Fat: 18g
    • Carbs: 8g
    • Serving Size: 1 piece of chicken with sauce

    Frequently Asked Questions

    • Can I use other meats for adobo? Yes, pork or beef can be used, but cooking times will vary.
    • Is chicken adobo spicy? Traditional adobo is not spicy, but you can add chili for heat.
    • What sides go well with adobo? Steamed rice, vegetables, or a fresh salad pair well.
    • Can I skip the broiling step? Yes, but broiling adds a delightful crispiness to the chicken.
    • How can I make the dish less salty? Use low-sodium soy sauce and adjust to taste.

  • 5-MIN FUEL: Zesty Cauliflower Tabbouleh That’s Easy on the Wallet!

    5-MIN FUEL: Zesty Cauliflower Tabbouleh That’s Easy on the Wallet!

    Introduction & My Personal Story

    Ah, the delightful zing of a fresh tabbouleh. Growing up, I always associated tabbouleh with long, leisurely family lunches. It was a dish my grandmother would prepare with meticulous care, chopping each ingredient with precision. Fast forward to my culinary journey, and I’ve found ways to keep the essence of this classic dish while adapting it to our fast-paced lives. Enter the 5-Minute Zesty Cauliflower Tabbouleh—a modern twist on a traditional favorite. In my 5 years of experience as a chef, I’ve learned that sometimes the best dishes are those that marry convenience with flavor. This recipe does just that, offering a quick, refreshing bite that’s perfect for those days when time is of the essence but quality cannot be compromised. My love for tabbouleh has only grown over the years, and this cauliflower version has become my go-to when I crave a light, nutritious meal that packs a punch of flavor without requiring a lot of time in the kitchen.

    Why You’ll Love This Recipe

    • Quick and easy—ready in just 5 minutes.
    • Healthy and low-calorie, only 71 kcal per serving.
    • Budget-friendly ingredients.
    • Gluten-free, thanks to the cauliflower rice.
    • Full of fresh, vibrant flavors.
    • Perfect for meal prep and busy days.

    Detailed Ingredients

    To create this quick and zesty tabbouleh, you’ll need:

    • 1 small head of cauliflower (about 500g), riced
    • 1 cup (150g) diced Roma tomatoes, seeds removed
    • 1 lemon, juiced (about 2 tablespoons)
    • 1 bunch curly parsley (about 50g), minced
    • 1 bunch mint (about 20g), minced
    • 3 green onions (green parts only), minced
    • 2 tablespoons olive oil
    • Salt and pepper to taste

    When shopping, look for fresh, vibrant greens and firm tomatoes. The cauliflower should be free of brown spots, and the herbs should be fragrant and lush.

    Step-by-Step Instructions

    Creating this dish is as easy as it is rewarding. Here’s how:

    Step 1: Gather and Prep Your Ingredients

    First, ensure all your ingredients are ready to go. Remove the thick stems from the mint, slice the lemon in half, seed and dice your Roma tomatoes, and mince the green parts of your green onions.

    Step 2: Rice the Cauliflower

    Break the cauliflower into florets and pulse them in a food processor until they resemble rice grains. Chef’s Tip: Be careful not to over-process, as you want the pieces to maintain a bit of bite.

    Step 3: Mince the Herbs

    Trim the stems from the parsley and mint, then finely chop them. These herbs are key to the dish’s fresh flavor profile, so take your time to chop them finely.

    Step 4: Combine the Ingredients

    In a large mixing bowl, combine the riced cauliflower, diced tomatoes, minced herbs, and green onions. Give everything a gentle toss to mix.

    Step 5: Season and Dress

    Add salt and pepper to taste, squeeze in the fresh lemon juice, and drizzle with olive oil. Toss the salad gently to ensure the dressing coats all the ingredients evenly.

    Step 6: Serve and Enjoy

    Serve this tabbouleh fresh for the best flavor. It pairs beautifully with grilled meats or can be enjoyed on its own as a light, refreshing meal.

    Common Mistakes to Avoid

    • **Over-processing the cauliflower**: This can lead to a mushy texture. Pulse it gently until it resembles rice.
    • **Using too much lemon juice**: While lemon is essential, too much can overpower the dish. Start with one lemon and adjust to taste.
    • **Skipping the de-seeding step for tomatoes**: Seeds can make the tabbouleh watery. Always remove them before dicing.
    • **Not drying herbs properly**: Ensure your herbs are dry after washing to prevent a soggy salad.

    How to Store & Reheat

    This tabbouleh is best enjoyed fresh, but it can be stored in an airtight container in the refrigerator for up to 2 days. If you need to reheat it, do so gently on low heat in a non-stick pan, but be aware that it’s meant to be a cold salad.

    Ingredient Substitutions

    • **Cauliflower**: Substitute with broccoli rice for a different flavor.
    • **Roma tomatoes**: Use cherry tomatoes for a sweeter taste.
    • **Olive oil**: Avocado oil works well if you’re looking for a different fat.
    • **Mint**: If you’re not a fan, basil can add a unique twist.

    Nutrition Facts

    • Calories: 71 kcal per serving
    • Protein: 2g
    • Fat: 5g
    • Carbohydrates: 6g
    • Serving Size: 1 cup

    Frequently Asked Questions

    Can I make this dish ahead of time?

    Yes, you can prepare the ingredients ahead of time, but it’s best to combine and dress them just before serving to maintain freshness.

    Is this recipe suitable for a keto diet?

    Absolutely! With its low-carb ingredients, this tabbouleh fits well into a keto lifestyle.

    What can I serve with cauliflower tabbouleh?

    It pairs wonderfully with grilled chicken, lamb, or even as a topping for falafel wraps.

    How can I make this dish spicier?

    Add a pinch of red pepper flakes or finely diced jalapeño to bring some heat.

    Can I freeze this tabbouleh?

    Freezing is not recommended as the texture of the cauliflower and herbs will change.

  • Hustle Fuel: Taco Pasta in a Flash – Your Quick One-Pot Meal!

    Hustle Fuel: Taco Pasta in a Flash – Your Quick One-Pot Meal!

    Introduction & My Personal Story

    Taco Pasta in a Flash – just the name conjures up memories of bustling weeknights and the comforting aroma of spices wafting through my kitchen. I remember the first time I decided to whip up this dish. It was one of those hectic evenings where both my energy and time were running low. With a hungry family to feed and a looming deadline, I needed something quick, satisfying, and packed with flavor. That’s when the idea of merging two beloved comfort foods – tacos and pasta – struck me. The concept was simple: take the robust flavors of taco seasoning, the heartiness of pasta, and the creamy allure of melted cheese, all cooked in one pot to save on time and cleanup. In that moment, Taco Pasta in a Flash was born. In my 5 years of experience as a chef, I’ve learned that the best meals are often the simplest, and this recipe is now a staple in our household. Every time I make it, it brings me back to that first night – the joy on my family’s faces, the relief of a quick meal, and the satisfaction of a dish that feels like a warm hug after a long day.

    Why You’ll Love This Recipe

    • Quick and easy – ready in under 30 minutes.
    • One-pot wonder – minimal cleanup required.
    • Rich in flavor – combines the best of tacos and pasta.
    • Customizable – easily adjust spices and toppings to taste.
    • Family-friendly – a hit with both kids and adults.

    Detailed Ingredients

    • Olive oil: 1 tablespoon – look for extra virgin for added flavor.
    • Onion: 1 medium, diced – choose firm and bright-colored onions.
    • Garlic: 2 cloves, minced – fresh cloves for that authentic aroma.
    • Ground beef: 500 grams (about 1 pound) – opt for lean to avoid excess grease.
    • Taco seasoning: 2 tablespoons – store-bought or homemade.
    • Diced tomatoes: 1 can (400 grams/14 ounces) – with green chiles for extra kick.
    • Pasta: 250 grams (about 2 cups) – choose short pasta like penne or rotini.
    • Beef broth: 2 cups – adds depth to the sauce.
    • Cheddar cheese: 1 cup, shredded – sharp cheddar melts beautifully.
    • Green onions: 2, sliced – for garnish.

    Step-by-Step Instructions

    Step 1: Sauté Aromatics
    Begin by heating the olive oil in a deep skillet over medium heat. Add the diced onion and minced garlic. Sauté for about 2-3 minutes, or until the onion turns translucent and the garlic is fragrant. This forms the flavor base of our dish, so make sure not to rush this step.

    Step 2: Cook Meat
    Increase the heat slightly and add the ground beef to the skillet. Sprinkle the taco seasoning over the meat. Cook, stirring frequently, until the beef is browned and fully cooked through. This should take about 5-7 minutes. Chef’s Tip: Break up the meat with your spatula as it cooks to ensure even browning.

    Step 3: Combine Ingredients
    Stir in the can of diced tomatoes with green chiles, including all the juices. This will help deglaze the pan and infuse the beef with tangy tomato flavors.

    Step 4: Add Pasta
    Pour in the uncooked pasta and beef broth. Stir well to combine, ensuring that the pasta is mostly submerged in the liquid. The pasta will absorb the flavors as it cooks.

    Step 5: Simmer
    Bring the mixture to a gentle boil, then reduce the heat to medium-low, cover the skillet, and let it simmer. Cook for about 10 minutes, stirring occasionally, until the pasta is tender and the liquid has thickened into a sauce.

    Step 6: Cheese It Up
    Remove the skillet from heat and sprinkle the shredded cheddar cheese over the top. Stir until the cheese is fully melted and the dish is creamy. Garnish with sliced green onions before serving for a fresh pop of color and flavor.

    Common Mistakes to Avoid

    • Overcooking the pasta: Make sure to check the pasta a few minutes before the suggested cooking time to prevent it from becoming mushy.
    • Not using enough liquid: The pasta needs sufficient liquid to cook properly. If it looks dry, add a little more broth.
    • Skipping the stirring: Stirring occasionally while simmering ensures even cooking and prevents sticking.

    How to Store & Reheat

    Allow any leftovers to cool completely before transferring them to an airtight container. Store in the refrigerator for up to 3 days. To reheat, place the pasta in a skillet over medium heat, adding a splash of water or broth to loosen the sauce. Stir occasionally until heated through.

    Ingredient Substitutions

    • Ground beef: Can be swapped with ground turkey or chicken for a lighter option.
    • Cheddar cheese: Try Monterey Jack or a Mexican cheese blend for different flavors.
    • Pasta: Whole wheat or gluten-free pasta can be used to suit dietary preferences.

    Nutrition Facts

    • Calories: 376 kcal per serving
    • Protein: 18 g
    • Fat: 20 g
    • Carbohydrates: 28 g
    • Serving Size: Approximately 1.5 cups

    Frequently Asked Questions

    • Can I make this dish ahead of time?
      Yes, you can prepare it a day in advance. Store in the fridge and reheat as needed.
    • Is it possible to freeze Taco Pasta?
      Absolutely! Freeze in a sealed container for up to 2 months. Thaw in the fridge before reheating.
    • What if I don’t have taco seasoning?
      You can make your own by mixing chili powder, cumin, paprika, onion powder, and garlic powder.
    • Can I add vegetables?
      Certainly! Bell peppers or corn can be added for extra texture and flavor.