Tag: Fuel

  • LATE NIGHT FUEL: My Homemade Teriyaki Sauce Outshines Store-Bought Every Time!

    LATE NIGHT FUEL: My Homemade Teriyaki Sauce Outshines Store-Bought Every Time!

    Introduction & My Personal Story

    There’s something magical about creating a sauce that can transform any dish into a mouthwatering masterpiece. My journey with homemade teriyaki sauce began during a late-night cooking session in my early culinary days. Picture this: it was a Friday night, and after a long week, I found solace in my kitchen. I had a craving for something savory and sweet but didn’t want to rely on the store-bought bottles that often left me wanting more. So, I decided to whip up my own version of teriyaki sauce. As I combined the ingredients, the familiar aroma of soy sauce, brown sugar, and freshly minced garlic filled the air. That’s when I realized the true power of homemade cooking.

    In my 5 years of experience, I’ve learned that the secret to an unforgettable teriyaki sauce lies in the balance of flavors. The ginger adds a zing, the garlic provides depth, and the brown sugar offers just the right amount of sweetness. That night, as I tasted my creation, I knew I had stumbled upon something special. It was a sauce that could outshine any store-bought version, and it has been my go-to ever since. Whether it’s for a quick stir-fry or as a glaze on grilled chicken, this sauce has become a staple in my kitchen, and I can’t wait to share it with you.

    Why You’ll Love This Recipe

    • Quick and easy to prepare, perfect for late-night cravings.
    • Uses simple pantry ingredients that you likely already have.
    • Customizable thickness with optional cornstarch.
    • Enhances the flavor of meat, tofu, or vegetables.
    • Free from preservatives and artificial flavors found in store-bought versions.

    Detailed Ingredients

    Here’s what you’ll need to make this fantastic teriyaki sauce:

    • 1/4 cup soy sauce (60 ml) – Opt for a low-sodium version if preferred.
    • 3 tablespoons brown sugar (45 grams) – Packed tightly.
    • 1 tablespoon water (15 ml) – To help dissolve the sugar.
    • 1 clove garlic, minced – Freshly minced for the best flavor.
    • 1 teaspoon grated ginger – Fresh ginger root for that zing.
    • Optional: 1 tablespoon cornstarch (8 grams) – For thickening the sauce.

    Step-by-Step Instructions

    Let’s dive into making this teriyaki sauce that will surely become a staple in your kitchen.

    Step 1: Mix the Marinade

    In a medium-sized bowl, combine 1/4 cup soy sauce, 3 tablespoons brown sugar, 1 tablespoon water, 1 clove of minced garlic, and 1 teaspoon grated ginger. Stir until the sugar is completely dissolved. Chef’s Tip: Use a whisk to ensure the ingredients are well combined and the sugar isn’t settling at the bottom.

    Step 2: Marinate Your Choice of Protein

    Pour the marinade over your choice of protein, such as chicken, tofu, or fish. Allow it to marinate for at least 15-30 minutes to let the flavors penetrate. If you’re short on time, even a quick 10-minute soak will do wonders. Chef’s Tip: For a deeper flavor, marinate overnight in the refrigerator.

    Step 3: Thicken the Sauce (Optional)

    If you prefer a thicker sauce, mix 1 tablespoon cornstarch with 1/2 cup water until smooth. Add this mixture to the marinade and transfer to a saucepan. Simmer over medium heat, whisking continuously until the sauce thickens and coats the back of a spoon. This should take about 5 minutes.

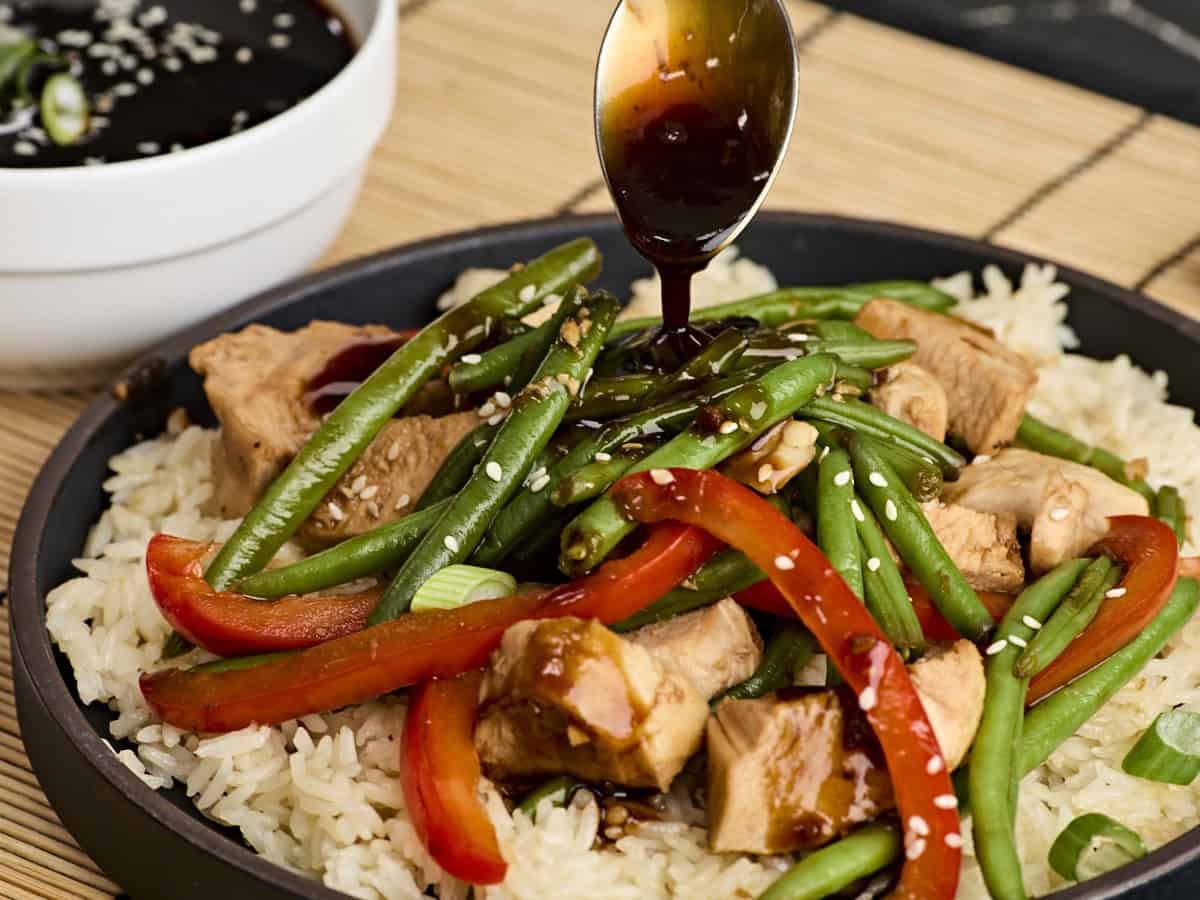
    Step 4: Use in Stir-Fry or as a Glaze

    Once your sauce is ready, add it directly to a hot pan of stir-fried vegetables or protein for an instant flavor boost. Alternatively, brush it onto grilled or baked items during the last few minutes of cooking for a delightful glaze.

    Common Mistakes to Avoid

    • Using too much cornstarch can make the sauce overly thick and gloopy. Stick to the recommended amount.
    • Over-marinating can result in a too-salty dish, especially with soy sauce. Keep marinating time under 24 hours.
    • Not simmering the sauce long enough can prevent proper thickening. Ensure you whisk continuously to avoid lumps.

    How to Store & Reheat

    Once your sauce is prepared, allow it to cool completely. Transfer it to an airtight container or jar and refrigerate. It will keep fresh for up to one week. To reheat, simply warm it in a saucepan over low heat, stirring occasionally. If it thickens too much in the fridge, add a splash of water to reach your desired consistency.

    Ingredient Substitutions

    Need to make some swaps? No problem! Here are some safe substitutions:

    • For a gluten-free version, use tamari instead of soy sauce.
    • Replace brown sugar with honey or maple syrup for a different sweetness profile.
    • If fresh ginger is unavailable, use 1/4 teaspoon of ground ginger.

    Nutrition Facts

    Here’s the nutritional breakdown per serving (approximately 2 tablespoons):

    • Calories: 40
    • Protein: 1g
    • Fat: 0g
    • Carbohydrates: 10g
    • Serving Size: 2 tablespoons

    Frequently Asked Questions

    • Can I make this sauce ahead of time? Yes, it stores well in the refrigerator for up to a week.
    • Is this sauce vegan? Yes, all the ingredients are plant-based.
    • Can I freeze the sauce? Absolutely! Freeze in a sealed container for up to 3 months. Thaw overnight in the fridge before use.
    • How can I make it spicier? Add a pinch of red pepper flakes or a dash of hot sauce to the marinade.
    • What can I use this sauce for? It’s perfect for stir-fries, marinades, glazes, or even as a dipping sauce.

  • 5-MIN FUEL: 17 Delicious Stir-Fry Recipes on a Budget!

    5-MIN FUEL: 17 Delicious Stir-Fry Recipes on a Budget!

    Introduction & My Personal Story

    Let me take you back to a time when I was just starting out in the bustling world of culinary arts. I was a novice chef, working my way through the ranks in a busy kitchen. It was during this period that I discovered the magic of the quick vegetable stir-fry. Picture this: a late night after a grueling shift, with only a handful of ingredients left in the pantry. I was hungry, tired, and in desperate need of a meal that would not only satisfy my hunger but also lift my spirits. That’s when I stumbled upon the idea of a simple stir-fry.

    Armed with a few bell peppers, some broccoli, and a carrot or two, I heated up a trusty skillet. I remember the sizzle of the oil as I tossed in the chopped vegetables, the vibrant colors coming to life in the pan. In just a few minutes, my kitchen was filled with the mouth-watering aroma of garlic and ginger mingling with soy sauce. That night, I learned the art of creating something extraordinary from the simplest of ingredients, and it was a revelation. The quick vegetable stir-fry became my go-to dish, a symbol of resourcefulness and culinary creativity. It’s a dish that has stayed with me over the years, and I’m thrilled to share it with you.

    Why You’ll Love This Recipe

    • Quick and easy: Ready in just 5 minutes.
    • Budget-friendly: Uses simple, affordable ingredients.
    • Healthy: Packed with vitamins and nutrients.
    • Versatile: Customize with your favorite vegetables.
    • Low-calorie: Perfect for those watching their intake, with an estimated 300 kcal.

    Detailed Ingredients

    Here’s what you’ll need for this delightful stir-fry:

    • **1 tablespoon vegetable oil** – Look for a neutral oil like canola or sunflower.
    • **1 cup bell peppers**, sliced – Choose a mix of red, yellow, and green for color.
    • **1 cup broccoli florets** – Fresh is best, but frozen works in a pinch.
    • **1/2 cup carrots**, julienned – Adds a touch of sweetness and crunch.
    • **2 tablespoons soy sauce** – Opt for low-sodium if preferred.
    • **2 cloves garlic**, minced – Fresh garlic enhances the flavor.
    • **1 teaspoon fresh ginger**, grated – Adds warmth and depth.

    Step-by-Step Instructions

    Let’s dive into the process of creating this vibrant stir-fry:

    Step 1: Prepare Your Vegetables

    Start by washing and slicing your **bell peppers**, **broccoli**, and **carrots**. Aim for uniform sizes to ensure even cooking. Chef’s Tip: Use a sharp knife to make prep quicker and safer.

    Step 2: Heat the Skillet

    Place a large skillet over medium-high heat and add **1 tablespoon of vegetable oil**. Allow the oil to heat up until it shimmers. This indicates it’s ready for the vegetables.

    Step 3: Stir-Fry the Vegetables

    Carefully add the sliced vegetables to the hot skillet. Stir them continuously for about 2-3 minutes. You’re looking for them to become slightly tender yet still vibrant in color.

    Step 4: Add Flavor

    In a small bowl, combine **2 tablespoons soy sauce**, **2 minced garlic cloves**, and **1 teaspoon grated ginger**. Pour this mixture over the vegetables in the skillet. Stir everything together for an additional minute, ensuring the vegetables are well-coated with the sauce.

    Step 5: Serve

    Transfer the stir-fry to a plate and serve it hot over a bed of cooked rice or quinoa for a complete meal. Chef’s Tip: Garnish with sesame seeds or chopped green onions for an added touch of flavor.

    Common Mistakes to Avoid

    • **Overcrowding the Pan:** This leads to steaming rather than stir-frying. Use a large enough skillet to allow the vegetables to cook evenly.
    • **Not Preheating the Oil:** Adding vegetables to cold oil results in a soggy texture. Ensure the oil is hot before adding your ingredients.
    • **Overcooking the Vegetables:** Stir-frying is quick. Keep an eye on the vegetables to maintain their crunch and color.

    How to Store & Reheat

    Store any leftovers in an airtight container in the refrigerator for up to 3 days. To reheat, simply place the stir-fry in a skillet over medium heat, stirring occasionally until warmed through. Alternatively, microwave it in a microwave-safe dish for 1-2 minutes.

    Ingredient Substitutions

    • **Vegetable Oil:** Swap with olive oil or sesame oil for a different flavor profile.
    • **Soy Sauce:** Tamari or coconut aminos are great gluten-free alternatives.
    • **Broccoli:** Cauliflower or snap peas can be used if you prefer.

    Nutrition Facts

    • Calories: 300 kcal
    • Protein: 5g
    • Fat: 10g
    • Carbohydrates: 45g
    • Serving Size: 1 cup

    Frequently Asked Questions

    Can I use frozen vegetables?

    Yes, frozen vegetables are a convenient option. Just be sure to thaw them before cooking to avoid excess moisture in the pan.

    What other vegetables can I add?

    Feel free to add mushrooms, zucchini, or snow peas for additional variety and flavor.

    Is this dish vegan?

    Yes, as long as you use a plant-based oil and soy sauce, this stir-fry is completely vegan.

    Can I add protein to the stir-fry?

    Absolutely! Tofu, chicken, or shrimp make excellent protein additions to this dish.

    How can I make it spicier?

    Add a dash of chili flakes or a splash of sriracha for a spicy kick.

  • LATE NIGHT FUEL: Homemade Egg Rolls That Outshine Takeout (and Cost Just Pennies!)

    LATE NIGHT FUEL: Homemade Egg Rolls That Outshine Takeout (and Cost Just Pennies!)

    Introduction & My Personal Story

    There was a time, during my culinary school days, when late-night cravings would often strike amidst marathon study sessions. The cafeteria was closed, and my options were limited, but my hunger was fierce. It was during these late hours that I stumbled upon the perfect solution: **Homemade Egg Rolls**. They were not only a delicious treat but also a cost-effective way to fuel my brain for those long nights. I remember the first time I decided to make them from scratch, outshining any takeout I had ever tried. The crispiness of the baked wrapper, the savory filling of vegetables, and the aroma filling my tiny student kitchen were simply unforgettable. Over time, these egg rolls became my go-to recipe, and I discovered that they were not just a snack but a symbol of those hardworking nights. In my 5 years of experience as a chef, I’ve refined this recipe to perfection, making it a reliable companion for anyone needing a late-night boost.

    Why You’ll Love This Recipe

    • Cost-Effective: These egg rolls cost just pennies compared to takeout.
    • Healthier Option: Baked instead of fried, they offer all the crunch without the guilt.
    • Customizable: Easily adaptable with your favorite ingredients.
    • Easy Preparation: Simple steps make it accessible for any skill level.
    • Perfect for Meal Prep: Make a batch and store for later cravings.

    Detailed Ingredients

    Here’s what you’ll need to make these delicious egg rolls:

    • 1 tablespoon vegetable oil (15 ml)
    • 3 medium green onions, sliced (about 45 grams)
    • 2 small garlic cloves, minced (about 6 grams)
    • 1 inch fresh ginger, peeled and grated (about 10 grams)
    • 4 ounces mushrooms, cleaned and sliced (about 115 grams)
    • 2 medium carrots, peeled and grated (about 100 grams)
    • 1 small head green cabbage, cored and thinly sliced (about 450 grams)
    • ½ tablespoon cornstarch (7 grams)
    • ¼ cup soy sauce (60 ml)
    • 1 teaspoon sesame oil (5 ml)
    • 20 egg roll wrappers
    • Non-stick cooking spray

    When shopping, look for fresh and crisp vegetables. The cabbage should be firm, and the mushrooms clean and free of spots.

    Step-by-Step Instructions

    Here’s how to make these egg rolls, step-by-step:

    Step 1: Prep Your Veggies

    Start by cleaning and cutting all your vegetables. Grate the carrots and ginger, and slice the green onions and mushrooms. This prep work will ensure a smooth cooking process.

    Step 2: Sauté Aromatics

    In a large skillet, heat the vegetable oil over medium heat. Add the sliced green onions, minced garlic, and grated ginger. Sauté for about 1-2 minutes until they’re softened and fragrant. Chef’s Tip: Keep an eye on the garlic to ensure it doesn’t burn, which can turn it bitter.

    Step 3: Add Mushrooms

    Next, add the sliced mushrooms to the skillet. Cook them until they release their moisture and start to brown slightly, about 5 minutes.

    Step 4: Mix in Other Veggies

    Add the grated carrots and sliced cabbage to the skillet. Stir everything together and cook until the cabbage wilts and becomes tender, around 10 minutes.

    Step 5: Prepare the Sauce

    In a small bowl, dissolve the cornstarch in the soy sauce. Pour this mixture over the veggies in the skillet, stirring to create a light glaze. Add the sesame oil and turn off the heat. Taste the mixture and adjust the seasoning if needed.

    Step 6: Fill the Egg Rolls

    Lay an egg roll wrapper on a clean surface. Place about 1/4 cup of the filling slightly off-center. Fold the bottom corner over the filling, then fold the sides in, and roll it up tightly. Use a little water to seal the edges.

    Step 7: Preheat the Oven

    Preheat your oven to 425°F (220°C). Line a baking sheet with aluminum foil and lightly spray it with non-stick cooking spray. Place the egg rolls on the sheet and lightly spray the tops as well.

    Step 8: Bake

    Bake the egg rolls for 20-25 minutes, turning them halfway through, until they’re golden brown and crispy. Let them cool slightly before serving.

    Common Mistakes to Avoid

    Here are some pitfalls to watch out for:

    • Overstuffing: This can cause the rolls to burst while baking. Stick to about 1/4 cup of filling per wrapper.
    • Not sealing properly: Use enough water to ensure the edges are sealed, preventing leaks.
    • Skipping the flip: Flipping the rolls halfway ensures even browning.

    How to Store & Reheat

    To store leftover egg rolls, let them cool completely and place them in an airtight container. They will keep in the refrigerator for up to 3 days. For longer storage, freeze them for up to 2 months.

    To reheat, preheat your oven to 350°F (175°C) and bake the egg rolls for about 10 minutes until heated through and crispy.

    Ingredient Substitutions

    If you’re missing an ingredient or need to adapt the recipe, here are some substitutions:

    • Mushrooms: Substitute with bell peppers or zucchini for a different texture.
    • Green Cabbage: Use napa cabbage or even bok choy.
    • Soy Sauce: Tamari or coconut aminos work as gluten-free alternatives.

    Nutrition Facts

    • Calories: 150 per egg roll
    • Protein: 4 grams
    • Fat: 3 grams
    • Carbs: 25 grams
    • Serving Size: 1 egg roll

    Frequently Asked Questions

    • Can I fry these egg rolls instead of baking?
      Yes, you can fry them in vegetable oil until golden brown for a crispier texture.
    • Can I make these egg rolls ahead of time?
      Absolutely! Assemble them and keep them in the fridge for up to a day before baking.
    • What dipping sauce pairs well with these egg rolls?
      A sweet chili sauce or soy sauce with a splash of lime is delicious.
    • Are these egg rolls vegan?
      Yes, they are vegan as long as you use vegan-friendly egg roll wrappers.
    • Can I add protein to this recipe?
      Certainly! Add cooked shrimp, chicken, or tofu for extra protein.

  • 5-MIN FUEL: Love at First Bite White Bean Skillet!

    5-MIN FUEL: Love at First Bite White Bean Skillet!

    Introduction & My Personal Story

    There’s something magical about a dish that can be whipped up in a flash yet tastes like it’s been simmering for hours. My 5-Minute Fuel: Love at First Bite White Bean Skillet is exactly that kind of dish. It takes me back to my college days when time was of the essence, and sustenance needed to be both quick and nourishing. I remember those late nights spent cramming for exams, my mind craving something more than just caffeine. I stumbled upon this recipe almost by accident, combining the ingredients I had on hand in a moment of desperation. Little did I know, it would become a staple in my kitchen.

    In my 5 years of experience as a chef, I’ve learned that the simplest dishes often bring the most joy. This white bean skillet is no exception. Its creamy texture and rich flavors are a testament to the beauty of minimalism in cooking. Whether you’re a busy professional or a parent juggling multiple tasks, this dish provides the perfect balance of ease and satisfaction. It’s a dish that has seen me through countless busy weeks, and I promise it will become a favorite in your household too.

    Why You’ll Love This Recipe

    • Quick and Easy: Ready in under 10 minutes.
    • Nutritious: Packed with protein and fiber from the white beans.
    • Versatile: Can be served with crusty bread, over rice, or even pasta.
    • Flavorful: Rich in herbs and spices, creating a delightful taste.
    • Minimal Cleanup: Only requires one skillet.

    Detailed Ingredients

    • 2 tablespoons sun-dried tomato oil (or olive oil)
    • 1 medium onion, diced (about 150 grams)
    • 3 cloves garlic, minced
    • 1/2 teaspoon red pepper flakes
    • 2 cans (15 oz each) white beans, with liquid
    • 1 cup vegetable broth
    • 1/2 cup sun-dried tomatoes, chopped
    • 1 teaspoon salt
    • 1 teaspoon Italian seasoning
    • 1 cup thawed spinach, squeezed dry
    • 1/2 cup heavy cream
    • 1/4 cup grated Parmesan cheese
    • Fresh basil for garnish

    Step-by-Step Instructions

    Step 1: Gather Ingredients – Before you start cooking, make sure all your ingredients are prepped and ready to go. This will make the cooking process smoother and faster. Chef’s Tip: Use the oil from the jar of sun-dried tomatoes for extra flavor.

    Step 2: Heat Oil – In a large skillet, heat the sun-dried tomato oil over medium heat. You’ll want the oil to shimmer but not smoke, indicating it’s the perfect temperature to start sautéing.

    Step 3: Sauté Aromatics – Add the diced onion, minced garlic, and red pepper flakes to the skillet. Cook for 2-3 minutes until the onions are translucent and the garlic is fragrant. Stir occasionally to prevent burning.

    Step 4: Combine Ingredients – Stir in the white beans (including their liquid), vegetable broth, chopped sun-dried tomatoes, salt, and Italian seasoning. Increase the heat slightly and bring to a gentle boil.

    Step 5: Simmer – Reduce the heat to low and let the mixture simmer for about 15 minutes. This allows the flavors to meld together beautifully. You’ll notice the liquid reducing and thickening slightly.

    Step 6: Add Creaminess – Stir in the thawed spinach, heavy cream, and Parmesan cheese. Allow the mixture to simmer for an additional 5 minutes until it’s creamy and the spinach is fully incorporated.

    Step 7: Serve Up – Spoon the white bean skillet into bowls and garnish with fresh basil. Serve warm with crusty bread or over rice. Enjoy the comforting, rich flavors!

    Common Mistakes to Avoid

    • Skipping the Sauté: The sauté step builds the flavor base. Don’t rush it.
    • Overcooking the Beans: They should be tender but not mushy. Keep an eye on the simmer time.
    • Using Stale Spices: Ensure your spices are fresh for maximum flavor.
    • Forgetting to Adjust Seasoning: Taste before serving and adjust salt and pepper as needed.

    How to Store & Reheat

    To store, transfer the leftovers to an airtight container and refrigerate for up to 3 days. For longer storage, place in a freezer-safe container and freeze for up to 2 months.

    To reheat, simply warm on the stove over medium heat until heated through. If the mixture is too thick, add a splash of broth or water. For frozen portions, thaw in the refrigerator overnight before reheating.

    Ingredient Substitutions

    • Beans: You can swap white beans for chickpeas or cannellini beans.
    • Heavy Cream: Substitute with coconut milk for a dairy-free option.
    • Spinach: Kale or swiss chard can be used if preferred.
    • Parmesan Cheese: Nutritional yeast can be used for a vegan option.

    Nutrition Facts

    • Calories: 313 kcal per serving
    • Protein: 12g
    • Fat: 16g
    • Carbs: 32g
    • Serving Size: 1 cup

    Frequently Asked Questions

    • Can I use fresh tomatoes instead of sun-dried? Yes, but you may need to add a bit more salt to compensate for the reduced intensity of flavor.
    • Is this dish suitable for meal prep? Absolutely! It’s perfect for preparing in advance and reheats well.
    • What can I serve this dish with? It’s great with crusty bread, over rice, or tossed with pasta.
    • Can I make this dish vegan? Yes, simply substitute the heavy cream with coconut milk and the Parmesan with nutritional yeast.

  • LATE NIGHT FUEL: Sip Your Way to Cozy with This Comforting Homemade Golden Milk ✨

    LATE NIGHT FUEL: Sip Your Way to Cozy with This Comforting Homemade Golden Milk ✨

    Introduction & My Personal Story

    Picture this: It’s a chilly night, and the moonlight is spilling through the windows. After a long day, I find myself craving something comforting yet nourishing. That’s when I remember the first time I discovered the magic of Golden Milk. About five years ago, during a culinary trip to India, I was introduced to this warm, golden elixir. It was a late night in Jaipur, the air was filled with the scent of spices, and I was exhausted after a day of exploring. A local chef offered me a cup of golden milk, and with the first sip, I was enveloped in warmth and comfort. The blend of turmeric, cinnamon, and ginger was unlike anything I had tasted before, and I knew I had stumbled upon something special.

    Fast forward to today, as a chef with five years of experience, I’ve perfected this recipe to suit late-night hustlers like you and me. It’s not just a drink; it’s an experience—a hug in a mug that recharges the spirit and fuels the night’s endeavors. Whether you’re burning the midnight oil on a project or simply winding down after a long day, this homemade Golden Milk is your go-to beverage for those cozy, late-night moments.

    Why You’ll Love This Recipe

    • Rich in antioxidants from **turmeric** and **cinnamon**.
    • Helps promote relaxation and better sleep.
    • Easy to make with ingredients you likely have at home.
    • Customizable to suit your taste preferences and dietary needs.
    • Offers a caffeine-free energy boost for late-night productivity.

    Detailed Ingredients

    • 1½ teaspoons turmeric – Look for organic turmeric for the best flavor and health benefits.
    • 1 teaspoon vanilla extract – Pure vanilla extract enhances the flavor profile.
    • ½ teaspoon cinnamon – Ground cinnamon adds warmth and sweetness.
    • ¼ teaspoon cardamom – Freshly ground cardamom is preferred for its aromatic qualities.
    • ¼ teaspoon black pepper – Essential for activating the curcumin in turmeric.
    • 1 can coconut milk (400ml) – Full-fat coconut milk gives a creamy texture.
    • 2 cups milk (almond, coconut, or whole) – Choose your preferred milk for the base.
    • Honey – Add to taste for sweetness.
    • Fresh ginger – A thumb-sized piece, grated for a spicy kick.

    Step-by-Step Instructions

    Step 1: Gather Ingredients
    Before starting, ensure you have all the ingredients ready. This will make the process smoother and more enjoyable. Measure out **turmeric**, **vanilla extract**, **cinnamon**, **cardamom**, and **black pepper**. Open your can of **coconut milk** and have your chosen **milk** ready. Grate the **fresh ginger** and have **honey** on standby for later.

    Step 2: Combine in a Pot
    In a medium-sized saucepan, combine the **turmeric**, **vanilla extract**, **cinnamon**, **cardamom**, **black pepper**, **coconut milk**, and your chosen **milk**. Set the heat to low. Chef’s Tip: Keep the heat low to gently infuse the spices without boiling, which can alter the flavors. Simmer for about 5 minutes, whisking occasionally to ensure everything is well mixed.

    Step 3: Add Ginger
    Add the grated **fresh ginger** to the pot. Whisk the mixture to incorporate the ginger thoroughly. You should start to smell the fragrant spices coming together, a sign that the flavors are melding beautifully.

    Step 4: Strain Mixture
    After simmering, strain the mixture into a bowl using a fine mesh sieve to remove the ginger fibers and any undissolved spices. This step ensures a smooth and creamy texture for your golden milk.

    Step 5: Return to Pot
    Pour the strained mixture back into the pot. Heat gently and add **honey** to taste. Whisk until the honey is completely dissolved. Chef’s Tip: Taste as you go to balance the sweetness according to your preference.

    Step 6: Serve Hot
    Pour the Golden Milk into your favorite mug and enjoy it hot. It’s the perfect companion for late-night reading or a quiet moment of reflection.

    Common Mistakes to Avoid

    • Boiling the Milk: Keep the heat low to prevent the milk from boiling, which can cause the spices to become bitter.
    • Skipping the Strain: Always strain the mixture to remove any gritty texture from undissolved spices.
    • Not Adjusting Sweetness: Honey is to taste, so don’t skip tasting to ensure it’s just right for you.

    How to Store & Reheat

    Store any leftover Golden Milk in an airtight container in the refrigerator for up to 3 days. To reheat, pour the desired amount into a saucepan and warm over low heat, stirring occasionally. Avoid microwaving as it can alter the texture and flavor.

    Ingredient Substitutions

    • Milk Alternatives: Use any plant-based milk like oat or soy if you prefer to keep it vegan.
    • Sweeteners: Replace honey with maple syrup or agave nectar for a vegan option.
    • Spice Variations: Add a pinch of nutmeg or cloves for a different spice profile.

    Nutrition Facts

    • Calories: 210 per serving
    • Protein: 2g
    • Fat: 12g
    • Carbs: 23g
    • Serving Size: 1 cup

    Frequently Asked Questions

    Q: Can I make Golden Milk in advance?
    A: Absolutely! Make a batch and store it in the fridge for up to 3 days. Reheat gently on the stove before serving.

    Q: Is Golden Milk suitable for kids?
    A: Yes, but adjust the spices according to their taste preference and consult with a pediatrician if necessary.

    Q: Can I use ground ginger instead of fresh?
    A: You can, but fresh ginger offers a more vibrant flavor. If using ground, start with ¼ teaspoon and adjust to taste.

    Q: What are the benefits of drinking Golden Milk?
    A: It’s known for its anti-inflammatory properties, aids digestion, and can help with relaxation and sleep.

  • 5-MIN FUEL: Lentil & Cranberry Power Salad!

    5-MIN FUEL: Lentil & Cranberry Power Salad!

    Introduction & My Personal Story

    There’s something incredibly satisfying about a dish that not only fuels your body but also delights your taste buds. The 5-MINUTE FUEL: Lentil and Cranberry Power Salad is one such recipe that has a special place in my heart. I first stumbled upon this gem of a salad five years ago when I was knee-deep in culinary school. With tight schedules and endless cooking experiments, I needed something quick yet nourishing to keep me going. This salad became my go-to. The earthy lentils paired with the sweet bursts of dried cranberries and crunchy walnuts were just what I needed to power through long days.

    In my 5 years of experience as a chef, I have found that a well-balanced salad can be a game changer. This particular recipe has not only become a staple in my personal diet but also a favorite among my clients and friends. There’s a certain nostalgia that hits me every time I make it, reminding me of those formative days in the kitchen, learning and experimenting. It’s a simple dish, but one that packs a punch in terms of flavor and nutrition, and I’m thrilled to share it with you today.

    Why You’ll Love This Recipe

    • Quick & Easy: Ready in just 5 minutes if you have pre-cooked lentils.
    • Nutritious: Packed with protein, fiber, and essential nutrients.
    • Flavorful: A delicious combination of earthy, sweet, and tangy flavors.
    • Versatile: Perfect as a main dish or a side.
    • Meal Prep Friendly: Keeps well in the fridge for quick meals throughout the week.

    Detailed Ingredients

    To make the Lentil and Cranberry Power Salad, you’ll need the following ingredients:

    • Lentils: 1 cup of dried lentils (about 200 grams). Look for lentils that are firm and free of debris.
    • Spinach: 2 cups of fresh spinach (around 60 grams), washed and dried.
    • Dried Cranberries: 1/2 cup (about 60 grams), look for unsweetened varieties if you prefer less sugar.
    • Apple: 1 medium-sized apple (about 150 grams), diced. Choose a crisp variety like Granny Smith or Honeycrisp.
    • Feta Cheese: 1/4 cup (about 40 grams), crumbled.
    • Walnuts: 1/4 cup (about 30 grams), roughly chopped.
    • Olive Oil: 3 tablespoons for the vinaigrette.
    • Lemon Juice: 2 tablespoons, freshly squeezed.
    • Apple Cider Vinegar: 1 tablespoon.
    • Dijon Mustard: 1 teaspoon.
    • Sugar: 1 teaspoon.
    • Garlic Powder: 1/2 teaspoon.
    • Salt & Pepper: To taste.

    Step-by-Step Instructions

    Here’s how you can whip up this delightful salad:

    Step 1: Cook the Lentils

    Begin by rinsing 1 cup of dried lentils under cold water to remove any dirt or debris. In a medium-sized pot, bring 3 cups of water to a boil. Add the lentils, cover, and reduce the heat to simmer. Let them cook for about 20 minutes or until tender. Chef’s Tip: Lentils should be cooked but not mushy, with a slight bite to them.

    Step 2: Prepare the Vinaigrette

    While the lentils are cooking, prepare the vinaigrette. In a small bowl, whisk together 2 tablespoons of lemon juice, 1 tablespoon of apple cider vinegar, 1 teaspoon of Dijon mustard, 1 teaspoon of sugar, 1/2 teaspoon of garlic powder, and a pinch of salt and pepper. Gradually drizzle in 3 tablespoons of olive oil while whisking continuously until the dressing is smooth and emulsified.

    Step 3: Assemble the Salad

    Once the lentils are cooked, drain them and rinse with cold water to stop the cooking process. In a large mixing bowl, combine the lentils with 2 cups of fresh spinach. Add 1/2 cup of dried cranberries, 1 diced apple, 1/4 cup of crumbled feta cheese, and 1/4 cup of chopped walnuts. Pour the vinaigrette over the salad and toss gently to combine all the ingredients.

    Step 4: Serve

    Transfer the salad to a serving platter or individual bowls. Serve immediately or let it chill in the fridge for 30 minutes to allow the flavors to meld. This salad is a great make-ahead option and tastes even better the next day!

    Common Mistakes to Avoid

    • Overcooking Lentils: Keep an eye on the lentils as they cook. Overcooked lentils can become mushy and lose their texture.
    • Not Rinsing Lentils: Rinsing lentils after cooking helps to cool them quickly and prevents further cooking.
    • Skipping the Vinaigrette Emulsification: Gradually adding the olive oil while whisking is crucial for a smooth dressing.

    How to Store & Reheat

    Store any leftover salad in an airtight container in the refrigerator for up to 3 days. The flavors will continue to develop, making it even more delicious over time. If you plan to store it for longer, keep the dressing separate and add it just before serving. This will prevent the salad from becoming soggy.

    Ingredient Substitutions

    • Lentils: Feel free to use canned lentils if you’re short on time. Just make sure to rinse them well.
    • Spinach: Arugula or mixed greens can be used for a different flavor profile.
    • Dried Cranberries: Swap with raisins or chopped dried apricots for a different sweetness.
    • Feta Cheese: Goat cheese or blue cheese can be used for a stronger flavor.
    • Walnuts: Pecans or almonds can be used for a different crunch.

    Nutrition Facts

    • Calories: 288 kcal
    • Protein: 12g
    • Fat: 13g
    • Carbohydrates: 34g
    • Serving Size: 1 bowl (approximately 250g)

    Frequently Asked Questions

    • Can I make this salad vegan? Yes, simply omit the feta cheese or replace it with a vegan cheese alternative.
    • What type of lentils should I use? Green or brown lentils work best as they hold their shape better than red lentils.
    • Can I add protein to this salad? Absolutely! Grilled chicken or tofu are great additions for extra protein.
    • Is this salad gluten-free? Yes, all the ingredients listed are naturally gluten-free.

  • Brain Fuel: Conquering Post Pill Amenorrhea

    Brain Fuel: Conquering Post Pill Amenorrhea

    Introduction & My Personal Story

    When I think about meals that have truly changed my perspective on nutrition, the Omega-3 Power Bowl immediately comes to mind. Five years ago, during a particularly hectic period in my life, I found myself struggling with focus and energy. As a chef, I knew food could be the answer, but I needed something that provided more than just sustenance. I needed a dish that was both a feast for the senses and a powerhouse for the brain.

    One evening, after a long day in the kitchen, I stumbled upon a simple combination of ingredients that changed everything. I grilled a fillet of fresh salmon, tossed it with some vibrant spinach, and sprinkled a mix of walnuts and chia seeds. A squeeze of lemon juice tied it all together. The result was not just a meal—it was a revelation. This dish became my go-to for days when I needed to be at my best, providing a boost in focus and clarity that was immediately noticeable.

    In my 5 years of experience, I’ve refined this recipe to perfection, and today I’m sharing it with you. It’s more than just a bowl; it’s a strategy for conquering the demands of a busy life. Whether you’re a student, a professional, or just someone looking to enhance your cognitive performance, this Omega-3 Power Bowl is your secret weapon.

    Why You’ll Love This Recipe

    • Packed with brain-boosting Omega-3 fatty acids.
    • Quick and easy to prepare, perfect for busy schedules.
    • Rich in protein and healthy fats to keep you full and focused.
    • Customizable with your favorite greens and toppings.
    • Gluten-free and keto-friendly.

    Detailed Ingredients

    • Salmon fillet – 200g, fresh and preferably wild-caught for the highest Omega-3 content.
    • Spinach – 2 cups (about 60g), fresh and organic if possible for maximum nutrients.
    • Walnuts – 1/4 cup (30g), chopped for a crunchy texture.
    • Chia seeds – 1 tablespoon (12g), for an extra Omega-3 boost.
    • Avocado – 1/2, ripe and sliced for creaminess.
    • Lemon – 1, juiced for a zesty dressing.
    • Salt and pepper to taste.
    • Optional: Fresh herbs like dill or parsley for garnish.

    Step-by-Step Instructions

    Step 1: Prepare the Fish – Start by seasoning your 200g salmon fillet with salt, pepper, and a sprinkle of fresh dill if you have it. Heat a non-stick skillet over medium-high heat and add a small amount of oil. Once hot, place the salmon skin-side down. Cook for about 4-5 minutes per side, or until the fish is opaque and flakes easily with a fork. Chef’s Tip: Don’t move the salmon too soon; let it develop a nice crust.

    Step 2: Prep the Greens – While the salmon is cooking, rinse and dry your spinach. In a large bowl, toss the spinach with sliced avocado. This not only adds creaminess but also boosts the nutrient profile of the dish.

    Step 3: Add the Crunch – Chop the walnuts and sprinkle them over the spinach and avocado mixture. Add the tablespoon of chia seeds for an extra dose of Omega-3s and texture.

    Step 4: Assemble the Bowl – Once the salmon is cooked, let it rest for a minute before slicing it into strips. Arrange the salmon over the prepared greens.

    Step 5: Dress It Up – Squeeze fresh lemon juice over the entire bowl. This not only enhances the flavor but also helps with the absorption of iron from the spinach.

    Step 6: Serve & Enjoy – Garnish with fresh herbs, if using, and serve immediately. Enjoy the vibrant flavors and the knowledge that you’re fueling your brain with every bite.

    Common Mistakes to Avoid

    One common mistake is overcooking the salmon, which can make it dry. Keep an eye on the cooking time and use medium-high heat for a crispy skin. Another error is not drying the spinach thoroughly, which can lead to a soggy salad. Ensure your greens are as dry as possible before assembling the bowl.

    How to Store & Reheat

    If you have leftovers, store the components separately in airtight containers. The salmon will keep in the fridge for up to 2 days. To reheat, gently warm the salmon in a skillet over low heat. The greens are best served fresh, so assemble just before eating.

    Ingredient Substitutions

    • If you don’t have salmon, try mackerel or sardines for similar Omega-3 benefits.
    • For a nut-free version, substitute walnuts with toasted pumpkin seeds.
    • If you’re out of spinach, arugula or kale are great alternatives.

    Nutrition Facts

    • Calories: 450 kcal
    • Protein: 40g
    • Fat: 30g
    • Carbs: 10g
    • Serving Size: 1 bowl

    Frequently Asked Questions

    Q: Can I use frozen salmon?

    A: Yes, just make sure to thaw it completely before cooking for the best texture.

    Q: How can I make this dish vegan?

    A: Substitute the salmon with grilled tofu or chickpeas for a plant-based version.

    Q: What other greens can I use?

    A: Feel free to use any leafy greens you enjoy, such as kale, arugula, or mixed greens.

    Q: Is this dish suitable for meal prep?

    A: Absolutely! Just keep the components separate until you’re ready to eat.


  • LATE NIGHT FUEL: The Easy Curry You’ll Crave!

    LATE NIGHT FUEL: The Easy Curry You’ll Crave!

    Introduction & My Personal Story

    Ah, the sweet aroma of a late-night curry simmering on the stove—there’s nothing quite like it. The first time I whipped up this easy curry, it was during my college years. Picture this: I was deep into a study session, notes scattered everywhere, and the clock striking midnight. My stomach growled louder than the thunderstorm raging outside. I needed something quick, something satisfying, and, most importantly, something that wouldn’t lull me into a food coma.

    I rummaged through my pantry and found a can of chickpeas, a can of coconut milk, and some spices. In my 5 years of experience as a chef, I’ve learned that the best recipes often come together when necessity meets creativity. With a little bit of this and a dash of that, my first late-night curry was born. It was a revelation—a dish that not only filled my belly but also fueled my brain for the long hours ahead. Since then, this curry has been my go-to recipe for those nights when work or creativity keeps me burning the midnight oil. Let me share this late-night gem with you.

    Why You’ll Love This Recipe

    • Quick and Easy: Ready in under 30 minutes.
    • Budget-Friendly: Uses pantry staples like **chickpeas** and **coconut milk**.
    • Vegan and Gluten-Free: Suitable for various dietary preferences.
    • Customizable: Swap out vegetables or adjust spices to suit your taste.
    • Perfect Late-Night Snack: Light yet satisfying enough to keep you energized.

    Detailed Ingredients

    Here’s what you’ll need to make this delicious late-night curry:

    • 1 onion (about 150g), diced
    • 2 garlic cloves, minced
    • 1 teaspoon fresh ginger, grated
    • 2 tablespoons olive oil
    • 1½ tablespoons curry powder
    • 1 teaspoon ground cumin
    • 2 cans (15 oz each) chickpeas, drained and rinsed
    • 8 oz tomato sauce
    • 1 can (13.5 oz) coconut milk
    • 4 oz kale (about 3 cups), chopped
    • Salt to taste (about ½ teaspoon)

    When selecting ingredients, look for fresh and firm **kale** leaves. For the **coconut milk**, opt for a full-fat version for a creamier texture.

    Step-by-Step Instructions

    Follow these steps to make the perfect late-night curry:

    Step 1: Prepare Your Ingredients

    Start by preparing your ingredients. Dice the **onion**, mince the **garlic**, and grate the **ginger**. If you haven’t already, chop the **kale** into bite-sized pieces. This prep work will make the cooking process smooth and quick.

    Step 2: Toast the Spices

    Heat a large skillet over medium heat. Add **1½ tablespoons of curry powder** and **1 teaspoon of cumin**. Toast the spices for about one minute, stirring frequently. You’ll know they’re ready when they release a fragrant aroma.

    Step 3: Sauté the Aromatics

    To the toasted spices, add **2 tablespoons of olive oil**, the diced **onion**, minced **garlic**, and grated **ginger**. Sauté for about 5 minutes or until the onion becomes soft and translucent. This forms the flavorful base of your curry.

    Step 4: Add Main Ingredients

    Once the aromatics are ready, add the drained **chickpeas**, **tomato sauce**, and **coconut milk** to the skillet. Stir everything together until well combined.

    Step 5: Simmer the Curry

    Increase the heat to medium-high to bring the curry to a simmer. Once simmering, reduce the heat to medium-low and let it cook for about 15 minutes. Stir occasionally to prevent sticking. You’re looking for a slightly thickened sauce.

    Step 6: Incorporate the Greens

    Finally, add the chopped **kale** to the skillet. Cook for an additional 5 minutes or until the kale has wilted. Season the curry with **salt** to taste, starting with about ½ teaspoon.

    Step 7: Serve Hot

    Your late-night curry is ready to serve! It’s best enjoyed over rice, with bread, or even as a dip with tortillas. This dish is versatile and pairs well with many sides.

    Common Mistakes to Avoid

    Even the simplest recipes can go awry. Here are some common pitfalls to watch out for:

    • Not Toasting Spices: Skipping this step can result in a less flavorful curry.
    • Overcooking the Chickpeas: They should be tender but not mushy.
    • Adding Kale Too Early: It can become too soft; add it towards the end.
    • Skipping the Stirring: Stir occasionally to prevent sticking and ensure even cooking.

    How to Store & Reheat

    Storing and reheating this curry is a breeze:

    • Allow the curry to cool completely before transferring it to an airtight container.
    • Store in the refrigerator for up to 3 days.
    • For longer storage, freeze the curry for up to 2 months.
    • To reheat, warm on the stove over medium heat or microwave until heated through.

    Ingredient Substitutions

    Need to make a swap? Here are some safe substitutions:

    • Chickpeas: Use lentils or white beans for a different texture.
    • Coconut Milk: Substitute with almond milk for a lighter version.
    • Kale: Spinach or Swiss chard works well as a replacement.
    • Olive Oil: Coconut oil or vegetable oil can be used instead.

    Nutrition Facts

    • Calories: 320 per serving
    • Protein: 10g
    • Fat: 18g
    • Carbohydrates: 32g
    • Serving Size: 1 cup

    Frequently Asked Questions

    • Can I make this curry spicier?
      Add a pinch of red pepper flakes or a chopped chili for extra heat.
    • Is it okay to use canned tomatoes?
      Yes, canned tomatoes can be used in place of tomato sauce.
    • How can I thicken the curry?
      Simmer longer to reduce the liquid or add a slurry of cornstarch and water.
    • Can I double the recipe?
      Absolutely! Just make sure you have a large enough skillet.
    • What can I serve with this curry?
      Rice, naan bread, or quinoa are great options.

  • 5-MIN FUEL: Crispy Air Fryer Broccoli on a Budget!

    5-MIN FUEL: Crispy Air Fryer Broccoli on a Budget!

    Introduction & My Personal Story

    There’s something magical about transforming a simple vegetable like **broccoli** into a crispy, flavorful delight. My journey with this humble green began five years ago during a busy weeknight when time was scarce, and my energy was dwindling. I needed something quick, nutritious, and satisfying. Enter the air fryer, a kitchen gadget that had been collecting dust on my countertop. It was then that I discovered the art of making **Crispy Air Fryer Broccoli**. The first bite was a revelation – the crispy edges, the tender inside, and the burst of flavor were enough to make this a staple in my weekly meal prep. This dish is not just a side; it’s a testament to how simple ingredients can create something extraordinary. Now, every time I make it, I’m reminded of that first bite and the joy of finding a recipe that perfectly balances speed and taste.

    Why You’ll Love This Recipe

    • **Quick and Easy**: Ready in just 5 minutes of cooking time.
    • **Budget-Friendly**: Uses simple, affordable ingredients.
    • **Nutritious**: Packed with vitamins and minerals.
    • **Versatile**: Perfect as a side dish or a healthy snack.
    • **Flavorful**: Combines the umami of soy sauce with the aroma of garlic and onion powder.

    Detailed Ingredients

    • 1 lb of **broccoli** florets (about 450 grams)
    • 1 tablespoon **olive oil**
    • 1 teaspoon **soy sauce**
    • ¼ teaspoon **garlic powder**
    • ¼ teaspoon **onion powder**
    • Optional: A pinch of **red pepper flakes** for some heat

    When shopping, look for bright green broccoli with firm stalks and compact florets. Avoid any yellowing or wilting.

    Step-by-Step Instructions

    Step 1: Preheat Your Air Fryer

    Set your air fryer to 400°F (200°C). Preheating ensures that the broccoli cooks evenly and achieves that desirable crispiness.

    Step 2: Prepare the Broccoli

    Cut the broccoli into uniform florets. This ensures even cooking. Chef’s Tip: Don’t discard the stems; they can be saved for soups or stir-fries.

    Step 3: Season the Broccoli

    In a large bowl, toss the broccoli florets with olive oil, soy sauce, garlic powder, and onion powder. Ensure each floret is well-coated. The soy sauce adds a depth of flavor, while the olive oil helps in achieving the crisp texture.

    Step 4: Arrange in the Air Fryer

    Place the seasoned broccoli in the air fryer basket in a single layer. Avoid overcrowding to allow the hot air to circulate and cook the broccoli evenly.

    Step 5: Cook to Perfection

    Air fry for 6 minutes, shaking the basket halfway through to ensure even cooking. For extra crunch, cook for an additional 2 minutes. Look for golden edges and tender stalks as visual cues of doneness.

    Step 6: Serve and Enjoy

    Transfer the crispy broccoli to a serving dish. Garnish with a sprinkle of red pepper flakes if desired. Enjoy immediately for the best texture and flavor.

    Common Mistakes to Avoid

    • **Overcrowding the Basket**: This prevents the broccoli from crisping properly. Cook in batches if necessary.
    • **Skipping the Preheat**: A cold air fryer can lead to uneven cooking. Always preheat for consistent results.
    • **Using Wet Broccoli**: Ensure the broccoli is dry before seasoning to avoid steaming instead of frying.

    How to Store & Reheat

    Store leftover broccoli in an airtight container in the refrigerator for up to 3 days. To reheat, place in the air fryer at 350°F (175°C) for 3-4 minutes to regain some crispness.

    Ingredient Substitutions

    • **Olive Oil**: Can be replaced with avocado oil or coconut oil for different flavor profiles.
    • **Soy Sauce**: Use tamari or coconut aminos for a gluten-free option.
    • **Garlic and Onion Powder**: Fresh minced garlic and onion can be used; adjust quantities to taste.

    Nutrition Facts

    • Calories: 71 kcal
    • Protein: 3g
    • Fat: 4g
    • Carbohydrates: 7g
    • Serving Size: 1 cup

    Frequently Asked Questions

    Q: Can I use frozen broccoli?

    A: Yes, but thaw and pat it dry first to avoid excess moisture.

    Q: What if I don’t have an air fryer?

    A: You can roast the broccoli in an oven at 400°F (200°C) for about 15-20 minutes.

    Q: How can I make it spicier?

    A: Add more red pepper flakes or a dash of hot sauce to the seasoning mix.

    Q: Is this recipe vegan?

    A: Yes, as long as you use vegan-friendly soy sauce or tamari.

    Q: Can I add cheese?

    A: Absolutely! Sprinkle some parmesan or nutritional yeast before serving for a cheesy twist.

  • Brain Fuel: Butterfinger Bliss Smoothie

    Brain Fuel: Butterfinger Bliss Smoothie

    Introduction & My Personal Story

    Ah, the Butterfinger Bliss Smoothie. Just saying the name brings back a flood of memories. As a young chef, I was always on the lookout for recipes that could satisfy my sweet tooth without derailing my health goals. The Butterfinger candy bar was my guilty pleasure, but I knew I needed to transform that indulgent treat into something a bit more wholesome. It was during a particularly busy week, juggling culinary school and a part-time job, that I first experimented with this recipe. The goal was simple: create a smoothie that mimicked the iconic flavor of a Butterfinger, but with a nutritional boost to fuel my hectic days.

    In those early days, I learned a lot about the power of ingredients. The rich creaminess of oat milk, the natural sweetness from frozen bananas, and the secret addition of zucchini for extra nutrients without altering the taste. Each morning, I’d blend up this concoction, sip it on my way to class, and feel instantly energized and focused. In my 5 years of experience as a chef, I’ve perfected this recipe to ensure it delivers the decadent taste of a Butterfinger bar while packing a nutritional punch. It’s a recipe that holds a special place in my heart, and I can’t wait to share it with you.

    Why You’ll Love This Recipe

    • Tastes like a dessert: Satisfy your sweet cravings without the guilt.
    • Boosts brain power: Packed with Omega-3s for enhanced focus.
    • Quick and easy: Ready in just 10 minutes, perfect for busy mornings.
    • High in protein: Provides over 29g of protein to keep you full and energized.
    • Customizable: Easily adjust ingredients to fit dietary needs.

    Detailed Ingredients

    For this Butterfinger Bliss Smoothie, you’ll need:

    • 1 cup (240ml) Oat Milk: Opt for unsweetened for a creamier texture. Almond or cashew milk can be used as alternatives.
    • 1 frozen banana: Provides natural sweetness and a thick, creamy texture. Ensure it’s ripe before freezing.
    • 1/2 cup (75g) frozen zucchini: Adds nutrients without altering the taste. Slice before freezing for easier blending.
    • 1 scoop (30g) Chocolate Protein Powder: Choose a quality brand like Nuzest for a rich chocolate flavor.
    • 1 Medjool Date: Offers natural sweetness. You can omit it if you’re watching sugar intake.
    • 2 tablespoons (30g) Peanut Butter: Use natural peanut butter without added sugars or oils. Almond butter can be substituted.
    • 1 cup (240ml) Ice: Essential for that refreshing chill and thickness.
    • 2 tablespoons (20g) Goji Berries: Not only do they add a delightful crunch, but they’re also packed with antioxidants.

    Step-by-Step Instructions

    Step 1: Prepare Your Ingredients

    Begin by gathering all your ingredients. Make sure your banana and zucchini are frozen. This is key to achieving the desired creamy texture without needing additional ice cream or sweeteners. If your peanut butter is stored in the fridge, bring it to room temperature for easier blending.

    Step 2: Blend the Base

    In a high-powered blender, combine the oat milk, frozen banana, frozen zucchini, chocolate protein powder, Medjool date, and peanut butter. Blend on high for about 1-2 minutes until the mixture is completely smooth. You’re looking for a thick, creamy consistency without any lumps. If the mixture is too thick for your liking, add a splash more oat milk.

    Step 3: Add the Crunch

    Add the goji berries to the blender and pulse for just a few seconds. You want the berries to break up slightly but not be completely pulverized. This preserves the delightful crunch that mimics the texture of a Butterfinger bar.

    Step 4: Serve and Enjoy

    Pour the smoothie into a tall glass and serve immediately. For an extra touch, garnish with a few whole goji berries or a sprinkle of crushed peanuts. Sip, savor, and enjoy the blissful combination of flavors and textures.

    Common Mistakes to Avoid

    • Not freezing the banana or zucchini: This is crucial for the texture. Without freezing, the smoothie will be too thin.
    • Over-blending the goji berries: Pulse them just enough to break them up slightly; otherwise, you’ll lose the crunch.
    • Using a low-quality blender: A high-powered blender ensures a smooth consistency without chunks.
    • Skipping the protein powder: It not only adds flavor but also boosts the protein content significantly.

    How to Store & Reheat

    If you find yourself with leftover smoothie (though it’s so delicious, that’s unlikely!), store it in an airtight container in the refrigerator for up to 24 hours. Before consuming, give it a good shake or stir, as separation may occur. Note that the texture will be slightly thinner after storage.

    Ingredient Substitutions

    • Oat Milk: Swap with almond or cashew milk for a different flavor profile.
    • Banana: If you’re not a fan of bananas, try using frozen mango for a tropical twist.
    • Peanut Butter: Almond butter or sunflower seed butter can be used for those with peanut allergies.
    • Chocolate Protein Powder: Use a vanilla-flavored powder and add a tablespoon of cocoa powder for a similar effect.

    Nutrition Facts

    • Calories: 422 kcal
    • Protein: 29g
    • Fat: 18g
    • Carbohydrates: 45g
    • Serving Size: 1 smoothie

    Frequently Asked Questions

    • Can I make this smoothie ahead of time? Yes, you can prepare it the night before and store it in the fridge. Just give it a good shake before drinking.
    • Is there a substitute for goji berries? You can use chia seeds or flaxseeds for added nutrition and texture.
    • How can I make this smoothie vegan? Ensure your protein powder is plant-based, and all other ingredients are already vegan-friendly.
    • Can I add greens to this smoothie? Absolutely! A handful of spinach or kale will blend in seamlessly without altering the taste much.