Blog

  • 5-MIN FUEL: Kodiak Mix Sheet Pan Pancakes

    5-MIN FUEL: Kodiak Mix Sheet Pan Pancakes

    Introduction & My Personal Story

    There’s something magical about waking up on a lazy Sunday morning to the smell of freshly baked pancakes. But let’s face it, not everyone has the luxury of leisurely mornings. That’s where my 5-Minute Fuel: Kodiak Mix Sheet Pan Pancakes come into play. My journey with this recipe began during a particularly hectic phase of my life. In my 5 years of experience as a chef, I’ve learned that sometimes, simplicity is the key to deliciousness.

    I remember the first time I stumbled upon the concept of sheet pan pancakes. It was a revelation! No more standing by the stove flipping pancakes one by one. Instead, I could whip up a batch, pop them in the oven, and have breakfast ready in a flash. The first time I tried these Kodiak Mix pancakes, I was hooked. The blend of whole grains and protein in the mix provided a hearty start to my day, and the convenience was unbeatable.

    These sheet pan pancakes have since become a staple in my household. Whether I’m rushing to get the kids ready for school or preparing for a busy workday, this recipe saves the day every time. It’s the perfect blend of nutrition and speed, and I can’t wait to share it with you.

    Why You’ll Love This Recipe

    • Quick and easy preparation – ready in under 10 minutes of prep time.
    • Minimal cleanup – just one sheet pan to wash.
    • Customizable with your choice of toppings.
    • Packed with protein and whole grains for sustained energy.
    • Perfect for meal prep – make ahead and enjoy throughout the week.

    Detailed Ingredients

    • 2 cups **Kodiak pancake mix**
    • 1 1/2 cups **milk** (whole or any milk substitute)
    • 2 large **eggs**
    • 1 teaspoon **vanilla extract**
    • 2 tablespoons **melted butter**
    • Optional toppings: **fresh berries**, **chocolate chips**, **nuts**

    When shopping for ingredients, look for the **Kodiak pancake mix** that contains whole grains and protein. Fresh berries should be plump and vibrant, and always check the expiration date on your milk and eggs.

    Step-by-Step Instructions

    Step 1: Preheat your oven to 350°F (175°C). Lightly grease a quarter sheet pan with butter or non-stick spray. This prevents the pancakes from sticking and ensures an even bake.

    Step 2: In a large mixing bowl, combine 2 cups of **Kodiak pancake mix**, 1 1/2 cups of **milk**, 2 large **eggs**, 1 teaspoon of **vanilla extract**, and 2 tablespoons of **melted butter**. Stir until just combined. Be careful not to overmix; a few lumps are perfectly normal.

    Step 3: Pour the batter into the prepared sheet pan. Use a spatula to spread the batter evenly across the pan, ensuring it reaches all the edges for uniform thickness.

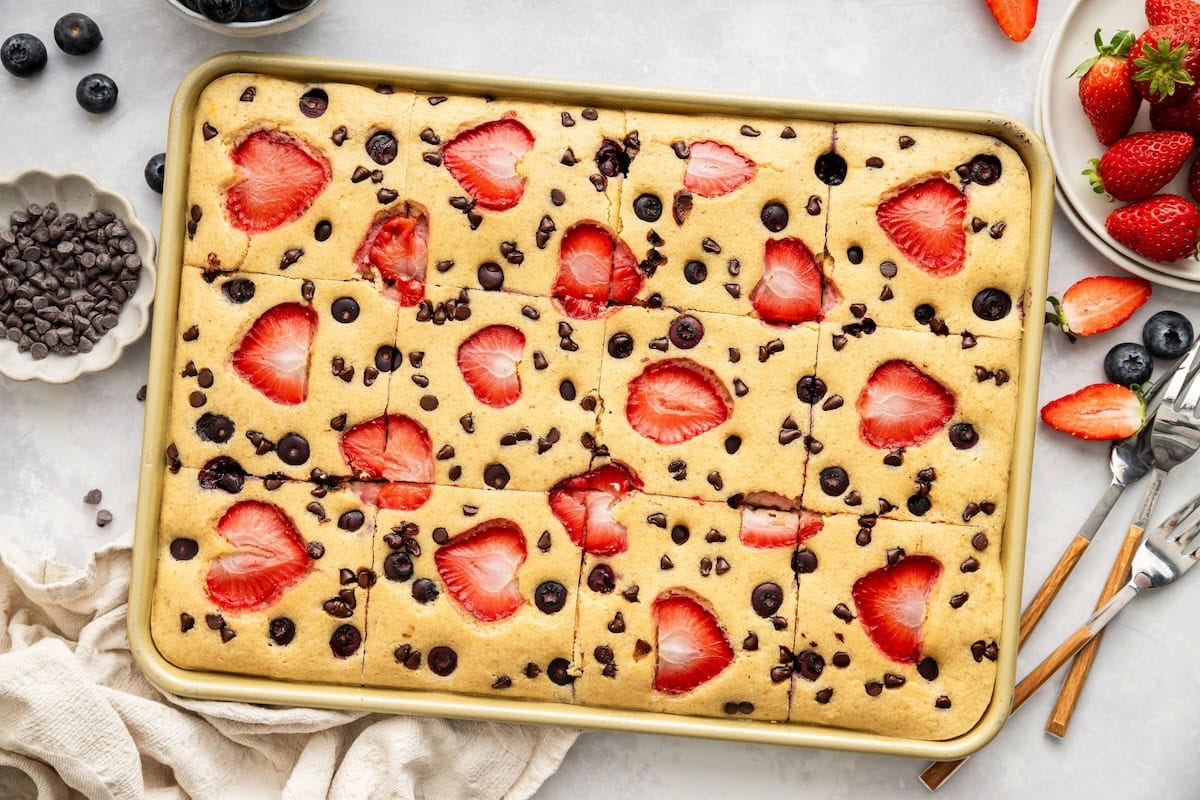
    Step 4: Now comes the fun part – toppings! Sprinkle your choice of **fresh berries**, **chocolate chips**, or **nuts** over the batter. This is where you can get creative and cater to your family’s preferences.

    Step 5: Bake in the preheated oven for 18-20 minutes. You’ll know it’s done when the edges are lightly golden, and a toothpick inserted into the center comes out clean. If you’re unsure, give it a couple more minutes – but keep an eye on it!

    Step 6: Once baked, remove the sheet pan from the oven and allow it to cool slightly. Cut into squares and serve warm with maple syrup or your favorite pancake toppings.

    Common Mistakes to Avoid

    One common mistake is overmixing the batter, which can result in dense pancakes. Remember, a few lumps are your friend here. Another issue is uneven spreading of the batter; make sure it’s evenly distributed to avoid undercooked spots. Finally, be cautious with toppings – too many can weigh down the batter and affect the baking time.

    How to Store & Reheat

    Store any leftover pancakes in an airtight container in the refrigerator for up to 3 days. For longer storage, place them in a freezer-safe bag and freeze for up to a month. To reheat, simply pop them in the toaster or microwave until warmed through. Chef’s Tip: Reheat in the oven at 300°F for a few minutes for that fresh-baked texture.

    Ingredient Substitutions

    If you’re out of **milk**, feel free to use almond milk, soy milk, or any other milk substitute. No **butter**? Coconut oil or vegetable oil works just fine. For a dairy-free version, use plant-based butter and milk alternatives. And if you’re avoiding eggs, a flaxseed or chia seed egg substitute can do the trick.

    Nutrition Facts

    • Calories: 288 kcal (per serving)
    • Protein: 14g
    • Fat: 8g
    • Carbohydrates: 38g
    • Serving Size: 1 square (1/8 of the sheet pan)

    Frequently Asked Questions

    • Can I make these pancakes gluten-free? Yes, simply use a gluten-free pancake mix.
    • What other toppings can I use? Try sliced bananas, shredded coconut, or even a sprinkle of cinnamon.
    • Can I make this recipe vegan? Absolutely! Use a plant-based pancake mix, milk, and butter substitute.
    • How can I make the pancakes fluffier? Add an extra half teaspoon of baking powder to the mix.
    • Is this recipe child-friendly? Definitely, kids love customizing their own toppings!

  • Brain Fuel: Creamy Avocado Dressing

    Brain Fuel: Creamy Avocado Dressing

    Introduction & My Personal Story

    Ah, avocados! Just the mere mention of them brings a smile to my face. I remember the first time I tasted an avocado. I was visiting my grandmother in California, where her backyard was a veritable orchard of fresh produce. One sunny afternoon, she handed me a toast topped with a creamy, green spread, and I was hooked. The rich, buttery texture and subtle, nutty flavor were unlike anything I had tasted before. It was love at first bite.

    Fast forward a few years, and avocados became my secret weapon in the kitchen. Among the many dishes I experimented with, the Creamy Avocado Dressing stood out as a game-changer. It was during my early days as a chef, when I was working long hours and needed a quick, nutritious boost. This dressing became my go-to for sprucing up salads, bowls, and even sandwiches. It was a revelation how something so simple could transform an ordinary meal into something extraordinary.

    In my 5 years of experience, I’ve come to appreciate how versatile and forgiving avocados are. They adapt beautifully to a variety of flavors and textures. This dressing is a testament to that versatility, combining the creamy richness of avocado with the tang of lemon and the fresh burst of herbs. It’s a recipe that’s not only delicious but also packed with brain-boosting nutrients. So, let’s dive into this delightful recipe and discover how to bring a touch of California sunshine to your kitchen!

    Why You’ll Love This Recipe

    • Quick & Easy: Ready in just 5 minutes with minimal cleanup.
    • Nutritious: Packed with healthy fats and Omega-3s for brain health.
    • Versatile: Perfect as a salad dressing, dip, or spread.
    • Customizable: Easily adjustable to suit dietary preferences.
    • Delicious: A creamy, flavorful addition to any meal.

    Detailed Ingredients

    • 1 ripe avocado (about 150g) – Look for avocados that yield slightly to gentle pressure, indicating ripeness.
    • ½ cup (120g) Greek yogurt – Opt for full-fat or 2% for a creamier texture.
    • 2 tablespoons (30ml) lemon juice – Freshly squeezed for the best flavor.
    • 2 tablespoons (30ml) olive oil – Choose extra virgin for a richer taste.
    • 1 clove garlic – Peeled and minced for a subtle kick.
    • ¼ cup (15g) fresh parsley – Or substitute with cilantro or basil for a different flavor profile.
    • Salt and pepper – To taste, for seasoning.
    • Water – As needed to adjust consistency.

    Step-by-Step Instructions

    Step 1: Prepare the Avocado

    Start by slicing the avocado in half and removing the pit. Using a spoon, scoop the flesh into a blender or food processor. Chef’s Tip: If the avocado is ripe, it should come out easily without much resistance.

    Step 2: Add Ingredients

    To the blender, add the Greek yogurt, lemon juice, olive oil, minced garlic, and chopped parsley. Season with a pinch of salt and pepper. These components will create a harmonious blend of creamy, tangy, and herby flavors.

    Step 3: Blend

    Process the mixture on high speed until it’s smooth and creamy. You may need to stop and scrape down the sides of the blender to ensure everything is well combined. The consistency should be thick but pourable. If it’s too thick, add a tablespoon of water at a time until you reach your desired consistency.

    Step 4: Taste and Adjust

    Give the dressing a taste and adjust the seasoning as necessary. You might want to add more salt or a splash of lemon juice for extra tang. Remember, flavors tend to mellow after chilling, so don’t be afraid to season boldly.

    Step 5: Store

    Transfer the dressing to an airtight container. To prevent browning, press a piece of parchment or plastic wrap directly onto the surface before sealing. Store in the refrigerator for up to 3-4 days.

    Common Mistakes to Avoid

    Using Unripe Avocados: An unripe avocado will result in a lumpy, bitter dressing. Ensure your avocado is ripe and creamy.

    Over-Blending: While you want a smooth consistency, over-blending can introduce too much air, making the dressing too fluffy. Blend just until combined.

    Incorrect Seasoning: Under-seasoning can lead to a bland dressing. Taste and adjust as necessary, keeping in mind that flavors develop over time.

    How to Store & Reheat

    Store the dressing in an airtight container in the refrigerator. To minimize browning, cover the surface with parchment or plastic wrap. It will keep fresh for 3-4 days. This dressing is best served cold and does not require reheating. If it thickens in the fridge, stir in a little water to loosen it up before serving.

    Ingredient Substitutions

    • Dairy-Free Option: Replace Greek yogurt with a coconut or cashew-based yogurt.
    • Spice it Up: Add a slice of jalapeño or a pinch of cayenne pepper for a spicy kick.
    • Citrus Twist: Swap lemon juice with lime juice for a different zest.
    • Thicker Version: Omit water if you prefer a thicker dip-like consistency.

    Nutrition Facts

    • Calories: 54 kcal per 2 tablespoons
    • Protein: 1g
    • Fat: 5g
    • Carbs: 3g
    • Serving Size: 2 tablespoons

    Frequently Asked Questions

    Can I freeze this dressing? Freezing is not recommended as the texture of the avocado may change upon thawing.

    What dishes pair well with this dressing? This dressing is versatile and works well with salads, grain bowls, wraps, and as a veggie dip.

    How can I prevent the dressing from turning brown? Cover the surface with a piece of parchment or plastic wrap before sealing the container.

    Is this dressing keto-friendly? Yes, it’s low in carbs and high in healthy fats, making it suitable for a keto diet.

    Can I use a hand blender? Yes, a hand blender will work, but ensure the avocado is very ripe for easy blending.

  • CHEAT DAY: Indulgent Snickers Salad Protein Bowl Delight

    CHEAT DAY: Indulgent Snickers Salad Protein Bowl Delight

    Introduction & My Personal Story

    Ah, the indulgence of a cheat day. The very thought can bring a smile to your face, especially when it involves a dish as delightful as the Snickers Salad Protein Bowl. It all started about five years ago when I was deep into my culinary journey, experimenting with flavors and textures that could satisfy cravings without completely derailing my nutrition goals. I stumbled upon the idea of combining the irresistible flavors of a Snickers bar with the creamy goodness of a protein-packed salad. It seemed almost too good to be true, but the result was nothing short of magical.

    In my 5 years of experience, I’ve learned that a cheat day isn’t just about indulgence; it’s a reward for your dedication and hard work. This Snickers Salad Protein Bowl became my go-to treat, especially after a week of disciplined eating. The creamy texture of Greek yogurt and cottage cheese, combined with the crunch of apples and the decadent taste of peanut butter and protein bars, was a revelation. It’s not just a dish; it’s a celebration of flavors that indulges your senses without the guilt. Every bite reminds me of those early days of discovery, where culinary experimentation met nutritional mindfulness.

    Why You’ll Love This Recipe

    • Quick & Easy: No cooking required, ready in just 10 minutes.
    • High Protein: Packed with Greek yogurt and cottage cheese.
    • Decadent Flavor: Tastes like your favorite candy bar.
    • Customizable: Easy to swap ingredients based on preference.
    • Perfect for Cheat Days: Satisfies cravings while providing nutrients.

    Detailed Ingredients

    • 5.3 oz Greek yogurt – Opt for plain or vanilla for best results.
    • 1 cup cottage cheese – Choose low-fat or full-fat based on preference.
    • 1 apple – A crisp variety like Granny Smith or Honeycrisp works well.
    • 2 tbsp PB2 powder – Look for it in the health food section.
    • 1 Barebells Salty Peanut protein bar – Can be found in most health stores.
    • Peanut butter – Natural or smooth, for drizzling.

    Step-by-Step Instructions

    Step 1: Start by preparing your ingredients. Chop the apple into small, bite-sized pieces. This adds a fresh, juicy crunch to your bowl. Chef’s Tip: Leave the skin on for added fiber and color.

    Step 2: In a medium-sized bowl, combine the Greek yogurt and cottage cheese. Stir them together until you have a smooth, creamy base. The blend of these two ingredients is the secret to a protein-packed foundation.

    Step 3: Sprinkle in the PB2 powder. This will give a subtle peanut butter flavor without the added fat. Mix thoroughly until the powder is fully incorporated.

    Step 4: Gently fold in the chopped apple pieces. Ensure they are evenly distributed throughout the mixture. The apple provides a natural sweetness and a delightful texture contrast.

    Step 5: Chop the Barebells Salty Peanut protein bar into small chunks. Add these to the bowl, stirring gently to combine. These chunks mimic the nougat and peanut crunch of a Snickers bar.

    Step 6: For the final touch, drizzle with your choice of peanut butter. This adds a rich, indulgent layer to your protein bowl. Serve immediately to enjoy at the peak of freshness.

    Common Mistakes to Avoid

    • Overmixing: Stir gently to avoid breaking down the apple pieces and protein bar chunks.
    • Using flavored yogurt: Stick to plain or vanilla to control sweetness levels.
    • Skipping the PB2 powder: It provides essential flavor without excess calories.
    • Incorrect apple variety: Use crisp apples to maintain texture.

    How to Store & Reheat

    Store any leftovers in an airtight container in the refrigerator. The Snickers Salad Protein Bowl is best consumed within 24 hours to enjoy its full flavor and texture. If you need to store it longer, it’s best not to add the peanut butter drizzle until just before serving. This dish does not require reheating, as it’s meant to be enjoyed chilled.

    Ingredient Substitutions

    • Greek yogurt: Substitute with plain skyr or a plant-based yogurt for a dairy-free option.
    • Cottage cheese: Use ricotta cheese or a vegan alternative if needed.
    • PB2 powder: Regular peanut butter or almond butter can be used, but adjust quantities for taste.
    • Protein bar: Any nut-based protein bar can replace the Barebells bar.

    Nutrition Facts

    • Calories: 450 per serving
    • Protein: 35g
    • Fat: 15g
    • Carbs: 45g
    • Serving Size: 1 bowl

    Frequently Asked Questions

    • Can I use a different fruit instead of apple? Yes, pears or bananas can work well.
    • Is there a vegan version of this recipe? Yes, use plant-based yogurt, ricotta, and a vegan protein bar.
    • How can I make it even more indulgent? Add a drizzle of chocolate syrup or caramel sauce.
    • Can I prepare this in advance? It’s best made fresh, but you can prep the yogurt and cheese mix a day ahead.
    • What if I don’t have PB2 powder? Regular peanut butter will work, just adjust the quantity for flavor.

  • 5-MIN FUEL: Snickerdoodle Overnight Oats That Pack a Protein Punch!

    5-MIN FUEL: Snickerdoodle Overnight Oats That Pack a Protein Punch!

    Introduction & My Personal Story

    There’s something truly magical about waking up to a breakfast that’s already waiting for you, especially when it’s as scrumptious as Snickerdoodle Overnight Oats. This recipe takes me back to a time when I was just starting my culinary journey. In my 5 years of experience as a chef, I’ve learned that the simpler the dish, the more room there is for creativity and flavor. I remember those early mornings in culinary school when time was of the essence, and breakfast had to be quick, yet satisfying. That’s when I stumbled upon the concept of overnight oats. The allure of having a ready-to-eat, nutritious meal in the morning was unbeatable.

    One particular morning, I decided to infuse my oats with the warm, comforting flavors of a snickerdoodle cookie. It was a game-changer! The aroma of cinnamon and vanilla wafting through the kitchen made it feel like the holidays in the middle of July. Each spoonful was a delightful reminder of the cookies my grandmother used to bake during festive seasons. Now, whenever I prepare this dish, I am transported back to those cozy mornings, blending nostalgia with the hustle of modern life. It’s a recipe that not only fuels your body but also warms your soul.

    Why You’ll Love This Recipe

    • **Quick & Easy:** Perfect for busy mornings with just 5 minutes of prep.
    • **Protein Packed:** Keeps you full and energized throughout the day.
    • **Customizable:** Adapt the flavors to suit your taste preferences.
    • **Make-Ahead Convenience:** Prepare the night before for a stress-free breakfast.
    • **Nutritious & Delicious:** Combines the flavors of a classic cookie with the benefits of whole grains.

    Detailed Ingredients

    To create the perfect Snickerdoodle Overnight Oats, you’ll need the following ingredients:

    • Rolled oats: 1/2 cup (45 grams). Choose old-fashioned oats for the best texture.
    • Unsweetened almond milk: 1 cup (240 ml). Look for a brand with no added sugars.
    • Chia seeds: 1 tablespoon (12 grams). These add thickness and extra nutrients.
    • Protein powder: 1 scoop (about 30 grams). Opt for snickerdoodle or vanilla for that authentic cookie flavor.
    • Cinnamon: 1 teaspoon (2 grams). Freshly ground if possible, for the most robust flavor.
    • Vanilla extract: 1/2 teaspoon (2.5 ml). Pure vanilla extract is preferred.
    • Maple syrup: 1 tablespoon (15 ml). Adds natural sweetness.
    • Sea salt: A pinch. Enhances all the flavors.

    Step-by-Step Instructions

    Creating these oats is as easy as pie. Follow these steps for the best results:

    Step 1: Mix Ingredients

    In a medium-sized jar or bowl, combine the **rolled oats**, **almond milk**, **chia seeds**, **protein powder**, **cinnamon**, **vanilla extract**, **maple syrup**, and a pinch of **sea salt**. Chef’s Tip: Use a jar with a tight-fitting lid if you plan to grab and go in the morning.

    Step 2: Stir Thoroughly

    Mix everything until well combined. Make sure there are no clumps of protein powder remaining. A whisk can be helpful here. The mixture should be smooth and homogenous.

    Step 3: Refrigerate

    Cover the jar or bowl and place it in the refrigerator. Let it chill for at least 4 hours, but overnight is ideal for the oats to fully absorb the liquid and flavors. You’ll know it’s ready when the mixture is thick and creamy.

    Step 4: Enjoy

    In the morning, give the oats a good stir. If you find them too thick, add a splash more almond milk to reach your desired consistency. Top with extra cinnamon or some cookie crumbles for added texture and flavor.

    Common Mistakes to Avoid

    • **Using Quick Oats:** These will become mushy. Stick with rolled oats for the best texture.
    • **Skipping the Stir:** Make sure you mix thoroughly to avoid clumps of protein powder.
    • **Not Refrigerating Long Enough:** Give it enough time to chill and thicken properly.
    • **Overloading on Sweeteners:** The protein powder and maple syrup add plenty of sweetness, so taste before adding more.

    How to Store & Reheat

    Store your **Snickerdoodle Overnight Oats** in the refrigerator for up to 4 days. Make sure they are in a sealed container to keep them fresh. If you prefer your oats warm, you can gently heat them in the microwave for 30-60 seconds, stirring halfway through. Add a bit of almond milk to loosen them up if needed.

    Ingredient Substitutions

    • **Almond Milk:** Swap with any milk of your choice, like soy, oat, or cow’s milk.
    • **Chia Seeds:** Use flaxseeds for a similar thickening effect.
    • **Protein Powder:** If you’re not a fan of snickerdoodle flavor, vanilla or plain protein powder works well too.
    • **Maple Syrup:** Honey or agave nectar can serve as alternatives.

    Nutrition Facts

    • **Calories:** 452 kcal
    • **Protein:** 20 grams
    • **Fat:** 10 grams
    • **Carbs:** 63 grams
    • **Serving Size:** 1 jar (entire recipe)

    Frequently Asked Questions

    Can I use steel-cut oats instead of rolled oats?

    Steel-cut oats require more liquid and longer soaking times, so they’re not ideal for overnight oats. Stick with rolled oats for the best texture.

    Is it necessary to use protein powder?

    No, but it adds a significant protein boost. If you prefer, you can leave it out or replace it with Greek yogurt.

    Can I add fruits to my overnight oats?

    Absolutely! Fresh fruits like bananas, apples, or berries make great additions and add natural sweetness.

    How can I make this recipe vegan?

    The recipe is already vegan if you use plant-based milk and protein powder. Just ensure your toppings are vegan-friendly too.

    Can I double the recipe?

    Yes, you can easily double or triple the ingredients to make more servings, perfect for meal prepping.

  • Brain Fuel: Iced Matcha Magic

    Brain Fuel: Iced Matcha Magic

    Introduction & My Personal Story

    Let me take you back to a sunny afternoon in Kyoto, where my love affair with matcha began. I was wandering through the bustling Nishiki Market, overwhelmed by the vibrant colors and tantalizing aromas. Amidst the clatter of vendors and the chatter of excited tourists, I stumbled upon a small teahouse tucked away in a quiet corner. There, I experienced my first sip of matcha. The earthy, slightly sweet flavor was unlike anything I’d ever tasted. It was invigorating, refreshing, and, dare I say, magical.

    Fast forward a few years, and I found myself craving that same sense of calm energy, especially during the hustle of my daily routine. That’s when I decided to recreate that Kyoto experience with a modern twist: the Iced Matcha Magic. This recipe is not just a drink; it’s a ritual. In my 5 years of experience as a chef, I’ve learned that the right beverage can set the tone for the entire day. With this recipe, you’ll not only fuel your body but also your mind, making it the perfect companion for those busy mornings or afternoon slumps.

    Why You’ll Love This Recipe

    • Quick and Easy: Ready in just 10 minutes.
    • Health Benefits: Packed with antioxidants and brain-boosting properties.
    • Customizable: Use your favorite milk and sweetener.
    • Refreshing: Perfect for warm days or as an afternoon pick-me-up.

    Detailed Ingredients

    • Hot Water: ½ cup, heated to 110ºF+. This helps dissolve the matcha smoothly.
    • Matcha Powder: 1 teaspoon. Opt for high-quality, ceremonial grade for the best flavor and health benefits.
    • Milk: 1 cup. You can use dairy or plant-based options like oat or almond milk.
    • Sweetener: Optional. Choose from maple syrup, honey, or stevia based on your preference.
    • Ice: Enough to fill your glass. Crushed ice works best for a more chilled experience.

    Step-by-Step Instructions

    Step 1: Prepare the Matcha

    Start by heating ½ cup of water to at least 110ºF. This temperature is crucial to ensure the matcha powder dissolves completely without becoming bitter. Pour the hot water into a small bowl and add 1 teaspoon of matcha powder. Using a bamboo whisk, whisk the mixture vigorously in a zigzag motion until it becomes smooth and frothy. This should take about 1-2 minutes.

    Step 2: Chill the Matcha

    Once you’ve achieved a smooth consistency, place the bowl in the refrigerator to chill for about 10 minutes. This step is essential to prevent the ice from melting too quickly when you pour the matcha over it.

    Step 3: Assemble the Drink

    Fill a tall glass with ice. Pour 1 cup of your chosen milk over the ice. If you like your drinks sweet, add your preferred sweetener at this stage and stir well to combine.

    Step 4: Combine and Serve

    Remove the chilled matcha from the fridge and give it a quick whisk to ensure it’s well-mixed. Pour the matcha over the milk and ice. Stir gently to combine all the elements, and enjoy your refreshing Iced Matcha Magic!

    Common Mistakes to Avoid

    • Using Low-Quality Matcha: Always choose ceremonial-grade matcha for the best flavor and health benefits.
    • Skipping the Chilling Step: This can result in a watered-down drink as the ice melts too quickly.
    • Incorrect Water Temperature: Too hot, and the matcha becomes bitter; too cold, and it won’t dissolve properly.

    How to Store & Reheat

    If you have any leftovers, store the iced matcha in a sealed container in the refrigerator. It will stay fresh for up to 2 days. However, it’s best enjoyed fresh. To reheat, simply whisk it again and pour over fresh ice. Avoid microwaving as it can alter the taste and texture.

    Ingredient Substitutions

    • Milk: Swap dairy milk for any plant-based alternative like soy, almond, or coconut milk.
    • Sweetener: Use agave syrup or coconut sugar as a natural alternative.
    • Matcha Powder: If unavailable, green tea powder can be a substitute, though it lacks the rich flavor of matcha.

    Nutrition Facts

    • Calories: 109 kcal per serving
    • Protein: 2g
    • Fat: 3g
    • Carbohydrates: 12g
    • Serving Size: 1 glass

    Frequently Asked Questions

    • Can I use cold water instead of hot? No, hot water is necessary to dissolve the matcha properly.
    • What’s the best type of milk for this recipe? Any milk works, but oat milk pairs exceptionally well with matcha.
    • How much caffeine is in this drink? Matcha contains about 70mg of caffeine per serving, similar to a cup of coffee.
    • Can I make this drink ahead of time? Yes, but it’s best consumed fresh to enjoy the full flavor and benefits.
    • Is matcha safe for children? Due to its caffeine content, it’s best to consult a pediatrician before serving to children.

  • CHEAT DAY: Decadent High-Protein Strawberry Pretzel Delight!

    CHEAT DAY: Decadent High-Protein Strawberry Pretzel Delight!

    Introduction & My Personal Story

    Ah, the sweet nostalgia of a cheat day. It’s that sacred time when we momentarily cast aside dietary restrictions and indulge in something truly delightful. For me, the Decadent High-Protein Strawberry Pretzel Delight has always been a favorite. I remember the first time I tasted this dish; it was during a particularly busy week, and I needed a quick yet indulgent escape. The combination of crunchy pretzels, creamy filling, and juicy strawberries made my taste buds dance with joy.

    As someone who has spent the last 5 years experimenting with flavors and textures, this dessert holds a special place in my heart. It’s simple, yet each layer brings something unique to the table. The pretzel crust provides a salty crunch that perfectly complements the sweet, creamy filling and the fresh strawberries. Every time I make it, I’m reminded of those carefree summer days spent with family, where food was the centerpiece of our gatherings.

    This dessert is not just about indulgence; it’s about balance. It offers a high-protein punch thanks to the Greek yogurt and cream cheese, making it a guilt-free treat that satisfies both your cravings and your nutritional needs. So, whether you’re planning a cheat day or simply looking for a fun dessert to share with loved ones, this recipe is sure to hit the spot.

    Why You’ll Love This Recipe

    • No-Bake: Perfect for those hot days when you don’t want to turn on the oven.
    • High-Protein: Thanks to Greek yogurt and cream cheese, it’s a treat that packs a nutritional punch.
    • Quick to Prepare: Ready in under 30 minutes, with minimal effort required.
    • Sweet & Salty Delight: The combination of pretzels and strawberries is irresistible.
    • Customizable: Easily swap ingredients to suit dietary needs or personal preferences.

    Detailed Ingredients

    For this recipe, you’ll need the following ingredients:

    • Pretzels: 2 cups (about 100g) of crushed pretzels. Look for pretzels with a good crunch and minimal salt.
    • Butter: 1/4 cup (56g) of melted unsalted butter.
    • Sugar: 2 tablespoons (25g) for the crust, plus 1/4 cup (50g) for the filling.
    • Cream Cheese: 1 cup (240g) of full-fat cream cheese, softened.
    • Greek Yogurt: 1/2 cup (120g) of plain Greek yogurt. Opt for full-fat for a richer taste.
    • Fresh Strawberries: 2 cups (300g) of sliced strawberries. Choose ripe, red strawberries for maximum sweetness.
    • Whipped Topping: 1 cup (240ml) or use coconut cream for a dairy-free option.
    • Vanilla Extract: 1 tablespoon for added flavor.

    Step-by-Step Instructions

    Let’s dive into making this delightful dessert:

    Step 1: Prep the Pretzel Crust

    Start by crushing 2 cups of pretzels. You can do this by placing them in a zip-lock bag and using a rolling pin. Mix the crushed pretzels with 1/4 cup of melted butter and 2 tablespoons of sugar. Ensure everything is well combined, then press the mixture firmly into the bottom of your serving dish, creating an even layer. This will be the base of your dessert, providing a satisfying crunch.

    Step 2: Make the Filling

    In a mixing bowl, beat 1 cup of cream cheese until smooth. Gradually add in 1/2 cup of Greek yogurt and 1/4 cup of sugar, mixing until the ingredients are well incorporated. Spread this creamy mixture evenly over the pretzel crust, ensuring full coverage to create a smooth layer.

    Step 3: Prepare the Topping

    Slice your fresh strawberries, aiming for uniform pieces. Arrange them meticulously over the cream cheese filling. The vibrant red of the strawberries will add a pop of color and a fresh, juicy layer to your dessert.

    Step 4: Add the Final Touch

    In a separate bowl, combine 1 cup of whipped topping with 1 tablespoon of vanilla extract. Spread this mixture evenly over the strawberries, creating a fluffy top layer. The vanilla adds a subtle depth of flavor that ties the dessert together.

    Step 5: Chill

    Refrigerate your creation for at least 30 minutes. This chilling period allows the layers to set, making it easier to slice and serve. Plus, it enhances the flavors, offering a refreshing experience with every bite.

    Common Mistakes to Avoid

    • Not Crushing Pretzels Enough: Ensure pretzels are finely crushed for a cohesive crust.
    • Skipping the Chill Time: Don’t rush. Chilling is crucial for the layers to set properly.
    • Using Low-Fat Ingredients: For optimal taste and texture, stick to full-fat options where possible.
    • Uneven Strawberry Slices: Uniform slices ensure even distribution of flavor.

    How to Store & Reheat

    Store any leftovers in an airtight container in the refrigerator. This dessert can be kept for up to 3 days. If you’ve used coconut cream, it may separate slightly, so give it a gentle stir before serving again. This dish is best enjoyed cold, so there’s no need to reheat.

    Ingredient Substitutions

    • Gluten-Free Pretzels: Swap regular pretzels for gluten-free to accommodate dietary restrictions.
    • Coconut Cream: Use this instead of whipped topping for a dairy-free version.
    • Honey or Maple Syrup: Use these as natural sweeteners instead of sugar if preferred.

    Nutrition Facts

    • Calories: 320 per serving
    • Protein: 8g
    • Fat: 20g
    • Carbs: 28g
    • Serving Size: 1/8 of the dish

    Frequently Asked Questions

    • Can I make this dessert ahead of time? Yes, it’s even better the next day as the flavors meld together.
    • Is there a way to make this vegan? Absolutely, use dairy-free yogurt and cream cheese, along with coconut cream.
    • What if I don’t have Greek yogurt? You can substitute with regular yogurt or even a dairy-free alternative.
    • Can I use frozen strawberries? Fresh is best for texture, but you can use thawed frozen strawberries in a pinch.

  • 5-MIN FUEL: Your Ultimate Crustless Quiche Recipe!

    5-MIN FUEL: Your Ultimate Crustless Quiche Recipe!

    Introduction & My Personal Story

    Ah, the crustless quiche! Just the mention of it takes me back to my bustling college days. I remember those early mornings when I had just five minutes to whip up breakfast before dashing off to class. Back then, I was on a tight budget and even tighter schedule, so I had to get creative in the kitchen. That’s when I stumbled upon the idea of a crustless quiche. It was simple, quick, and packed with the energy I needed to keep me going through a long day of lectures and study sessions.

    The first time I made it, I was skeptical. Could something so easy really taste good? But as I pulled that golden, fluffy quiche out of the oven, the aroma was irresistible. One bite, and I was hooked. The combination of **eggs**, **ham**, **broccoli**, and **cheese** created a flavor explosion that was both satisfying and nourishing. Over the years, this recipe has been my go-to for busy mornings, lazy brunches, and even late-night snacks. It’s a dish that feels like a warm hug, reminding me of those formative years when I learned to balance life, studies, and my passion for cooking.

    Why You’ll Love This Recipe

    • Quick and easy – Ready in just 5 minutes of prep!
    • No crust – Fewer carbs and gluten-free.
    • Versatile – Customize with your favorite ingredients.
    • Great for meal prep – Make ahead and enjoy all week.
    • Perfect for any meal – Breakfast, lunch, or dinner.

    Detailed Ingredients

    To make this delicious crustless quiche, you’ll need:

    • **5 large eggs** – Fresh and free-range if possible.
    • **1 cup (240 ml) whole milk** – For a rich and creamy texture.
    • **1/4 teaspoon salt** – Enhance the natural flavors.
    • **1/4 teaspoon black pepper** – Freshly ground for best taste.
    • **1/4 teaspoon garlic powder** – Adds a subtle kick.
    • **1 cup (150 g) chopped cooked ham** – Look for a quality cut at the deli.
    • **1 cup (150 g) chopped broccoli** – Fresh or frozen, just make sure it’s thawed.
    • **1/2 cup (75 g) chopped onion** – Adds sweetness and depth.
    • **1 cup (100 g) shredded cheese** – Cheddar or your favorite blend.

    Step-by-Step Instructions

    Step 1: Preheat and Prep

    Start by preheating your oven to 375°F (190°C). While the oven heats, grease a 9-inch pie dish with a bit of butter or non-stick spray. This will ensure your quiche releases easily after baking.

    Step 2: Whisk the Mixture

    In a large bowl, crack the **eggs** and add the **milk**. Whisk together until fully combined. Add the **salt**, **pepper**, and **garlic powder**, whisking again to incorporate the seasonings evenly. Chef’s Tip: Whisking thoroughly ensures a light, airy texture.

    Step 3: Add the Fillings

    Stir in the **chopped ham**, **broccoli**, and **onion**. Make sure these ingredients are evenly distributed throughout the egg mixture. Finally, fold in the **shredded cheese**, ensuring it’s well combined. In my 5 years of experience, I’ve found that mixing the cheese into the egg mixture, rather than just sprinkling it on top, prevents it from burning and gives a more uniform flavor.

    Step 4: Pour and Bake

    Carefully pour the mixture into your prepared pie dish, spreading it evenly with a spatula. Place it in the oven and bake for 35–40 minutes, or until the quiche is set and a knife inserted into the center comes out clean. The top should be lightly golden, and the quiche should have a slight jiggle when you gently shake the dish.

    Step 5: Cool and Serve

    Remove from the oven and let it cool for 5–10 minutes. This resting time allows the quiche to set further and makes slicing easier. Serve warm, garnished with fresh herbs if desired.

    Common Mistakes to Avoid

    Even a simple dish like this can have pitfalls. Here are some common mistakes and how to avoid them:

    • Overbaking: This can lead to a dry, rubbery texture. Keep an eye on the quiche during the last 5 minutes of baking.
    • Uneven Cooking: Make sure ingredients are evenly distributed to avoid uneven cooking.
    • Using Too Much Liquid: Stick to the recipe’s milk-to-egg ratio to prevent a soggy quiche.
    • Skipping the Grease: Always grease your dish to ensure the quiche releases easily.

    How to Store & Reheat

    Once your quiche has cooled completely, cover it tightly with plastic wrap or transfer slices to an airtight container. It will keep in the refrigerator for up to 4 days. For longer storage, you can freeze slices individually wrapped in plastic wrap and then foil, for up to 2 months.

    To reheat, place a slice in the microwave for 1-2 minutes or until heated through. If frozen, thaw in the refrigerator overnight before reheating.

    Ingredient Substitutions

    If you don’t have all the ingredients on hand, here are some safe swaps:

    • Milk: Substitute with almond milk or soy milk for a dairy-free option.
    • Ham: Use cooked bacon or sausage for a different flavor profile.
    • Broccoli: Spinach or kale can be a great alternative for greens.
    • Cheese: Try using feta, mozzarella, or Swiss cheese for a unique taste.

    Nutrition Facts

    Here’s the nutritional breakdown per slice (assuming 6 slices):

    • **Calories:** 293 kcal
    • **Protein:** 18g
    • **Fat:** 20g
    • **Carbohydrates:** 7g
    • **Serving Size:** 1 slice

    Frequently Asked Questions

    • Can I make this quiche ahead of time? Absolutely! It’s perfect for meal prep. Make it the night before and reheat in the morning.
    • Can I make this quiche vegetarian? Yes, simply omit the ham and add more vegetables or a vegetarian protein like tofu.
    • What can I serve with this quiche? It’s great on its own, but you can pair it with a fresh salad or some whole grain toast.
    • How do I know when the quiche is done? The center should be set, and a knife inserted should come out clean.
    • Can I use egg substitutes? Yes, liquid egg substitutes work well if you’re looking to reduce cholesterol.

  • Brain Fuel: Sizzling Sweet Potatoes

    Brain Fuel: Sizzling Sweet Potatoes

    Introduction & My Personal Story

    Sweet potatoes have always held a special place in my heart, and this recipe for Sizzling Sweet Potatoes is no exception. I remember the first time I tasted roasted sweet potatoes; it was a chilly autumn evening, and I was visiting my grandmother. She had just pulled a tray of perfectly roasted sweet potatoes from the oven, their caramelized edges glistening in the dim kitchen light. The aroma was intoxicating, a sweet and earthy scent that wrapped around me like a warm blanket.

    In my 5 years of experience as a chef, I’ve come to appreciate the versatility and nutritional benefits of sweet potatoes. They’re not only delicious but also packed with nutrients that are essential for brain health. This recipe has become a staple in my kitchen, not just for its taste but for the energy and focus it provides. Whether you’re preparing for a busy workday or looking for a side dish that complements any meal, these Sizzling Sweet Potatoes are sure to become your go-to recipe.

    Why You’ll Love This Recipe

    • Rich in Omega-3 fatty acids for enhanced brain function.
    • Easy to prepare with minimal ingredients.
    • Perfectly roasted for a crispy outside and tender inside.
    • A versatile side dish that pairs well with any meal.
    • Great for meal prep and stays fresh for up to a week.

    Detailed Ingredients

    • 2 medium-sized sweet potatoes (approximately 500 grams)
    • 1-2 tablespoons of avocado oil or olive oil
    • 1 teaspoon of sea salt
    • 1/2 teaspoon of ground black pepper
    • Optional: 1/2 teaspoon of cinnamon for a sweet twist

    When shopping, look for firm, smooth-skinned sweet potatoes without any blemishes or soft spots.

    Step-by-Step Instructions

    Step 1: Preheat Your Oven

    Begin by preheating your oven to 400°F (200°C). This is the ideal temperature to ensure your sweet potatoes achieve that perfect balance of crispy exterior and soft interior.

    Step 2: Prepare the Sweet Potatoes

    Peel your sweet potatoes using a vegetable peeler. Cut them into evenly-sized chunks, about 1-inch in size. This ensures they cook evenly. Chef’s Tip: Consistent sizing is key to even roasting.

    Step 3: Season the Potatoes

    In a large mixing bowl, combine the sweet potato chunks with 1-2 tablespoons of avocado or olive oil. Add the sea salt and ground black pepper. For a hint of sweetness, sprinkle in some cinnamon. Toss the mixture thoroughly until each piece is well-coated.

    Step 4: Roast to Perfection

    Line a baking sheet with parchment paper for easy cleanup. Spread the seasoned sweet potatoes in a single layer on the sheet. Roast in the preheated oven for 30-45 minutes. Halfway through, toss the potatoes to ensure even cooking. You’ll know they’re done when they’re fork-tender and golden brown on the edges.

    Step 5: Serve and Enjoy

    Remove the sweet potatoes from the oven and let them cool slightly. Adjust the seasoning if necessary. Serve them warm as a side dish, or let them cool completely before storing.

    Common Mistakes to Avoid

    One common mistake is overcrowding the baking sheet, which can lead to steaming rather than roasting. Make sure there’s enough space between each piece for air to circulate. Another pitfall is not tossing halfway through roasting, which ensures even cooking and browning.

    How to Store & Reheat

    Store any leftovers in an airtight container in the refrigerator. They will stay fresh for up to one week. To reheat, spread them on a baking sheet and warm in a 350°F (175°C) oven for about 10 minutes. This helps maintain their crispiness.

    Ingredient Substitutions

    If you’re out of avocado or olive oil, coconut oil works as a great alternative. For a spicy kick, try adding a pinch of cayenne pepper. If you’re avoiding salt, consider using a salt-free seasoning blend.

    Nutrition Facts

    • Calories: 115 kcal per serving
    • Protein: 1g
    • Fat: 5g
    • Carbohydrates: 20g
    • Serving Size: 1/2 cup

    Frequently Asked Questions

    Q: Can I leave the skin on the sweet potatoes?

    A: Absolutely! The skin adds extra fiber and nutrients. Just make sure to wash them thoroughly.

    Q: How can I make these sweet potatoes spicier?

    A: Add a pinch of cayenne pepper or smoked paprika for a spicy twist.

    Q: Can I use this recipe for meal prep?

    A: Yes, these sweet potatoes are perfect for meal prep and can be stored in the fridge for up to a week.

    Q: What other dishes pair well with these sweet potatoes?

    A: They pair beautifully with grilled chicken, fish, or even as a topping for salads.

  • NO-BAKE REWARD: Decadent High-Protein Banana Delight

    NO-BAKE REWARD: Decadent High-Protein Banana Delight

    Introduction & My Personal Story

    The kitchen has always been my sanctuary, a place where I could create something special from simple ingredients. My journey into the world of high-protein snacks began about five years ago when I was looking for healthier options that didn’t compromise on taste. One lazy Sunday afternoon, I stumbled upon a few overripe bananas in my fruit basket and a half-eaten tub of cottage cheese in the fridge. A light bulb went off, and the idea for a no-bake, high-protein banana delight was born.

    Back then, I was focused on finding delicious ways to increase my protein intake without resorting to bland or overly processed options. I wanted something quick, easy, and satisfying, a recipe that would become a staple in my cheat day repertoire. This banana delight, with its creamy texture and natural sweetness, was the perfect answer. Every spoonful reminded me of banana pudding from my childhood, but with a modern, health-conscious twist.

    In my 5 years of experience, this dish has evolved, but its core remains the same: simplicity, flavor, and a touch of nostalgia. It’s the kind of recipe that makes you feel rewarded for making healthier choices without feeling deprived. Whether you’re a fitness enthusiast or just someone who loves a good dessert, this high-protein banana delight is bound to become a favorite in your household.

    Why You’ll Love This Recipe

    • Quick and easy to prepare with no baking required.
    • Packed with protein from both **cottage cheese** and **Greek yogurt**.
    • Naturally sweetened with ripe **bananas** and **honey**.
    • Customizable with your favorite toppings like nuts or granola.
    • Perfect for a healthy cheat day treat or post-workout snack.

    Detailed Ingredients

    To make this no-bake high-protein banana delight, you’ll need:

    • **2 cups (450g) of cottage cheese** – Opt for low-fat or full-fat based on your dietary preferences.
    • **1 cup (245g) of Greek yogurt** – Choose plain, unsweetened for the best results.
    • **1 ripe banana** – Look for bananas with a few brown spots for optimal sweetness.
    • **2 tablespoons (30ml) of honey** – You can substitute with **maple syrup** if desired.
    • **1 teaspoon (5ml) of vanilla extract** – Pure vanilla extract adds the best flavor.
    • **A pinch of salt** – Enhances the flavors of the other ingredients.
    • **Additional sliced bananas** – For layering and garnishing.
    • **Crushed nuts or granola** – Optional, for added texture and crunch.

    Step-by-Step Instructions

    Step 1: Start by combining the **cottage cheese** and **Greek yogurt** in a large mixing bowl. Using a whisk or an electric mixer, blend the two until you achieve a smooth and creamy consistency. This mixture forms the base of your banana delight.

    Step 2: Mash the **ripe banana** using a fork or potato masher. Add the mashed banana to the cottage cheese and yogurt mixture, and mix thoroughly. The banana should be fully integrated, leaving no large chunks.

    Step 3: Stir in **2 tablespoons of honey** and **1 teaspoon of vanilla extract**. Add a pinch of salt to balance the sweetness and enhance the overall flavor. Mix until all ingredients are well combined.

    Step 4: In a serving dish, begin layering the mixture with **sliced bananas**. Start with a layer of the creamy mixture, followed by a layer of banana slices. Repeat the process until all the mixture is used up, ending with a layer of banana slices on top.

    Step 5: Refrigerate the layered delight for at least 30 minutes. This chilling time allows the flavors to meld together and the texture to firm up slightly.

    Step 6: Before serving, top the banana delight with **crushed nuts or granola** for an added crunch. This step is optional but highly recommended for texture contrast.

    Common Mistakes to Avoid

    Over-mixing: While it’s crucial to have a smooth mixture, over-mixing can lead to a runny texture. Mix just until the ingredients are combined.

    Using underripe bananas: Make sure your bananas are ripe. Underripe bananas won’t provide the natural sweetness needed for this dish.

    Skipping the chill time: The dessert needs time in the fridge to set. Don’t cut this step short, or you may end up with a soupy dessert.

    How to Store & Reheat

    Store any leftovers in an airtight container in the refrigerator. This banana delight will keep well for up to 3 days, though it’s best enjoyed fresh. If you’re adding toppings like granola, consider storing them separately to maintain their crunch.

    Ingredient Substitutions

    • Cottage Cheese: If you’re not a fan, you can substitute with ricotta cheese for a similar texture.
    • Greek Yogurt: Regular yogurt can be used, but it may result in a slightly less creamy texture.
    • Honey: Swap with **maple syrup** or agave syrup for a different flavor profile.
    • Bananas: For a different fruit twist, try using mashed mangoes or peaches.

    Nutrition Facts

    • Calories: 250 per serving
    • Protein: 18g
    • Fat: 5g
    • Carbs: 35g
    • Serving Size: 1 cup

    Frequently Asked Questions

    • Can I make this ahead of time? Yes, this dessert can be made a day in advance. Just be sure to store it properly in the fridge.
    • What other toppings can I use? Consider adding chocolate chips, coconut flakes, or even a dollop of whipped cream.
    • Is this recipe suitable for vegans? Substitute the dairy products with vegan alternatives like almond yogurt and tofu-based cheese.
    • Can I freeze this dessert? Freezing is not recommended as it can alter the texture upon thawing.


  • Fast Fuel: 5-Minute Overnight Oats for a Boost!

    Fast Fuel: 5-Minute Overnight Oats for a Boost!

    Introduction & My Personal Story

    There’s something magical about waking up to a breakfast that’s ready to eat, especially when it’s as delightful and energizing as overnight oats. My journey with this dish started five years ago when I was constantly on the go, juggling early morning shifts and late-night recipe testing. I needed something quick yet nutritious to fuel my mornings. Enter overnight oats—a revelation in a jar.

    I remember my first attempt, which was a bit of a disaster. I used steel-cut oats instead of rolled oats, and the result was more like a chewy cereal than the creamy delight I was hoping for. But with a little trial and error, I found the perfect balance. Now, this recipe is a staple in my kitchen, especially when I need to tackle a busy day. It’s like having a personal chef who’s prepped my breakfast while I sleep. Every spoonful is a reminder of how a simple mix of ingredients can transform into something so satisfying and wholesome.

    Why You’ll Love This Recipe

    • Quick and Easy: Takes just 5 minutes to prepare.
    • Customizable: Endless flavor variations to suit your taste.
    • Nutritious: Packed with fibers, proteins, and essential vitamins.
    • Perfect for Meal Prep: Make several jars at once.
    • Portable: Ideal for on-the-go breakfasts.

    Detailed Ingredients

    • **1/2 cup rolled oats** (50g) – Look for organic, gluten-free options for the best quality.
    • **1/2 cup milk** (120ml) – Any type works: almond, soy, or cow’s milk.
    • **1/4 cup yogurt** (60g) – Greek yogurt for extra creaminess, or a non-dairy option if preferred.
    • **1 tbsp maple syrup** (15ml) – Or swap with honey for a different sweetness profile.
    • **1 tbsp chia seeds** (optional, 12g) – Adds a nutritional boost with omega-3s.
    • **Pinch of sea salt** – Enhances the flavors.
    • **1 tsp vanilla extract** (5ml) – Use pure vanilla for the best aroma.

    Step-by-Step Instructions

    Step 1: Combine Ingredients – In a medium-sized jar or bowl, mix together **1/2 cup of rolled oats**, **1/2 cup of milk**, and **1/4 cup of yogurt**. Stir until the oats are fully submerged.

    Step 2: Sweeten and Flavor – Add **1 tbsp of maple syrup**, **1 tsp of vanilla extract**, and a **pinch of sea salt**. These elements not only sweeten but also enhance the overall flavor profile. Stir well to blend.

    Step 3: Add Optional Boost – Stir in **1 tbsp of chia seeds** if using. These tiny seeds will expand and add a delightful texture while packing a nutritional punch.

    Step 4: Refrigerate – Cover the jar with a lid or plastic wrap and place in the refrigerator. For the best texture, let it chill overnight, or for at least 2-4 hours if you’re short on time.

    Step 5: Serve – Before serving, give the oats a good stir. If the mixture is too thick, add a splash of milk to reach your desired consistency. Top with fruits, nuts, or any toppings you love.

    Common Mistakes to Avoid

    • Using the Wrong Oats: Steel-cut oats won’t soften properly overnight. Stick with rolled oats for the best texture.
    • Not Mixing Well: Ensure all ingredients are well combined to avoid uneven flavors.
    • Skipping the Salt: A pinch of salt brings out the sweetness and depth of the flavors.

    How to Store & Reheat

    Store your overnight oats in an airtight container in the refrigerator. They’re best enjoyed within the first 3 days, but they can last up to 5 days. If you prefer them warm, you can microwave them for about 30-60 seconds, stirring halfway through. Add a splash of milk if they seem too dry.

    Ingredient Substitutions

    • Milk: Substitute with any plant-based milk like almond or oat milk.
    • Yogurt: Use coconut or almond yogurt for a dairy-free option.
    • Maple Syrup: Swap with honey or agave syrup for a different taste.
    • Chia Seeds: If unavailable, flax seeds can be used for a similar texture and health benefits.

    Nutrition Facts

    • Calories: 272 kcal
    • Protein: 8g
    • Fat: 7g
    • Carbs: 45g
    • Serving Size: 1 jar

    Frequently Asked Questions

    • Can I prepare this with instant oats? Instant oats can become mushy, so it’s best to stick with rolled oats for the right texture.
    • Is it necessary to add sweetener? Not at all! You can skip it or use natural sweeteners like mashed bananas.
    • How can I make it gluten-free? Simply use certified gluten-free oats.
    • What are some good topping ideas? Fresh fruits, nuts, seeds, and a dollop of nut butter work wonderfully.
    • Can I make a larger batch? Absolutely, just multiply the ingredients and divide them into individual jars for convenience.