Author: Muxudo

  • Fast Fuel: Almond Croissant Baked Oatmeal Delight!

    Fast Fuel: Almond Croissant Baked Oatmeal Delight!

    Introduction & My Personal Story

    Ah, the Almond Croissant Baked Oatmeal Delight. Just the name brings back a flood of warm memories from my childhood. I remember waking up to the smell of freshly baked croissants wafting through the house every Sunday morning. My mother, a culinary enthusiast, would bake these luscious almond croissants that were the highlight of our weekend brunches. They were buttery, flaky, and filled with a rich almond paste that made each bite a sheer delight.

    Fast forward to my years in culinary school, I yearned to recreate that nostalgic flavor but with a twist. That’s when I stumbled upon the idea of combining the essence of those croissants with the heartiness of baked oatmeal. The result? A dish that not only pays homage to my childhood but also caters to my busy lifestyle today. This Almond Croissant Baked Oatmeal Delight is everything you want in a breakfast—nutritious, filling, and incredibly satisfying. In my 5 years of experience as a chef, this recipe has become a staple not just in my kitchen, but also a favorite among my readers who crave a quick yet indulgent breakfast.

    Why You’ll Love This Recipe

    • Quick and Easy: Ready in under an hour with minimal prep.
    • Nutritious: Packed with healthy oats and almonds.
    • Indulgent Flavor: Captures the essence of an almond croissant.
    • Versatile: Perfect for breakfast, brunch, or dessert.
    • Make-Ahead: Stores well for a grab-and-go meal.

    Detailed Ingredients

    • 2 cups (160g) of rolled oats
    • 2 cups (480ml) of almond milk
    • 1/2 cup (120g) of almond paste
    • 1/4 cup (60ml) of maple syrup
    • 1/4 cup (30g) of sliced almonds
    • 1 teaspoon (5ml) of vanilla extract
    • 1/2 teaspoon (2.5g) of baking powder
    • 1/4 teaspoon (1.25g) of salt
    • 1/4 cup (30g) of dark chocolate chips (optional)

    When shopping, look for fresh, unsweetened almond paste and high-quality maple syrup to enhance the flavor of your dish.

    Step-by-Step Instructions

    Step 1: Preheat Your Oven
    Preheat your oven to 350°F (175°C). This ensures that your oatmeal bakes evenly, resulting in a perfectly cooked dish.

    Step 2: Mix the Dry Ingredients
    In a large mixing bowl, combine the rolled oats, baking powder, and salt. Stir well to ensure that the baking powder is evenly distributed, which will help the oatmeal rise slightly and give it a nice texture.

    Step 3: Prepare the Wet Mixture
    In another bowl, whisk together the almond milk, almond paste, maple syrup, and vanilla extract. Make sure the almond paste is fully dissolved to prevent clumps in your oatmeal.

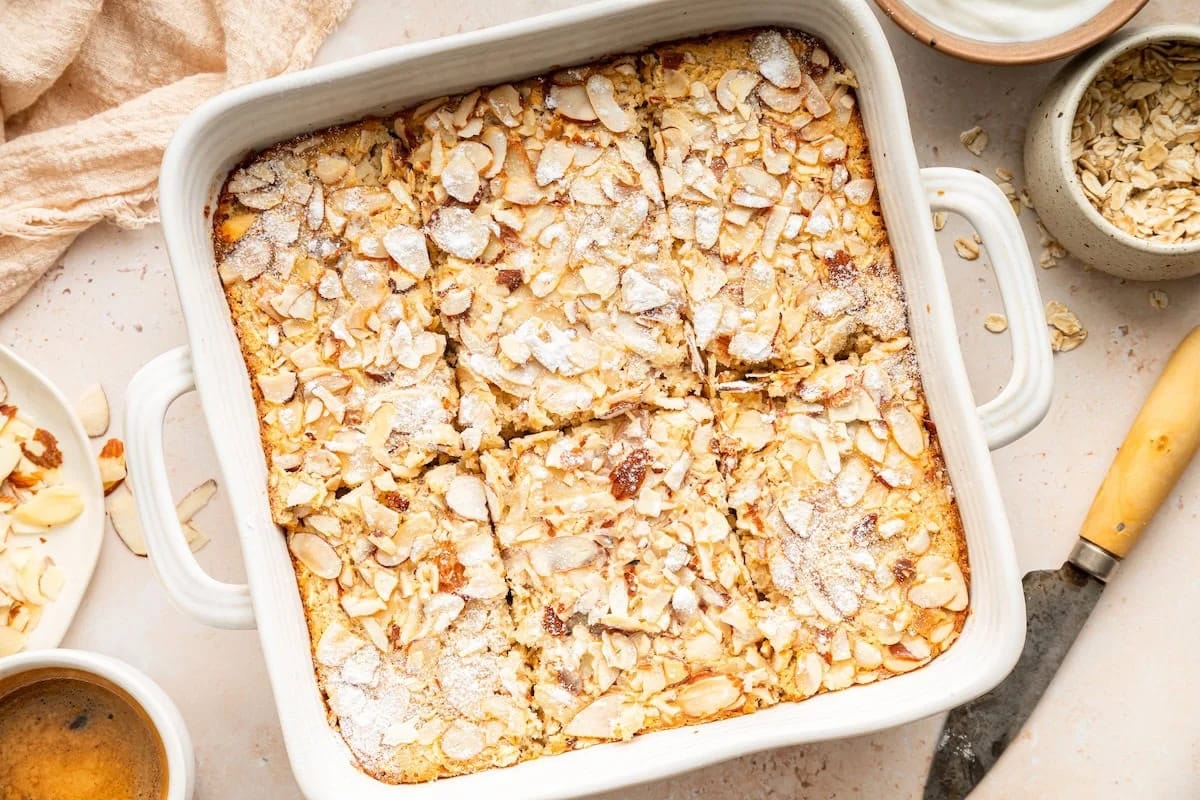
    Step 4: Combine and Add Toppings
    Pour the wet mixture into the dry ingredients, stirring until everything is well combined. Transfer the mixture into a greased baking dish. Sprinkle the sliced almonds and chocolate chips on top for added flavor and texture.

    Step 5: Bake
    Place the baking dish in the oven and bake for 30-35 minutes or until the top is golden brown and the oatmeal is set. A toothpick inserted in the center should come out mostly clean.

    Chef’s Tip: Let the oatmeal cool for a few minutes before serving. This allows the flavors to meld beautifully and makes it easier to cut into portions.

    Common Mistakes to Avoid

    Overmixing the Batter: Stir the ingredients until just combined to avoid a dense texture.

    Incorrect Oven Temperature: Always preheat your oven to ensure even cooking. An oven thermometer can be a handy tool.

    Skipping the Cooling Time: Allowing the oatmeal to cool slightly helps it firm up, making it easier to serve.

    How to Store & Reheat

    Store any leftovers in an airtight container in the refrigerator for up to 5 days. For longer storage, freeze portions in a freezer-safe container for up to 3 months. To reheat, warm in the oven at 350°F (175°C) for 10-15 minutes or microwave individual servings for 1-2 minutes.

    Ingredient Substitutions

    • Dairy-Free Option: Use coconut milk instead of almond milk.
    • Sugar-Free Option: Replace maple syrup with a sugar-free syrup or stevia.
    • Nuts Allergy: Substitute almond paste with sunflower seed butter and sliced almonds with pumpkin seeds.

    Nutrition Facts

    • Calories: 350 per serving
    • Protein: 8g
    • Fat: 15g
    • Carbohydrates: 45g
    • Serving Size: 1/6 of the baked oatmeal

    Frequently Asked Questions

    Can I use steel-cut oats instead of rolled oats?
    While steel-cut oats can be used, they require longer cooking times and a bit more liquid. Adjust accordingly if you choose to use them.

    Is it possible to make this recipe vegan?
    Yes, this recipe is already vegan if you use non-dairy milk and ensure your chocolate chips are dairy-free.

    How can I add more protein to this dish?
    Consider adding a scoop of protein powder to the wet ingredients or serving with a side of Greek yogurt.

    Can I prepare this the night before?
    Absolutely! Assemble the ingredients in the baking dish, cover, and refrigerate overnight. Bake in the morning as directed.

  • Brain Fuel: Sweet Potato Bliss!

    Brain Fuel: Sweet Potato Bliss!

    Introduction & My Personal Story

    Ah, sweet potatoes! Just saying the name takes me back to my childhood kitchen, where the aroma of these starchy jewels roasting in the oven would fill the air with warmth and comfort. My grandmother, a culinary wizard in her own right, had a knack for transforming simple ingredients into something extraordinary. It was in her cozy kitchen that I first learned the art of making the perfect sweet potato puree, a dish that not only nourishes the body but also fuels the mind.

    In my 5 years of experience as a chef, I’ve come to appreciate the versatility of sweet potatoes. They’re not just a side dish; they’re a powerhouse of nutrition, especially when it comes to brain health. I vividly remember one particular Sunday afternoon, standing beside my grandmother, as she explained how the natural sugars in sweet potatoes release slowly, providing sustained energy and focus. “A chef’s secret weapon,” she whispered, winking as she mashed the tender flesh into a creamy puree.

    Fast forward to today, and sweet potatoes remain a staple in my kitchen. Whether I’m whipping up a quick snack or preparing a gourmet meal, I often turn to my trusty sweet potato puree recipe. It’s not just about the taste; it’s about the feeling of being grounded, connected to my roots, and knowing I’m putting something wholesome and beneficial on the table. Let’s dive into how you can recreate this sweet potato bliss in your own kitchen!

    Why You’ll Love This Recipe

    • Boosts brain power with essential nutrients.
    • Provides sustained energy without sugar crashes.
    • Easy to prepare with minimal ingredients.
    • Versatile: perfect as a side dish or ingredient in other recipes.
    • Kid-friendly and packed with natural sweetness.

    Detailed Ingredients

    • Sweet Potatoes: 2 large, approximately 600 grams (look for firm, smooth skin without blemishes).
    • Olive Oil: 1 tablespoon, for baking (optional).
    • Salt: 1/2 teaspoon, to taste.
    • Butter: 2 tablespoons, unsalted, for added creaminess (optional).
    • Cinnamon: 1/2 teaspoon, for a warm, spicy note (optional).

    Step-by-Step Instructions

    Step 1: Preheat the Oven

    Set your oven to 400°F (200°C). This temperature is perfect for roasting sweet potatoes, ensuring they become tender and caramelized.

    Step 2: Prepare the Sweet Potatoes

    Wash the sweet potatoes thoroughly under running water to remove any dirt. Dry them with a clean towel. Using a fork, poke about 4-5 holes in each potato. This allows steam to escape during baking, preventing them from bursting.

    Step 3: Bake the Sweet Potatoes

    Place the sweet potatoes directly on a baking sheet lined with parchment paper. For added flavor, you can brush them lightly with olive oil and sprinkle a pinch of salt. Bake for about 60 minutes, or until the skins are wrinkled and a fork easily pierces the flesh. Chef’s Tip: The longer you bake, the sweeter they become, as the natural sugars caramelize beautifully.

    Step 4: Cool Down

    Once baked, remove the sweet potatoes from the oven and let them cool on the baking sheet for about 10-15 minutes. This makes them easier to handle and peel.

    Step 5: Peel the Sweet Potatoes

    Gently peel away the skin using your hands or a small knife. The skin should come off easily. If you’re feeling adventurous, save the skins—they’re nutrient-rich and can be crisped up in the oven for a tasty snack!

    Step 6: Puree the Sweet Potatoes

    Transfer the peeled sweet potatoes to a food processor or blender. Add the butter and cinnamon, if using, and blend until smooth. You can also use an immersion blender in a large bowl. For a chunkier texture, mash the potatoes with a fork or potato masher.

    Step 7: Serve

    Transfer the smooth puree to a serving bowl. Taste and adjust the seasoning with salt if needed. Serve immediately, or store in the refrigerator for up to 3 days.

    Common Mistakes to Avoid

    Undercooking: Ensure the sweet potatoes are fully cooked before mashing. They should be soft and tender.

    Over-blending: While a smooth puree is desirable, over-blending can make it gummy. Blend just until smooth.

    Skipping the cooling step: Peeling hot sweet potatoes can be a painful experience. Allow them to cool slightly first.

    How to Store & Reheat

    Store any leftover sweet potato puree in an airtight container in the refrigerator. It will keep for up to 3 days. To reheat, place the puree in a saucepan over low heat, stirring occasionally until warmed through. You can also reheat in the microwave for 1-2 minutes, stirring halfway through. Chef’s Tip: Add a splash of milk or water when reheating to restore the creamy texture.

    Ingredient Substitutions

    If you’re missing some ingredients, don’t worry! Here are a few substitutions:

    • Olive Oil: Substitute with coconut oil for a hint of tropical flavor.
    • Butter: Use ghee or margarine for a dairy-free option.
    • Cinnamon: Nutmeg or pumpkin spice can offer a similar warmth.

    Nutrition Facts

    • Calories: 150 per serving
    • Protein: 2g per serving
    • Fat: 5g per serving
    • Carbohydrates: 27g per serving
    • Serving Size: 1/2 cup

    Frequently Asked Questions

    Q: Can I use sweet potato puree in other recipes?

    A: Absolutely! It’s fantastic in soups, stews, baked goods, or mixed into oatmeal.

    Q: Can I freeze sweet potato puree?

    A: Yes, freeze it in an airtight container for up to 3 months. Thaw overnight in the fridge before using.

    Q: What can I add for extra flavor?

    A: Try adding ginger, nutmeg, or a splash of vanilla extract for a unique twist.

    Q: Is this recipe vegan?

    A: It can be! Simply omit the butter or use a vegan substitute.

  • ZERO PREP: Budget-Friendly Pesto Hack for Big Flavor!

    ZERO PREP: Budget-Friendly Pesto Hack for Big Flavor!

    Introduction & My Personal Story

    There’s a certain magic in the air when I reminisce about the first time I stumbled upon this Budget-Friendly Pesto Hack. Picture this: I was fresh out of culinary school, strapped for cash, yet eager to whip up something that would dazzle my friends at our monthly potluck. The challenge was real—how to create big flavor with minimal resources. In my 5 years of experience as a chef, I’ve learned that necessity truly is the mother of invention, and often, the simplest dishes turn out to be the most memorable.

    One lazy Sunday, I found myself staring blankly into my pantry. I had some fresh basil, a handful of baby spinach, a few cloves of garlic, and some sunflower seeds that had been languishing in a jar. Parmesan cheese was a staple in my fridge, and I always kept a bottle of good olive oil on hand. With a dash of imagination and a squeeze of lemon juice, I dared to craft my very own pesto without the traditional pine nuts and expensive Parmesan. The result? A pesto that was not only budget-friendly but required zero prep and was bursting with flavor. It was a hit at the potluck, and to this day, it’s my go-to recipe when I need something quick, delicious, and satisfying.

    Why You’ll Love This Recipe

    • Quick and easy to make with zero prep time required.
    • Uses affordable and accessible ingredients.
    • Packed with fresh, vibrant flavors.
    • Versatile and can be used in a variety of dishes.
    • Minimal cleanup, perfect for busy days.

    Detailed Ingredients

    Let’s dive into the components that make this pesto shine. Here’s what you’ll need:

    • Fresh basil: 2 cups, loosely packed. Look for bright green leaves without any brown spots.
    • Baby spinach: 1 cup, loosely packed. Opt for fresh, crisp leaves.
    • Garlic: 2 cloves, peeled. Choose firm cloves for the best flavor.
    • Sunflower seeds: 1/4 cup. Toast them lightly for added depth.
    • Parmesan cheese: 1/2 cup, grated. Aged Parmesan will give the best results.
    • Olive oil: 1/2 cup. Use extra virgin for its rich taste.
    • Lemon juice: 1 tablespoon, freshly squeezed. Adds brightness and acidity.
    • Salt: 1/2 teaspoon, or to taste.

    Step-by-Step Instructions

    Ready to whip up this delightful pesto? Follow these steps:

    Step 1: Prepare Your Ingredients

    First, gather all your ingredients. Make sure to wash and dry the basil and spinach thoroughly. A salad spinner works wonders here, ensuring no excess water dilutes your pesto.

    Step 2: Toast the Sunflower Seeds

    Chef’s Tip: Toasting sunflower seeds enhances their nutty flavor. Simply heat them in a dry skillet over medium heat for 3-4 minutes, stirring frequently. They’ll be ready when they’re golden brown and fragrant.

    Step 3: Blend the Dry Ingredients

    Add the prepared garlic, toasted sunflower seeds, and Parmesan cheese to a food processor. Pulse until everything is finely chopped, forming a coarse mixture.

    Step 4: Incorporate the Greens

    Add the basil and spinach to the processor. Pulse again until the greens are roughly chopped and well combined with the other ingredients.

    Step 5: Add the Liquid Ingredients

    With the processor running, drizzle in the lemon juice and olive oil. Blend until the mixture is smooth and creamy. Season with salt to taste.

    Step 6: Serve and Enjoy

    Your pesto is ready to go! Use it immediately as a sauce for pasta, a spread for sandwiches, or a topping for grilled proteins. Store leftovers in an airtight container in the fridge.

    Common Mistakes to Avoid

    • Skipping the toasting step: This is crucial for intensifying the flavor of the sunflower seeds.
    • Over-processing: Blend just until smooth. Over-processing can lead to a greasy pesto.
    • Not drying the greens: Excess water can make your pesto watery.

    How to Store & Reheat

    Store your pesto in an airtight container in the refrigerator for up to a week. For longer storage, freeze it in ice cube trays and transfer the cubes to a freezer bag. This way, you can thaw just what you need. To reheat, simply let it come to room temperature or gently warm it in a saucepan over low heat.

    Ingredient Substitutions

    • Basil and spinach: Swap with arugula or kale for a peppery twist.
    • Sunflower seeds: Replace with almonds or walnuts if preferred.
    • Parmesan cheese: Use nutritional yeast for a vegan option.

    Nutrition Facts

    • Calories: 180 per serving
    • Protein: 4g
    • Fat: 18g
    • Carbs: 3g
    • Serving Size: 2 tablespoons

    Frequently Asked Questions

    • Can I make this pesto vegan? Absolutely! Substitute the Parmesan cheese with nutritional yeast for a cheesy flavor without the dairy.
    • How can I make the pesto spicier? Add a pinch of red pepper flakes for a bit of heat.
    • Is it necessary to use a food processor? While a food processor is ideal, a blender or mortar and pestle can work in a pinch.
    • What dishes pair well with this pesto? It’s perfect for pasta, pizza, sandwiches, or as a dip for veggies.
    • Can I use dried basil instead of fresh? Fresh basil is recommended for the best flavor, but in a pinch, you can use dried—just reduce the quantity significantly.

  • LATE NIGHT FUEL: Umami Bombs on a Stick – These Mushroom Kebabs Will Steal the Show!

    LATE NIGHT FUEL: Umami Bombs on a Stick – These Mushroom Kebabs Will Steal the Show!

    Introduction & My Personal Story

    There’s something magical about late-night cooking. The world is quiet, your mind is clear, and the kitchen becomes your sanctuary. I remember my first encounter with mushroom kebabs during a late-night culinary experiment. I had just wrapped up a long day and was craving something savory yet light. I rummaged through my fridge and found a pack of white mushrooms staring back at me. That was the beginning of my love affair with these umami-packed skewers.

    In my 5 years of experience as a chef, I’ve learned that simplicity often leads to the most satisfying dishes. These Smoky Grilled Mushroom Kebabs became my go-to late-night snack. The earthy flavor of the mushrooms combined with the smoky marinade is like a warm hug after a long day. Plus, they’re incredibly easy to make, which is perfect when you’re running on fumes and just want something delicious without much fuss.

    Every time I prepare these kebabs, I’m reminded of that first night. The smell of the grill, the sizzle of the mushrooms, and the burst of flavor with each bite is a nostalgic trip down memory lane. Whether you’re working late, studying, or just in need of a midnight snack, these kebabs will steal the show and keep you fueled for whatever the night holds.

    Why You’ll Love This Recipe

    • Quick and easy to prepare, perfect for late-night cravings.
    • Light yet satisfying, ensuring no post-snack sluggishness.
    • Rich in umami flavor with a smoky twist that tantalizes your taste buds.
    • Vegan-friendly and packed with nutrients.
    • Minimal cleanup, thanks to the simple ingredients and grilling method.

    Detailed Ingredients

    • 8 oz. white mushrooms – Look for firm, fresh mushrooms without any blemishes.
    • 2 tablespoons soy sauce – Opt for low-sodium if preferred.
    • 1 tablespoon Worcestershire sauce – Adds depth and a hint of tanginess.
    • 1 tablespoon toasted sesame oil – Provides a nutty aroma and flavor.
    • 1 tablespoon olive oil – Use extra virgin for the best taste.
    • 1 teaspoon smoked paprika – Essential for that smoky kick.
    • 1 tablespoon apple cider vinegar – Balances the flavors with its acidity.
    • 1 tablespoon maple syrup – Adds a touch of sweetness to the marinade.
    • Salt and pepper to taste
    • Fresh herbs (optional) – Such as parsley or cilantro for garnish.

    Step-by-Step Instructions

    Step 1: Clean the Mushrooms
    Begin by wiping the mushrooms with a clean, damp towel to remove any dirt. Avoid rinsing them under water as they can absorb moisture and become soggy.

    Step 2: Prepare the Marinade
    In a medium-sized bowl, whisk together the soy sauce, Worcestershire sauce, toasted sesame oil, olive oil, smoked paprika, apple cider vinegar, and maple syrup. This marinade will infuse the mushrooms with flavor and help them caramelize on the grill.

    Step 3: Slice the Mushrooms
    Cut the cleaned mushrooms in half lengthwise. This helps them cook evenly and makes them easier to skewer.

    Step 4: Marinate the Mushrooms
    Toss the mushroom halves in the marinade, ensuring each piece is well coated. Let them sit for about 15 minutes to absorb the flavors. Chef’s Tip: If you have extra time, marinate them longer for a more intense flavor.

    Step 5: Skewer the Mushrooms
    Thread the marinated mushrooms onto skewers, about 4-5 pieces per skewer. If using wooden skewers, soak them in water for 30 minutes beforehand to prevent burning.

    Step 6: Preheat the Grill
    Preheat your grill to 500°F. If you’re using an electric grill, this high temperature helps achieve a nice sear on the mushrooms.

    Step 7: Grill the Mushrooms
    Place the skewers on the grill, cut side down. Brush them with the remaining marinade. Grill for 5-8 minutes until they are seared and tender. Flip the skewers and grill for another 3-4 minutes. The mushrooms should have a nice char and be juicy.

    Step 8: Finish and Serve
    Remove the skewers from the grill and sprinkle with salt and pepper. Top with fresh herbs if desired. Serve warm and enjoy the umami bomb explosion!

    Common Mistakes to Avoid

    Overcrowding the Skewers: Ensure there’s space between each mushroom to allow for even cooking and proper caramelization.

    Skipping the Marinade Time: Allowing the mushrooms to marinate is crucial for absorbing the flavors. Don’t rush this step.

    Using Wet Mushrooms: Wet mushrooms won’t char properly. Always pat them dry before marinating.

    Not Preheating the Grill: A hot grill is essential for that perfect sear and smoky flavor. Don’t skip the preheat.

    How to Store & Reheat

    To store leftover mushroom kebabs, place them in an airtight container in the refrigerator for up to 3 days. To reheat, preheat your oven to 350°F and heat the kebabs for about 5-7 minutes until warmed through. Avoid microwaving as it can make the mushrooms rubbery.

    Ingredient Substitutions

    • White mushrooms: Can be replaced with cremini or portobello mushrooms for a meatier texture.
    • Soy sauce: Substitute with tamari for a gluten-free option.
    • Worcestershire sauce: Use a vegan Worcestershire sauce to keep the dish plant-based.
    • Maple syrup: Honey can be used if you prefer a non-vegan sweetener.

    Nutrition Facts

    • Calories: 120 per serving
    • Protein: 4g
    • Fat: 6g
    • Carbs: 12g
    • Serving Size: 2 skewers

    Frequently Asked Questions

    Q: Can I make these kebabs in advance?
    A: Absolutely! You can marinate the mushrooms and keep them in the fridge for up to 24 hours before grilling.

    Q: What can I serve with these mushroom kebabs?
    A: They pair well with a fresh salad, rice, or as a side to your favorite protein.

    Q: Can I use a stovetop grill pan instead of an outdoor grill?
    A: Yes, a grill pan works perfectly. Make sure it’s preheated to a high temperature before adding the skewers.

    Q: Are these kebabs suitable for a keto diet?
    A: While they are low in carbs, you might want to adjust the maple syrup to fit a strict keto diet.

  • CHEAT DAY: Decadent Oreo Balls with a Hidden Twist!

    CHEAT DAY: Decadent Oreo Balls with a Hidden Twist!

    Introduction & My Personal Story

    Ah, the sweet allure of a cheat day. There’s something about indulging in a little decadence that makes all the hard work seem worth it. Let me take you back to a time when I stumbled upon my now-famous Decadent Oreo Balls with a Hidden Twist. It was a lazy Saturday afternoon, and I was in the mood for something sweet yet satisfying. I wanted to create a treat that was not only delicious but also had a surprise element—a hidden twist that would leave everyone guessing. My fondness for Oreos, combined with my love for experimenting in the kitchen, led to the birth of these delightful no-bake treats.

    In my 5 years of experience as a chef, I’ve learned that the best recipes often come from moments of spontaneous creativity. That day, I decided to incorporate a bit of cottage cheese into the mix—something I hadn’t seen done before. The result was a creamier, tangier filling that perfectly complemented the sweetness of the Oreos. These Oreo balls quickly became a family favorite, and now I’m thrilled to share this indulgent recipe with you. So, grab your apron, and let’s dive into this cheat day delight!

    Why You’ll Love This Recipe

    • No-Bake: No oven required, making it perfect for a quick treat.
    • Surprise Twist: The addition of cottage cheese adds a creamy tanginess.
    • Customizable: Top with your favorite toppings like sprinkles or crushed Oreos.
    • Simple Ingredients: Requires only a few pantry staples.
    • Quick Chill Time: Ready to enjoy in under an hour.

    Detailed Ingredients

    • Oreos: 36 cookies (about 300 grams), finely crushed.
    • Cream Cheese: 225 grams (8 oz), softened to room temperature.
    • Cottage Cheese: 100 grams, for that secret twist.
    • Chocolate Chips: 300 grams (10 oz), choose your favorite (dark, milk, or white).
    • Coconut Oil: 1 tablespoon, to help melt the chocolate smoothly.
    • Optional Toppings: Sprinkles, crushed Oreos, or sea salt.

    Step-by-Step Instructions

    Step 1: Prepare the Oreos

    Start by placing your Oreos in a food processor. Pulse them until they are finely ground. You want a consistency similar to sand. If you don’t have a food processor, a rolling pin and a ziplock bag will do the trick.

    Step 2: Blend the Mixture

    In a large mixing bowl, combine the crushed Oreos with the softened cream cheese and cottage cheese. Use a spatula or a stand mixer to blend until smooth. The mixture should be well combined with no visible chunks of cream cheese.

    Step 3: Form the Balls

    Scoop out about 1 tablespoon of the mixture and roll it into a ball using your hands. Place each ball on a baking sheet lined with parchment paper. Once all the balls are formed, place the tray in the freezer for about 30 minutes. This will help them firm up for dipping.

    Step 4: Melt the Chocolate

    In a microwave-safe bowl, combine the chocolate chips with the coconut oil. Microwave in 30-second increments, stirring in between, until the chocolate is completely melted and smooth. Alternatively, you can use a double boiler.

    Step 5: Dip the Balls

    Remove the Oreo balls from the freezer. Using a fork, dip each ball into the melted chocolate, ensuring it is fully coated. Let the excess chocolate drip off before placing it back on the parchment-lined sheet.

    Step 6: Add Toppings

    While the chocolate is still wet, sprinkle your choice of toppings—be it sprinkles, extra crushed Oreos, or a pinch of sea salt. This is where you can get creative and personalize each treat.

    Step 7: Final Chill

    Place the coated Oreo balls in the refrigerator for about 15–20 minutes, or until the chocolate is set. Then, they’re ready to serve!

    Common Mistakes to Avoid

    • Skipping the Chill: Don’t rush the chilling process; it’s crucial for firming up the balls before dipping.
    • Overheating Chocolate: Be careful not to burn the chocolate. Use short intervals when microwaving and stir often.
    • Too Much Filling: Avoid overfilling with cream cheese, which can make the balls too soft.

    How to Store & Reheat

    Once your Oreo balls are set, store them in an airtight container in the refrigerator. They will keep well for up to a week. If you prefer them warm, let them sit at room temperature for a few minutes before enjoying. However, they are best served chilled.

    Ingredient Substitutions

    • Oreos: Substitute with any chocolate sandwich cookie.
    • Cream Cheese: Use mascarpone for a richer taste.
    • Chocolate Chips: Use baking chocolate or candy melts as alternatives.

    Nutrition Facts

    • Calories: 150 per ball
    • Protein: 2 grams
    • Fat: 10 grams
    • Carbs: 15 grams
    • Serving Size: 1 ball

    Frequently Asked Questions

    Q: Can I make these Oreo balls in advance?

    A: Absolutely! They can be made a day or two in advance and stored in the fridge.

    Q: Can I use low-fat cream cheese?

    A: Yes, but the texture might be slightly different. Full-fat cream cheese gives the best results.

    Q: What if I don’t have a food processor?

    A: You can crush the Oreos using a rolling pin and a ziplock bag.

    Q: Can I freeze the Oreo balls?

    A: Yes, they can be frozen for up to a month. Thaw in the refrigerator before serving.

  • 5-MIN FUEL: Decadent Chocolate Cherry Cheesecake Yogurt Bowl Packed with 30g Protein!

    5-MIN FUEL: Decadent Chocolate Cherry Cheesecake Yogurt Bowl Packed with 30g Protein!

    Introduction & My Personal Story

    There’s something special about a dish that can be whipped up in just five minutes yet feels like a treat worthy of a leisurely Sunday brunch. My journey with the Decadent Chocolate Cherry Cheesecake Yogurt Bowl started on a particularly hectic morning. As a chef with a bustling schedule, finding time for a nutritious breakfast can be challenging. One day, as I rummaged through my fridge, I stumbled upon some frozen cherries, Greek yogurt, and a bar of chocolate staring back at me. The idea struck like lightning—I could combine these humble ingredients into something spectacular.

    In my 5 years of experience, I’ve learned that the simplest ingredients can create the most profound flavors. That morning, as I took my first bite of this chocolate cherry concoction, I was transported back to childhood summers spent picking cherries with my grandmother. The rich creaminess of the yogurt paired with the tartness of the cherries and the indulgent chocolate undertones made for an unforgettable experience. This bowl is not just about taste; it’s a powerhouse of protein, perfect for anyone who wants to fuel their day without sacrificing flavor. Whether you’re a busy professional or a fitness enthusiast, this dish is designed to fit seamlessly into your lifestyle.

    Why You’ll Love This Recipe

    • Quick and Easy: Ready in just 5 minutes—perfect for those rushed mornings.
    • High in Protein: Packed with over 30g of protein to keep you satiated and energized.
    • Decadent Flavor: Combines the richness of chocolate with the tartness of cherries.
    • Healthy Ingredients: Uses natural, wholesome ingredients without any guilt.
    • Versatile: Enjoy it as a quick breakfast, post-workout snack, or even a dessert.

    Detailed Ingredients

    To craft this Chocolate Cherry Cheesecake Yogurt Bowl, you’ll need:

    • 1 cup (245g) Greek yogurt: Look for unsweetened, full-fat for creaminess.
    • 1/2 cup (120g) cottage cheese: Choose small curd for a smoother texture.
    • 1 cup (150g) frozen cherries: Opt for pitted and unsweetened.
    • 1 teaspoon vanilla extract: Pure extract enhances the cheesecake flavor.
    • 1/4 cup (30g) chocolate cereal: Adds crunch and chocolate goodness.
    • 2 tablespoons chocolate chips: Dark chocolate for a richer taste.
    • 1 tablespoon almond butter: Creamy almond butter for a nutty finish.

    Step-by-Step Instructions

    Step 1: Combine Ingredients
    In a medium-sized bowl, mix together the Greek yogurt and cottage cheese until well combined. This mixture forms the creamy base of your bowl, reminiscent of a cheesecake texture. Chef’s Tip: If you prefer a smoother consistency, blend the cottage cheese before mixing it with the yogurt.

    Step 2: Add Cherries and Vanilla
    Stir in the frozen cherries and vanilla extract. Allow the cherries to sit for a minute or two. The cold cherries will start to thaw slightly, releasing their juices and infusing the yogurt with a sweet-tart flavor. The vanilla adds a subtle depth that ties the flavors together.

    Step 3: Top with Cereal and Chocolate
    Sprinkle the chocolate cereal and chocolate chips on top. The cereal provides a delightful crunch, while the chocolate chips melt slightly, creating pockets of rich chocolatey flavor.

    Step 4: Drizzle with Almond Butter
    Using a spoon, drizzle the almond butter over the top. This step not only adds a nutty flavor but also increases the dish’s protein content, making it even more satisfying.

    Step 5: Mix and Enjoy
    Gently mix all the ingredients together until you have a beautiful, marbled effect. Enjoy immediately for the best texture and flavor.

    Common Mistakes to Avoid

    Even a simple dish like this can have its pitfalls. Here’s how to steer clear of them:

    • Overmixing: Mixing too vigorously can break down the cherries too much, leading to a mushy texture. Stir gently to maintain a pleasant consistency.
    • Using sweetened yogurt: Opting for sweetened yogurt can make the dish overly sweet. Stick to unsweetened to control the sugar levels.
    • Skipping the almond butter: This ingredient is crucial for the protein content and flavor balance. If nut allergies are a concern, consider using sunflower seed butter instead.

    How to Store & Reheat

    While this dish is best enjoyed fresh, you can prepare it in advance. Store any leftovers in an airtight container in the refrigerator for up to 2 days. Before consuming, give it a quick stir to redistribute the ingredients. If the yogurt has thickened too much, add a splash of milk or water to loosen it up.

    Ingredient Substitutions

    Need to make some swaps? Here’s how:

    • Greek yogurt: Substitute with any plant-based yogurt for a vegan version.
    • Frozen cherries: Fresh cherries or berries like strawberries or raspberries work well.
    • Almond butter: Peanut butter or sunflower seed butter can be used as alternatives.
    • Chocolate cereal: Granola or crushed nuts make excellent crunchy substitutes.

    Nutrition Facts

    • Calories: 393 kcal
    • Protein: 30g
    • Fat: 18g
    • Carbohydrates: 35g
    • Serving Size: 1 bowl

    Frequently Asked Questions

    • Can I use fresh cherries instead of frozen?
      Yes, fresh cherries can be used, but the texture will be slightly different. Frozen cherries provide a nice chill and juiciness when they thaw.
    • Is this recipe suitable for vegans?
      With a few substitutions like plant-based yogurt and omitting cottage cheese, you can easily make it vegan.
    • How can I add more protein?
      Consider adding a scoop of protein powder to the yogurt mixture or increasing the amount of cottage cheese.
    • What if I don’t have chocolate cereal?
      You can use granola or any crunchy cereal you have on hand as a substitute.

  • Focus Win: Ultimate Smoothie Bowl

    Focus Win: Ultimate Smoothie Bowl

    Introduction & My Personal Story

    Ah, the smoothie bowl. Is there anything more satisfying than diving into a bowl of vibrant, creamy goodness that’s packed with nutrition? My love affair with the smoothie bowl began about five years ago when I was searching for a quick breakfast that could keep up with my hectic mornings. I remember the first time I blended up a concoction of frozen bananas, berries, and a splash of almond milk. It was a revelation. The texture was creamy, almost like soft-serve ice cream, and it was so refreshing. But what truly sold me was how energized and focused I felt afterward.

    In my 5 years of experience as a chef and food blogger, I’ve dabbled in various recipes, but this one remains my go-to for a nourishing start to the day. It’s not just food; it’s a ritual. I love experimenting with different toppings and flavors, but the core ingredients remain the same. This smoothie bowl has seen me through countless early mornings, post-workout refuels, and even as a guilt-free dessert. It’s a bowl of comfort, energy, and pure joy. Let me guide you through creating your own ultimate smoothie bowl that’s not only delicious but also boosts your focus and vitality.

    Why You’ll Love This Recipe

    • Quick and easy to prepare, perfect for busy mornings.
    • Packed with Omega-3s for enhanced cognitive function.
    • Customizable with your favorite toppings.
    • Naturally sweetened with fruits, no added sugars.
    • Vegan and dairy-free, suitable for various dietary needs.

    Detailed Ingredients

    • 1 frozen banana (approximately 120g): Adds creaminess and natural sweetness.
    • 1 scoop protein powder (about 30g): Choose vanilla or chocolate for an extra nutrient boost.
    • 1 cup frozen mixed berries (150g): A mix of strawberries, blueberries, and raspberries works well.
    • 1/4 cup unsweetened almond milk (60ml): Provides a smooth consistency; any plant-based milk can be used.
    • 1 tablespoon nut butter (15g): Almond or peanut butter adds healthy fats and richness.

    Step-by-Step Instructions

    Step 1: Prepare Your Ingredients
    Gather all your ingredients on the counter. Make sure the banana and berries are frozen, as this is key to achieving the right texture. Chef’s Tip: Slice the banana before freezing for easier blending.

    Step 2: Blend It Up
    In a high-powered blender, combine the frozen banana, protein powder, frozen berries, and almond milk. Start with just 2 tablespoons of almond milk to keep the mixture thick. Blend on high speed until smooth. If the mixture is too thick, add more almond milk, one tablespoon at a time. The goal is a thick, creamy consistency similar to soft-serve ice cream.

    Step 3: Pour and Top
    Transfer the blended mixture into a bowl. This is where you can get creative. Top with your favorite ingredients like granola, fresh fruits, or a drizzle of nut butter. Chef’s Tip: Add a sprinkle of chia seeds or flaxseeds for an extra boost of Omega-3s.

    Step 4: Enjoy Immediately
    Smoothie bowls are best enjoyed fresh. The texture and flavors are most vibrant when consumed right away. Dig in and savor each spoonful of your ultimate smoothie bowl.

    Common Mistakes to Avoid

    • Using room temperature fruit: Always use frozen fruit for the right consistency.
    • Over-blending: Blend just until smooth to avoid a runny texture.
    • Too much liquid: Add almond milk gradually to keep it thick.
    • Skipping the protein powder: It’s crucial for maintaining energy and focus throughout the day.

    How to Store & Reheat

    If you have leftovers, cover the smoothie bowl with plastic wrap and store it in the freezer for up to 2 days. To enjoy again, let it sit at room temperature for about 10 minutes before eating. Note that the texture will be more like a sorbet than a fresh smoothie bowl.

    Ingredient Substitutions

    • Frozen banana: Substitute with frozen avocado or zucchini for a lower-sugar option.
    • Protein powder: If you prefer, skip it or use a plant-based option to keep it vegan.
    • Almond milk: Swap with oat, soy, or coconut milk as per preference.
    • Nut butter: Use sunflower seed butter for a nut-free alternative.

    Nutrition Facts

    • Calories: 291 kcal
    • Protein: 21g
    • Carbohydrates: 24g
    • Fat: 6g
    • Fiber: 6g
    • Serving Size: 1 bowl

    Frequently Asked Questions

    • Can I make this smoothie bowl ahead of time? It’s best enjoyed fresh, but you can freeze it and thaw slightly before eating.
    • What toppings work best? Fresh fruits, nuts, seeds, and granola are great options.
    • Is this recipe suitable for kids? Absolutely! It’s a fun and healthy way to get kids to eat more fruits.
    • How can I increase the protein content? Add more protein powder or a scoop of Greek yogurt.
    • Can I use fresh berries instead of frozen? Fresh berries can be used but ensure the banana is frozen for the right texture.

  • ZERO PREP: Zesty Homemade Cocktail Sauce for Instant Party Fun!

    ZERO PREP: Zesty Homemade Cocktail Sauce for Instant Party Fun!

    Introduction & My Personal Story

    There’s something magical about a sauce that can elevate a dish and bring people together. My journey with this Zesty Homemade Cocktail Sauce dates back to a summer when I was just starting out in my culinary career. It was my first big family gathering after I took the leap into the world of cooking. I was tasked with preparing shrimp cocktail for a party of twenty, and I knew the real star would be the sauce. I remember standing in the kitchen, surrounded by the hustle and bustle of family chatter, as I meticulously mixed ingredients, tasting and adjusting until it was just right. The first bite was a revelation—a perfect balance of tangy, spicy, and savory. It was a hit, and from that moment, I knew I had a secret weapon in my culinary arsenal. In my 5 years of experience, I’ve learned that sometimes the simplest recipes, like this cocktail sauce, can make the biggest impact. It’s a quick, no-cook solution for any party or quick snack, and it’s been a staple in my kitchen ever since.

    Why You’ll Love This Recipe

    • Quick and Easy: Ready in under 5 minutes with zero cooking required.
    • Minimal Ingredients: Only 7 pantry staples needed.
    • Customizable: Adjust the heat and tang to your liking.
    • Versatile: Perfect for shrimp, oysters, fries, and more.
    • Party Favorite: A guaranteed hit at any gathering.

    Detailed Ingredients

    • ½ cup ketchup: Look for a brand with natural ingredients for the best base flavor.
    • 2 tbsp prepared horseradish: Fresh and pungent, this adds the signature kick.
    • Juice of ½ lemon: Freshly squeezed for that bright, zesty flavor.
    • ½ tbsp Worcestershire sauce: Adds depth and umami.
    • ¼ tsp hot sauce: Choose your favorite brand to control the heat level.
    • ⅛ tsp salt: Enhances all the flavors.
    • ⅛ tsp black pepper: Freshly ground for a subtle spice.

    Step-by-Step Instructions

    Step 1: Gather Your Ingredients
    Before you start, ensure all your ingredients are measured and ready. This makes the process smooth and stress-free, which is ideal when you’re in a rush. Chef’s Tip: Use fresh lemon juice for the best flavor burst.

    Step 2: Combine the Ingredients
    In a medium-sized mixing bowl, add the ½ cup ketchup, 2 tbsp prepared horseradish, and the juice of ½ lemon. Stir gently with a spoon until the mixture is smooth and the ketchup and horseradish are well blended.

    Step 3: Add the Flavor Boosters
    Pour in the ½ tbsp Worcestershire sauce and ¼ tsp hot sauce. These two ingredients will add depth and a slight heat to your sauce. Mix thoroughly until everything is well incorporated.

    Step 4: Season to Perfection
    Finally, sprinkle in ⅛ tsp salt and ⅛ tsp black pepper. Stir again, ensuring that the seasoning is evenly distributed. Taste and adjust any flavors if necessary. Chef’s Tip: Let it sit for a few minutes to allow the flavors to meld.

    Step 5: Serve or Store
    Your cocktail sauce is now ready to enjoy! Serve it immediately with your favorite seafood or store it in an airtight container in the refrigerator for later use. It’s best consumed within a week for optimal freshness.

    Common Mistakes to Avoid

    • Overpowering Heat: Be cautious with the hot sauce. Start with a small amount and adjust to taste.
    • Skipping Fresh Lemon Juice: Bottled lemon juice lacks the vibrant flavor of fresh. Always opt for fresh.
    • Not Mixing Well: Ensure all ingredients are thoroughly combined to avoid uneven flavor distribution.

    How to Store & Reheat

    Store your cocktail sauce in an airtight container in the refrigerator. It will keep for up to one week. If you find the sauce has thickened after refrigeration, let it sit at room temperature for a few minutes and stir before serving. This sauce is not suitable for freezing as it can alter the texture and flavor.

    Ingredient Substitutions

    • Ketchup: Substitute with tomato paste and a pinch of sugar for a thicker, less sweet version.
    • Prepared Horseradish: If unavailable, mix freshly grated horseradish with a touch of vinegar.
    • Worcestershire Sauce: Soy sauce with a dash of vinegar can be a quick alternative.
    • Hot Sauce: Use cayenne pepper or chili flakes if you prefer dry heat.

    Nutrition Facts

    • Calories: 30 per 2-tablespoon serving
    • Protein: 0g
    • Fat: 0g
    • Carbs: 8g
    • Serving Size: 2 tablespoons

    Frequently Asked Questions

    • Can I make this sauce in advance?
      Absolutely! It can be made a day ahead and stored in the fridge.
    • Is this sauce gluten-free?
      Yes, ensure your Worcestershire sauce and ketchup are gluten-free.
    • How can I make it less spicy?
      Reduce or omit the hot sauce to suit your taste.
    • Can I use lime instead of lemon?
      Yes, lime juice can offer a slightly different but still delicious citrus note.
    • What can I serve this with besides seafood?
      Try it with fries, chicken tenders, or as a burger topping.

  • GAINS: Power-Packed, Freezer-Friendly Meatballs!

    GAINS: Power-Packed, Freezer-Friendly Meatballs!

    Introduction & My Personal Story

    There’s something about a batch of homemade meatballs that transports me back to my grandmother’s kitchen. Growing up, Sunday afternoons were reserved for family dinners, and meatballs were always the star of the show. The aroma of sizzling meat, the gentle hum of conversation, and the clinking of forks against plates are memories I cherish. In my 5 years of experience as a chef, I’ve learned that food is not just about sustenance; it’s about creating moments, and these power-packed, freezer-friendly meatballs are a testament to that philosophy.

    As a young chef, I was always experimenting, tweaking my grandmother’s recipe to boost its nutritional value without sacrificing flavor. I wanted to create a meal that was not only delicious but also aligned with my fitness goals. These meatballs fit the bill perfectly. They’re loaded with protein to fuel your muscles and are easy to prepare in advance, making them a staple in my kitchen. Whether you’re meal prepping for the week or looking for a quick, post-workout meal, these meatballs have got you covered.

    Why You’ll Love This Recipe

    • High Protein: Each serving packs a punch with 24g of protein, perfect for muscle recovery.
    • Freezer-Friendly: Make a big batch and freeze them for easy future meals.
    • Simple Ingredients: No need for a long shopping list; everything can be found at your local market.
    • Versatile: Enjoy them on their own, in a sandwich, or with pasta.
    • Quick to Make: From start to finish in under an hour.

    Detailed Ingredients

    To create these delicious and nutritious meatballs, you’ll need the following ingredients:

    • **500g ground beef**: Look for lean cuts to reduce fat content.
    • **250g Italian sausage**: Adds a spicy kick; you can choose mild if preferred.
    • **1 cup (100g) breadcrumbs**: Opt for whole wheat for added fiber.
    • **1/2 cup (50g) grated Parmesan**: Aged Parmesan has a richer flavor.
    • **2 teaspoons garlic powder**
    • **1 teaspoon onion powder**
    • **1 tablespoon Italian seasoning**: A blend of oregano, basil, thyme, and rosemary.
    • **2 large eggs**: Acts as a binder for the mixture.
    • **1/4 cup (60ml) milk**: Keeps the meatballs moist.
    • **Salt and pepper to taste**

    Step-by-Step Instructions

    Step 1: Prepare the Mixture

    Start by combining your dry ingredients in a small bowl: **breadcrumbs**, **Parmesan**, **garlic powder**, **onion powder**, **Italian seasoning**, **salt**, and **pepper**. In a separate bowl, lightly whisk the **eggs**. This ensures even distribution when mixing with the meat.

    Step 2: Combine Ingredients

    In a large mixing bowl, combine the breadcrumb mixture with the **eggs**, **milk**, **Italian sausage**, and **ground beef**. Using your hands, gently mix until everything is well combined. Be careful not to overmix; otherwise, the meatballs can become tough.

    Step 3: Rest the Mixture

    Allow the mixture to rest for about five minutes. This gives the breadcrumbs time to absorb the liquid, which results in a more cohesive meatball.

    Step 4: Shape the Meatballs

    Divide the mixture and shape it into approximately 32 balls, each about 2 tablespoons in size. Chef’s Tip: Use a small ice cream scoop for uniform sizing.

    Step 5: Preheat and Prepare for Baking

    Preheat your oven to 400°F (200°C). Line a baking sheet with parchment paper and place the meatballs on it, ensuring they are spaced about one inch apart to allow even cooking.

    Step 6: Bake the Meatballs

    Bake the meatballs for 15 minutes or until they are lightly browned and reach an internal temperature of 160°F (70°C). This ensures they’re cooked through while retaining juiciness.

    Step 7: Simmer in Sauce (Optional)

    If you’d like to add an extra layer of flavor, transfer the meatballs to a simmering **marinara sauce** for an additional five minutes. If you’re skipping the sauce, bake them for an extra 3–5 minutes until fully cooked.

    Common Mistakes to Avoid

    • Overmixing: This can lead to tough meatballs. Mix just until combined.
    • Skipping the Rest: Allowing the mixture to rest is crucial for texture.
    • Incorrect Oven Temperature: Always preheat your oven to ensure even cooking.
    • Not Checking Internal Temperature: Use a meat thermometer to ensure meatballs are fully cooked.

    How to Store & Reheat

    To store your meatballs, let them cool completely before transferring them to an airtight container. They can be refrigerated for up to 4 days. For longer storage, place them in a freezer-safe bag or container and freeze for up to 3 months.

    When you’re ready to reheat, thaw them overnight in the refrigerator if frozen. You can reheat them in the oven at 350°F (175°C) for about 10 minutes or until warmed through. Alternatively, you can simmer them in sauce for a quick and flavorful meal.

    Ingredient Substitutions

    • Ground Turkey or Chicken: For a leaner option, swap out ground beef.
    • Gluten-Free Breadcrumbs: Use these if you’re avoiding gluten.
    • Almond Milk: A non-dairy alternative to regular milk.
    • Vegan Parmesan: For a dairy-free option.

    Nutrition Facts

    • Calories: 490 kcal
    • Protein: 24g
    • Fat: 35g
    • Carbs: 12g
    • Serving Size: 4 meatballs

    Frequently Asked Questions

    • Can I make these meatballs ahead of time? Yes, prepare the mixture and shape the meatballs, then refrigerate for up to a day before cooking.
    • What type of sauce pairs well with these meatballs? Marinara or a spicy arrabbiata sauce complements them beautifully.
    • Can I cook these meatballs in a skillet? Absolutely, just ensure they’re cooked through by checking the internal temperature.
    • Are these meatballs suitable for meal prep? Definitely, they freeze well and can be reheated easily for a quick meal.
    • How can I make these meatballs spicier? Add red pepper flakes or use hot Italian sausage for an extra kick.

  • LATE NIGHT FUEL: Sticky-Sweet Teriyaki Salmon with Serious Takeout Vibes

    LATE NIGHT FUEL: Sticky-Sweet Teriyaki Salmon with Serious Takeout Vibes

    Introduction & My Personal Story

    When the moon rises and the world quiets down, I find solace in my kitchen. Late nights have always been my creative sanctuary, a time when I can experiment with flavors and create something that not only satisfies my hunger but also fuels my passion. One dish that has become a staple in my late-night repertoire is the Sticky-Sweet Teriyaki Salmon. I remember the first time I made this dish; it was during a particularly intense week of culinary school. I needed something quick, flavorful, and energizing. The aroma of sweet soy sauce mingling with ginger and garlic filled my tiny apartment, and as I took my first bite, I knew I had found my late-night muse.

    What makes this dish special to me is its versatility and simplicity. It’s the kind of recipe that transforms leftover ingredients into a gourmet meal. Over the years, in my 5 years of experience as a chef, I’ve perfected the nuances of this dish to ensure it delivers serious takeout vibes without the guilt. Whether you’re pulling an all-nighter or just craving something delicious, this Teriyaki Salmon is your go-to. It’s light enough to avoid the dreaded food coma yet packed with the energy you need to power through those late hours.

    Why You’ll Love This Recipe

    • Quick and easy to prepare, perfect for late-night cravings.
    • Packed with flavor, offering a balance of sweet and savory.
    • Healthy alternative to takeout, with fresh ingredients.
    • Customizable to suit your spice level with sriracha mayo.
    • Minimal cleanup required, so you can get back to your hustle.

    Detailed Ingredients

    To make the perfect Sticky-Sweet Teriyaki Salmon, gather the following:

    • 1 lb salmon, cut into 4 equal pieces. Look for fresh, firm fillets with vibrant color.
    • ¼ cup soy sauce (preferably low-sodium for a healthier option).
    • 2 Tbsp water, to dilute the marinade slightly.
    • ½ Tbsp toasted sesame oil, for a nutty aroma.
    • 1 inch grated ginger, fresh for a zesty kick.
    • ½ tsp minced garlic, or more if you love garlic like I do.
    • 2 Tbsp brown sugar, to add that sticky sweetness.
    • 2 Tbsp rice wine, for depth of flavor.
    • 1 tsp cornstarch, to thicken the sauce.
    • ¼ cup mayo, for the sriracha mayo.
    • 2 Tbsp sriracha, adjust according to your spice preference.

    Step-by-Step Instructions

    Step 1: Make the Marinade
    Start by whisking together the soy sauce, water, toasted sesame oil, grated ginger, minced garlic, brown sugar, rice wine, and cornstarch in a bowl. The cornstarch will help the sauce cling to the salmon, creating that sought-after stickiness.

    Step 2: Prep the Salmon
    Cut the salmon into 4 equal pieces. Ensure each piece is of similar thickness to cook evenly. Chef’s Tip: Pat the salmon dry with paper towels to help the marinade adhere better.

    Step 3: Marinate
    Place the salmon pieces in a zip-top bag or shallow dish. Pour the marinade over the salmon, ensuring each piece is well-coated. Seal the bag or cover the dish and refrigerate for at least 30 minutes, flipping occasionally to ensure even marination.

    Step 4: Heat the Skillet
    Use a well-oiled skillet over medium-high heat. Allow the pan to heat for a few minutes until it’s hot but not smoking. This ensures a good sear on the salmon.

    Step 5: Cook the Salmon
    Add the salmon to the skillet, skin-side down. Cook for 2-3 minutes per side. You’ll know it’s done when it flakes easily with a fork and has a beautiful caramelized exterior.

    Step 6: Make the Sriracha Mayo
    In a small bowl, mix the mayo with sriracha. Adjust the amount of sriracha to your liking. This creamy, spicy sauce pairs perfectly with the sweet teriyaki glaze.

    Step 7: Serve
    Plate the salmon, drizzle with sriracha mayo, and serve alongside your choice of veggies or rice. Enjoy the late-night vibes!

    Common Mistakes to Avoid

    • Over-marinating: Leaving the salmon in the marinade for too long can make it too salty. Stick to the 30-minute mark.
    • High heat: Cooking on too high a heat can burn the glaze. Keep it at medium-high for a perfect sear.
    • Uneven pieces: Cut the salmon evenly to ensure each piece cooks at the same rate.
    • Skipping the pat dry: Moisture prevents the marinade from sticking well, so always pat the salmon dry.

    How to Store & Reheat

    Store any leftover salmon in an airtight container in the refrigerator for up to 3 days. To reheat, place it in a skillet over low heat until warmed through, or use the microwave for 1-2 minutes, ensuring you don’t dry it out.

    Ingredient Substitutions

    • Soy sauce: Swap for tamari or coconut aminos for a gluten-free option.
    • Brown sugar: Honey or maple syrup can be used for a different sweetness profile.
    • Rice wine: Substitute with mirin or a splash of apple cider vinegar.
    • Sriracha: Use your favorite hot sauce or chili paste if preferred.

    Nutrition Facts

    • Calories: 350 per serving
    • Protein: 30g
    • Fat: 20g
    • Carbs: 15g
    • Serving Size: 1 piece of salmon with sauce

    Frequently Asked Questions

    • Can I use frozen salmon? Yes, just ensure it’s fully thawed and patted dry before marinating.
    • What sides pair well with this dish? Steamed rice, sautéed greens, or a simple salad complement the flavors beautifully.
    • How can I make it spicier? Increase the amount of sriracha in the mayo or add chili flakes to the marinade.
    • Can I grill the salmon instead? Absolutely, grilling adds a nice smoky flavor to the dish.
    • Is there a vegetarian alternative? Try using tofu or tempeh as a substitute for salmon.