Author: Muxudo

  • Brain Fuel: Sweet Potato Bliss Hummus

    Brain Fuel: Sweet Potato Bliss Hummus

    Introduction & My Personal Story

    There’s something magical about the first time you taste a dish that feels both nourishing and indulgent. My journey with Sweet Potato Bliss Hummus began in a small, sunlit kitchen in my grandmother’s home. She had a knack for turning humble ingredients into culinary masterpieces, and her sweet potato hummus was no exception. I remember the aroma of sweet potatoes steaming, mingling with the earthy scent of cumin and the sharp tang of freshly squeezed lemon juice. As a child, I would eagerly watch her blend everything into a velvety hummus, my mouth watering in anticipation.

    Fast forward to my adult life, and this dish remains a staple in my kitchen. In my 5 years of experience as a chef, I’ve learned that food is not just about sustenance; it’s about experience, memories, and sometimes, a little bit of magic. Sweet Potato Bliss Hummus is my go-to when I need a brain boost or a comforting snack that feels like a warm hug. It’s a dish that not only nourishes the body but also fuels the soul, reminding me of those cherished moments in my grandmother’s kitchen.

    Why You’ll Love This Recipe

    • Rich in Omega-3 fatty acids, perfect for enhancing cognitive function.
    • Low in calories, making it a guilt-free snack.
    • Simple ingredients that are easy to find and budget-friendly.
    • Versatile dish that pairs well with a variety of dippers like veggies, pita chips, or crackers.
    • Can be made ahead of time, perfect for meal prep and busy weeks.

    Detailed Ingredients

    • Sweet Potato – 1 medium (about 200g), peeled and cubed. Look for firm, unblemished potatoes.
    • Tahini – ¼ cup (60g). Opt for a smooth, creamy variety.
    • Lemon Juice – 2 tablespoons (30ml), freshly squeezed for the best flavor.
    • Salt – ½ teaspoon.
    • Garlic – 1 clove, minced. Fresh garlic provides the best punch.
    • Cumin – ½ teaspoon. Adds warmth and depth.
    • Cayenne Pepper – Optional, for a spicy kick.
    • Olive Oil – For drizzling. Use extra virgin for a rich flavor.
    • Paprika – For garnish, adds a pop of color and flavor.

    Step-by-Step Instructions

    Step 1: Steam the Sweet Potatoes

    Place the cubed sweet potatoes in a steamer basket over boiling water. Cover and let them steam for about 15 minutes. You’ll know they’re ready when a fork easily pierces through them. This step is crucial as it ensures the sweet potatoes are soft enough to blend smoothly.

    Step 2: Blend the Ingredients

    Transfer the steamed sweet potatoes to a food processor. Add the tahini, lemon juice, salt, minced garlic, cumin, and cayenne pepper if you’re using it. Blend on high for 3-4 minutes. You’re aiming for a smooth, creamy consistency, so scrape down the sides of the processor as needed.
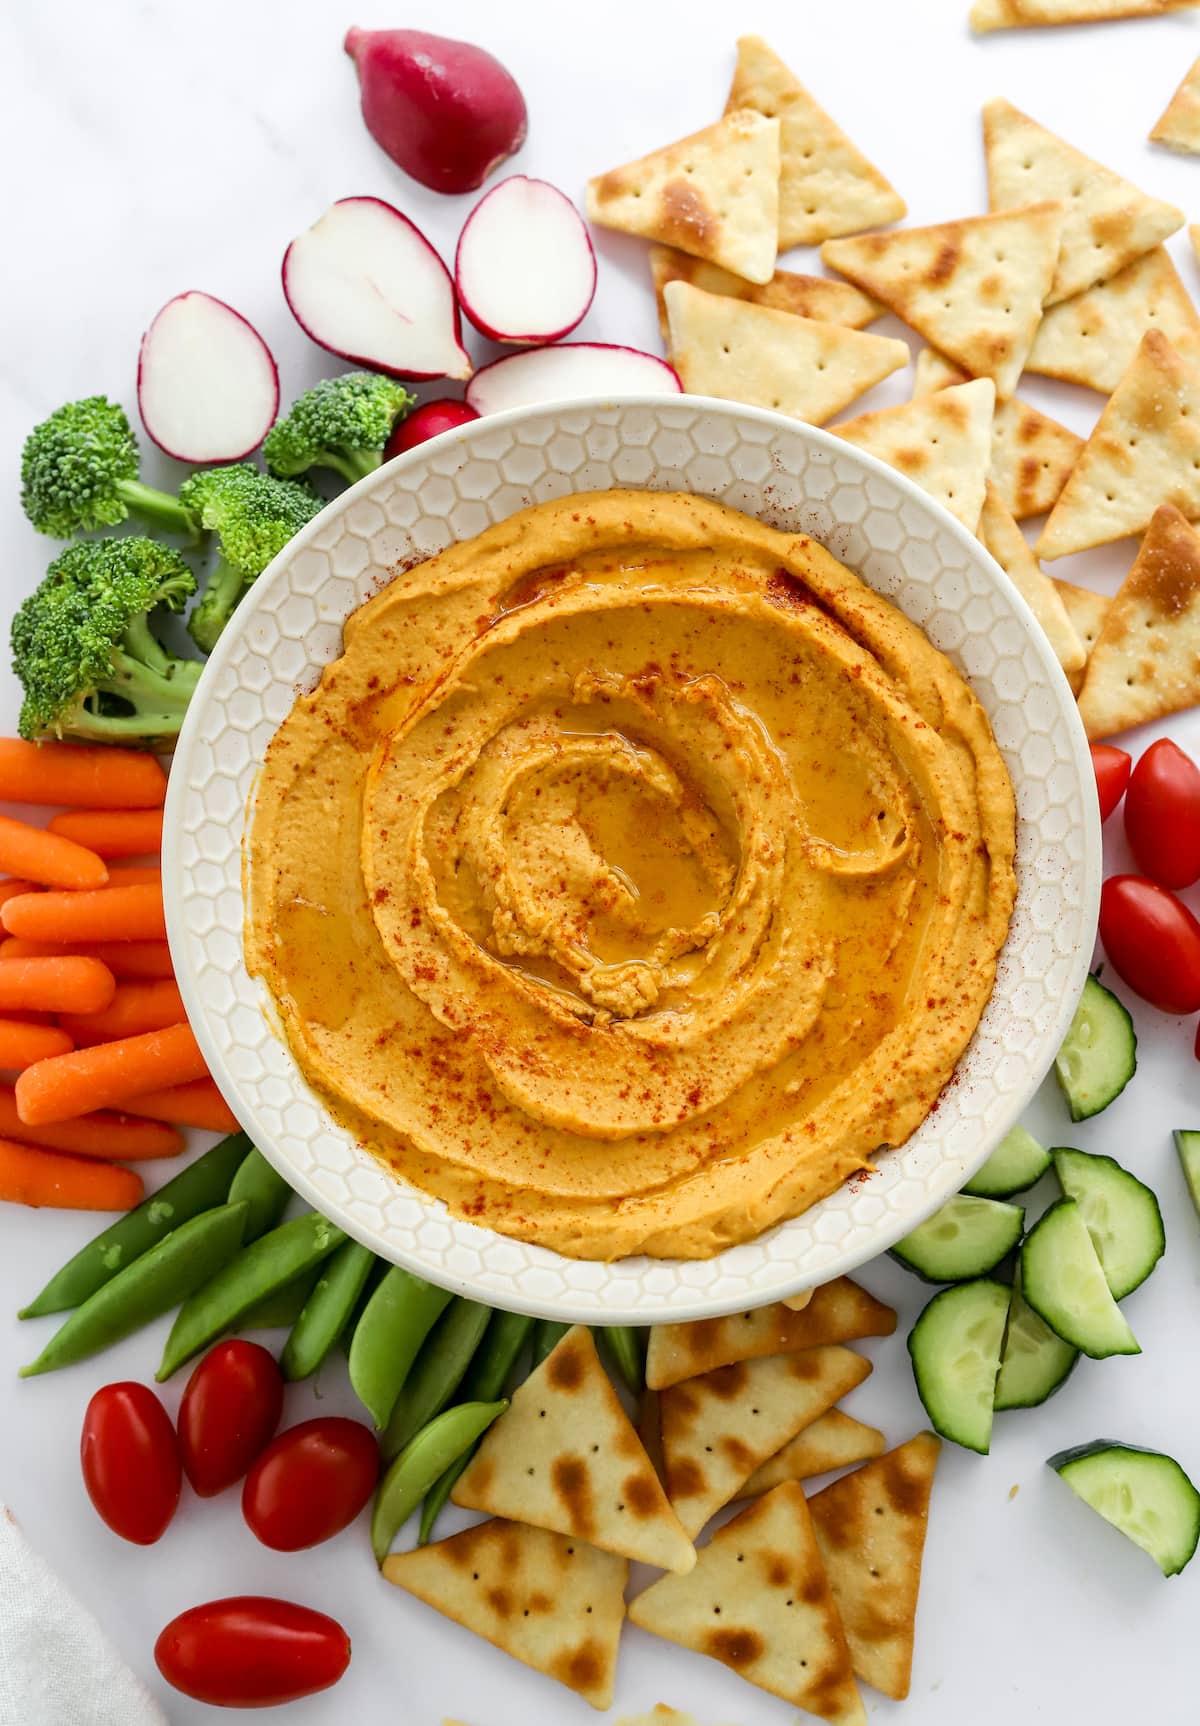
    Step 3: Serve

    Spoon the hummus into a serving bowl. Drizzle with a bit of olive oil and sprinkle with paprika. This not only enhances the flavor but also makes your dish visually appealing.

    Step 4: Enjoy

    Pair your hummus with fresh veggies, pita chips, or crackers. It’s a perfect snack for any time of the day, offering a delicious way to boost your energy and focus.

    Common Mistakes to Avoid

    • Overcooking the Sweet Potatoes: Steaming them for too long can make them mushy and waterlogged, affecting the texture of the hummus.
    • Using Bottled Lemon Juice: Freshly squeezed lemon juice provides a much brighter and fresher flavor.
    • Not Blending Long Enough: To achieve that creamy texture, ensure you blend for the full 3-4 minutes, scraping down the sides as needed.
    • Skipping the Olive Oil Drizzle: It adds a richness and depth to the final dish that shouldn’t be missed.

    How to Store & Reheat

    Transfer any leftover hummus to an airtight container. Store it in the refrigerator for up to 7 days. When you’re ready to enjoy it again, let it sit at room temperature for a few minutes and give it a good stir. If you prefer warm hummus, gently reheat it in a microwave-safe bowl for about 20 seconds, but be cautious not to overheat as it can alter the texture.

    Ingredient Substitutions

    • Sweet Potatoes: You can substitute with butternut squash for a slightly different flavor profile.
    • Tahini: If you’re out of tahini, almond butter can be used, though it will alter the taste.
    • Lemon Juice: Lime juice can be used in a pinch, offering a unique twist.
    • Garlic: Garlic powder can be substituted, but use sparingly as it’s more concentrated.

    Nutrition Facts

    • Calories: 114 kcal per ¼ cup
    • Protein: 2 g
    • Fat: 6 g
    • Carbs: 14 g
    • Serving Size: ¼ cup

    Frequently Asked Questions

    • Can I freeze sweet potato hummus? Yes, you can freeze it in an airtight container for up to 3 months. Thaw in the refrigerator before serving.
    • How can I make the hummus spicier? Add more cayenne pepper or a dash of hot sauce to increase the heat.
    • Is this recipe vegan? Absolutely, it’s completely plant-based and vegan-friendly.
    • What can I pair with sweet potato hummus? It’s great with fresh vegetables like carrots and bell peppers, or with pita chips and whole-grain crackers.
    • Can I make this hummus without a food processor? A high-powered blender can work as an alternative, though you may need to process in batches.

  • NO-BAKE REWARD: Irresistibly Creamy Frozen Delight for Summer!

    NO-BAKE REWARD: Irresistibly Creamy Frozen Delight for Summer!

    Introduction & My Personal Story

    Ah, summer! The season of sun, fun, and frozen treats. One of my fondest memories as a child was spending lazy afternoons at my grandmother’s house, where she would whip up the most delightful, no-bake desserts. Her kitchen was a haven of creativity, and while she had a treasure trove of recipes, there was one that stood out – the frozen s’mores. These weren’t your ordinary s’mores. They were a creamy, chocolatey, and irresistibly cool version that required no fire or fuss. Just layers of crunchy graham crackers, rich chocolate, and a creamy filling that melted in your mouth. Fast forward to today, in my 5 years of experience as a chef, I’ve managed to recreate that magic with a modern twist. My version, the **No-Bake Protein Frozen S’mores**, is not only a nod to those nostalgic days but also a perfect treat for those who crave something sweet yet nutritious. This treat is perfect for a cheat day or just a sunny afternoon indulgence, offering a balance of flavor and protein-packed goodness.

    Why You’ll Love This Recipe

    • **No-Bake**: Perfect for hot days when you don’t want to turn on the oven.
    • **Protein-Packed**: A guilt-free indulgence that supports your fitness goals.
    • **Quick to Make**: Minimal preparation time with maximum reward.
    • **Customizable**: Easily adapt with your favorite flavors and add-ins.
    • **Kid-Friendly**: A fun and easy recipe to make with the little ones.

    Detailed Ingredients

    • **Graham Crackers**: 200g (about 20 crackers). Look for whole grain options for added fiber.
    • **Chocolate Chips**: 150g (about 1 cup). Choose high-quality dark chocolate for a richer taste.
    • **Coco Whip**: 250ml (1 cup), thawed. Opt for the unsweetened version if watching sugar intake.
    • **Vanilla Protein Powder**: 50g (about 1/2 cup). Use a brand with a creamy texture for best results.

    Step-by-Step Instructions

    Step 1: Prepare Your Pan

    Line an 8×8-inch baking dish with parchment paper, ensuring there’s enough overhang on the sides. This will make it easier to lift out the frozen bars later. Chef’s Tip: Secure the parchment with binder clips to keep it in place while assembling.

    Step 2: Layer the Graham Crackers

    Arrange your **graham crackers** in a single layer, upside down, to cover the bottom of the pan completely. Some slight overlapping is fine, but aim for a snug fit.

    Step 3: Melt the Chocolate

    In a microwave-safe bowl, melt the **chocolate chips** in 30-second intervals, stirring in between, until smooth. Alternatively, you can use a double boiler over low heat. Pour the melted chocolate over the graham crackers and spread evenly with a spatula.

    Step 4: Prepare the Filling

    In a medium bowl, combine the thawed **coco whip** and **vanilla protein powder**. Stir until smooth and fully incorporated. Gently spread this mixture over the chocolate layer, ensuring even coverage.

    Step 5: Add the Top Layer

    Place the remaining graham crackers over the filling, pressing down lightly to secure them in place. This will form the top layer of your frozen s’mores.

    Step 6: Freeze

    Freeze the assembled dish for at least 2 hours, or until firm. Chef’s Tip: For the best texture, allow it to freeze overnight.

    Step 7: Serve and Enjoy

    Use the parchment overhang to lift the bars out of the dish. Slice into squares and serve immediately. Store any leftovers in an airtight container in the freezer.

    Common Mistakes to Avoid

    • Skipping the Parchment Paper: This makes removing the bars a hassle. Always line your dish.
    • Overcooking Chocolate: Chocolate can seize if overheated. Use low heat and stir frequently.
    • Uneven Layers: Spread each layer evenly to ensure every bite has a balance of flavors.

    How to Store & Reheat

    Store the frozen s’mores in an airtight container, using parchment paper between layers to prevent sticking. They are best consumed within 2 weeks. If they become too firm, let them sit at room temperature for 2–5 minutes before enjoying.

    Ingredient Substitutions

    • Graham Crackers: Substitute with digestive biscuits for a similar texture.
    • Chocolate Chips: Use white or milk chocolate for a sweeter version.
    • Coco Whip: Replace with regular whipped cream if dairy is not a concern.
    • Vanilla Protein Powder: Choose chocolate or peanut butter flavored protein for a different twist.

    Nutrition Facts

    • Calories: 250 per serving
    • Protein: 8g
    • Fat: 12g
    • Carbs: 30g
    • Serving Size: 1 square (based on 16 servings)

    Frequently Asked Questions

    Q: Can I make these in advance?

    A: Absolutely! These can be made a day ahead and stored in the freezer until you’re ready to serve.

    Q: What if I don’t have protein powder?

    A: You can omit it, though the protein content will be lower. Consider adding a tablespoon of peanut butter for flavor and some protein.

    Q: Can I add nuts or other toppings?

    A: Yes! Chopped nuts, shredded coconut, or sprinkles can be added between layers for extra texture.

    Q: Is there a vegan option?

    A: Use vegan graham crackers, chocolate, and protein powder to make this recipe completely plant-based.

  • 5-MIN FUEL: Whip Up Delicious Matcha Chia Pudding!

    5-MIN FUEL: Whip Up Delicious Matcha Chia Pudding!

    Introduction & My Personal Story

    There’s something magical about waking up to a breakfast that’s both nourishing and invigorating. For me, that magic is encapsulated in my Matcha Chia Pudding. My love affair with matcha started years ago during a trip to Japan, where I was introduced to the traditional tea ceremony. The vibrant green hue and the earthy aroma of matcha left an indelible mark on my culinary soul. Fast forward to today, and it’s become a staple in my kitchen, especially in this quick and delightful pudding.

    In my 5 years of experience as a chef, I’ve always sought recipes that are as practical as they are delicious. This matcha chia pudding is a perfect example. It was born out of necessity during my hectic early morning routines. I needed something that could be prepared in minutes but would keep me energized and focused throughout the day. Combining the antioxidant-rich matcha with the omega-packed chia seeds was a game-changer. It’s a dish that not only fuels my day but also brings back fond memories of my culinary journey.

    Every spoonful is a reminder of that serene Japanese garden and the calm it brought me. Now, I share this recipe with you, hoping it brings as much joy and energy to your mornings as it does to mine.

    Why You’ll Love This Recipe

    • Quick and easy: Ready in just 5 minutes of prep time.
    • Rich in antioxidants and omega-3 fatty acids.
    • Customizable with your favorite toppings.
    • Perfect for meal prep and busy mornings.
    • Vegan and gluten-free.

    Detailed Ingredients

    • Almond milk – 1 cup (240 ml). Look for unsweetened varieties for a healthier option.
    • Chia seeds – 3 tablespoons (36 grams). Ensure they are fresh and not clumped together.
    • Matcha powder – 1 teaspoon (2 grams). Opt for high-quality, ceremonial-grade matcha for the best flavor.
    • Maple syrup – 1 tablespoon (15 ml). Pure maple syrup will add a natural sweetness.
    • Vanilla extract – 1 teaspoon (5 ml). Use real vanilla extract for a richer taste.
    • Optional toppings: Fresh berries, nuts, coconut flakes, or a spoonful of almond butter.

    Step-by-Step Instructions

    Step 1: In a medium-sized jar or bowl, pour in 1 cup of **almond milk**. Make sure it’s cold, as this will help the chia seeds to thicken faster.

    Step 2: Add 1 teaspoon of **matcha powder** to the almond milk. Chef’s Tip: Use a small whisk or a matcha whisk to ensure the powder dissolves completely, leaving no clumps.

    Step 3: Stir in 1 tablespoon of **maple syrup** and 1 teaspoon of **vanilla extract**. These will add sweetness and depth to the pudding.

    Step 4: Gradually add 3 tablespoons of **chia seeds** into the mixture, stirring constantly to prevent them from clumping. The seeds should be evenly distributed throughout the liquid.

    Step 5: Cover the jar or bowl and place it in the refrigerator. Allow it to chill for at least 2–3 hours, or overnight for best results. The mixture should thicken to a pudding-like consistency.

    Step 6: Before serving, give the pudding a good stir to break up any clumps. Top with your favorite toppings such as fresh berries, nuts, or coconut flakes for added texture and flavor.

    Common Mistakes to Avoid

    • Not whisking the matcha properly: Ensure the matcha is fully dissolved to avoid a gritty texture.
    • Using old chia seeds: Fresh chia seeds are crucial for proper thickening. If your pudding is watery, your seeds might be past their prime.
    • Skipping the stir: Stir the pudding before serving to ensure even distribution of the chia seeds.

    How to Store & Reheat

    This matcha chia pudding can be stored in the refrigerator for up to 5 days. Keep it in an airtight container to maintain freshness. If the pudding becomes too thick over time, simply stir in a little more almond milk before serving.

    Ingredient Substitutions

    • Swap **almond milk** for any plant-based milk like coconut or soy milk.
    • Replace **maple syrup** with honey or agave for different sweetness profiles.
    • Use **vanilla bean paste** instead of extract for a more intense vanilla flavor.

    Nutrition Facts

    • Calories: 250 per serving
    • Protein: 6 grams
    • Fat: 10 grams
    • Carbs: 30 grams
    • Serving Size: 1 cup

    Frequently Asked Questions

    • Can I use regular milk instead of almond milk? Yes, but it will no longer be vegan.
    • Can I make this pudding ahead of time? Absolutely! It’s perfect for meal prep and can be made several days in advance.
    • What if I don’t like the taste of matcha? You can reduce the amount or omit it entirely and still enjoy a delicious chia pudding.
    • How can I make this pudding thicker? Add an extra tablespoon of chia seeds if you prefer a thicker consistency.

  • Brain Fuel: Protein Muddy Buddies!

    Brain Fuel: Protein Muddy Buddies!

    Introduction & My Personal Story

    Ah, Protein Muddy Buddies! Just saying the name takes me back to my college days when late-night study sessions were fueled by nothing more than a cup of coffee and whatever snack I could get my hands on. It was during one of these marathon study nights that I stumbled upon the idea of turning a classic snack into something a bit more brain-boosting. I was knee-deep in biochemistry textbooks, and I needed something that would not only satisfy my sweet tooth but also keep me focused and energized. That’s when I decided to experiment with adding protein and healthy fats to the traditional Muddy Buddies recipe.

    In my 5 years of experience as a chef, I’ve learned that snacks can be both delicious and nutritious. This recipe is a testament to that belief. The first time I made these Protein Muddy Buddies, they were an instant hit. My friends and I devoured them between pages of notes, and I knew I had created something special. The rich chocolate, creamy peanut butter, and crunchy cereal came together in a way that was nothing short of magical. These days, I make sure to have a batch ready for those moments when I need a quick pick-me-up. This is more than just a snack; it’s a powerhouse of flavor and nutrition that keeps you going when you need it most.

    Why You’ll Love This Recipe

    • Quick and easy to prepare – ready in just 15 minutes.
    • Packed with protein to keep you full and focused.
    • Uses simple ingredients you probably already have at home.
    • Perfect for meal prep and stays fresh in the fridge.
    • Great for both kids and adults – a family favorite!

    Detailed Ingredients

    • Rice Chex Cereal: 6 cups. Look for a mix of Rice Chex and Catalina Crunch for added protein.
    • Dark Chocolate Chips: 1 cup. Opt for brands like Lily’s to cut down on sugar.
    • Natural Peanut Butter: 1/3 cup. Choose one without added sugar for a healthier option.
    • Coconut Oil: 2 tablespoons. This helps to smooth out the chocolate mixture.
    • Powdered Sugar: 1 cup. Use powdered erythritol for a low-sugar alternative.
    • Vanilla Protein Powder: 1/4 cup. Nuzest is a great choice for this recipe.

    Step-by-Step Instructions

    Step 1: Prepare the Cereal
    Measure out 6 cups of Rice Chex and place them in a large mixing bowl. This will be the base of your Protein Muddy Buddies. Set the bowl aside while you prepare the rest of the ingredients.

    Step 2: Mix Dry Ingredients
    In a large 2-gallon resealable zip-lock bag, combine 1 cup of powdered sugar or erythritol with 1/4 cup of vanilla protein powder. This will be used later to coat the cereal, giving it a sweet finish.

    Step 3: Melt the Mixture
    In a saucepan over low-medium heat, combine 1/3 cup of natural peanut butter, 1 cup of dark chocolate chips, and 2 tablespoons of coconut oil. Stir continuously until the mixture is smooth and well combined. Alternatively, you can microwave the mixture in 30-second bursts, stirring after each interval, until smooth.

    Step 4: Coat the Cereal
    Pour the melted chocolate mixture over the bowl of cereal. Use a spatula to gently toss the cereal until every piece is evenly coated with the chocolate mixture. Make sure to work quickly so the chocolate doesn’t harden before the cereal is fully coated.

    Step 5: Shake and Chill
    Transfer the chocolate-coated cereal into the zip-lock bag with the dry ingredients. Seal the bag and shake it vigorously until all the cereal is coated with the powdered sugar mixture. Spread the mixture out on parchment paper to cool completely. Avoid placing it in an airtight container until it’s completely cool to prevent sogginess.

    Step 6: Store
    Once cooled, place the Protein Muddy Buddies in an airtight container and store them in the refrigerator. This will help maintain their freshness and crunchiness, making them ready to enjoy whenever you need a quick snack.

    Common Mistakes to Avoid

    Overheating the Chocolate Mixture: If the chocolate gets too hot, it can seize up and become grainy. Always melt on low-medium heat and stir continuously.

    Not Cooling Completely: Placing the mixture in an airtight container before it’s fully cooled can make the cereal soggy. Let it cool on parchment paper first.

    Uneven Coating: Be sure to thoroughly mix the cereal with the chocolate mixture to ensure every piece is coated. This helps the powdered sugar stick properly.

    How to Store & Reheat

    Store your Protein Muddy Buddies in an airtight container in the refrigerator. They will stay fresh and crunchy for up to 2 weeks. If you prefer them at room temperature, simply take them out of the fridge 10 minutes before serving. There’s no need to reheat; they’re perfect as is!

    Ingredient Substitutions

    If you need to make some swaps, here are a few safe substitutions:

    • Rice Chex: Use any gluten-free cereal or a mix with other high-protein cereals.
    • Dark Chocolate Chips: Substitute with milk or white chocolate chips, though this will alter the sugar content.
    • Peanut Butter: Almond butter or sunflower seed butter work as great alternatives.
    • Powdered Sugar: Powdered monk fruit sweetener can be used for a zero-calorie option.

    Nutrition Facts

    • Calories: 122 kcal per serving
    • Protein: 4g per serving
    • Fat: 8g per serving
    • Carbohydrates: 15g per serving
    • Serving Size: Approximately 1/2 cup

    Frequently Asked Questions

    Can I make this recipe vegan?
    Yes! Simply use a vegan protein powder and ensure your chocolate chips are dairy-free.

    How can I make this recipe more kid-friendly?
    Kids love sweet treats, so consider using milk chocolate chips and adding colorful sprinkles for fun!

    What if I don’t have coconut oil?
    You can substitute with unsalted butter or a neutral cooking oil like canola.

    Can I freeze Protein Muddy Buddies?
    Yes, they freeze well! Just place them in a freezer-safe bag or container and freeze for up to 3 months.

    Do I have to use a zip-lock bag for coating?
    While it’s convenient, you can also use a large bowl with a lid to shake the cereal and powdered mix.

  • NO-BAKE REWARD: Irresistibly Creamy Pumpkin Delight!

    NO-BAKE REWARD: Irresistibly Creamy Pumpkin Delight!

    Introduction & My Personal Story

    Ah, the magic of autumn! There’s something undeniably comforting about this time of year, with its crisp air and vibrant foliage. It’s a season that calls for cozy gatherings and indulgent treats. One of my all-time favorites is the No-Bake Reward: Irresistibly Creamy Pumpkin Delight. This dessert isn’t just a recipe; it’s a cherished tradition that takes me back to my childhood kitchen, where my grandmother would whip up the most delightful pumpkin creations. I remember the warmth of the kitchen, the aromatic scent of spices, and the joy of sneaking a spoonful of the creamy filling when she wasn’t looking.

    In my 5 years of experience as a chef, I’ve come to appreciate the beauty of no-bake desserts. They’re perfect for those days when you crave something sweet but don’t want to spend hours in the kitchen. This pumpkin delight has become a staple in my repertoire, especially during the holiday season. It’s the kind of dessert that brings people together, sparking conversations and creating memories. Every time I make it, I’m reminded of those cherished moments with my grandmother, and I hope it brings the same warmth and joy to your home.

    Why You’ll Love This Recipe

    • Quick and easy to prepare, with no baking required.
    • Rich, creamy texture that melts in your mouth.
    • Packed with the warm flavors of autumn spices.
    • Perfect for holiday gatherings or a cozy night in.
    • Can be made ahead of time, saving you stress on busy days.

    Detailed Ingredients

    • 1 cup (240g) of **pumpkin puree** – Look for canned puree with no added sugar.
    • 1 cup (240g) of **cream cheese**, softened – Opt for full-fat for the creamiest texture.
    • 1 cup (240g) of **whipped topping** – Make sure it’s thawed if using frozen.
    • 1 teaspoon of **vanilla extract** – Pure extract for the best flavor.
    • 1 teaspoon of **pumpkin pie spice** – A blend of cinnamon, nutmeg, ginger, and cloves.
    • 1 package of **graham crackers** – Approximately 200g, for layering.
    • 1 cup (240ml) of **milk** – For dipping the graham crackers.
    • Additional whipped topping and crushed graham crackers for garnish (optional).

    Step-by-Step Instructions

    Step 1: Begin by preparing your pumpkin filling. In a large mixing bowl, combine 1 cup of **pumpkin puree**, 1 cup of **cream cheese**, and 1 cup of **whipped topping**. Use an electric mixer on medium speed to blend until the mixture is smooth and creamy. Chef’s Tip: Ensure your cream cheese is at room temperature to avoid lumps.

    Step 2: Add 1 teaspoon of **vanilla extract** and 1 teaspoon of **pumpkin pie spice** to the mixture. Blend again until the spices are well incorporated, and the filling is fragrant and evenly spiced.

    Step 3: In a shallow bowl, pour 1 cup of **milk**. Dip each **graham cracker** quickly into the milk, just enough to moisten but not soggy. Line the bottom of a 9×13-inch dish with a layer of these dipped crackers.

    Step 4: Spread half of the pumpkin mixture over the graham cracker layer. Use a spatula to evenly distribute and smooth the filling.

    Step 5: Repeat the process with another layer of dipped **graham crackers**, followed by the remaining pumpkin mixture. Smooth out the top layer with a spatula.

    Step 6: For a finishing touch, spread additional **whipped topping** over the top. If desired, sprinkle with crushed graham crackers for added texture and visual appeal.

    Step 7: Cover the dish with plastic wrap and refrigerate for at least 4 hours, or until the dessert is set and the flavors have melded together. Chef’s Tip: This dessert tastes even better when left overnight, allowing the crackers to soften and the spices to deepen.

    Step 8: Slice, serve, and savor each creamy, spiced bite!

    Common Mistakes to Avoid

    • **Over-soaking the graham crackers**: A quick dip is all that’s needed. Too much milk can make them mushy.
    • **Lumpy filling**: Ensure the cream cheese is fully softened before mixing to achieve a smooth consistency.
    • **Skipping chill time**: The dessert needs at least 4 hours to set properly and develop flavors.

    How to Store & Reheat

    To store the Pumpkin Delight, cover it tightly with plastic wrap or transfer to an airtight container. It will keep in the refrigerator for up to 3 days. While this dessert is best enjoyed cold, if you prefer a slightly warmer treat, allow it to sit at room temperature for about 15 minutes before serving.

    Ingredient Substitutions

    • **Dairy-free**: Substitute cream cheese and whipped topping with plant-based alternatives.
    • **Gluten-free**: Use gluten-free graham crackers for those with dietary restrictions.
    • **Low-sugar**: Opt for a sugar-free whipped topping and check the label on your pumpkin puree for added sugars.

    Nutrition Facts

    • Calories: 250 per serving
    • Protein: 3g
    • Fat: 15g
    • Carbs: 28g
    • Serving Size: 1 slice (approx. 1/12 of the recipe)

    Frequently Asked Questions

    • Can I use fresh pumpkin instead of canned? Yes, simply roast and puree fresh pumpkin for a homemade touch.
    • How far in advance can I make this? It’s best made a day ahead to allow flavors to meld and the dessert to set.
    • Can I freeze this dessert? Freezing is not recommended as it may alter the texture.
    • What can I use instead of graham crackers? Vanilla wafers or digestive biscuits work well as substitutes.

  • 5-MIN FUEL: Protein-Packed French Toast Delight (36g Protein!)

    5-MIN FUEL: Protein-Packed French Toast Delight (36g Protein!)

    Introduction & My Personal Story

    Growing up, breakfast was a sacred ritual in my family. My father would always make sure we started our day with something hearty and wholesome. One morning, as I stumbled into the kitchen with sleep still clinging to me like a warm blanket, I was greeted by the irresistible aroma of cinnamon and vanilla wafting through the air. That was my first introduction to French toast, a dish that would become a beloved staple in our household.

    Fast forward to my college years, and like many of us, I found myself juggling classes, part-time jobs, and a social life. Breakfast had become a grab-and-go affair, often skipped in favor of a few extra minutes of sleep. It was during this hectic time that I decided to reinvent my childhood favorite into something that could fuel my busy mornings without compromising on nutrition. Thus, the Protein-Packed French Toast Delight was born.

    In my 5 years of experience as a chef and food blogger, I’ve learned that the best recipes are those that combine nostalgia with practicality. This French toast delivers just that—comforting flavors with a muscle-building twist. Every bite takes me back to those cherished mornings while giving me the energy to tackle whatever the day throws my way.

    Why You’ll Love This Recipe

    • High in protein — a whopping 36g per serving!
    • Quick and easy — ready in just 5 minutes.
    • Minimal ingredients — perfect for busy mornings.
    • Versatile and customizable with your favorite toppings.
    • Healthy yet indulgent — satisfies your sweet tooth without guilt.

    Detailed Ingredients

    • 2 large eggs
    • 1/2 cup (120 ml) unsweetened almond milk
    • 1 scoop (about 30g) vanilla protein powder
    • 1/2 teaspoon ground cinnamon
    • 1 teaspoon pure vanilla extract
    • A pinch of salt
    • 4 slices of whole-grain bread (look for bread that’s dense and firm to hold the batter well)
    • Cooking spray for the skillet

    Step-by-Step Instructions

    Start by whisking together the eggs, almond milk, protein powder, cinnamon, vanilla, and a pinch of salt in a shallow bowl. Make sure the protein powder is fully dissolved and the mixture is smooth.

    Take your slices of whole-grain bread and soak each one in the mixture for about 15–30 seconds per side. You want the bread to absorb the liquid but not become too soggy. Chef’s Tip: Use slightly stale bread for better absorption without falling apart.

    Heat a nonstick skillet over medium heat and coat it lightly with cooking spray. Once heated, add the soaked bread slices. Cook each side for about 2–3 minutes, or until they turn a beautiful golden brown and have a slight crispiness on the edges.

    Once done, serve your French toast warm. You can top it with fresh berries, a dollop of Greek yogurt, or a drizzle of maple syrup for an added touch of sweetness.

    Common Mistakes to Avoid

    • Over-soaking the bread: This can lead to a soggy texture. Keep the soak time to 15–30 seconds per side.
    • Using too high heat: Cooking on high heat can burn the outside while leaving the inside undercooked. Stick to medium heat for even cooking.
    • Skipping the protein powder: This is crucial for the protein content. Ensure it’s fully mixed into the batter for the best results.

    How to Store & Reheat

    If you have leftovers, let the French toast cool completely before storing. Place in an airtight container and refrigerate for up to 3 days. To reheat, simply pop them in a toaster or warm them in a skillet over medium heat until heated through.

    Ingredient Substitutions

    • Almond milk: Can be replaced with any other milk or milk alternative you prefer.
    • Whole-grain bread: Swap with gluten-free bread if needed.
    • Vanilla protein powder: Feel free to experiment with other flavors like chocolate or cinnamon.

    Nutrition Facts

    • Calories: 401 kcal
    • Protein: 36g
    • Fat: 10g
    • Carbohydrates: 42g
    • Serving Size: 2 slices

    Frequently Asked Questions

    Can I make this recipe vegan? Yes, you can substitute the eggs with a flaxseed mixture and use a plant-based protein powder.

    What other toppings can I use? Besides berries and yogurt, try nut butter, sliced bananas, or chopped nuts.

    Is it okay to use flavored protein powder? Absolutely! Just ensure it complements the vanilla and cinnamon flavors.

    How can I make the French toast crispier? Use a toaster to give them a quick crisp before serving.

    Can I prepare the batter ahead of time? Yes, you can mix the batter the night before and store it in the refrigerator.

  • Brain Fuel: 6 Stage 2 Baby Food Swaps!

    Brain Fuel: 6 Stage 2 Baby Food Swaps!

    Introduction & My Personal Story

    When it comes to introducing solid foods to your baby, it can be both an exciting and daunting task. I remember when my little one was ready to transition to stage 2 baby foods. It was a thrilling milestone in our household. I was determined to provide the best nutrition possible, and that meant getting creative in the kitchen. I recall the first time I combined sweet potatoes with apples and a hint of cinnamon – the aroma that filled the kitchen was delightful. My baby’s eyes lit up with each spoonful, and it became an instant favorite. Over time, I developed a repertoire of combinations that not only fueled my child’s growth but also helped enhance cognitive development. In my 5 years of experience as a chef and a parent, I’ve learned that the right ingredients can make a world of difference in a baby’s diet.

    Why You’ll Love This Recipe

    • Provides essential nutrients for brain development
    • Easy to prepare and customize
    • Uses fresh, wholesome ingredients
    • Perfect for introducing new flavors and textures
    • Can be stored and used over several days

    Detailed Ingredients

    Here’s what you’ll need for these powerful baby food combinations:

    • 1 avocado – Look for ripe, soft avocados.
    • 1 bunch of kale – Choose dark green, crisp leaves.
    • 1 sweet potato – Medium-sized, firm to touch.
    • 1 bunch asparagus – Fresh, firm stalks.
    • 1 banana – Ripe, with a few brown spots.
    • 2 apples – Sweet variety like Gala or Fuji.
    • 2 pears – Ripe but firm.
    • 4 peaches – Ripe, fragrant, slightly soft.
    • 1 pint blueberries – Firm, deep blue color.
    • 1 pineapple – Sweet smell, slight give when pressed.
    • 1 mango – Ripe, slight give when pressed.
    • Quinoa – Pre-rinsed or rinse before using.
    • Ground flax – Look for finely ground flaxseed.

    Step-by-Step Instructions

    Let’s get started on making these delicious baby food combinations:

    Step 1: Ingredient Prep

    Gather all your ingredients. Wash fruits and vegetables thoroughly. Peel and core the apples and pears. Pit and peel the peaches and mango. Trim the asparagus and kale.

    Step 2: Steam Fruits and Vegetables

    Steaming helps preserve nutrients. Here are the times:

    • Sweet potato: 12-15 minutes
    • Apple: 10-12 minutes
    • Asparagus: 7-13 minutes
    • Blueberries: 5-10 minutes
    • Peach: 2-4 minutes
    • Pear: 10-12 minutes
    • Pineapple: 5-10 minutes
    • Mango: 5-10 minutes

    Step 3: Blend

    Once steamed, transfer fruits and vegetables to a high-powered blender. Add a splash of water, breast milk, or formula to achieve your desired consistency. Blend until smooth.

    Step 4: Combine

    Mix the ingredients according to the combinations below:

    • Peach Pear: 2 steamed pears, 3 steamed peaches.
    • Asparagus Apple: 1 bunch steamed asparagus, 1 steamed apple.
    • Sweet Potato Apple Cinnamon: 1 steamed sweet potato, 1 steamed apple, pinch of cinnamon.
    • Avocado Peach Pineapple Kale: 1 avocado, 1 steamed peach, ½ cup steamed pineapple, ½ cup steamed kale.
    • Pineapple Mango: 1 cup steamed pineapple, 1 cup steamed mango.
    • Blueberry Banana Quinoa Flax: 1 pint steamed blueberries, ½ cup cooked quinoa, 1 ripe banana, 2 tbsp ground flax.

    Step 5: Store

    Allow purees to cool. Transfer to BPA-free containers or silicone ice cube trays. Label for easy identification and store in the refrigerator or freezer.

    Common Mistakes to Avoid

    Here’s what to watch out for:

    • Over-steaming: This can make fruits and vegetables lose nutrients. Stick to recommended times.
    • Not blending enough: Ensure a smooth consistency to avoid choking hazards.
    • Improper storage: Always use airtight containers and label them.

    How to Store & Reheat

    For best results, store purees in the fridge for up to 3 days or freeze for up to 3 months. To reheat, place in a bowl over warm water or microwave in short intervals, stirring in between.

    Ingredient Substitutions

    • Sweet potato: Swap with butternut squash for a similar texture.
    • Pears: Apples can be a substitute if pears are unavailable.
    • Quinoa: Replace with millet or rice for a different grain.

    Nutrition Facts

    • Calories: Approximately 60 kcal per serving
    • Protein: 1.5g
    • Fat: 2g
    • Carbs: 12g
    • Serving Size: 1/4 cup

    Frequently Asked Questions

    • Can I freeze these purees? Yes, they freeze well for up to 3 months.
    • What age are these recipes suitable for? These are ideal for babies around 6-8 months old.
    • Can I add spices? A pinch of cinnamon or nutmeg can be added for flavor.
    • Is it safe to use raw avocado? Yes, raw avocado is safe and nutritious for babies.
    • How do I know if my baby is allergic? Introduce one new food at a time and watch for any reactions.

  • 5-MINUTE FUEL: Zucchini & Corn Salad – A Fresh, No-Cook Delight!

    5-MINUTE FUEL: Zucchini & Corn Salad – A Fresh, No-Cook Delight!

    Introduction & My Personal Story

    I remember the first time I stumbled upon the idea of a zucchini and corn salad. It was a hot summer afternoon, and I was searching for something refreshing yet satisfying. As a chef, I’m always on the lookout for recipes that offer maximum flavor with minimal fuss. This particular salad became a staple in my kitchen during those sweltering months. The crunch of fresh corn, the subtle sweetness of zucchini, and the nutty bite of toasted almonds create a harmony that’s hard to resist. In my 5 years of experience, I’ve learned that sometimes the simplest dishes can leave the most lasting impressions. This salad, requiring no cooking, is a testament to that. It’s perfect for those days when you want to enjoy the flavors of summer without breaking a sweat. I recall serving it at a family barbecue, and it was an instant hit. Everyone marveled at the freshness and the burst of flavors. Now, whenever I make this dish, it brings back memories of laughter, sunshine, and the joy of sharing good food with loved ones.

    Why You’ll Love This Recipe

    • Quick and easy – ready in just 5 minutes.
    • No cooking required, perfect for hot days.
    • Uses fresh, seasonal ingredients.
    • Minimal cleanup, saving you time and effort.
    • Customizable with various toppings and dressings.

    Detailed Ingredients

    • 2 medium-sized **zucchinis** (about 300g), fresh and firm.
    • 2 ears of **corn**, husked and kernels shaved off.
    • 1/2 cup **sliced almonds**, lightly toasted.
    • 1 **lemon**, juiced.
    • 1/4 cup fresh **mint**, finely chopped.
    • 1/4 teaspoon **chili flakes**.
    • 3 tablespoons **olive oil**.
    • Salt and pepper to taste.
    • Optional: 1/4 cup grated **Parmesan cheese** for added flavor.

    Step-by-Step Instructions

    Step 1: Prepare the Ingredients
    Start by washing the **zucchinis** thoroughly. Cut them into long planks about 1/4 inch thick, then slice these planks into bite-sized pieces. This ensures that each piece retains its crunch and blends well with the other ingredients.

    Step 2: Shuck the Corn
    Hold the **corn** vertically on a cutting board and use a sharp knife to shave the kernels off. Fresh corn adds a sweet crunch, but if you prefer, you can use canned or frozen corn as a substitute.

    Step 3: Toast the Almonds
    Chef’s Tip: Toasting enhances the almonds’ flavor. In a dry pan over medium heat, add the **sliced almonds** and stir frequently for about 3-5 minutes until they are golden and fragrant. Keep a close eye to prevent burning.

    Step 4: Make the Dressing
    In a small bowl, combine the juice of one **lemon**, **olive oil**, **chili flakes**, and chopped **mint**. Season with salt and pepper. Whisk until everything is well combined. This dressing is light yet vibrant, complementing the salad perfectly.

    Step 5: Assemble the Salad
    In a large serving bowl, combine the **zucchini**, **corn**, and **toasted almonds**. If using, add the grated **Parmesan cheese**. Pour the dressing over the salad and toss gently to ensure everything is coated evenly.

    Common Mistakes to Avoid

    Overcooking the Almonds: Toast them just until they’re golden. They can burn quickly if left unattended.

    Using Old Ingredients: Freshness is key for this salad. Ensure your **zucchini** and **corn** are fresh for the best flavor.

    Overdressing: Add the dressing gradually. You can always add more, but you can’t take it away.

    How to Store & Reheat

    Since this is a no-cook salad, it’s best enjoyed fresh. However, if you need to store it, place it in an airtight container and refrigerate for up to 2 days. The **zucchini** may release some water, so toss it again before serving.

    Reheating isn’t necessary, as this salad is meant to be served cold. If you want to freshen it up, add a squeeze of **lemon** juice before serving.

    Ingredient Substitutions

    • Almonds: Swap with walnuts or pecans if preferred.
    • Corn: Use canned or frozen corn when fresh is unavailable.
    • Lemon: Lime juice can be a zesty alternative.
    • Mint: Try basil or cilantro for a different flavor profile.

    Nutrition Facts

    • Calories: 210 per serving
    • Protein: 5g
    • Fat: 15g
    • Carbohydrates: 18g
    • Serving Size: Approximately 1 cup

    Frequently Asked Questions

    Can I make this salad ahead of time?
    Yes, you can prepare the ingredients and dressing separately, then combine them just before serving to maintain freshness.

    Is this salad vegan?
    Yes, as long as you omit the **Parmesan cheese** or use a vegan alternative.

    How can I add more protein?
    Consider adding chickpeas or grilled chicken for a protein boost.

    What other vegetables can I add?
    Try adding cherry tomatoes or cucumber for additional flavor and texture.

  • LATE NIGHT FUEL: Irresistible Grilled Teriyaki Chicken Kebabs—Juicy, Sticky, and Sweet!

    LATE NIGHT FUEL: Irresistible Grilled Teriyaki Chicken Kebabs—Juicy, Sticky, and Sweet!

    Introduction & My Personal Story

    Ah, the memories of late-night study sessions and work marathons. In my 5 years of experience as a chef, few things have been as comforting and energizing as a plate of Grilled Teriyaki Chicken Kebabs. I remember my college days vividly, burning the midnight oil with a group of friends in a cramped apartment. We needed something quick, easy, and delicious to keep us going, and these kebabs were the answer. The smell of chicken grilling and the sweet, sticky aroma of teriyaki sauce wafting through the kitchen was all it took to lift our spirits.

    Not only did these kebabs provide the sustenance we needed, but they also became a symbol of camaraderie. Each skewer was a burst of flavor, a perfect mix of juicy chicken and sweet teriyaki glaze, providing the right balance of protein and carbs to fuel our brains. It was a dish that turned mundane study nights into memorable gatherings. Even now, whenever I grill these kebabs, I’m transported back to those nights filled with laughter, friendship, and the promise of future success.

    Why You’ll Love This Recipe

    • Quick and easy to prepare, perfect for late-night cravings.
    • Packed with protein to keep energy levels high.
    • The perfect balance of sweet, savory, and umami flavors.
    • Minimal cleanup with simple ingredients.
    • Customizable to suit different tastes and dietary needs.

    Detailed Ingredients

    Here’s what you’ll need to make these irresistible kebabs:

    • 2 lbs boneless, skinless chicken breasts, diced into 1-inch cubes
    • ½ cup soy sauce – Look for low-sodium options if preferred.
    • ⅓ cup brown sugar – Packed tightly for sweetness.
    • 2 cloves garlic, minced
    • 2 teaspoons fresh ginger, grated
    • 1 cup water
    • 2 tablespoons cornstarch
    • Wooden skewers, soaked in water for 30 minutes

    Step-by-Step Instructions

    Step 1: Preheat the Grill

    Set your grill to 375°F. This moderate heat ensures the chicken cooks evenly without burning. If you’re using wooden skewers, remember to soak them in water for at least 30 minutes to prevent them from catching fire.

    Step 2: Make the Teriyaki Sauce

    In a small saucepan, combine ½ cup soy sauce, ⅓ cup brown sugar, 2 cloves minced garlic, and 2 teaspoons grated ginger. Bring the mixture to a simmer over medium heat. In a separate bowl, mix 1 cup water with 2 tablespoons cornstarch to create a slurry. Slowly whisk the slurry into the simmering sauce until it thickens and turns glossy, about 2-3 minutes. Allow it to cool.

    Step 3: Marinate the Chicken

    Place the diced chicken in a large ziplock bag. Pour in two-thirds of your cooled teriyaki sauce, seal the bag, and massage the chicken to ensure all pieces are coated. Marinate for at least 30 minutes in the refrigerator. Reserve the remaining sauce for basting later.

    Step 4: Prepare the Skewers

    Thread the marinated chicken onto the soaked wooden skewers, leaving a small gap between each piece to ensure even cooking.

    Step 5: Grill the Kebabs

    Place the skewers on the preheated grill. Cook each side for about 4-5 minutes, basting with the reserved sauce as you turn them. The chicken is done when it reaches an internal temperature of 165°F and the juices run clear.

    Step 6: Cook the Rice

    While the chicken is grilling, prepare 1 cup of rice according to the package instructions. Fluff with a fork before serving.

    Step 7: Serve and Enjoy

    Plate the grilled teriyaki chicken skewers alongside the rice. Chef’s Tip: Garnish with chopped green onions or sesame seeds for an added pop of flavor and color.

    Common Mistakes to Avoid

    • Overcooking the Chicken: Keep an eye on your grill temperature and use a meat thermometer to ensure the chicken doesn’t dry out.
    • Skipping the Skewer Soak: If you forget to soak your skewers, they might burn. Always soak them in water for at least 30 minutes.
    • Not Marinating Long Enough: The longer the chicken marinates, the more flavorful it becomes. Aim for at least 30 minutes.

    How to Store & Reheat

    Store any leftover kebabs in an airtight container in the refrigerator for up to 3 days. To reheat, place them in a preheated oven at 350°F for 10-12 minutes or until warmed through. Alternatively, you can reheat them in a microwave, but be aware this may slightly change the texture.

    Ingredient Substitutions

    • Soy Sauce: For a gluten-free option, use tamari or coconut aminos.
    • Brown Sugar: Substitute with honey or maple syrup for a different sweetness profile.
    • Chicken Breasts: Thighs can be used for a juicier texture.

    Nutrition Facts

    • Calories: 250 per skewer
    • Protein: 26g
    • Fat: 5g
    • Carbohydrates: 25g
    • Serving Size: 2 skewers

    Frequently Asked Questions

    Q: Can I make these kebabs in advance?

    A: Yes, you can marinate the chicken and prepare the skewers a day in advance. Grill them just before serving for best results.

    Q: Can I use a different protein?

    A: Absolutely! These kebabs can be made with beef, pork, or even tofu for a vegetarian option.

    Q: How can I make the sauce thicker?

    A: If you prefer a thicker sauce, add more cornstarch to the slurry until you reach your desired consistency.

    Q: What sides go well with these kebabs?

    A: Steamed vegetables or a simple green salad make excellent accompaniments.

  • CHEAT DAY: Irresistible High-Protein Apple Salad Delight!

    CHEAT DAY: Irresistible High-Protein Apple Salad Delight!

    Introduction & My Personal Story

    Ah, the glorious cheat day! A day where the usual rules of disciplined eating are momentarily set aside, allowing for a culinary indulgence that satisfies the soul. One dish that has consistently been my go-to for these special occasions is the Irresistible High-Protein Apple Salad Delight. My journey with this recipe began quite serendipitously during my early days as a chef. In my 5 years of experience, I’ve learned that sometimes the simplest ingredients can create the most profound experiences.

    It was a sunny afternoon, and I was experimenting with various high-protein recipes in my cozy kitchen. I had just returned from the market with a bag full of fresh, crisp apples. Their vibrant color and sweet aroma were irresistible. I decided to pair them with some creamy Greek yogurt, a staple in my kitchen for its high protein content and velvety texture. As I mixed in some honey and a handful of crunchy walnuts, a sprinkle of cinnamon added a warm, inviting aroma that filled the room. The result was a delightful blend of flavors and textures that was both nourishing and indulgent.

    From that day on, this salad has become a cherished part of my cheat day repertoire. It’s a dish that embodies the perfect balance between health and indulgence, making it a favorite not only for me but also for my friends and family. Let me take you through this culinary experience, so you too can enjoy this delightful treat on your next cheat day.

    Why You’ll Love This Recipe

    • Quick and easy to prepare, perfect for a cheat day indulgence.
    • Packed with protein from the Greek yogurt, keeping you full and satisfied.
    • The combination of sweet apples and crunchy walnuts creates a tantalizing texture.
    • Honey and cinnamon add a natural sweetness and warmth without being overpowering.
    • Chill time of just 30 minutes enhances the flavors, making it a refreshing treat.

    Detailed Ingredients

    • 3 large apples, preferably Honeycrisp or Fuji, chopped (about 450 grams)
    • 1 cup (240 grams) Greek yogurt, plain and unsweetened
    • 2 tablespoons (30 ml) honey, plus extra for drizzling
    • 1/2 cup (60 grams) walnuts, roughly chopped
    • 1 teaspoon cinnamon
    • A pinch of salt to enhance flavors

    Step-by-Step Instructions

    Step 1: Start by washing the apples thoroughly. Core and chop them into bite-sized pieces. Chef’s Tip: Leave the skin on for added fiber and nutrition.

    Step 2: In a large mixing bowl, combine the chopped apples with 1 cup of Greek yogurt. The yogurt should be thick and creamy, which helps in binding all the ingredients together.

    Step 3: Add 2 tablespoons of honey to the mixture. Honey not only sweetens the salad but also adds a lovely floral note. If you prefer a sweeter salad, feel free to add an extra drizzle.

    Step 4: Toss in 1/2 cup of roughly chopped walnuts. These add a delightful crunch and are a great source of healthy fats.

    Step 5: Sprinkle 1 teaspoon of cinnamon over the mixture. This spice complements the sweetness of the apples and honey, adding depth to the flavor profile.

    Step 6: Gently fold the ingredients together until well combined. Be careful not to overmix, as you want to maintain the texture of the apples and walnuts.

    Step 7: Cover the bowl with plastic wrap and refrigerate for at least 30 minutes. This chilling time allows the flavors to meld beautifully, creating a refreshing and satisfying dish.

    Step 8: Serve the salad in individual bowls, topped with additional walnuts and a drizzle of honey for an extra touch of indulgence.

    Common Mistakes to Avoid

    • Overmixing: This can lead to a mushy texture. Gently fold the ingredients to maintain the integrity of the apples and walnuts.
    • Using too much honey: While it adds sweetness, too much can overpower the other flavors. Start with the recommended amount and adjust to taste.
    • Skipping the chill time: This step is crucial for the flavors to develop fully. Don’t rush it!

    How to Store & Reheat

    To store the salad, transfer it to an airtight container and refrigerate. It will keep well for up to 3 days. Since it’s a cold salad, reheating isn’t necessary. Simply give it a good stir before serving to redistribute any settled ingredients.

    Ingredient Substitutions

    • Apples: If you prefer a different flavor, pears can be a great substitute.
    • Greek yogurt: For a dairy-free option, use coconut yogurt.
    • Walnuts: Pecans or almonds can be used if you have a preference for different nuts.
    • Honey: Maple syrup is a suitable alternative for a different sweetness profile.

    Nutrition Facts

    • Calories: 280 per serving
    • Protein: 8 grams
    • Fat: 12 grams
    • Carbohydrates: 35 grams
    • Serving Size: Approximately 1 cup

    Frequently Asked Questions

    Q: Can I make this salad in advance?

    A: Yes, it’s perfect for meal prep. Just store it in the fridge and give it a good stir before serving.

    Q: Can I use flavored yogurt?

    A: While plain yogurt is recommended to control the sweetness, you can use lightly flavored yogurt if desired. Just adjust the honey accordingly.

    Q: What type of apples work best?

    A: Crisp and sweet varieties like Honeycrisp or Fuji are ideal for their texture and flavor.

    Q: Is this salad gluten-free?

    A: Absolutely! All the ingredients are naturally gluten-free.