Tag: Protein

  • GAINS: Love-Infused Protein Meatballs

    GAINS: Love-Infused Protein Meatballs

    Introduction & My Personal Story

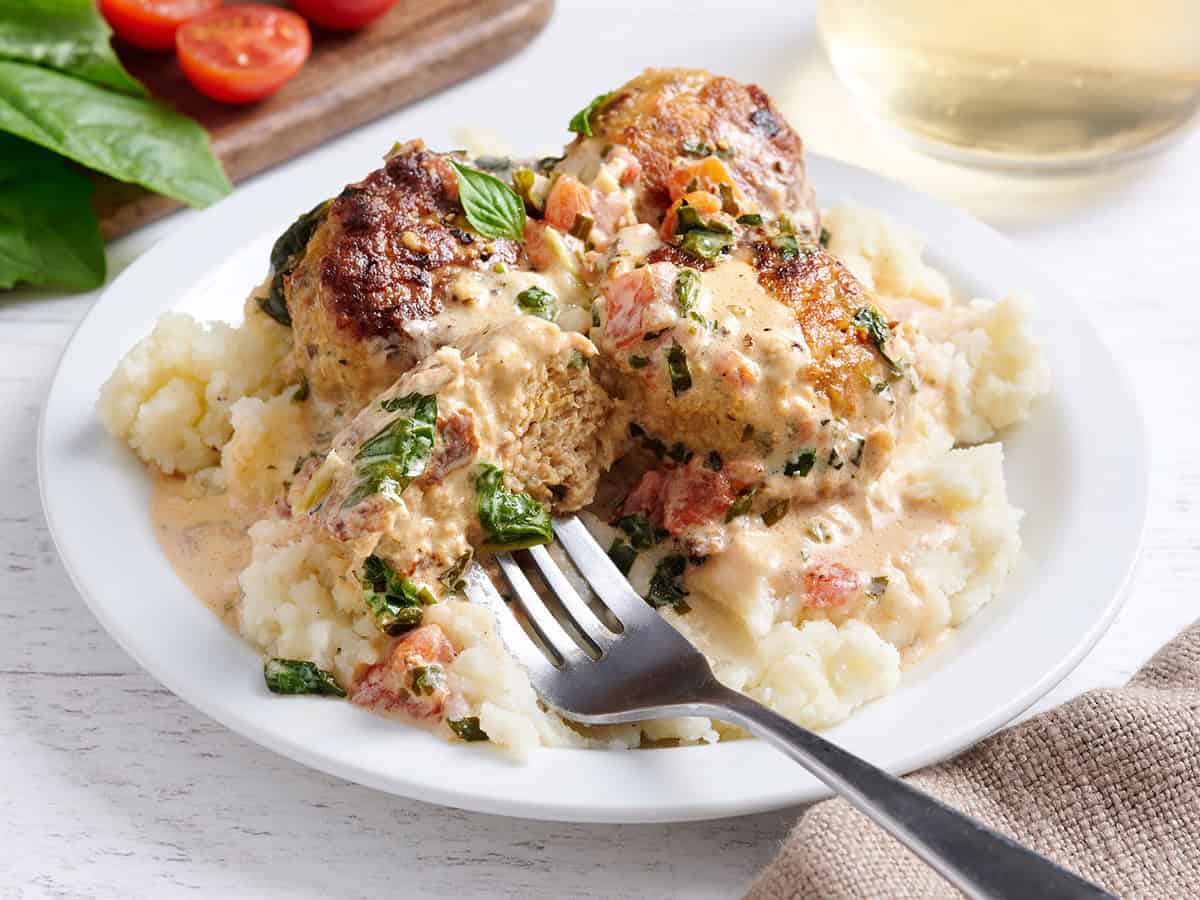
    Ah, the humble meatball! Let me take you back a few years to when I first stumbled upon the magic of protein-packed meals. It was a chilly afternoon, and I was dead-set on finding a recipe that would not only satisfy my hunger but also support my fitness goals. Enter: the High-Protein Marry Me Chicken Meatballs. I remember standing in my tiny kitchen, surrounded by the aroma of fresh herbs and sizzling chicken, eagerly awaiting the first taste. These meatballs were more than just a meal; they were a revelation. Over the years, I’ve tinkered and adjusted, striving to perfect this recipe that brings together flavor, nutrition, and a touch of nostalgia. Now, it’s a staple in my meal prep routine, and I can’t wait to share it with you. This dish is more than just food; it’s a love letter to the art of cooking and the pursuit of gains!

    Why You’ll Love This Recipe

    • High in Protein: Each serving packs a whopping 32g of protein.
    • Flavorful: Sun-dried tomatoes and fresh herbs make every bite burst with flavor.
    • Easy to Make: Straightforward steps that even beginners can follow.
    • Perfect for Meal Prep: Make a big batch and enjoy all week long.
    • Family-Friendly: A dish that pleases even the pickiest eaters.

    Detailed Ingredients

    Before you start, gather the following ingredients:

    • **1 lb. ground chicken**
    • **2 tablespoons sun-dried tomatoes**, minced
    • **1 tablespoon fresh basil**, minced
    • **½ tablespoon fresh parsley**, minced
    • **½ cup breadcrumbs**
    • **2 tablespoons salted butter**
    • **1 large egg**
    • **¼ teaspoon garlic powder**
    • **¼ teaspoon dried oregano**
    • **1 teaspoon dried basil**
    • **¼ teaspoon salt**
    • **¼ teaspoon black pepper**
    • **1 tablespoon mayonnaise**
    • **1 teaspoon soy sauce**
    • **2 tablespoons vegetable oil**
    • **3 cloves garlic**, minced
    • **⅛ teaspoon chili flakes**
    • **1 cup chicken broth**
    • **1 cup heavy cream**, room temperature
    • **14.5 oz can diced tomatoes**, strained
    • **⅓ cup frozen spinach**
    • **½ cup grated Parmesan cheese**

    When shopping, look for fresh, vibrant herbs and high-quality ground chicken for the best results.

    Step-by-Step Instructions

    Let’s get cooking! Follow these steps for perfect meatballs:

    Step 1: Toast the Breadcrumbs

    In a sauté pan, melt the 2 tablespoons of salted butter over medium heat. Add the ½ cup breadcrumbs and stir continuously until they turn golden brown. This should take about 3-5 minutes. Remove from heat and let them cool.

    Step 2: Mix the Meatball Ingredients

    In a large bowl, combine the toasted breadcrumbs with 1 lb. ground chicken, 1 large egg, ¼ teaspoon garlic powder, ¼ teaspoon dried oregano, 1 teaspoon dried basil, minced sun-dried tomatoes, ¼ teaspoon salt, ¼ teaspoon black pepper, 1 tablespoon mayonnaise, and 1 teaspoon soy sauce. Gently mix using a fork or your hands until everything is evenly combined. Chef’s Tip: Avoid over-mixing to keep the meatballs tender.

    Step 3: Shape and Cook the Meatballs

    Wipe the sauté pan clean and add 2 tablespoons of vegetable oil. Heat over medium. Use a 4-oz ice cream scoop to portion the meat mixture into the hot oil. Sear until browned on at least two sides, approximately 5 minutes per side. Transfer browned meatballs to a plate and repeat with the remaining mixture.

    Step 4: Prepare the Sauce

    In the same pan, melt 2 tablespoons of butter. Add 3 minced garlic cloves and ⅛ teaspoon chili flakes. Cook until fragrant, about 2 minutes. Pour in the 1 cup of chicken broth and simmer for 3-4 minutes, scraping up any browned bits from the pan’s bottom.

    Step 5: Finish the Sauce

    Lower the heat to medium-low and stir in 1 cup of room-temperature heavy cream. Add the 14.5 oz can of strained diced tomatoes, ⅓ cup frozen spinach, and ½ cup grated Parmesan. Stir and bring to a gentle simmer.

    Step 6: Cook the Meatballs in Sauce

    Return the browned chicken meatballs to the pan, spooning sauce over them as they cook. The meatballs are ready when they reach an internal temperature of at least 165°F, which should take about 15-20 minutes.

    Common Mistakes to Avoid

    Here’s what to watch out for:

    • **Over-mixing:** This can make the meatballs tough. Mix just until ingredients are combined.
    • **Skipping the browning step:** Searing the meatballs adds flavor and texture.
    • **Using cold cream:** Make sure the cream is at room temperature to prevent curdling.
    • **Not checking internal temperature:** Always ensure meatballs reach at least 165°F for safe consumption.

    How to Store & Reheat

    To store, place cooled meatballs in an airtight container in the refrigerator for up to 4 days. For longer storage, freeze them for up to 3 months. To reheat, use a microwave or stovetop. If frozen, thaw overnight in the fridge before reheating.

    Ingredient Substitutions

    If you need to make swaps, consider these options:

    • **Ground Turkey:** A lean alternative to chicken.
    • **Gluten-Free Breadcrumbs:** For a gluten-free version.
    • **Coconut Cream:** A dairy-free substitute for heavy cream.
    • **Fresh Spinach:** Can replace frozen, just chop and add directly to the sauce.

    Nutrition Facts

    • Calories: 726 kcal per serving
    • Protein: 32g
    • Fat: 52g
    • Carbohydrates: 20g
    • Serving Size: 4 meatballs

    Frequently Asked Questions

    Can I use a different type of ground meat? Absolutely! Ground turkey or beef are great alternatives.

    How can I make this dish spicier? Add more chili flakes or use spicy Italian sausage instead of ground chicken.

    Can I prepare the meatballs in advance? Yes, you can make them a day ahead and refrigerate until ready to cook.

    Is it okay to skip the sauce? You can, but the sauce adds moisture and flavor, enhancing the overall dish.

    What sides pair well with this dish? Consider serving with pasta, rice, or a simple green salad.

  • Fast Fuel: Delightfully Easy Chocolate Protein Pancakes!

    Fast Fuel: Delightfully Easy Chocolate Protein Pancakes!

    Introduction & My Personal Story

    Ah, chocolate protein pancakes. Just saying the words makes my taste buds tingle. I remember the first time I stumbled upon the idea of combining my love for pancakes with a protein boost. It was a hectic morning, one of those days where you feel like you’re running a marathon from the moment you wake up. As someone who has spent 5 years in the culinary field, I always strive to create meals that are not only delicious but also functional. That morning, I needed something quick, satisfying, and packed with energy. As I rummaged through my pantry, I found a bag of chocolate protein powder tucked away behind the flour. An idea sparked: why not merge my morning pancakes with a chocolatey protein punch?

    The result was nothing short of amazing. The pancakes were fluffy, with a rich chocolate flavor that made me feel like I was indulging in a dessert rather than a quick breakfast. They became a staple in my household, especially on those busy mornings when every second counts. I’ve tweaked the recipe over time, and now, I’m excited to share this delightful concoction with you. Trust me, these pancakes are more than just a meal; they’re a fast fuel to kick-start your day with a smile and a full belly.

    Why You’ll Love This Recipe

    • Quick and Easy: Ready in under 10 minutes.
    • High Protein: Each serving is packed with protein to keep you full.
    • Chocolate Flavor: Rich, decadent taste without the guilt.
    • Customizable: Add your favorite toppings or mix-ins.
    • Healthy Ingredients: Made with wholesome ingredients like oat flour and coconut sugar.

    Detailed Ingredients

    Before you head to the market, here’s what you’ll need:

    • Oat Flour: 1 cup (120 grams). Look for finely ground oat flour for a smooth batter.
    • Chocolate Protein Powder: 1 scoop (about 30 grams). Choose your favorite brand; I prefer whey or plant-based options.
    • Cocoa Powder: 2 tablespoons (10 grams). Opt for unsweetened cocoa for a rich taste.
    • Coconut Sugar: 2 tablespoons (24 grams). A healthier alternative to regular sugar.
    • Baking Powder: 1 teaspoon. Ensure it’s fresh for maximum rise.
    • Milk: 1 cup (240 ml). Use dairy or a non-dairy alternative like almond milk.
    • Eggs: 2 large. These will help bind the ingredients and add fluffiness.
    • Optional: Chocolate chips, nuts, or berries for extra flavor and texture.

    Step-by-Step Instructions

    Let’s dive into the process of making these delightful pancakes:

    Step 1: Prepare Your Dry Ingredients

    In a large mixing bowl, combine the oat flour, chocolate protein powder, cocoa powder, coconut sugar, and baking powder. Whisk them together until well-blended. This ensures that the baking powder is evenly distributed, which is crucial for even rising.

    Step 2: Mix Wet Ingredients

    In a separate bowl, whisk together the milk and eggs until fully combined. Slowly pour the wet ingredients into the dry ingredients, stirring continuously until you have a smooth batter. It should be thick but pourable. If it’s too thick, add a splash more milk.

    Step 3: Cooking the Pancakes

    Heat a non-stick pan over medium-low heat. Once hot, lightly grease it with a bit of oil or cooking spray. Pour about ¼ cup of the batter onto the pan for each pancake. Cook until you see bubbles forming on the surface, about 3-5 minutes. This is your cue that they’re ready to flip. Use a spatula to flip and cook for another 2-3 minutes until golden brown.

    Step 4: Serve and Enjoy

    Transfer the cooked pancakes to a plate. You can keep them warm in a low oven if making a large batch. Top with your favorite toppings like fresh berries, a drizzle of syrup, or a dollop of nut butter. Dig in and enjoy your fast fuel breakfast!

    Common Mistakes to Avoid

    • Overmixing the Batter: This can lead to dense pancakes. Mix until just combined.
    • High Heat: Cooking on too high a heat can burn the pancakes while leaving the inside raw. Medium-low is perfect.
    • Skipping the Bubbles: Flipping before bubbles form can result in undercooked pancakes.
    • Old Baking Powder: Ensure your baking powder is fresh for fluffier pancakes.

    How to Store & Reheat

    These pancakes can be stored in an airtight container in the refrigerator for up to 3 days. For longer storage, freeze them with parchment paper between each pancake to prevent sticking. They’ll keep for up to 2 months in the freezer.

    To reheat, simply pop them in the toaster or microwave for a quick breakfast on the go. If frozen, allow them to thaw in the fridge overnight before reheating.

    Ingredient Substitutions

    If you’re missing an ingredient or need to accommodate dietary preferences, here are some substitutions:

    • Oat Flour: Swap with whole wheat flour or almond flour for a different texture.
    • Coconut Sugar: Use brown sugar or a sugar substitute like stevia.
    • Milk: Any milk alternative like soy, oat, or coconut milk works well.
    • Eggs: Replace with flax eggs for a vegan option (1 tablespoon flaxseed meal + 2.5 tablespoons water per egg).

    Nutrition Facts

    • Calories: 331 kcal per serving
    • Protein: 20 grams
    • Fat: 10 grams
    • Carbs: 40 grams
    • Serving Size: 2 pancakes

    Frequently Asked Questions

    Can I make these pancakes gluten-free?

    Yes, use certified gluten-free oat flour and ensure all other ingredients are gluten-free certified.

    What can I add for extra flavor?

    Try adding a teaspoon of vanilla extract or a sprinkle of cinnamon for an extra flavor boost.

    Can I make the batter ahead of time?

    While fresh is best, you can make the batter a day in advance and store it in the fridge. Give it a good stir before using.

    How can I make these pancakes fluffier?

    Ensure your baking powder is fresh and don’t overmix the batter. Letting the batter sit for a few minutes can also help.

    Are these pancakes suitable for kids?

    Absolutely! They’re a great way to sneak in some protein and kids love the chocolate flavor.


  • 5-MIN FUEL: Whip Up Starbucks-Style Protein Cold Foam!

    5-MIN FUEL: Whip Up Starbucks-Style Protein Cold Foam!

    Introduction & My Personal Story

    When I think back to my early days as a chef, the hustle and bustle of morning routines always fascinated me. People rushing to grab their morning coffee, the aroma of freshly brewed beans wafting through the air—it was an experience in itself. But it wasn’t just the coffee that caught my attention. It was the innovation around it. One particular creation that stood out was the Starbucks-style Protein Cold Foam. Imagine my delight when, after years of experimentation, I managed to whip up a quick and delicious version of this treat right at home.

    In my 5 years of experience as a chef, I’ve learned that the best recipes are those that combine efficiency with flavor. This Protein Cold Foam does exactly that. It takes me back to those early mornings when I’d sip on a frothy coffee, feeling energized and ready to conquer the day. The smooth, creamy foam paired with the robust flavor of cold brew is a match made in heaven. It’s not just a drink; it’s a morning ritual that sets the tone for a productive day.

    Creating this recipe has been a journey of discovery. From testing various protein powders to finding the perfect frothing technique, every step has been an adventure. Now, I’m thrilled to share this recipe with you, so you too can enjoy a Starbucks-style Protein Cold Foam in the comfort of your home, without the wait or the hefty price tag.

    Why You’ll Love This Recipe

    • Quick & Easy: Ready in just 5 minutes, perfect for busy mornings.
    • High in Protein: Gives you the energy boost you need to start your day.
    • Cost-Effective: Enjoy a premium coffee experience without breaking the bank.
    • Customizable: Adjust sweetness and flavor to your preference.
    • Healthy Alternative: Offers a nutritious start without excess calories.

    Detailed Ingredients

    • 1 cup Cold Brew Coffee: Opt for a strong, robust blend for the best flavor.
    • ½ cup Nonfat Milk: Alternatively, use almond or oat milk if you prefer a dairy-free option.
    • 1 scoop Protein Powder (about 30g): Choose a flavor that complements coffee, like vanilla or chocolate.
    • Optional Sweetener: Use a zero-calorie sweetener like stevia or monk fruit to taste.

    Step-by-Step Instructions

    Step 1: Prepare the Cold Brew

    Brew your cold coffee in advance or use a cold brew concentrate. Ensure it’s chilled and ready to go. Pour 1 cup of cold brew into a tall glass, leaving room for the foam.

    Step 2: Mix the Protein Foam

    In a blender, combine ½ cup of nonfat milk and 1 scoop of protein powder. For a richer texture, use a high-speed blender. Blend on high until the mixture is frothy and thick, about 30 seconds. Chef’s Tip: Make sure the protein powder is fully dissolved to avoid any grainy texture.

    Step 3: Froth to Perfection

    Check the consistency of your foam. It should be creamy and smooth. If you find it’s too runny, blend for an additional 10-15 seconds. The ideal foam should hold its shape for a few seconds after pouring.

    Step 4: Assemble Your Drink

    Gently layer the protein foam over your cold brew coffee. Pour slowly to create a beautiful separation between the coffee and the foam. This layering not only looks impressive but ensures every sip is a delightful mix of coffee and foam.

    Step 5: Sweeten & Serve

    If desired, add your chosen sweetener and stir gently. Serve immediately and enjoy your homemade Starbucks-style Protein Cold Foam!

    Common Mistakes to Avoid

    • Using Warm Milk: Always use cold milk to help the foam stabilize better.
    • Over-Blending: This can break down the foam. Blend just until you achieve the right consistency.
    • Wrong Protein Powder: Some powders don’t dissolve well or alter the taste negatively. Choose a high-quality, complementary flavor.

    How to Store & Reheat

    This drink is best enjoyed fresh. However, if you need to store it, keep the coffee and foam separate. Store the cold brew in the fridge for up to 3 days. The foam can be stored in an airtight container for up to 24 hours, but it may lose some of its fluffiness. Re-blend before serving to restore texture.

    Ingredient Substitutions

    • Milk: Substitute with almond or coconut milk for a dairy-free option.
    • Protein Powder: Use plant-based protein if you prefer a vegan version.
    • Sweetener: Try honey or agave syrup if you’re not counting calories.

    Nutrition Facts

    • Calories: 100 kcal
    • Protein: 15g
    • Fat: 1g
    • Carbohydrates: 8g
    • Serving Size: 1 drink

    Frequently Asked Questions

    • Can I use flavored protein powder? Yes, flavors like vanilla or chocolate work well!
    • Is it necessary to use a blender? For the best foam texture, a blender is recommended.
    • Can I make this ahead of time? It’s best fresh, but you can store components separately.
    • How can I make it sweeter? Add more sweetener to taste, but do it gradually.

  • CHEAT DAY: Irresistible High Protein Dunkaroo Dip!

    CHEAT DAY: Irresistible High Protein Dunkaroo Dip!

    Introduction & My Personal Story

    Let me take you back to a time when I was a kid, heart racing with excitement as I tore open those little packs of Dunkaroos. Those tiny cookies and sweet, creamy frosting were the highlight of my lunchbox. Fast forward to today, with my 5 years of experience as a chef and food blogger, I’ve recreated that nostalgic delight with a modern twist: the High Protein Dunkaroo Dip. This recipe was born out of a desire to enjoy the flavors of my childhood while adhering to a more grown-up, protein-packed lifestyle.

    It all started one rainy afternoon when I was looking for a quick, satisfying snack that wouldn’t derail my fitness goals. I wanted something that would not only taste indulgent but also provide a good amount of protein. After a few experiments in my kitchen, I found the perfect balance. The creamy texture of Greek yogurt, the rich flavor of vanilla protein powder, and the colorful sprinkles that brought back memories of those cherished lunchbox treats. Now, it’s become my go-to cheat day indulgence, and I can’t wait to share it with you!

    Why You’ll Love This Recipe

    • Quick and easy to prepare – ready in just 10 minutes.
    • No baking required – perfect for those hot summer days.
    • Packs a protein punch – perfect for post-workout recovery.
    • Customizable – add your favorite toppings or mix-ins.
    • Brings back childhood memories with a healthy twist.

    Detailed Ingredients

    • 1 cup Greek yogurt (plain, unsweetened – look for a brand with high protein content)
    • 1 scoop vanilla protein powder (approximately 30 grams – choose a quality brand you enjoy)
    • 1 teaspoon vanilla extract (pure, not imitation)
    • 2 tablespoons rainbow sprinkles (or more if you love them as much as I do!)
    • Optional: Graham crackers or fresh fruit for dipping

    Step-by-Step Instructions

    Step 1: Mix Ingredients

    Grab a medium-sized mixing bowl and add in the Greek yogurt and vanilla protein powder. Using a spoon or a whisk, stir until the mixture is smooth and creamy. You want to make sure there are no lumps of protein powder left. Chef’s Tip: If the mixture seems too thick, add a tablespoon of milk to achieve the desired consistency.

    Step 2: Add Vanilla Extract

    Pour in the vanilla extract. This will enhance the flavor profile and bring out the sweetness naturally present in the yogurt and protein powder. Mix until everything is well combined.

    Step 3: Fold in Sprinkles

    Gently fold in the rainbow sprinkles. Be careful not to over-mix, as the colors from the sprinkles can start to bleed into the yogurt. The key here is to maintain that fun, colorful look that makes this dip so special.

    Step 4: Chill (Optional)

    If you have the patience, refrigerate the dip for about 15 minutes. This will allow the flavors to meld together and the dip to thicken slightly, giving you a more satisfying texture when served. However, if you’re in a rush, you can enjoy it right away!

    Step 5: Serve

    Serve your High Protein Dunkaroo Dip with a side of graham crackers or fresh fruit. I personally love using apple slices or strawberries, as they add a refreshing contrast to the creamy dip. Enjoy!

    Common Mistakes to Avoid

    • Using flavored yogurt: This can throw off the taste and add unnecessary sugar. Stick to plain, unsweetened Greek yogurt.
    • Not mixing thoroughly: Ensure the protein powder is completely dissolved to avoid a gritty texture.
    • Over-mixing the sprinkles: This can cause the colors to bleed, resulting in a less appealing appearance.
    • Skipping the chill time: While optional, chilling enhances the texture and flavor.

    How to Store & Reheat

    Store any leftover dip in an airtight container in the refrigerator. It will keep well for up to 3 days. Before serving again, give it a quick stir. If the dip has thickened too much, simply add a splash of milk to loosen it up. This dip is best served cold, so there’s no need to reheat.

    Ingredient Substitutions

    • Greek yogurt: Can be replaced with plain, unsweetened almond or coconut yogurt for a dairy-free option.
    • Vanilla protein powder: Use a plant-based protein powder if you prefer a vegan alternative.
    • Vanilla extract: Swap with almond extract for a different flavor profile.
    • Sprinkles: Use mini chocolate chips or crushed nuts for a different texture.

    Nutrition Facts

    • Calories: 150 per serving
    • Protein: 15 grams
    • Fat: 4 grams
    • Carbohydrates: 18 grams
    • Serving Size: About 1/2 cup

    Frequently Asked Questions

    • Can I make this dip ahead of time? Yes, you can prepare it up to a day in advance. Just store it in the fridge and give it a stir before serving.
    • What if I don’t have protein powder? You can skip it, but the dip will have less protein. Consider adding a bit of sweetener to taste if needed.
    • Are there any other toppings I can add? Absolutely! Try adding shredded coconut, chopped nuts, or even a drizzle of honey.
    • Is this recipe gluten-free? The dip itself is gluten-free. Just ensure your dipping items, like graham crackers, are also gluten-free.
    • Can I use flavored yogurt? It’s best to stick with plain yogurt to control the sugar content and flavor profile.

  • CHEAT DAY: Indulgent Snickers Salad Protein Bowl Delight

    CHEAT DAY: Indulgent Snickers Salad Protein Bowl Delight

    Introduction & My Personal Story

    Ah, the indulgence of a cheat day. The very thought can bring a smile to your face, especially when it involves a dish as delightful as the Snickers Salad Protein Bowl. It all started about five years ago when I was deep into my culinary journey, experimenting with flavors and textures that could satisfy cravings without completely derailing my nutrition goals. I stumbled upon the idea of combining the irresistible flavors of a Snickers bar with the creamy goodness of a protein-packed salad. It seemed almost too good to be true, but the result was nothing short of magical.

    In my 5 years of experience, I’ve learned that a cheat day isn’t just about indulgence; it’s a reward for your dedication and hard work. This Snickers Salad Protein Bowl became my go-to treat, especially after a week of disciplined eating. The creamy texture of Greek yogurt and cottage cheese, combined with the crunch of apples and the decadent taste of peanut butter and protein bars, was a revelation. It’s not just a dish; it’s a celebration of flavors that indulges your senses without the guilt. Every bite reminds me of those early days of discovery, where culinary experimentation met nutritional mindfulness.

    Why You’ll Love This Recipe

    • Quick & Easy: No cooking required, ready in just 10 minutes.
    • High Protein: Packed with Greek yogurt and cottage cheese.
    • Decadent Flavor: Tastes like your favorite candy bar.
    • Customizable: Easy to swap ingredients based on preference.
    • Perfect for Cheat Days: Satisfies cravings while providing nutrients.

    Detailed Ingredients

    • 5.3 oz Greek yogurt – Opt for plain or vanilla for best results.
    • 1 cup cottage cheese – Choose low-fat or full-fat based on preference.
    • 1 apple – A crisp variety like Granny Smith or Honeycrisp works well.
    • 2 tbsp PB2 powder – Look for it in the health food section.
    • 1 Barebells Salty Peanut protein bar – Can be found in most health stores.
    • Peanut butter – Natural or smooth, for drizzling.

    Step-by-Step Instructions

    Step 1: Start by preparing your ingredients. Chop the apple into small, bite-sized pieces. This adds a fresh, juicy crunch to your bowl. Chef’s Tip: Leave the skin on for added fiber and color.

    Step 2: In a medium-sized bowl, combine the Greek yogurt and cottage cheese. Stir them together until you have a smooth, creamy base. The blend of these two ingredients is the secret to a protein-packed foundation.

    Step 3: Sprinkle in the PB2 powder. This will give a subtle peanut butter flavor without the added fat. Mix thoroughly until the powder is fully incorporated.

    Step 4: Gently fold in the chopped apple pieces. Ensure they are evenly distributed throughout the mixture. The apple provides a natural sweetness and a delightful texture contrast.

    Step 5: Chop the Barebells Salty Peanut protein bar into small chunks. Add these to the bowl, stirring gently to combine. These chunks mimic the nougat and peanut crunch of a Snickers bar.

    Step 6: For the final touch, drizzle with your choice of peanut butter. This adds a rich, indulgent layer to your protein bowl. Serve immediately to enjoy at the peak of freshness.

    Common Mistakes to Avoid

    • Overmixing: Stir gently to avoid breaking down the apple pieces and protein bar chunks.
    • Using flavored yogurt: Stick to plain or vanilla to control sweetness levels.
    • Skipping the PB2 powder: It provides essential flavor without excess calories.
    • Incorrect apple variety: Use crisp apples to maintain texture.

    How to Store & Reheat

    Store any leftovers in an airtight container in the refrigerator. The Snickers Salad Protein Bowl is best consumed within 24 hours to enjoy its full flavor and texture. If you need to store it longer, it’s best not to add the peanut butter drizzle until just before serving. This dish does not require reheating, as it’s meant to be enjoyed chilled.

    Ingredient Substitutions

    • Greek yogurt: Substitute with plain skyr or a plant-based yogurt for a dairy-free option.
    • Cottage cheese: Use ricotta cheese or a vegan alternative if needed.
    • PB2 powder: Regular peanut butter or almond butter can be used, but adjust quantities for taste.
    • Protein bar: Any nut-based protein bar can replace the Barebells bar.

    Nutrition Facts

    • Calories: 450 per serving
    • Protein: 35g
    • Fat: 15g
    • Carbs: 45g
    • Serving Size: 1 bowl

    Frequently Asked Questions

    • Can I use a different fruit instead of apple? Yes, pears or bananas can work well.
    • Is there a vegan version of this recipe? Yes, use plant-based yogurt, ricotta, and a vegan protein bar.
    • How can I make it even more indulgent? Add a drizzle of chocolate syrup or caramel sauce.
    • Can I prepare this in advance? It’s best made fresh, but you can prep the yogurt and cheese mix a day ahead.
    • What if I don’t have PB2 powder? Regular peanut butter will work, just adjust the quantity for flavor.

  • 5-MIN FUEL: Snickerdoodle Overnight Oats That Pack a Protein Punch!

    5-MIN FUEL: Snickerdoodle Overnight Oats That Pack a Protein Punch!

    Introduction & My Personal Story

    There’s something truly magical about waking up to a breakfast that’s already waiting for you, especially when it’s as scrumptious as Snickerdoodle Overnight Oats. This recipe takes me back to a time when I was just starting my culinary journey. In my 5 years of experience as a chef, I’ve learned that the simpler the dish, the more room there is for creativity and flavor. I remember those early mornings in culinary school when time was of the essence, and breakfast had to be quick, yet satisfying. That’s when I stumbled upon the concept of overnight oats. The allure of having a ready-to-eat, nutritious meal in the morning was unbeatable.

    One particular morning, I decided to infuse my oats with the warm, comforting flavors of a snickerdoodle cookie. It was a game-changer! The aroma of cinnamon and vanilla wafting through the kitchen made it feel like the holidays in the middle of July. Each spoonful was a delightful reminder of the cookies my grandmother used to bake during festive seasons. Now, whenever I prepare this dish, I am transported back to those cozy mornings, blending nostalgia with the hustle of modern life. It’s a recipe that not only fuels your body but also warms your soul.

    Why You’ll Love This Recipe

    • **Quick & Easy:** Perfect for busy mornings with just 5 minutes of prep.
    • **Protein Packed:** Keeps you full and energized throughout the day.
    • **Customizable:** Adapt the flavors to suit your taste preferences.
    • **Make-Ahead Convenience:** Prepare the night before for a stress-free breakfast.
    • **Nutritious & Delicious:** Combines the flavors of a classic cookie with the benefits of whole grains.

    Detailed Ingredients

    To create the perfect Snickerdoodle Overnight Oats, you’ll need the following ingredients:

    • Rolled oats: 1/2 cup (45 grams). Choose old-fashioned oats for the best texture.
    • Unsweetened almond milk: 1 cup (240 ml). Look for a brand with no added sugars.
    • Chia seeds: 1 tablespoon (12 grams). These add thickness and extra nutrients.
    • Protein powder: 1 scoop (about 30 grams). Opt for snickerdoodle or vanilla for that authentic cookie flavor.
    • Cinnamon: 1 teaspoon (2 grams). Freshly ground if possible, for the most robust flavor.
    • Vanilla extract: 1/2 teaspoon (2.5 ml). Pure vanilla extract is preferred.
    • Maple syrup: 1 tablespoon (15 ml). Adds natural sweetness.
    • Sea salt: A pinch. Enhances all the flavors.

    Step-by-Step Instructions

    Creating these oats is as easy as pie. Follow these steps for the best results:

    Step 1: Mix Ingredients

    In a medium-sized jar or bowl, combine the **rolled oats**, **almond milk**, **chia seeds**, **protein powder**, **cinnamon**, **vanilla extract**, **maple syrup**, and a pinch of **sea salt**. Chef’s Tip: Use a jar with a tight-fitting lid if you plan to grab and go in the morning.

    Step 2: Stir Thoroughly

    Mix everything until well combined. Make sure there are no clumps of protein powder remaining. A whisk can be helpful here. The mixture should be smooth and homogenous.

    Step 3: Refrigerate

    Cover the jar or bowl and place it in the refrigerator. Let it chill for at least 4 hours, but overnight is ideal for the oats to fully absorb the liquid and flavors. You’ll know it’s ready when the mixture is thick and creamy.

    Step 4: Enjoy

    In the morning, give the oats a good stir. If you find them too thick, add a splash more almond milk to reach your desired consistency. Top with extra cinnamon or some cookie crumbles for added texture and flavor.

    Common Mistakes to Avoid

    • **Using Quick Oats:** These will become mushy. Stick with rolled oats for the best texture.
    • **Skipping the Stir:** Make sure you mix thoroughly to avoid clumps of protein powder.
    • **Not Refrigerating Long Enough:** Give it enough time to chill and thicken properly.
    • **Overloading on Sweeteners:** The protein powder and maple syrup add plenty of sweetness, so taste before adding more.

    How to Store & Reheat

    Store your **Snickerdoodle Overnight Oats** in the refrigerator for up to 4 days. Make sure they are in a sealed container to keep them fresh. If you prefer your oats warm, you can gently heat them in the microwave for 30-60 seconds, stirring halfway through. Add a bit of almond milk to loosen them up if needed.

    Ingredient Substitutions

    • **Almond Milk:** Swap with any milk of your choice, like soy, oat, or cow’s milk.
    • **Chia Seeds:** Use flaxseeds for a similar thickening effect.
    • **Protein Powder:** If you’re not a fan of snickerdoodle flavor, vanilla or plain protein powder works well too.
    • **Maple Syrup:** Honey or agave nectar can serve as alternatives.

    Nutrition Facts

    • **Calories:** 452 kcal
    • **Protein:** 20 grams
    • **Fat:** 10 grams
    • **Carbs:** 63 grams
    • **Serving Size:** 1 jar (entire recipe)

    Frequently Asked Questions

    Can I use steel-cut oats instead of rolled oats?

    Steel-cut oats require more liquid and longer soaking times, so they’re not ideal for overnight oats. Stick with rolled oats for the best texture.

    Is it necessary to use protein powder?

    No, but it adds a significant protein boost. If you prefer, you can leave it out or replace it with Greek yogurt.

    Can I add fruits to my overnight oats?

    Absolutely! Fresh fruits like bananas, apples, or berries make great additions and add natural sweetness.

    How can I make this recipe vegan?

    The recipe is already vegan if you use plant-based milk and protein powder. Just ensure your toppings are vegan-friendly too.

    Can I double the recipe?

    Yes, you can easily double or triple the ingredients to make more servings, perfect for meal prepping.

  • NO-BAKE REWARD: Indulge in Creamy Vegan Protein Ice Cream!

    NO-BAKE REWARD: Indulge in Creamy Vegan Protein Ice Cream!

    Introduction & My Personal Story

    There’s something magical about making a dessert that doesn’t require an oven. My journey with **vegan protein ice cream** began five years ago when I was looking for a guilt-free indulgence that could satisfy my sweet tooth without compromising my health goals. During a particularly hot summer, I was inspired to create a creamy, luscious treat that even my non-vegan friends would love. The first time I made this no-bake ice cream, it was like a revelation. I remember the delight on my friends’ faces as they tasted the rich, chocolaty flavors, complemented by the smooth, velvety texture. It quickly became a staple in my household, especially on those days when I wanted something sweet without the hassle. This recipe is a testament to the fact that indulgence and health can go hand in hand. So, join me as we dive into the world of creamy, dreamy vegan protein ice cream, a treat that’s as satisfying to make as it is to eat!

    Why You’ll Love This Recipe

    • Quick and easy to make, with no baking required.
    • Packed with protein to support fitness goals.
    • Vegan-friendly and dairy-free.
    • Customizable flavors to suit any palate.
    • Perfect for a refreshing treat on hot days.

    Detailed Ingredients

    To ensure the best results, it’s important to use high-quality ingredients. Here’s what you’ll need:

    • **4 ripe bananas**, sliced and frozen
    • **1 cup almond milk** (or any plant-based milk)
    • **2 tablespoons almond butter** (look for unsweetened)
    • **3 tablespoons cocoa powder** for the chocolate version
    • **1 scoop chocolate protein powder** (about 30g)
    • **1 teaspoon vanilla extract** for the vanilla version
    • **1 teaspoon ground cinnamon** for a hint of spice
    • Optional: **Cacao nibs or chocolate chips** for added texture

    Step-by-Step Instructions

    Chocolate Version

    Step 1: Start by placing your **frozen banana chunks** into a food processor or high-speed blender. Add in the **almond milk**, **almond butter**, **cocoa powder**, and **chocolate protein powder**.

    Step 2: Blend the ingredients on high until the mixture becomes smooth and creamy. This typically takes about 3-4 minutes. Be sure to pause occasionally to scrape down the sides of the blender to ensure everything is well-mixed.

    Step 3: If you like a bit of crunch, stir in some **cacao nibs** or **chocolate chips**. Pulse the blender a couple of times to incorporate them into the mixture.

    Step 4: You can enjoy the ice cream right away by spooning it into bowls. For a firmer texture, pour the mixture into a loaf pan lined with parchment paper and freeze for at least 2 hours before scooping.

    Vanilla Version

    Step 1: Place your **frozen banana chunks** into the blender, along with **almond milk**, **vanilla extract**, **ground cinnamon**, and **protein powder**.

    Step 2: Blend until smooth and creamy, again stopping to scrape down the sides as needed. This should take 3-4 minutes.

    Step 3: Spoon the mixture into bowls for immediate enjoyment, or pour it into a loaf pan lined with parchment paper. Freeze for at least 2 hours for a scoopable consistency.

    Common Mistakes to Avoid

    Even a simple recipe can have its pitfalls. Here’s how to avoid common mistakes:

    • **Not using ripe bananas**: Ensure your bananas are ripe before freezing them. This adds natural sweetness and a creamier texture.
    • **Over-blending**: Be careful not to over-blend the mixture, as it can become too runny. If this happens, simply freeze it longer.
    • **Skipping scraping**: Not scraping down the sides of the blender can lead to uneven mixing.

    How to Store & Reheat

    Store your vegan protein ice cream in an airtight container in the freezer. It can last for up to a week, but for the best texture, consume it within a few days. To serve, let it sit at room temperature for about 10 minutes to soften slightly before scooping.

    Ingredient Substitutions

    If you need to make substitutions, here are some safe swaps:

    • **Almond milk** can be replaced with any plant-based milk, such as soy or oat milk.
    • **Almond butter** can be swapped with peanut butter or sunflower seed butter for a nut-free option.
    • For a different flavor, try using **vanilla protein powder** instead of chocolate.

    Nutrition Facts

    • Calories: 250 per serving
    • Protein: 10g
    • Fat: 8g
    • Carbs: 35g
    • Serving Size: 1 cup

    Frequently Asked Questions

    Q: Can I use fresh bananas instead of frozen?

    A: For the best texture, use frozen bananas. Fresh bananas won’t give the same creamy consistency.

    Q: How can I make this recipe nut-free?

    A: Swap almond milk for oat milk and use sunflower seed butter instead of almond butter.

    Q: Can I add other flavors to the ice cream?

    A: Absolutely! Try adding a teaspoon of instant coffee for a mocha flavor or a handful of berries for a fruity twist.

    Q: What type of blender is best for this recipe?

    A: A high-speed blender or food processor works best to achieve a smooth, creamy texture.


  • CHEAT DAY: Irresistible Chocolate Protein Delights Everyone Craves!

    CHEAT DAY: Irresistible Chocolate Protein Delights Everyone Craves!

    Introduction & My Personal Story

    As a chef with over 5 years of experience, I’ve come to recognize the irreplaceable joy of creating dishes that not only satisfy cravings but also align with a healthy lifestyle. One such creation that has become a staple in my kitchen is the **Irresistible Chocolate Protein Delights**. I remember the first time I crafted these little bites of heaven. It was a chilly Saturday afternoon, and my family was craving something sweet yet nutritious. As I stood in the kitchen, surrounded by a medley of ingredients, I had a lightbulb moment. Why not combine the indulgence of chocolate with the powerhouse of protein?

    What emerged was nothing short of a revelation. The rich aroma of **cacao powder** blended seamlessly with the creamy texture of **almond butter**, while the subtle sweetness of **Medjool dates** added a natural depth. Each bite was a burst of flavor, perfectly complemented by the slight crunch of flaky sea salt. My family couldn’t get enough, and soon, these protein delights became the go-to treat for our cheat days. Crafting these balls is now a cherished ritual, a moment of creativity and indulgence that brings us all together.

    Why You’ll Love This Recipe

    • Quick and easy to make – no baking required!
    • Packed with protein to keep you fueled and satisfied.
    • Rich in chocolate flavor with a hint of sea salt.
    • Perfect for a guilt-free cheat day indulgence.
    • Easy to store and enjoy throughout the week.

    Detailed Ingredients

    • 1 cup **Medjool dates**, pitted (approx. 200g)
    • 1/2 cup **oat flour** (60g)
    • 1/4 cup **cacao powder** (25g)
    • 1/2 cup **chocolate protein powder** (60g)
    • 2 tablespoons **maple syrup** (30ml)
    • 1/4 cup **almond or cashew butter** (60g)
    • 1/4 teaspoon **sea salt**
    • 1/2 cup **dark chocolate chips** (85g)
    • 1 tablespoon **coconut oil** (15ml)
    • Flaky sea salt for sprinkling

    Step-by-Step Instructions

    Step 1: Combine Ingredients

    Start by adding your **Medjool dates**, **oat flour**, **cacao powder**, **chocolate protein powder**, **maple syrup**, **almond butter**, and **sea salt** into a food processor. Ensure the dates are pitted to avoid any unpleasant surprises. Chef’s Tip: If your dates are a bit dry, soak them in warm water for 10 minutes before using.

    Step 2: Blend

    Blend the mixture until you achieve a sticky dough. You may need to scrape down the sides of the food processor a few times to ensure everything is well combined. If the mixture seems too dry, gradually add 1–2 teaspoons of water until the desired consistency is reached.

    Step 3: Form Balls

    Using your hands or a small cookie scoop, form the dough into 12 equal balls. Each should be about the size of a golf ball. Chef’s Tip: Lightly oil your hands to prevent the dough from sticking while you roll.

    Step 4: Prepare Chocolate Coating

    In a microwave-safe bowl, combine the **dark chocolate chips** and **coconut oil**. Heat in 30-second intervals, stirring in between, until the chocolate is fully melted and smooth. Be careful not to overheat, as chocolate can burn easily.

    Step 5: Dip Balls

    Carefully dip each protein ball into the melted chocolate, allowing any excess to drip off. Place them on a parchment-lined tray for easy cleanup.

    Step 6: Finish

    Immediately sprinkle the tops with flaky sea salt. This not only adds a delightful crunch but also enhances the chocolate’s richness. Chill the balls in the fridge or freezer for 10–15 minutes to set the chocolate coating.

    Common Mistakes to Avoid

    • **Overblending**: Blending too long can cause the mixture to become too oily. Pulse just until the dough forms.
    • **Skipping the Soak**: If your dates are dry, not soaking them can lead to a crumbly texture.
    • **Chocolate Overheating**: Always melt chocolate slowly to avoid burning. Stir frequently.

    How to Store & Reheat

    Store your **Chocolate Protein Delights** in an airtight container in the refrigerator for up to 1 week. For longer storage, freeze them for up to 3 months. To enjoy, simply let them sit at room temperature for a few minutes to soften slightly.

    Ingredient Substitutions

    • **Dates**: Substitute with figs or prunes for a different flavor profile.
    • **Oat Flour**: Almond flour can be used for a gluten-free option.
    • **Almond Butter**: Peanut butter or sunflower seed butter work well too.

    Nutrition Facts

    • Calories: 150 per ball
    • Protein: 5g
    • Fat: 7g
    • Carbs: 18g
    • Serving Size: 1 ball

    Frequently Asked Questions

    Q: Can I use a different type of protein powder?

    A: Absolutely! Feel free to use any protein powder you like, but be aware it might slightly change the flavor and texture.

    Q: How can I make these vegan?

    A: Ensure your protein powder and chocolate chips are vegan-friendly. Most other ingredients are naturally vegan.

    Q: What if I don’t have a food processor?

    A: A high-power blender could work, but you may need to blend in batches. Alternatively, chop the dates finely and mix by hand.

    Q: How do I prevent the balls from sticking together?

    A: Store them in layers with parchment paper in between to avoid sticking.

  • Brain Fuel: Protein Muddy Buddies!

    Brain Fuel: Protein Muddy Buddies!

    Introduction & My Personal Story

    Ah, Protein Muddy Buddies! Just saying the name takes me back to my college days when late-night study sessions were fueled by nothing more than a cup of coffee and whatever snack I could get my hands on. It was during one of these marathon study nights that I stumbled upon the idea of turning a classic snack into something a bit more brain-boosting. I was knee-deep in biochemistry textbooks, and I needed something that would not only satisfy my sweet tooth but also keep me focused and energized. That’s when I decided to experiment with adding protein and healthy fats to the traditional Muddy Buddies recipe.

    In my 5 years of experience as a chef, I’ve learned that snacks can be both delicious and nutritious. This recipe is a testament to that belief. The first time I made these Protein Muddy Buddies, they were an instant hit. My friends and I devoured them between pages of notes, and I knew I had created something special. The rich chocolate, creamy peanut butter, and crunchy cereal came together in a way that was nothing short of magical. These days, I make sure to have a batch ready for those moments when I need a quick pick-me-up. This is more than just a snack; it’s a powerhouse of flavor and nutrition that keeps you going when you need it most.

    Why You’ll Love This Recipe

    • Quick and easy to prepare – ready in just 15 minutes.
    • Packed with protein to keep you full and focused.
    • Uses simple ingredients you probably already have at home.
    • Perfect for meal prep and stays fresh in the fridge.
    • Great for both kids and adults – a family favorite!

    Detailed Ingredients

    • Rice Chex Cereal: 6 cups. Look for a mix of Rice Chex and Catalina Crunch for added protein.
    • Dark Chocolate Chips: 1 cup. Opt for brands like Lily’s to cut down on sugar.
    • Natural Peanut Butter: 1/3 cup. Choose one without added sugar for a healthier option.
    • Coconut Oil: 2 tablespoons. This helps to smooth out the chocolate mixture.
    • Powdered Sugar: 1 cup. Use powdered erythritol for a low-sugar alternative.
    • Vanilla Protein Powder: 1/4 cup. Nuzest is a great choice for this recipe.

    Step-by-Step Instructions

    Step 1: Prepare the Cereal
    Measure out 6 cups of Rice Chex and place them in a large mixing bowl. This will be the base of your Protein Muddy Buddies. Set the bowl aside while you prepare the rest of the ingredients.

    Step 2: Mix Dry Ingredients
    In a large 2-gallon resealable zip-lock bag, combine 1 cup of powdered sugar or erythritol with 1/4 cup of vanilla protein powder. This will be used later to coat the cereal, giving it a sweet finish.

    Step 3: Melt the Mixture
    In a saucepan over low-medium heat, combine 1/3 cup of natural peanut butter, 1 cup of dark chocolate chips, and 2 tablespoons of coconut oil. Stir continuously until the mixture is smooth and well combined. Alternatively, you can microwave the mixture in 30-second bursts, stirring after each interval, until smooth.

    Step 4: Coat the Cereal
    Pour the melted chocolate mixture over the bowl of cereal. Use a spatula to gently toss the cereal until every piece is evenly coated with the chocolate mixture. Make sure to work quickly so the chocolate doesn’t harden before the cereal is fully coated.

    Step 5: Shake and Chill
    Transfer the chocolate-coated cereal into the zip-lock bag with the dry ingredients. Seal the bag and shake it vigorously until all the cereal is coated with the powdered sugar mixture. Spread the mixture out on parchment paper to cool completely. Avoid placing it in an airtight container until it’s completely cool to prevent sogginess.

    Step 6: Store
    Once cooled, place the Protein Muddy Buddies in an airtight container and store them in the refrigerator. This will help maintain their freshness and crunchiness, making them ready to enjoy whenever you need a quick snack.

    Common Mistakes to Avoid

    Overheating the Chocolate Mixture: If the chocolate gets too hot, it can seize up and become grainy. Always melt on low-medium heat and stir continuously.

    Not Cooling Completely: Placing the mixture in an airtight container before it’s fully cooled can make the cereal soggy. Let it cool on parchment paper first.

    Uneven Coating: Be sure to thoroughly mix the cereal with the chocolate mixture to ensure every piece is coated. This helps the powdered sugar stick properly.

    How to Store & Reheat

    Store your Protein Muddy Buddies in an airtight container in the refrigerator. They will stay fresh and crunchy for up to 2 weeks. If you prefer them at room temperature, simply take them out of the fridge 10 minutes before serving. There’s no need to reheat; they’re perfect as is!

    Ingredient Substitutions

    If you need to make some swaps, here are a few safe substitutions:

    • Rice Chex: Use any gluten-free cereal or a mix with other high-protein cereals.
    • Dark Chocolate Chips: Substitute with milk or white chocolate chips, though this will alter the sugar content.
    • Peanut Butter: Almond butter or sunflower seed butter work as great alternatives.
    • Powdered Sugar: Powdered monk fruit sweetener can be used for a zero-calorie option.

    Nutrition Facts

    • Calories: 122 kcal per serving
    • Protein: 4g per serving
    • Fat: 8g per serving
    • Carbohydrates: 15g per serving
    • Serving Size: Approximately 1/2 cup

    Frequently Asked Questions

    Can I make this recipe vegan?
    Yes! Simply use a vegan protein powder and ensure your chocolate chips are dairy-free.

    How can I make this recipe more kid-friendly?
    Kids love sweet treats, so consider using milk chocolate chips and adding colorful sprinkles for fun!

    What if I don’t have coconut oil?
    You can substitute with unsalted butter or a neutral cooking oil like canola.

    Can I freeze Protein Muddy Buddies?
    Yes, they freeze well! Just place them in a freezer-safe bag or container and freeze for up to 3 months.

    Do I have to use a zip-lock bag for coating?
    While it’s convenient, you can also use a large bowl with a lid to shake the cereal and powdered mix.

  • 5-MIN FUEL: Protein-Packed French Toast Delight (36g Protein!)

    5-MIN FUEL: Protein-Packed French Toast Delight (36g Protein!)

    Introduction & My Personal Story

    Growing up, breakfast was a sacred ritual in my family. My father would always make sure we started our day with something hearty and wholesome. One morning, as I stumbled into the kitchen with sleep still clinging to me like a warm blanket, I was greeted by the irresistible aroma of cinnamon and vanilla wafting through the air. That was my first introduction to French toast, a dish that would become a beloved staple in our household.

    Fast forward to my college years, and like many of us, I found myself juggling classes, part-time jobs, and a social life. Breakfast had become a grab-and-go affair, often skipped in favor of a few extra minutes of sleep. It was during this hectic time that I decided to reinvent my childhood favorite into something that could fuel my busy mornings without compromising on nutrition. Thus, the Protein-Packed French Toast Delight was born.

    In my 5 years of experience as a chef and food blogger, I’ve learned that the best recipes are those that combine nostalgia with practicality. This French toast delivers just that—comforting flavors with a muscle-building twist. Every bite takes me back to those cherished mornings while giving me the energy to tackle whatever the day throws my way.

    Why You’ll Love This Recipe

    • High in protein — a whopping 36g per serving!
    • Quick and easy — ready in just 5 minutes.
    • Minimal ingredients — perfect for busy mornings.
    • Versatile and customizable with your favorite toppings.
    • Healthy yet indulgent — satisfies your sweet tooth without guilt.

    Detailed Ingredients

    • 2 large eggs
    • 1/2 cup (120 ml) unsweetened almond milk
    • 1 scoop (about 30g) vanilla protein powder
    • 1/2 teaspoon ground cinnamon
    • 1 teaspoon pure vanilla extract
    • A pinch of salt
    • 4 slices of whole-grain bread (look for bread that’s dense and firm to hold the batter well)
    • Cooking spray for the skillet

    Step-by-Step Instructions

    Start by whisking together the eggs, almond milk, protein powder, cinnamon, vanilla, and a pinch of salt in a shallow bowl. Make sure the protein powder is fully dissolved and the mixture is smooth.

    Take your slices of whole-grain bread and soak each one in the mixture for about 15–30 seconds per side. You want the bread to absorb the liquid but not become too soggy. Chef’s Tip: Use slightly stale bread for better absorption without falling apart.

    Heat a nonstick skillet over medium heat and coat it lightly with cooking spray. Once heated, add the soaked bread slices. Cook each side for about 2–3 minutes, or until they turn a beautiful golden brown and have a slight crispiness on the edges.

    Once done, serve your French toast warm. You can top it with fresh berries, a dollop of Greek yogurt, or a drizzle of maple syrup for an added touch of sweetness.

    Common Mistakes to Avoid

    • Over-soaking the bread: This can lead to a soggy texture. Keep the soak time to 15–30 seconds per side.
    • Using too high heat: Cooking on high heat can burn the outside while leaving the inside undercooked. Stick to medium heat for even cooking.
    • Skipping the protein powder: This is crucial for the protein content. Ensure it’s fully mixed into the batter for the best results.

    How to Store & Reheat

    If you have leftovers, let the French toast cool completely before storing. Place in an airtight container and refrigerate for up to 3 days. To reheat, simply pop them in a toaster or warm them in a skillet over medium heat until heated through.

    Ingredient Substitutions

    • Almond milk: Can be replaced with any other milk or milk alternative you prefer.
    • Whole-grain bread: Swap with gluten-free bread if needed.
    • Vanilla protein powder: Feel free to experiment with other flavors like chocolate or cinnamon.

    Nutrition Facts

    • Calories: 401 kcal
    • Protein: 36g
    • Fat: 10g
    • Carbohydrates: 42g
    • Serving Size: 2 slices

    Frequently Asked Questions

    Can I make this recipe vegan? Yes, you can substitute the eggs with a flaxseed mixture and use a plant-based protein powder.

    What other toppings can I use? Besides berries and yogurt, try nut butter, sliced bananas, or chopped nuts.

    Is it okay to use flavored protein powder? Absolutely! Just ensure it complements the vanilla and cinnamon flavors.

    How can I make the French toast crispier? Use a toaster to give them a quick crisp before serving.

    Can I prepare the batter ahead of time? Yes, you can mix the batter the night before and store it in the refrigerator.