Tag: PowerPacked

  • GAINS: Power-Packed Tuna Wraps

    GAINS: Power-Packed Tuna Wraps

    Introduction & My Personal Story

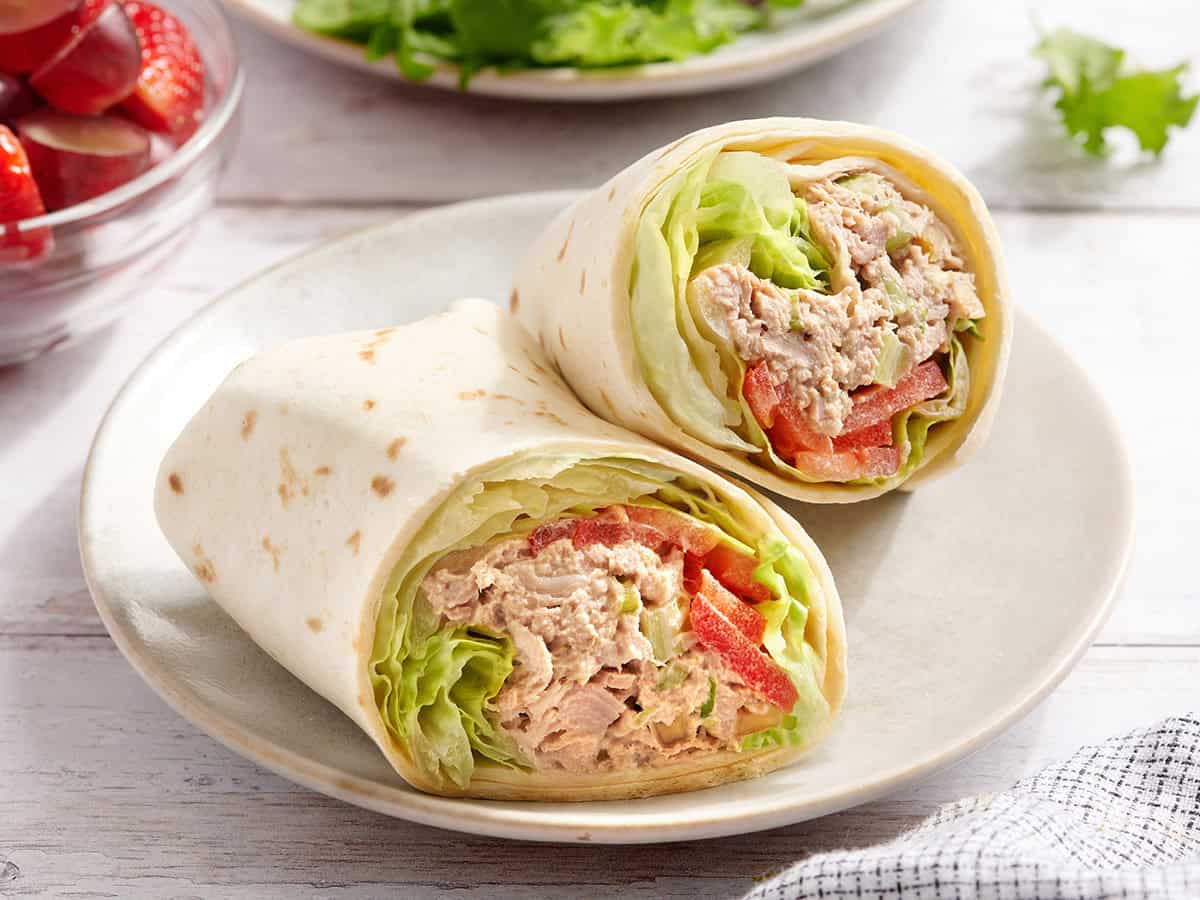
    When I think back to my early days in the bustling kitchen, there’s one dish that stands out for its simplicity and power: the Power-Packed Tuna Wrap. It was during my first year as a chef, amidst the clatter of pots and the sizzle of pans, that I stumbled upon this nutritional powerhouse. I was always on the lookout for meals that provided a quick, hearty boost, especially during those long shifts. Tuna wraps became my go-to, a perfect blend of protein and flavor wrapped in a convenient package. I remember the first time I made it, the aroma of fresh tuna mixing with the crunch of celery and the tang of lemon—it was a revelation. This dish not only fueled my long hours but also became a staple in my personal cookbook. Over the years, I’ve refined this recipe, ensuring it delivers maximum gains for those seeking a healthy, muscle-building meal. It’s a dish that’s close to my heart and one I’m thrilled to share with you today.

    Why You’ll Love This Recipe

    • High in Protein: Each wrap is packed with over 30g of protein, essential for muscle growth and repair.
    • Quick and Easy: Ready in under 15 minutes, making it perfect for busy schedules.
    • Customizable: Easily adapt the ingredients to fit your taste or dietary needs.
    • Portable: These wraps are great for on-the-go meals or post-workout snacks.
    • Nutritious: Balanced with healthy fats, carbs, and fiber for a complete meal.

    Detailed Ingredients

    • 1 (12 oz) can of **chunk light tuna**, drained
    • ½ cup (about 1 rib) of **celery**, finely diced
    • 2 tablespoons of **walnuts**, chopped
    • 1 **green onion**, sliced
    • ¼ cup of **mayonnaise**
    • ½ tablespoon of **lemon juice**
    • ⅛ teaspoon of **black pepper**
    • ⅛ teaspoon of **salt**
    • 6 leaves of **romaine lettuce**, torn into smaller pieces
    • 1 **Roma tomato**, thinly sliced
    • 3 **extra-large tortillas**

    Step-by-Step Instructions

    Step 1: Prepare Your Ingredients

    Start by gathering all your ingredients. Chef’s Tip: Having everything in place before you start cooking, known as “mise en place,” ensures a smooth cooking process. Drain the tuna thoroughly to avoid a soggy wrap. Finely dice the celery, chop the walnuts, and slice the green onion. These textures add a delightful crunch to your wrap.

    Step 2: Mix the Filling

    In a large bowl, combine the drained tuna, diced celery, chopped walnuts, sliced green onion, mayonnaise, lemon juice, black pepper, and salt. Mix until everything is well incorporated. The lemon juice adds a refreshing zing that complements the rich, creamy mayonnaise.

    Step 3: Prepare the Salad Base

    Take the romaine lettuce leaves and tear them into smaller, bite-sized pieces. Thinly slice the Roma tomato. Chef’s Tip: Thinner slices of tomato help the wrap stay intact and prevent the filling from slipping out.

    Step 4: Warm the Tortillas

    Microwave each extra-large tortilla for 5-10 seconds. This softens them, making it easier to wrap without tearing. Be careful not to overheat, as this can make them brittle.

    Step 5: Assemble the Wrap

    Lay a tortilla flat and place a layer of romaine lettuce on it. Add ⅓ of the tomato slices and then spoon ⅓ of the tuna mixture on top. Spread it evenly to ensure each bite is flavorful.

    Step 6: Roll and Seal

    Begin rolling the tortilla from one side, tucking in the sides as you go to create a sealed edge. Place the wrap seam-side down for a minute. This resting period helps the wrap stay closed.

    Step 7: Repeat and Serve

    Repeat the filling and rolling process with the remaining tortillas. Serve immediately for the best texture and flavor.

    Common Mistakes to Avoid

    Overfilling the Wrap: It’s tempting to add more filling, but this can lead to a messy wrap that falls apart. Stick to the recommended amounts.

    Skipping the Warming Step: Cold tortillas are prone to tearing. A quick warm-up makes them pliable and easy to handle.

    Not Draining Tuna Properly: Excess liquid can make the wrap soggy. Ensure the tuna is well-drained before mixing.

    How to Store & Reheat

    Store any leftover wraps in an airtight container in the refrigerator for up to 2 days. To reheat, unwrap the tortilla slightly and microwave for 20-30 seconds. Chef’s Tip: Reheating in a skillet over low heat can help restore some of the original texture.

    Ingredient Substitutions

    • Tuna: Swap with canned chicken for a different protein option.
    • Mayonnaise: Use Greek yogurt for a lower-calorie, tangy alternative.
    • Walnuts: Substitute with almonds or omit for nut allergies.
    • Tortillas: Opt for whole wheat or gluten-free tortillas based on dietary needs.

    Nutrition Facts

    • Calories: 412 kcal per wrap
    • Protein: 34g
    • Fat: 20g
    • Carbohydrates: 28g
    • Serving Size: 1 wrap

    Frequently Asked Questions

    Q: Can I make these wraps ahead of time?

    A: Yes, you can prepare the filling up to a day in advance. Assemble the wraps just before serving for the best texture.

    Q: Are there vegan alternatives for this recipe?

    A: Certainly! Substitute tuna with chickpeas and use vegan mayonnaise for a plant-based version.

    Q: What other vegetables can I add?

    A: Feel free to add shredded carrots, sliced bell peppers, or cucumbers for extra crunch and nutrients.

    Q: How can I make this recipe spicier?

    A: Add a dash of hot sauce or finely chopped jalapeños to the tuna mixture for a spicy kick.

  • 5-MIN FUEL: Cookie Dough Overnight Oats for a Power-Packed Breakfast!

    5-MIN FUEL: Cookie Dough Overnight Oats for a Power-Packed Breakfast!

    Introduction & My Personal Story

    There’s nothing quite like waking up to a breakfast that’s ready to go, especially when it tastes like a treat but fuels you like a champion. Let me take you back to a time in my life when mornings were hectic, and breakfast was an afterthought. It was during a particularly busy period in my culinary career, where 5 a.m. wake-up calls were the norm, and every minute counted. In my 5 years of experience as a chef, I’ve learned that a solid breakfast can make or break your day. This is where my love for overnight oats began. The idea of waking up to a jar filled with creamy, indulgent oats that mimic the taste of cookie dough was a revelation. I’d mix them up the night before, and by morning, they were ready to power me through the day. The combination of nut butter, chocolate chips, and oats created a texture and flavor that felt like a guilty pleasure, yet it was packed with nutrients. This dish not only saved time but also provided the energy boost I needed to handle the demands of a bustling kitchen. Now, I’m excited to share this recipe with you, hoping it brings the same joy and convenience to your mornings as it did to mine.

    Why You’ll Love This Recipe

    • Quick and easy preparation – just 5 minutes!
    • Packed with protein and fiber to keep you full.
    • Tastes like a dessert but healthy enough for breakfast.
    • Customizable with your favorite toppings.
    • Perfect for meal prep and busy mornings.

    Detailed Ingredients

    • Rolled Oats: 1/2 cup (45g) – Look for organic, gluten-free oats for best results.
    • Protein Powder: 1 scoop (30g) – Choose a flavor that complements your cookie dough theme, such as vanilla or chocolate.
    • Chia Seeds: 1 tablespoon (12g) – These tiny seeds add fiber and omega-3 fatty acids.
    • Cinnamon: 1/2 teaspoon – Adds warmth and depth to the flavor.
    • Salt: A pinch – Enhances all the flavors.
    • Almond Milk: 1 cup (240ml) – Unsweetened is best to control the sweetness.
    • Cashew Butter: 1 tablespoon (16g) – Offers a creamy texture and nutty flavor.
    • Maple Syrup: 1 tablespoon (15ml) – Natural sweetness without refined sugars.
    • Vanilla Extract: 1/2 teaspoon – For that authentic cookie dough taste.
    • Mini Chocolate Chips: 2 tablespoons (28g) – Go for dark chocolate for a richer taste.

    Step-by-Step Instructions

    Step 1: Mix Dry Ingredients
    In a medium-sized jar or bowl, combine **1/2 cup of rolled oats**, **1 scoop of protein powder**, **1 tablespoon of chia seeds**, **1/2 teaspoon of cinnamon**, and a pinch of **salt**. Stir them together until well mixed.

    Step 2: Add Wet Ingredients
    Pour in **1 cup of almond milk**, **1 tablespoon of cashew butter**, **1 tablespoon of maple syrup**, and **1/2 teaspoon of vanilla extract**. Stir the mixture thoroughly until the cashew butter is well incorporated and the mixture appears smooth.

    Step 3: Fold in Chocolate Chips
    Gently fold in **2 tablespoons of mini chocolate chips**. Chef’s Tip: Reserve a few chips to sprinkle on top before serving for an extra touch of indulgence.

    Step 4: Refrigerate
    Cover the jar or bowl and refrigerate for at least 4 hours, but overnight is best. This allows the oats to absorb the liquid and flavors, achieving a creamy, cohesive texture.

    Step 5: Serve
    Before serving, give the oats a good stir. If they seem too thick, add a splash of almond milk to reach your desired consistency. Top with additional chocolate chips or a drizzle of nut butter if desired.

    Common Mistakes to Avoid

    Too Thick or Thin: If your oats are too thick, add more liquid until the desired consistency is reached. If too thin, reduce the amount of almond milk next time.

    Clumpy Protein Powder: Ensure the protein powder is well mixed to avoid clumps. Use a whisk or fork for better results.

    Not Refrigerating Long Enough: The oats need time to absorb the liquid and flavors. Make sure to refrigerate for at least 4 hours.

    How to Store & Reheat

    Store your **cookie dough overnight oats** in an airtight container in the refrigerator. They can be stored for up to 4 days. If you prefer them warm, reheat in the microwave for about 30 seconds to 1 minute, stirring halfway through. Add a splash of almond milk if they appear too thick after reheating.

    Ingredient Substitutions

    • Rolled Oats: Substitute with quick oats, but reduce soaking time.
    • Cashew Butter: Swap with almond or peanut butter for a different flavor.
    • Almond Milk: Use any plant-based milk like soy or oat milk.
    • Maple Syrup: Honey or agave syrup can be used as alternatives.

    Nutrition Facts

    • Calories: 471 kcal
    • Protein: 20g
    • Fat: 16g
    • Carbs: 63g
    • Serving Size: 1 jar/bowl

    Frequently Asked Questions

    Q: Can I make this recipe without protein powder?
    A: Yes, you can omit the protein powder, but it will reduce the protein content. Consider adding Greek yogurt for a protein boost.

    Q: Are there gluten-free options?
    A: Absolutely! Use certified gluten-free oats to keep this recipe gluten-free.

    Q: Can I use steel-cut oats?
    A: Steel-cut oats require more soaking time and may not achieve the same creamy texture. Stick with rolled or quick oats for best results.

    Q: How can I make this vegan?
    A: This recipe is already vegan if you use plant-based protein powder and chocolate chips.

    Q: What can I use instead of chia seeds?
    A: Flaxseeds are a great alternative to chia seeds and offer similar nutritional benefits.

  • GAINS: Power-Packed, Freezer-Friendly Meatballs!

    GAINS: Power-Packed, Freezer-Friendly Meatballs!

    Introduction & My Personal Story

    There’s something about a batch of homemade meatballs that transports me back to my grandmother’s kitchen. Growing up, Sunday afternoons were reserved for family dinners, and meatballs were always the star of the show. The aroma of sizzling meat, the gentle hum of conversation, and the clinking of forks against plates are memories I cherish. In my 5 years of experience as a chef, I’ve learned that food is not just about sustenance; it’s about creating moments, and these power-packed, freezer-friendly meatballs are a testament to that philosophy.

    As a young chef, I was always experimenting, tweaking my grandmother’s recipe to boost its nutritional value without sacrificing flavor. I wanted to create a meal that was not only delicious but also aligned with my fitness goals. These meatballs fit the bill perfectly. They’re loaded with protein to fuel your muscles and are easy to prepare in advance, making them a staple in my kitchen. Whether you’re meal prepping for the week or looking for a quick, post-workout meal, these meatballs have got you covered.

    Why You’ll Love This Recipe

    • High Protein: Each serving packs a punch with 24g of protein, perfect for muscle recovery.
    • Freezer-Friendly: Make a big batch and freeze them for easy future meals.
    • Simple Ingredients: No need for a long shopping list; everything can be found at your local market.
    • Versatile: Enjoy them on their own, in a sandwich, or with pasta.
    • Quick to Make: From start to finish in under an hour.

    Detailed Ingredients

    To create these delicious and nutritious meatballs, you’ll need the following ingredients:

    • **500g ground beef**: Look for lean cuts to reduce fat content.
    • **250g Italian sausage**: Adds a spicy kick; you can choose mild if preferred.
    • **1 cup (100g) breadcrumbs**: Opt for whole wheat for added fiber.
    • **1/2 cup (50g) grated Parmesan**: Aged Parmesan has a richer flavor.
    • **2 teaspoons garlic powder**
    • **1 teaspoon onion powder**
    • **1 tablespoon Italian seasoning**: A blend of oregano, basil, thyme, and rosemary.
    • **2 large eggs**: Acts as a binder for the mixture.
    • **1/4 cup (60ml) milk**: Keeps the meatballs moist.
    • **Salt and pepper to taste**

    Step-by-Step Instructions

    Step 1: Prepare the Mixture

    Start by combining your dry ingredients in a small bowl: **breadcrumbs**, **Parmesan**, **garlic powder**, **onion powder**, **Italian seasoning**, **salt**, and **pepper**. In a separate bowl, lightly whisk the **eggs**. This ensures even distribution when mixing with the meat.

    Step 2: Combine Ingredients

    In a large mixing bowl, combine the breadcrumb mixture with the **eggs**, **milk**, **Italian sausage**, and **ground beef**. Using your hands, gently mix until everything is well combined. Be careful not to overmix; otherwise, the meatballs can become tough.

    Step 3: Rest the Mixture

    Allow the mixture to rest for about five minutes. This gives the breadcrumbs time to absorb the liquid, which results in a more cohesive meatball.

    Step 4: Shape the Meatballs

    Divide the mixture and shape it into approximately 32 balls, each about 2 tablespoons in size. Chef’s Tip: Use a small ice cream scoop for uniform sizing.

    Step 5: Preheat and Prepare for Baking

    Preheat your oven to 400°F (200°C). Line a baking sheet with parchment paper and place the meatballs on it, ensuring they are spaced about one inch apart to allow even cooking.

    Step 6: Bake the Meatballs

    Bake the meatballs for 15 minutes or until they are lightly browned and reach an internal temperature of 160°F (70°C). This ensures they’re cooked through while retaining juiciness.

    Step 7: Simmer in Sauce (Optional)

    If you’d like to add an extra layer of flavor, transfer the meatballs to a simmering **marinara sauce** for an additional five minutes. If you’re skipping the sauce, bake them for an extra 3–5 minutes until fully cooked.

    Common Mistakes to Avoid

    • Overmixing: This can lead to tough meatballs. Mix just until combined.
    • Skipping the Rest: Allowing the mixture to rest is crucial for texture.
    • Incorrect Oven Temperature: Always preheat your oven to ensure even cooking.
    • Not Checking Internal Temperature: Use a meat thermometer to ensure meatballs are fully cooked.

    How to Store & Reheat

    To store your meatballs, let them cool completely before transferring them to an airtight container. They can be refrigerated for up to 4 days. For longer storage, place them in a freezer-safe bag or container and freeze for up to 3 months.

    When you’re ready to reheat, thaw them overnight in the refrigerator if frozen. You can reheat them in the oven at 350°F (175°C) for about 10 minutes or until warmed through. Alternatively, you can simmer them in sauce for a quick and flavorful meal.

    Ingredient Substitutions

    • Ground Turkey or Chicken: For a leaner option, swap out ground beef.
    • Gluten-Free Breadcrumbs: Use these if you’re avoiding gluten.
    • Almond Milk: A non-dairy alternative to regular milk.
    • Vegan Parmesan: For a dairy-free option.

    Nutrition Facts

    • Calories: 490 kcal
    • Protein: 24g
    • Fat: 35g
    • Carbs: 12g
    • Serving Size: 4 meatballs

    Frequently Asked Questions

    • Can I make these meatballs ahead of time? Yes, prepare the mixture and shape the meatballs, then refrigerate for up to a day before cooking.
    • What type of sauce pairs well with these meatballs? Marinara or a spicy arrabbiata sauce complements them beautifully.
    • Can I cook these meatballs in a skillet? Absolutely, just ensure they’re cooked through by checking the internal temperature.
    • Are these meatballs suitable for meal prep? Definitely, they freeze well and can be reheated easily for a quick meal.
    • How can I make these meatballs spicier? Add red pepper flakes or use hot Italian sausage for an extra kick.

  • GAINS: Power-Packed Pork and Sauerkraut

    GAINS: Power-Packed Pork and Sauerkraut

    Introduction & My Personal Story

    As a chef with 5 years of experience, I’ve spent countless hours in the kitchen experimenting with flavors and textures to fuel my passion for both cooking and fitness. The Power-Packed Pork and Sauerkraut dish is more than just a meal; it’s a nostalgic trip down memory lane. I remember the first time I encountered this hearty combination. It was during a visit to my grandmother’s cozy kitchen, where the aroma of pork roasting with tangy sauerkraut filled the air. She had a knack for creating meals that satisfied both the soul and the body, and this dish was no exception.

    Over the years, I’ve adapted her classic recipe to fit a more protein-focused lifestyle. This dish has become my go-to when I need a robust meal that supports muscle recovery and growth. The tender, juicy pork, paired with the zesty sauerkraut, is not only delicious but also packed with nutrients. It’s a recipe that bridges the gap between traditional comfort food and modern nutritional needs, making it a staple in my kitchen and a favorite among friends and family. Whether you’re a fitness enthusiast or just someone who appreciates a good meal, this dish is sure to become a beloved part of your culinary repertoire.

    Why You’ll Love This Recipe

    • High in Protein: Perfect for muscle recovery and growth.
    • Rich in Flavor: A delightful blend of savory pork and tangy sauerkraut.
    • Easy to Prepare: Simple steps for a rewarding meal.
    • Nutritious: Packed with vitamins and minerals.
    • Versatile: Great for meal prep or a family dinner.

    Detailed Ingredients

    • 2.5 kg (5.5 lbs) pork butt: Look for a cut with good marbling for tenderness.
    • 1 tablespoon salt
    • 1 teaspoon black pepper
    • 1 tablespoon garlic powder
    • 2 tablespoons vegetable oil
    • 2 large onions, sliced
    • 2 apples, peeled and sliced (Granny Smith works well for a tart flavor)
    • 3 cloves garlic, minced
    • 2 tablespoons brown sugar
    • 2 tablespoons Dijon mustard
    • 1 tablespoon caraway seeds
    • 1 teaspoon smoked paprika
    • 1 bay leaf
    • 1 kg (2.2 lbs) sauerkraut, drained
    • 500 ml (2 cups) chicken broth

    Step-by-Step Instructions

    Step 1: Preheat and Prepare
    Preheat your oven to 300°F (150°C). This low and slow cooking method ensures the pork becomes tender and flavorful. Gather all your ingredients, ensuring everything is within reach for a smooth cooking process.

    Step 2: Season the Pork
    Generously season the pork butt with salt, black pepper, and garlic powder. This creates a flavorful crust during searing. Chef’s Tip: Ensure the pork is at room temperature before seasoning to allow for even cooking.

    Step 3: Sear the Pork
    In a large Dutch oven, heat the vegetable oil over medium-high heat. Carefully add the pork and sear each side for about 8-10 minutes until a deep golden crust forms. This step locks in the juices, making the pork succulent.

    Step 4: Sauté the Onions and Apples
    Reduce the heat to medium. Add the sliced onions and apples to the pot. Cook for about 5-8 minutes, stirring occasionally, until they are softened and lightly browned. The apples add a subtle sweetness that balances the dish.

    Step 5: Add the Aromatics
    Stir in the minced garlic, brown sugar, Dijon mustard, caraway seeds, smoked paprika, remaining black pepper, and bay leaf. Cook for about a minute until the mixture is fragrant, enhancing the depth of flavor.

    Step 6: Build the Base
    Add the drained sauerkraut to the pot, spreading it evenly. Pour in the chicken broth, stirring to create a flavorful bed for the pork. The sauerkraut absorbs the spices, becoming a delicious accompaniment.

    Step 7: Roast the Pork
    Place the seared pork butt on top of the sauerkraut mixture. Cover with a lid and roast in the oven for 3 to 3½ hours. The pork should be fork-tender, indicating it’s ready.

    Step 8: Brown and Reduce
    Remove the lid, increase the oven temperature to 375°F (190°C), and continue roasting for another 20-30 minutes. This step browns the pork further and reduces the juices slightly, intensifying the flavors.

    Step 9: Rest and Shred
    Remove the pot from the oven and let the pork rest for about 10 minutes. Using two forks, shred the pork directly in the pot, mixing it with the sauerkraut mixture to soak up all the flavors.

    Step 10: Serve and Enjoy
    Serve the pork and sauerkraut warm, straight from the pot. This protein-rich meal is perfect for fueling your body post-workout or enjoying a hearty family dinner.

    Common Mistakes to Avoid

    • Skipping the Sear: Don’t skip searing the pork; it seals in the juices and adds flavor.
    • Overcooking the Sauerkraut: Add the sauerkraut just before roasting to avoid it becoming mushy.
    • Insufficient Seasoning: Make sure to season the pork generously for a well-rounded taste.
    • Not Resting the Pork: Allow the pork to rest before shredding to retain its juices.

    How to Store & Reheat

    Storage: Once cooled, store the pork and sauerkraut in an airtight container in the refrigerator for up to 3 days.

    Reheating: To reheat, place the mixture in a covered oven-safe dish and warm in a preheated oven at 350°F (175°C) for about 15-20 minutes. Alternatively, reheat in a microwave-safe dish, stirring occasionally, until heated through.

    Ingredient Substitutions

    • Pork Butt: You can substitute with pork shoulder for a similar texture.
    • Apples: Pears can be used for a different flavor profile.
    • Chicken Broth: Vegetable broth works well if you prefer a lighter base.
    • Dijon Mustard: Whole grain mustard adds a unique texture and flavor.

    Nutrition Facts

    • Calories: 319 kcal per serving
    • Protein: 34g
    • Fat: 15g
    • Carbohydrates: 10g
    • Serving Size: 1/8 of the recipe

    Frequently Asked Questions

    Q: Can I make this recipe in a slow cooker?

    A: Yes, after searing the pork, transfer it along with the other ingredients to a slow cooker. Cook on low for 6-8 hours.

    Q: Is there a vegetarian version of this dish?

    A: Yes, replace the pork with jackfruit and use vegetable broth to create a vegetarian-friendly version.

    Q: Can I freeze leftovers?

    A: Absolutely. Store in a freezer-safe container for up to 2 months. Thaw in the refrigerator before reheating.

    Q: What sides pair well with this dish?

    A: Mashed potatoes or a fresh green salad complement the flavors beautifully.

  • GAINS: Power-Packed Chicken & Rice Casserole!

    GAINS: Power-Packed Chicken & Rice Casserole!

    Introduction & My Personal Story

    There’s something uniquely comforting about a warm, hearty casserole. Growing up, my mother would often prepare a chicken and rice casserole that seemed to cure any ailment, big or small. As a young aspiring chef, I was mesmerized by how a simple dish could bring the family together, providing not just nourishment but a sense of unity. Fast forward to my twenties, when I began my journey as a professional chef, I realized the power of protein-rich meals, especially for those leading an active lifestyle. In my 5 years of experience crafting recipes that fuel fitness enthusiasts, I’ve come to appreciate this revamped version of my childhood favorite. The “Gains: Power-Packed Chicken & Rice Casserole” is more than just a meal; it’s a testament to the power of nutrition in muscle recovery and strength building. Every bite is a nostalgic nod to my roots, yet it’s tailored for today’s active warriors. Let’s dive into why this dish is not only delicious but also a powerhouse of nutrients.

    Why You’ll Love This Recipe

    • High in **protein** for muscle recovery and growth.
    • Rich in **flavor** with a blend of spices and creamy sauce.
    • Perfect for meal prep – stays fresh and tasty for days.
    • Simple, straightforward steps for a hassle-free cooking experience.
    • Customizable with your favorite vegetables and spices.

    Detailed Ingredients

    To create this power-packed casserole, you’ll need the following ingredients:

    • 1 ½ cups long-grain white rice (uncooked)
    • 3 cups water (for cooking rice)
    • 1 boneless, skinless **chicken breast** (approximately 300 grams), cut into ½-inch cubes
    • ½ teaspoon salt
    • ½ teaspoon pepper
    • 1 tablespoon olive oil
    • 1 small yellow onion, diced
    • 3 medium carrots, diced
    • ½ lb. broccoli florets, thawed if frozen
    • 3 tablespoons butter
    • 3 tablespoons all-purpose flour
    • 1 cup chicken broth
    • 1 cup whole milk
    • 1 teaspoon smoked paprika
    • ½ teaspoon garlic powder
    • ½ teaspoon onion powder
    • 2 cups shredded cheddar cheese

    When shopping, look for fresh, vibrant vegetables, and high-quality **chicken** to ensure the best taste and nutritional value.

    Step-by-Step Instructions

    Step 1: Prep the Oven and Dish

    Preheat your oven to 350°F (175°C). Spray an 8×10-inch casserole dish with nonstick spray to prevent sticking.

    Step 2: Cook the Rice

    In a saucepan, bring 3 cups of water to a boil. Add 1 ½ cups of long-grain white rice, reduce to a simmer, and cover. Cook according to package instructions until the rice is tender and yields about 4 cups.

    Step 3: Prepare the Chicken

    While the rice is cooking, cut your **chicken breast** into ½-inch cubes. Season with ½ teaspoon of salt and ½ teaspoon of pepper.

    Step 4: Sear the Chicken

    Heat a large skillet over medium-high heat. Add 1 tablespoon of olive oil and the seasoned chicken cubes. Sear for about 2 minutes on each side until lightly browned. Transfer the chicken to a large bowl.

    Step 5: Sauté the Vegetables

    In the same skillet, add the diced onion and carrots. Sauté for about 5 minutes until softened. Add them to the bowl with the chicken.

    Step 6: Make the Sauce

    Using the same skillet, melt 3 tablespoons of butter over medium heat. Add 3 tablespoons of flour, whisking constantly until the mixture becomes foamy. Cook for about 1 minute to eliminate the raw flour taste.

    Step 7: Add Liquids to the Sauce

    Slowly whisk in 1 cup of chicken broth, allowing the mixture to simmer and thicken. Gradually add 1 cup of whole milk, whisking continuously until the sauce coats the back of a spoon.

    Step 8: Season the Sauce

    Turn off the heat and stir in 1 teaspoon of smoked paprika, ½ teaspoon of garlic powder, and ½ teaspoon of onion powder. Mix well with the remaining salt and pepper.

    Step 9: Combine All Ingredients

    In the bowl with the chicken and vegetables, add the broccoli florets, cooked rice, and half of the shredded cheddar cheese (about 1 cup). Pour in the sauce and mix until everything is well combined.

    Step 10: Assemble the Casserole

    Transfer the mixture to the prepared casserole dish. Smooth out the top and sprinkle the remaining shredded cheese evenly over the mixture.

    Step 11: Bake

    Bake in the preheated oven for about 35 minutes, or until the edges are golden brown and the cheese is bubbly.

    Step 12: Serve

    Serve hot as a hearty, protein-packed meal. Perfect for post-workout recovery or a comforting family dinner.

    Common Mistakes to Avoid

    Here are a few pitfalls to watch out for when making this casserole:

    • Overcooking the chicken: Searing should be brief to prevent dryness. Aim for just a light browning.
    • Undercooked rice: Ensure the rice is fully cooked before adding it to the casserole to avoid crunchy bites.
    • Runny sauce: Allow the sauce to thicken properly before combining with other ingredients. It should coat the back of a spoon.

    How to Store & Reheat

    To store leftovers, allow the casserole to cool completely. Transfer to an airtight container and refrigerate for up to 4 days. For longer storage, freeze for up to 3 months. To reheat, preheat the oven to 350°F (175°C) and warm the casserole until heated through, about 20-25 minutes. If reheating from frozen, allow it to thaw overnight in the refrigerator first.

    Ingredient Substitutions

    • Chicken: Swap with turkey or tofu for a different protein source.
    • Rice: Use brown rice for a nuttier flavor and more fiber.
    • Cheese: Substitute with mozzarella or a dairy-free alternative if preferred.
    • Milk: Almond or soy milk can be used for a lactose-free option.

    Nutrition Facts

    • Calories: Approximately 513 kcal per serving
    • Protein: 24g
    • Fat: 23g
    • Carbohydrates: 45g
    • Serving Size: 1/6 of the casserole

    Frequently Asked Questions

    • Can I make this casserole ahead of time? Yes, prepare the casserole up to the baking step, cover, and refrigerate for up to 24 hours before baking.
    • Is this recipe gluten-free? Substitute the all-purpose flour with a gluten-free flour blend to make it gluten-free.
    • Can I add more vegetables? Absolutely, feel free to add bell peppers, peas, or any of your favorite veggies.
    • How can I make this spicier? Add a pinch of cayenne pepper or a chopped jalapeño to the sauce for extra heat.