Tag: GAINS

  • GAINS: Tuna Power Meals for Muscle Growth

    GAINS: Tuna Power Meals for Muscle Growth

    Introduction & My Personal Story

    Ah, the humble tuna. I remember my college days when I was a budding chef and an avid gym-goer, living on a shoestring budget. Tuna was my go-to protein source. Not only was it affordable, but it was also packed with the nutrients I needed to fuel my workouts and muscle growth. I would often experiment with different combinations, trying to keep my meals exciting and my taste buds entertained. One particular memory stands out: a late-night cooking session after an exhausting day of classes and gym. I opened my pantry to find a few cans of tuna and a couple of ingredients lying around. With a bit of creativity, I whipped up a dish that not only satisfied my hunger but also became a staple in my diet. This dish, which I fondly call “Tuna Power Meals,” is something I’ve perfected over the years. In my 5 years of experience as a chef, I’ve learned that the simplest ingredients can create the most powerful meals. Today, I’m thrilled to share my recipe for GAINS: Tuna Power Meals for Muscle Growth. Let’s dive into the world of flavors and fitness!

    Why You’ll Love This Recipe

    • High Protein Content: Each serving provides approximately 25g of protein, essential for muscle repair and growth.
    • Quick and Easy: Perfect for those who need a nutritious meal in under 30 minutes.
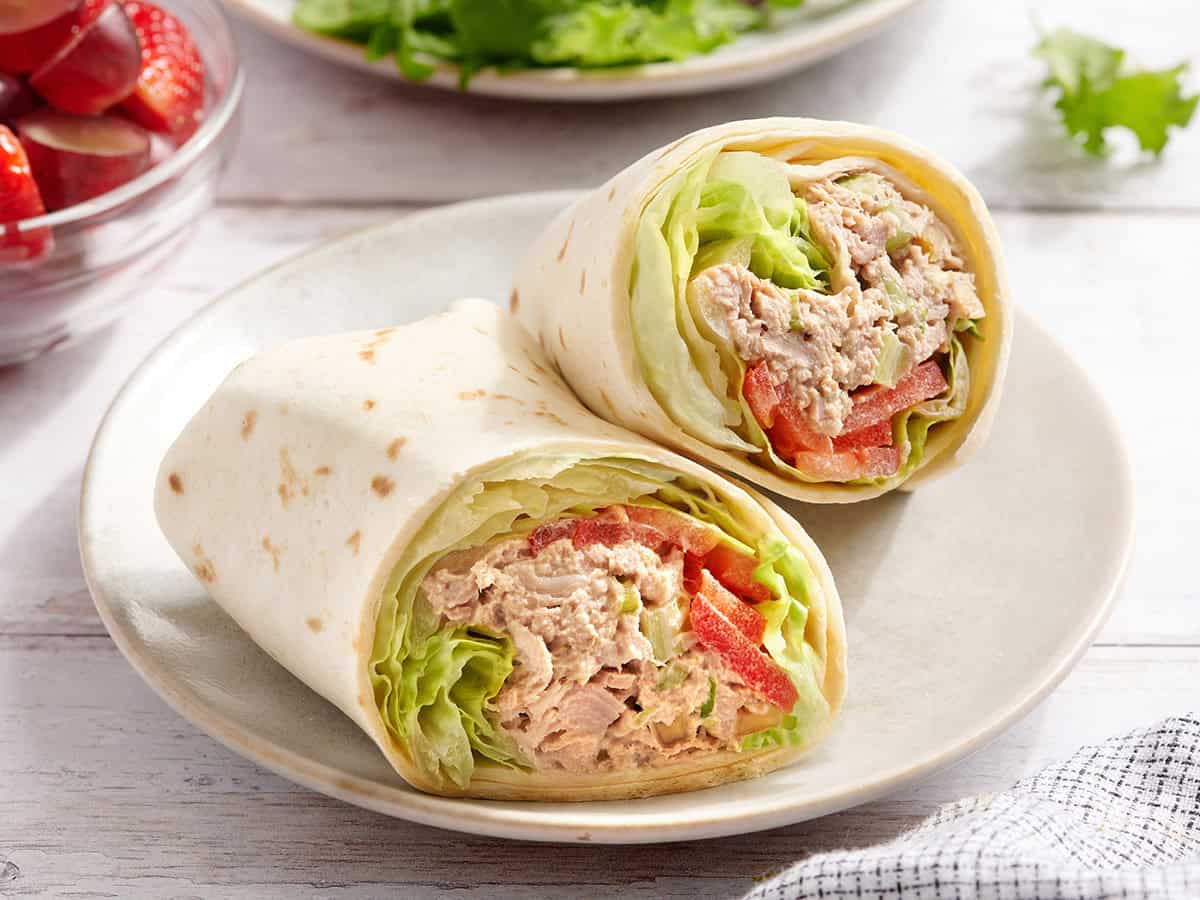
    • Versatile: Can be served in various ways – in wraps, over salads, or as a standalone dish.
    • Budget-Friendly: Uses cost-effective ingredients without compromising on nutrition.
    • Customizable: Easily adapt the recipe with your choice of herbs and spices.

    Detailed Ingredients

    • 2 cans of **tuna** (in water or oil), drained – approx. 280g total
    • 1/2 cup of **Greek yogurt** – about 120g
    • 1 **avocado**, ripe and mashed
    • 1 tablespoon of **lemon juice**
    • 1/4 cup of chopped **celery** – around 30g
    • 1/4 cup of chopped **red onion** – around 30g
    • 2 tablespoons of **fresh parsley**, finely chopped
    • Salt and pepper to taste
    • Optional: **sriracha sauce** for heat, **mustard** for tang

    Step-by-Step Instructions

    Step 1: Prepare the Ingredients
    Start by draining the cans of **tuna**. Use a fork to break the tuna into smaller flakes in a large mixing bowl. This will ensure that the tuna mixes evenly with the other ingredients.

    Step 2: Mix the Base
    Add the **Greek yogurt** and mashed **avocado** to the bowl with the tuna. The yogurt adds creaminess and tang, while the avocado provides healthy fats. Use a spatula to mix these ingredients until well combined.

    Step 3: Add Flavor and Texture
    Stir in the **lemon juice**, **chopped celery**, **red onion**, and **parsley**. These ingredients add crunch and freshness to the dish. Season with salt and pepper. If you like a bit of heat, add a splash of **sriracha sauce**.

    Step 4: Let It Chill
    For the best flavor, cover the bowl with plastic wrap and refrigerate for at least 30 minutes. This allows the flavors to meld together, creating a more cohesive and delicious dish.

    Step 5: Serve and Enjoy
    Once chilled, the Tuna Power Meal is ready to serve. You can enjoy it as a salad, in a wrap, or simply on its own. Chef’s Tip: Pair it with whole-grain bread or a side of quinoa for a complete meal.

    Common Mistakes to Avoid

    • Overmixing: This can make the tuna mushy. Mix just enough to combine the ingredients.
    • Not Draining Tuna Properly: Excess liquid can make the dish watery. Ensure the tuna is well-drained before mixing.
    • Skipping the Chill Time: This step is crucial for flavor development. Give it the 30 minutes it needs in the fridge.
    • Using Overly Ripe Avocados: They can overpower the dish. Choose avocados that are just ripe enough to mash easily.

    How to Store & Reheat

    Store any leftovers in an airtight container in the refrigerator. The Tuna Power Meal will last up to 3 days. When ready to eat, give it a good stir. If you prefer it warm, gently heat it in a pan over low heat, but it’s traditionally served cold.

    Ingredient Substitutions

    • Greek Yogurt: Can be replaced with sour cream or mayonnaise for a different flavor profile.
    • Avocado: If unavailable, try using hummus for a smooth texture.
    • Celery and Red Onion: Swap with bell peppers or scallions for a different crunch.

    Nutrition Facts

    • Calories: 300 kcal per serving
    • Protein: 25g
    • Fat: 15g
    • Carbs: 10g
    • Serving Size: 1 cup

    Frequently Asked Questions

    • Can I use fresh tuna instead of canned?
      Absolutely! Fresh tuna can be grilled or seared before mixing with the other ingredients.
    • Is this recipe suitable for meal prep?
      Yes, it’s perfect for meal prep. Make a batch and store it in the fridge for up to 3 days.
    • What can I serve with the Tuna Power Meal?
      Serve it with whole-grain bread, rice cakes, or a side of mixed greens.
    • Can I freeze this dish?
      Freezing is not recommended as it may change the texture of the yogurt and avocado.
    • How can I adjust the spice level?
      Increase or decrease the **sriracha sauce** according to your preference.


  • GAINS: Power-Packed Tuna Wraps

    GAINS: Power-Packed Tuna Wraps

    Introduction & My Personal Story

    When I think back to my early days in the bustling kitchen, there’s one dish that stands out for its simplicity and power: the Power-Packed Tuna Wrap. It was during my first year as a chef, amidst the clatter of pots and the sizzle of pans, that I stumbled upon this nutritional powerhouse. I was always on the lookout for meals that provided a quick, hearty boost, especially during those long shifts. Tuna wraps became my go-to, a perfect blend of protein and flavor wrapped in a convenient package. I remember the first time I made it, the aroma of fresh tuna mixing with the crunch of celery and the tang of lemon—it was a revelation. This dish not only fueled my long hours but also became a staple in my personal cookbook. Over the years, I’ve refined this recipe, ensuring it delivers maximum gains for those seeking a healthy, muscle-building meal. It’s a dish that’s close to my heart and one I’m thrilled to share with you today.

    Why You’ll Love This Recipe

    • High in Protein: Each wrap is packed with over 30g of protein, essential for muscle growth and repair.
    • Quick and Easy: Ready in under 15 minutes, making it perfect for busy schedules.
    • Customizable: Easily adapt the ingredients to fit your taste or dietary needs.
    • Portable: These wraps are great for on-the-go meals or post-workout snacks.
    • Nutritious: Balanced with healthy fats, carbs, and fiber for a complete meal.

    Detailed Ingredients

    • 1 (12 oz) can of **chunk light tuna**, drained
    • ½ cup (about 1 rib) of **celery**, finely diced
    • 2 tablespoons of **walnuts**, chopped
    • 1 **green onion**, sliced
    • ¼ cup of **mayonnaise**
    • ½ tablespoon of **lemon juice**
    • ⅛ teaspoon of **black pepper**
    • ⅛ teaspoon of **salt**
    • 6 leaves of **romaine lettuce**, torn into smaller pieces
    • 1 **Roma tomato**, thinly sliced
    • 3 **extra-large tortillas**

    Step-by-Step Instructions

    Step 1: Prepare Your Ingredients

    Start by gathering all your ingredients. Chef’s Tip: Having everything in place before you start cooking, known as “mise en place,” ensures a smooth cooking process. Drain the tuna thoroughly to avoid a soggy wrap. Finely dice the celery, chop the walnuts, and slice the green onion. These textures add a delightful crunch to your wrap.

    Step 2: Mix the Filling

    In a large bowl, combine the drained tuna, diced celery, chopped walnuts, sliced green onion, mayonnaise, lemon juice, black pepper, and salt. Mix until everything is well incorporated. The lemon juice adds a refreshing zing that complements the rich, creamy mayonnaise.

    Step 3: Prepare the Salad Base

    Take the romaine lettuce leaves and tear them into smaller, bite-sized pieces. Thinly slice the Roma tomato. Chef’s Tip: Thinner slices of tomato help the wrap stay intact and prevent the filling from slipping out.

    Step 4: Warm the Tortillas

    Microwave each extra-large tortilla for 5-10 seconds. This softens them, making it easier to wrap without tearing. Be careful not to overheat, as this can make them brittle.

    Step 5: Assemble the Wrap

    Lay a tortilla flat and place a layer of romaine lettuce on it. Add ⅓ of the tomato slices and then spoon ⅓ of the tuna mixture on top. Spread it evenly to ensure each bite is flavorful.

    Step 6: Roll and Seal

    Begin rolling the tortilla from one side, tucking in the sides as you go to create a sealed edge. Place the wrap seam-side down for a minute. This resting period helps the wrap stay closed.

    Step 7: Repeat and Serve

    Repeat the filling and rolling process with the remaining tortillas. Serve immediately for the best texture and flavor.

    Common Mistakes to Avoid

    Overfilling the Wrap: It’s tempting to add more filling, but this can lead to a messy wrap that falls apart. Stick to the recommended amounts.

    Skipping the Warming Step: Cold tortillas are prone to tearing. A quick warm-up makes them pliable and easy to handle.

    Not Draining Tuna Properly: Excess liquid can make the wrap soggy. Ensure the tuna is well-drained before mixing.

    How to Store & Reheat

    Store any leftover wraps in an airtight container in the refrigerator for up to 2 days. To reheat, unwrap the tortilla slightly and microwave for 20-30 seconds. Chef’s Tip: Reheating in a skillet over low heat can help restore some of the original texture.

    Ingredient Substitutions

    • Tuna: Swap with canned chicken for a different protein option.
    • Mayonnaise: Use Greek yogurt for a lower-calorie, tangy alternative.
    • Walnuts: Substitute with almonds or omit for nut allergies.
    • Tortillas: Opt for whole wheat or gluten-free tortillas based on dietary needs.

    Nutrition Facts

    • Calories: 412 kcal per wrap
    • Protein: 34g
    • Fat: 20g
    • Carbohydrates: 28g
    • Serving Size: 1 wrap

    Frequently Asked Questions

    Q: Can I make these wraps ahead of time?

    A: Yes, you can prepare the filling up to a day in advance. Assemble the wraps just before serving for the best texture.

    Q: Are there vegan alternatives for this recipe?

    A: Certainly! Substitute tuna with chickpeas and use vegan mayonnaise for a plant-based version.

    Q: What other vegetables can I add?

    A: Feel free to add shredded carrots, sliced bell peppers, or cucumbers for extra crunch and nutrients.

    Q: How can I make this recipe spicier?

    A: Add a dash of hot sauce or finely chopped jalapeños to the tuna mixture for a spicy kick.

  • GAINS: Love-Infused Protein Meatballs

    GAINS: Love-Infused Protein Meatballs

    Introduction & My Personal Story

    Ah, the humble meatball! Let me take you back a few years to when I first stumbled upon the magic of protein-packed meals. It was a chilly afternoon, and I was dead-set on finding a recipe that would not only satisfy my hunger but also support my fitness goals. Enter: the High-Protein Marry Me Chicken Meatballs. I remember standing in my tiny kitchen, surrounded by the aroma of fresh herbs and sizzling chicken, eagerly awaiting the first taste. These meatballs were more than just a meal; they were a revelation. Over the years, I’ve tinkered and adjusted, striving to perfect this recipe that brings together flavor, nutrition, and a touch of nostalgia. Now, it’s a staple in my meal prep routine, and I can’t wait to share it with you. This dish is more than just food; it’s a love letter to the art of cooking and the pursuit of gains!

    Why You’ll Love This Recipe

    • High in Protein: Each serving packs a whopping 32g of protein.
    • Flavorful: Sun-dried tomatoes and fresh herbs make every bite burst with flavor.
    • Easy to Make: Straightforward steps that even beginners can follow.
    • Perfect for Meal Prep: Make a big batch and enjoy all week long.
    • Family-Friendly: A dish that pleases even the pickiest eaters.

    Detailed Ingredients

    Before you start, gather the following ingredients:

    • **1 lb. ground chicken**
    • **2 tablespoons sun-dried tomatoes**, minced
    • **1 tablespoon fresh basil**, minced
    • **½ tablespoon fresh parsley**, minced
    • **½ cup breadcrumbs**
    • **2 tablespoons salted butter**
    • **1 large egg**
    • **¼ teaspoon garlic powder**
    • **¼ teaspoon dried oregano**
    • **1 teaspoon dried basil**
    • **¼ teaspoon salt**
    • **¼ teaspoon black pepper**
    • **1 tablespoon mayonnaise**
    • **1 teaspoon soy sauce**
    • **2 tablespoons vegetable oil**
    • **3 cloves garlic**, minced
    • **⅛ teaspoon chili flakes**
    • **1 cup chicken broth**
    • **1 cup heavy cream**, room temperature
    • **14.5 oz can diced tomatoes**, strained
    • **⅓ cup frozen spinach**
    • **½ cup grated Parmesan cheese**

    When shopping, look for fresh, vibrant herbs and high-quality ground chicken for the best results.

    Step-by-Step Instructions

    Let’s get cooking! Follow these steps for perfect meatballs:

    Step 1: Toast the Breadcrumbs

    In a sauté pan, melt the 2 tablespoons of salted butter over medium heat. Add the ½ cup breadcrumbs and stir continuously until they turn golden brown. This should take about 3-5 minutes. Remove from heat and let them cool.

    Step 2: Mix the Meatball Ingredients

    In a large bowl, combine the toasted breadcrumbs with 1 lb. ground chicken, 1 large egg, ¼ teaspoon garlic powder, ¼ teaspoon dried oregano, 1 teaspoon dried basil, minced sun-dried tomatoes, ¼ teaspoon salt, ¼ teaspoon black pepper, 1 tablespoon mayonnaise, and 1 teaspoon soy sauce. Gently mix using a fork or your hands until everything is evenly combined. Chef’s Tip: Avoid over-mixing to keep the meatballs tender.

    Step 3: Shape and Cook the Meatballs

    Wipe the sauté pan clean and add 2 tablespoons of vegetable oil. Heat over medium. Use a 4-oz ice cream scoop to portion the meat mixture into the hot oil. Sear until browned on at least two sides, approximately 5 minutes per side. Transfer browned meatballs to a plate and repeat with the remaining mixture.

    Step 4: Prepare the Sauce

    In the same pan, melt 2 tablespoons of butter. Add 3 minced garlic cloves and ⅛ teaspoon chili flakes. Cook until fragrant, about 2 minutes. Pour in the 1 cup of chicken broth and simmer for 3-4 minutes, scraping up any browned bits from the pan’s bottom.

    Step 5: Finish the Sauce

    Lower the heat to medium-low and stir in 1 cup of room-temperature heavy cream. Add the 14.5 oz can of strained diced tomatoes, ⅓ cup frozen spinach, and ½ cup grated Parmesan. Stir and bring to a gentle simmer.

    Step 6: Cook the Meatballs in Sauce

    Return the browned chicken meatballs to the pan, spooning sauce over them as they cook. The meatballs are ready when they reach an internal temperature of at least 165°F, which should take about 15-20 minutes.

    Common Mistakes to Avoid

    Here’s what to watch out for:

    • **Over-mixing:** This can make the meatballs tough. Mix just until ingredients are combined.
    • **Skipping the browning step:** Searing the meatballs adds flavor and texture.
    • **Using cold cream:** Make sure the cream is at room temperature to prevent curdling.
    • **Not checking internal temperature:** Always ensure meatballs reach at least 165°F for safe consumption.

    How to Store & Reheat

    To store, place cooled meatballs in an airtight container in the refrigerator for up to 4 days. For longer storage, freeze them for up to 3 months. To reheat, use a microwave or stovetop. If frozen, thaw overnight in the fridge before reheating.

    Ingredient Substitutions

    If you need to make swaps, consider these options:

    • **Ground Turkey:** A lean alternative to chicken.
    • **Gluten-Free Breadcrumbs:** For a gluten-free version.
    • **Coconut Cream:** A dairy-free substitute for heavy cream.
    • **Fresh Spinach:** Can replace frozen, just chop and add directly to the sauce.

    Nutrition Facts

    • Calories: 726 kcal per serving
    • Protein: 32g
    • Fat: 52g
    • Carbohydrates: 20g
    • Serving Size: 4 meatballs

    Frequently Asked Questions

    Can I use a different type of ground meat? Absolutely! Ground turkey or beef are great alternatives.

    How can I make this dish spicier? Add more chili flakes or use spicy Italian sausage instead of ground chicken.

    Can I prepare the meatballs in advance? Yes, you can make them a day ahead and refrigerate until ready to cook.

    Is it okay to skip the sauce? You can, but the sauce adds moisture and flavor, enhancing the overall dish.

    What sides pair well with this dish? Consider serving with pasta, rice, or a simple green salad.

  • GAINS: Easy Slow Cooker Jambalaya Power Meal

    GAINS: Easy Slow Cooker Jambalaya Power Meal

    Introduction & My Personal Story

    Picture this: a bustling kitchen, the warm aroma of spices wafting through the air, and a pot of jambalaya simmering away. That was my childhood. Growing up in Louisiana, jambalaya was more than just a dish; it was a tradition. My grandmother, a culinary genius in her own right, would often have us gathered around her kitchen island, each of us assigned a task—chopping, seasoning, stirring. I remember the way she would say, “Jambalaya is like life; it’s all about the balance.” Fast forward to my early years as a chef, and her words still ring true. In my 5 years of experience, I’ve learned that a well-prepared jambalaya can be both a comfort food and a powerhouse meal.

    When I decided to create a high-protein version of this beloved dish, I wanted to keep the essence of the original while giving it a modern twist. The slow cooker became my secret weapon, allowing the flavors to meld together effortlessly while I went about my day. This recipe is my homage to those childhood memories, a way to fuel my body and soul simultaneously. Whether you’re a seasoned athlete or just someone looking to enjoy a hearty meal, this Easy Slow Cooker Jambalaya Power Meal is sure to become a staple in your kitchen.

    Why You’ll Love This Recipe

    • High Protein: Packed with 25g of protein per serving, it’s perfect for muscle recovery.
    • Easy to Prepare: Let the slow cooker do the work while you go about your day.
    • Flavorful: A rich combination of spices and ingredients for a taste explosion.
    • Versatile: Can be customized with different proteins or vegetables.
    • Meal Prep Friendly: Makes enough for leftovers, saving you time during the week.

    Detailed Ingredients

    Here’s what you’ll need to make this delicious High-Protein Slow Cooker Jambalaya:

    • 3 ribs of **celery**, finely diced (about 150g)
    • 1 **yellow onion**, finely diced (about 200g)
    • 1 **green bell pepper**, finely diced (about 150g)
    • 2 cloves **garlic**, minced
    • 12-16 oz. of sliced smoked **sausage** (about 340-450g)
    • 2 **boneless, skinless chicken thighs**, cubed (about 300g)
    • 1 tsp **dried oregano**
    • 1 tsp **dried thyme**
    • ½ Tbsp **smoked paprika**
    • ½ tsp **cayenne pepper**
    • Freshly cracked **black pepper** to taste
    • 1 can (28 oz.) **diced tomatoes** with juices (about 790g)
    • 2 cups **chicken broth** (about 480ml)
    • ¼ bunch of chopped fresh **parsley**
    • 2 cups **uncooked long-grain white rice** (about 370g)
    • Sliced green onions for garnish

    Step-by-Step Instructions

    Step 1: Prep Ingredients

    Start by gathering all your ingredients. Finely dice the celery, onion, and bell pepper. Mince the garlic. Chef’s Tip: Keep your knife sharp for precise cuts, ensuring even cooking.

    Step 2: Layer Veggies

    In a 5-quart slow cooker, add the diced celery, onion, bell pepper, and minced garlic. These veggies form the aromatic base of your jambalaya, infusing the dish with flavor as they cook.

    Step 3: Add Meat and Spices

    Layer the sliced smoked sausage and cubed chicken thighs on top of the veggies. Sprinkle with dried oregano, thyme, smoked paprika, cayenne pepper, and a generous amount of freshly cracked black pepper. The spices will penetrate the meat, adding depth to the dish.

    Step 4: Pour Liquids

    Add the diced tomatoes with their juices, chicken broth, and chopped parsley. Stir briefly to combine, ensuring the spices and liquids are evenly distributed.

    Step 5: Cook

    Place the lid on the slow cooker and set it to high. Allow it to cook for 4 hours. During this time, the flavors will meld together, and the chicken will become tender.

    Step 6: Add Rice

    Once the liquid reaches a boil, quickly add the uncooked rice, ensuring it’s fully submerged. Replace the lid and continue cooking on high. Chef’s Tip: Avoid opening the lid too often to keep the heat consistent.

    Step 7: Finish Cooking

    Allow the jambalaya to cook for an additional 20-25 minutes, or until the rice has absorbed the liquid and is tender. Stir occasionally to prevent sticking.

    Step 8: Fluff and Serve

    Open the lid, check the rice for tenderness, and gently fluff the contents with a fork. Top with sliced green onions before serving. Enjoy your hearty, protein-packed meal!

    Common Mistakes to Avoid

    • Overcooking the Chicken: Keep an eye on the cooking time to prevent dry, overcooked chicken.
    • Not Fully Submerging the Rice: Ensure the rice is completely covered in liquid to cook evenly.
    • Using the Wrong Rice: Stick to long-grain white rice for the best texture.
    • Opening the Lid Too Often: Resist the urge to peek too frequently, as this can disrupt the cooking process.

    How to Store & Reheat

    Once cooled, transfer the jambalaya to an airtight container. Store in the refrigerator for up to 4 days. To reheat, place a portion in a microwave-safe dish and cover with a damp paper towel to retain moisture. Heat for 2-3 minutes, stirring halfway through.

    Ingredient Substitutions

    • Smoked Sausage: Use turkey sausage for a leaner option.
    • Chicken Thighs: Substitute with chicken breast if preferred.
    • Chicken Broth: Vegetable broth works well for a different flavor profile.
    • Long-Grain White Rice: Brown rice can be used, but adjust cooking time accordingly.

    Nutrition Facts

    • Calories: 420 kcal
    • Protein: 25g
    • Fat: 12g
    • Carbs: 45g
    • Serving Size: 1 bowl (approximately 1 1/2 cups)

    Frequently Asked Questions

    Q: Can I make this recipe spicier?

    A: Absolutely! Add more cayenne pepper or a splash of hot sauce for extra heat.

    Q: Can I freeze jambalaya?

    A: Yes, you can freeze it for up to 3 months. Thaw in the refrigerator overnight before reheating.

    Q: What can I serve with jambalaya?

    A: A simple green salad or crusty bread pairs well with this dish.

    Q: Can I use a different type of sausage?

    A: Definitely! Andouille sausage adds a traditional Cajun flair, but feel free to experiment.

  • GAINS: Power-Packed, Freezer-Friendly Meatballs!

    GAINS: Power-Packed, Freezer-Friendly Meatballs!

    Introduction & My Personal Story

    There’s something about a batch of homemade meatballs that transports me back to my grandmother’s kitchen. Growing up, Sunday afternoons were reserved for family dinners, and meatballs were always the star of the show. The aroma of sizzling meat, the gentle hum of conversation, and the clinking of forks against plates are memories I cherish. In my 5 years of experience as a chef, I’ve learned that food is not just about sustenance; it’s about creating moments, and these power-packed, freezer-friendly meatballs are a testament to that philosophy.

    As a young chef, I was always experimenting, tweaking my grandmother’s recipe to boost its nutritional value without sacrificing flavor. I wanted to create a meal that was not only delicious but also aligned with my fitness goals. These meatballs fit the bill perfectly. They’re loaded with protein to fuel your muscles and are easy to prepare in advance, making them a staple in my kitchen. Whether you’re meal prepping for the week or looking for a quick, post-workout meal, these meatballs have got you covered.

    Why You’ll Love This Recipe

    • High Protein: Each serving packs a punch with 24g of protein, perfect for muscle recovery.
    • Freezer-Friendly: Make a big batch and freeze them for easy future meals.
    • Simple Ingredients: No need for a long shopping list; everything can be found at your local market.
    • Versatile: Enjoy them on their own, in a sandwich, or with pasta.
    • Quick to Make: From start to finish in under an hour.

    Detailed Ingredients

    To create these delicious and nutritious meatballs, you’ll need the following ingredients:

    • **500g ground beef**: Look for lean cuts to reduce fat content.
    • **250g Italian sausage**: Adds a spicy kick; you can choose mild if preferred.
    • **1 cup (100g) breadcrumbs**: Opt for whole wheat for added fiber.
    • **1/2 cup (50g) grated Parmesan**: Aged Parmesan has a richer flavor.
    • **2 teaspoons garlic powder**
    • **1 teaspoon onion powder**
    • **1 tablespoon Italian seasoning**: A blend of oregano, basil, thyme, and rosemary.
    • **2 large eggs**: Acts as a binder for the mixture.
    • **1/4 cup (60ml) milk**: Keeps the meatballs moist.
    • **Salt and pepper to taste**

    Step-by-Step Instructions

    Step 1: Prepare the Mixture

    Start by combining your dry ingredients in a small bowl: **breadcrumbs**, **Parmesan**, **garlic powder**, **onion powder**, **Italian seasoning**, **salt**, and **pepper**. In a separate bowl, lightly whisk the **eggs**. This ensures even distribution when mixing with the meat.

    Step 2: Combine Ingredients

    In a large mixing bowl, combine the breadcrumb mixture with the **eggs**, **milk**, **Italian sausage**, and **ground beef**. Using your hands, gently mix until everything is well combined. Be careful not to overmix; otherwise, the meatballs can become tough.

    Step 3: Rest the Mixture

    Allow the mixture to rest for about five minutes. This gives the breadcrumbs time to absorb the liquid, which results in a more cohesive meatball.

    Step 4: Shape the Meatballs

    Divide the mixture and shape it into approximately 32 balls, each about 2 tablespoons in size. Chef’s Tip: Use a small ice cream scoop for uniform sizing.

    Step 5: Preheat and Prepare for Baking

    Preheat your oven to 400°F (200°C). Line a baking sheet with parchment paper and place the meatballs on it, ensuring they are spaced about one inch apart to allow even cooking.

    Step 6: Bake the Meatballs

    Bake the meatballs for 15 minutes or until they are lightly browned and reach an internal temperature of 160°F (70°C). This ensures they’re cooked through while retaining juiciness.

    Step 7: Simmer in Sauce (Optional)

    If you’d like to add an extra layer of flavor, transfer the meatballs to a simmering **marinara sauce** for an additional five minutes. If you’re skipping the sauce, bake them for an extra 3–5 minutes until fully cooked.

    Common Mistakes to Avoid

    • Overmixing: This can lead to tough meatballs. Mix just until combined.
    • Skipping the Rest: Allowing the mixture to rest is crucial for texture.
    • Incorrect Oven Temperature: Always preheat your oven to ensure even cooking.
    • Not Checking Internal Temperature: Use a meat thermometer to ensure meatballs are fully cooked.

    How to Store & Reheat

    To store your meatballs, let them cool completely before transferring them to an airtight container. They can be refrigerated for up to 4 days. For longer storage, place them in a freezer-safe bag or container and freeze for up to 3 months.

    When you’re ready to reheat, thaw them overnight in the refrigerator if frozen. You can reheat them in the oven at 350°F (175°C) for about 10 minutes or until warmed through. Alternatively, you can simmer them in sauce for a quick and flavorful meal.

    Ingredient Substitutions

    • Ground Turkey or Chicken: For a leaner option, swap out ground beef.
    • Gluten-Free Breadcrumbs: Use these if you’re avoiding gluten.
    • Almond Milk: A non-dairy alternative to regular milk.
    • Vegan Parmesan: For a dairy-free option.

    Nutrition Facts

    • Calories: 490 kcal
    • Protein: 24g
    • Fat: 35g
    • Carbs: 12g
    • Serving Size: 4 meatballs

    Frequently Asked Questions

    • Can I make these meatballs ahead of time? Yes, prepare the mixture and shape the meatballs, then refrigerate for up to a day before cooking.
    • What type of sauce pairs well with these meatballs? Marinara or a spicy arrabbiata sauce complements them beautifully.
    • Can I cook these meatballs in a skillet? Absolutely, just ensure they’re cooked through by checking the internal temperature.
    • Are these meatballs suitable for meal prep? Definitely, they freeze well and can be reheated easily for a quick meal.
    • How can I make these meatballs spicier? Add red pepper flakes or use hot Italian sausage for an extra kick.

  • GAINS: Power-Packed Pork and Sauerkraut

    GAINS: Power-Packed Pork and Sauerkraut

    Introduction & My Personal Story

    As a chef with 5 years of experience, I’ve spent countless hours in the kitchen experimenting with flavors and textures to fuel my passion for both cooking and fitness. The Power-Packed Pork and Sauerkraut dish is more than just a meal; it’s a nostalgic trip down memory lane. I remember the first time I encountered this hearty combination. It was during a visit to my grandmother’s cozy kitchen, where the aroma of pork roasting with tangy sauerkraut filled the air. She had a knack for creating meals that satisfied both the soul and the body, and this dish was no exception.

    Over the years, I’ve adapted her classic recipe to fit a more protein-focused lifestyle. This dish has become my go-to when I need a robust meal that supports muscle recovery and growth. The tender, juicy pork, paired with the zesty sauerkraut, is not only delicious but also packed with nutrients. It’s a recipe that bridges the gap between traditional comfort food and modern nutritional needs, making it a staple in my kitchen and a favorite among friends and family. Whether you’re a fitness enthusiast or just someone who appreciates a good meal, this dish is sure to become a beloved part of your culinary repertoire.

    Why You’ll Love This Recipe

    • High in Protein: Perfect for muscle recovery and growth.
    • Rich in Flavor: A delightful blend of savory pork and tangy sauerkraut.
    • Easy to Prepare: Simple steps for a rewarding meal.
    • Nutritious: Packed with vitamins and minerals.
    • Versatile: Great for meal prep or a family dinner.

    Detailed Ingredients

    • 2.5 kg (5.5 lbs) pork butt: Look for a cut with good marbling for tenderness.
    • 1 tablespoon salt
    • 1 teaspoon black pepper
    • 1 tablespoon garlic powder
    • 2 tablespoons vegetable oil
    • 2 large onions, sliced
    • 2 apples, peeled and sliced (Granny Smith works well for a tart flavor)
    • 3 cloves garlic, minced
    • 2 tablespoons brown sugar
    • 2 tablespoons Dijon mustard
    • 1 tablespoon caraway seeds
    • 1 teaspoon smoked paprika
    • 1 bay leaf
    • 1 kg (2.2 lbs) sauerkraut, drained
    • 500 ml (2 cups) chicken broth

    Step-by-Step Instructions

    Step 1: Preheat and Prepare
    Preheat your oven to 300°F (150°C). This low and slow cooking method ensures the pork becomes tender and flavorful. Gather all your ingredients, ensuring everything is within reach for a smooth cooking process.

    Step 2: Season the Pork
    Generously season the pork butt with salt, black pepper, and garlic powder. This creates a flavorful crust during searing. Chef’s Tip: Ensure the pork is at room temperature before seasoning to allow for even cooking.

    Step 3: Sear the Pork
    In a large Dutch oven, heat the vegetable oil over medium-high heat. Carefully add the pork and sear each side for about 8-10 minutes until a deep golden crust forms. This step locks in the juices, making the pork succulent.

    Step 4: Sauté the Onions and Apples
    Reduce the heat to medium. Add the sliced onions and apples to the pot. Cook for about 5-8 minutes, stirring occasionally, until they are softened and lightly browned. The apples add a subtle sweetness that balances the dish.

    Step 5: Add the Aromatics
    Stir in the minced garlic, brown sugar, Dijon mustard, caraway seeds, smoked paprika, remaining black pepper, and bay leaf. Cook for about a minute until the mixture is fragrant, enhancing the depth of flavor.

    Step 6: Build the Base
    Add the drained sauerkraut to the pot, spreading it evenly. Pour in the chicken broth, stirring to create a flavorful bed for the pork. The sauerkraut absorbs the spices, becoming a delicious accompaniment.

    Step 7: Roast the Pork
    Place the seared pork butt on top of the sauerkraut mixture. Cover with a lid and roast in the oven for 3 to 3½ hours. The pork should be fork-tender, indicating it’s ready.

    Step 8: Brown and Reduce
    Remove the lid, increase the oven temperature to 375°F (190°C), and continue roasting for another 20-30 minutes. This step browns the pork further and reduces the juices slightly, intensifying the flavors.

    Step 9: Rest and Shred
    Remove the pot from the oven and let the pork rest for about 10 minutes. Using two forks, shred the pork directly in the pot, mixing it with the sauerkraut mixture to soak up all the flavors.

    Step 10: Serve and Enjoy
    Serve the pork and sauerkraut warm, straight from the pot. This protein-rich meal is perfect for fueling your body post-workout or enjoying a hearty family dinner.

    Common Mistakes to Avoid

    • Skipping the Sear: Don’t skip searing the pork; it seals in the juices and adds flavor.
    • Overcooking the Sauerkraut: Add the sauerkraut just before roasting to avoid it becoming mushy.
    • Insufficient Seasoning: Make sure to season the pork generously for a well-rounded taste.
    • Not Resting the Pork: Allow the pork to rest before shredding to retain its juices.

    How to Store & Reheat

    Storage: Once cooled, store the pork and sauerkraut in an airtight container in the refrigerator for up to 3 days.

    Reheating: To reheat, place the mixture in a covered oven-safe dish and warm in a preheated oven at 350°F (175°C) for about 15-20 minutes. Alternatively, reheat in a microwave-safe dish, stirring occasionally, until heated through.

    Ingredient Substitutions

    • Pork Butt: You can substitute with pork shoulder for a similar texture.
    • Apples: Pears can be used for a different flavor profile.
    • Chicken Broth: Vegetable broth works well if you prefer a lighter base.
    • Dijon Mustard: Whole grain mustard adds a unique texture and flavor.

    Nutrition Facts

    • Calories: 319 kcal per serving
    • Protein: 34g
    • Fat: 15g
    • Carbohydrates: 10g
    • Serving Size: 1/8 of the recipe

    Frequently Asked Questions

    Q: Can I make this recipe in a slow cooker?

    A: Yes, after searing the pork, transfer it along with the other ingredients to a slow cooker. Cook on low for 6-8 hours.

    Q: Is there a vegetarian version of this dish?

    A: Yes, replace the pork with jackfruit and use vegetable broth to create a vegetarian-friendly version.

    Q: Can I freeze leftovers?

    A: Absolutely. Store in a freezer-safe container for up to 2 months. Thaw in the refrigerator before reheating.

    Q: What sides pair well with this dish?

    A: Mashed potatoes or a fresh green salad complement the flavors beautifully.

  • GAINS: Perfect Roux for Muscle-Building Gumbo!

    GAINS: Perfect Roux for Muscle-Building Gumbo!

    Introduction & My Personal Story

    Ah, gumbo! The dish that instantly transports me back to my early days in the kitchen, where I first learned the art of crafting a perfect roux. I remember standing beside my grandmother, who hailed from the heart of Louisiana, as she patiently stirred the roux until it reached that signature deep chocolate color. It was a labor of love, and she always said, “A good gumbo starts with a good roux.” Over the years, I’ve taken that wisdom to heart, blending it with my own culinary experiences to create a version of gumbo that not only brings comfort but also packs a punch of protein for those looking to fuel their muscles.

    In my 5 years of experience as a chef, I’ve learned that a dish like gumbo is all about balance. It’s about marrying flavors and textures, and in this case, it’s about creating a meal that not only delights the taste buds but also supports an active lifestyle. Whether you’re a seasoned athlete or someone just starting their fitness journey, this gumbo is designed to keep you going strong. It’s hearty, satisfying, and brimming with nutrients that will help you recover after a tough workout. So, let’s dive into this muscle-building masterpiece and make some gains!

    Why You’ll Love This Recipe

    Detailed Ingredients

    For this muscle-building gumbo, you’ll need:

    • **13.5 oz. andouille sausage**, sliced
    • **1 lb. boneless, skinless chicken thighs**, cubed
    • **2 tablespoons Creole seasoning**
    • **¾ cup vegetable oil**
    • **1 cup all-purpose flour**
    • **1 large onion**, diced
    • **1 green bell pepper**, diced
    • **3 ribs of celery**, sliced
    • **2 garlic cloves**, minced
    • **12 oz. frozen okra**
    • **1 teaspoon dried thyme**
    • **3 bay leaves**
    • **¼ teaspoon salt**
    • **¼ teaspoon black pepper**
    • **6 cups chicken broth**
    • **2 tablespoons hot sauce**
    • **¼ bunch fresh parsley**, chopped
    • **2 green onions**, sliced
    • **2 cups uncooked rice**

    When shopping, look for fresh vegetables and high-quality sausage to ensure the best flavor.

    Step-by-Step Instructions

    Sear the Sausage: Heat 1 tablespoon of vegetable oil in a large, deep skillet over medium heat. Once hot, add the sliced andouille sausage. Brown both sides, about 5 minutes each. Remove and set aside.

    Cook the Chicken: Toss the cubed chicken thighs with 1 tablespoon of Creole seasoning. Add to the skillet, searing for 5 minutes on each side. Remove and cover with foil to keep warm.

    Make the Roux: Lower the heat to medium-low and add **¾ cup vegetable oil** and **1 cup all-purpose flour**. Stir constantly for about 2 hours until it reaches a dark brown color. This step requires patience, as the roux is the foundation of flavor. Chef’s Tip: Keep stirring to prevent burning!

    Add Vegetables: Increase heat to medium. Stir in the diced onion, green pepper, and sliced celery. Cook until softened, about 5 minutes.

    Combine Ingredients: Add the browned chicken, sausage, any accumulated juices, minced garlic, and frozen okra. Season with the remaining tablespoon of Cajun seasoning, dried thyme, bay leaves, salt, and pepper.

    Simmer: Pour in the chicken broth. Bring to a boil, then lower the heat and simmer until thickened, about 30 minutes. The gumbo should have a rich, deep flavor by now.

    Final Touches: In the last 5 minutes, stir in hot sauce, chopped parsley, and sliced green onions, saving some for garnish.

    Cook the Rice: Prepare the rice according to package instructions. Typically, use 4 cups of water and let simmer until tender.

    Serve: Once the rice is cooked, fluff with a fork and serve with gumbo. Garnish with reserved parsley and green onions. Enjoy!

    Common Mistakes to Avoid

    • Burning the Roux: Stir constantly and adjust the heat as needed. If it burns, you’ll need to start over.
    • Overcooking the Meat: Keep an eye on the chicken and sausage to ensure they don’t dry out.
    • Skipping the Simmer: Allow the gumbo to simmer to develop deep flavors and thicken properly.

    How to Store & Reheat

    Store any leftover gumbo in airtight containers in the refrigerator for up to 3 days. For longer storage, freeze in portion-sized containers for up to 3 months. To reheat, thaw overnight in the refrigerator if frozen, then warm on the stove over medium heat until hot.

    Ingredient Substitutions

    • Sausage: Substitute with turkey sausage or a plant-based alternative for a different flavor profile.
    • Chicken Thighs: Use chicken breasts if preferred, but adjust cooking time to prevent drying out.
    • Vegetable Oil: Can be replaced with canola oil or a similar neutral oil.
    • Okra: If not a fan, consider using zucchini or omit entirely.

    Nutrition Facts

    • Calories: 673 kcal
    • Protein: 27g
    • Fat: 36g
    • Carbs: 53g
    • Serving Size: 1 cup of gumbo with rice

    Frequently Asked Questions

    Q: Can I make this gumbo spicier?

    A: Absolutely! Add more hot sauce or a pinch of cayenne pepper to turn up the heat.

    Q: What’s the best way to thicken the gumbo?

    A: The roux does most of the work, but you can also let it simmer uncovered to reduce further.

    Q: Can I make this recipe vegetarian?

    A: Yes, substitute the sausage and chicken with plant-based proteins and use vegetable broth.

    Q: What should I serve with gumbo?

    A: It’s traditionally served with rice, but you can also enjoy it with crusty bread or cornbread.

  • GAINS: All-Week Juicy Chicken Breast Prep

    GAINS: All-Week Juicy Chicken Breast Prep

    Introduction & My Personal Story

    As a chef who has spent over five years in the kitchen, one of the most rewarding experiences has been crafting meals that not only taste great but also fuel the body. I remember the first time I perfected my **Juicy Chicken Breast Prep**. I was still a budding chef, determined to create a dish that was both nutritious and delicious for a friend who was training for a bodybuilding competition. After several trials and tweaks, I finally nailed the perfect balance of herbs and seasonings that made the chicken not just a source of protein, but a culinary delight.

    This recipe quickly became a staple in my kitchen and a favorite among my fitness-focused friends. It’s not just about the gains; it’s about enjoying the journey with every bite. This dish brings back memories of those early days in my culinary career, where every successful recipe was a stepping stone to mastering the art of cooking. Today, I’m excited to share this tried-and-true recipe with you, hoping it becomes as much a part of your meal prep routine as it has been in mine.

    Why You’ll Love This Recipe

    • High in **protein** – essential for muscle growth and recovery.
    • Perfect for meal prep – stays juicy and delicious all week long.
    • Simple ingredients – easily available at any grocery store.
    • Customizable with your favorite herbs and spices.
    • Low in calories but packed with flavor.

    Detailed Ingredients

    Here’s what you’ll need to create this protein-packed dish:

    • 4 large **chicken breasts** (about 800g total)
    • 3 tablespoons unsalted **butter**, room temperature
    • 2 cloves of **garlic**, minced
    • 1 teaspoon dried **basil**
    • 1 teaspoon dried **thyme**
    • 1 teaspoon dried **rosemary**
    • 1/2 teaspoon **salt**
    • 1/2 teaspoon freshly cracked **black pepper**

    When selecting your chicken breasts, look for ones that are plump and evenly sized to ensure even cooking. Fresh herbs can be substituted for dried ones if you prefer a more intense flavor.

    Step-by-Step Instructions

    Let’s get into the nitty-gritty of making this delicious dish.

    Step 1: Preheat & Prep

    Start by preheating your oven to 275ºF (135ºC). Allowing the chicken to sit out for about 5 minutes will help bring it to room temperature, which is crucial for even cooking.

    Step 2: Make the Herb Butter

    In a small bowl, mix together the room temperature butter, minced garlic, dried basil, thyme, rosemary, salt, and black pepper. This herb butter will infuse the chicken with flavor and keep it moist.

    Step 3: Pat Dry

    Place the chicken breasts on a cutting board and pat them dry with paper towels. This step is crucial for ensuring the seasoning adheres well and the skin crisps up nicely.

    Step 4: Season the Chicken

    Generously smear the herb butter mixture over both sides of the chicken breasts. Make sure every inch is covered for maximum flavor.

    Step 5: Bake

    Transfer the seasoned chicken into a deep casserole dish and cover it tightly with foil. Bake in the preheated oven for 90 minutes, basting halfway through with the juices from the dish.

    Step 6: Crisp the Skin

    After 90 minutes, remove the foil and baste the chicken again. Increase the oven temperature to 425ºF (220ºC) and bake for an additional 20 minutes, or until the skin is golden and crispy. The internal temperature should reach 165ºF (74ºC).

    Step 7: Rest & Serve

    Once done, take the chicken out of the oven and let it rest for 5-10 minutes. This resting period allows the juices to redistribute, ensuring every bite is juicy. Slice or shred the chicken and drizzle with the reserved juices before serving.

    Common Mistakes to Avoid

    • **Under-seasoning**: Don’t skimp on the herbs and spices. They are crucial for flavor.
    • **Overcooking**: Use a meat thermometer to ensure the chicken reaches 165ºF (74ºC).
    • **Skipping the rest period**: This is essential for juicy, tender chicken.

    How to Store & Reheat

    Store the cooked chicken breasts in an airtight container in the refrigerator for up to 5 days. To reheat, place the chicken in a preheated oven at 350ºF (175ºC) for about 10 minutes, or until warmed through. This method helps maintain moisture and texture.

    Ingredient Substitutions

    If you’re missing an ingredient, here are some safe swaps you can make:

    • **Butter**: Use olive oil for a different flavor profile.
    • **Herbs**: Swap dried herbs for fresh ones at a 3:1 ratio.
    • **Garlic**: Garlic powder can be used if fresh garlic is unavailable.

    Nutrition Facts

    • **Calories**: 235 kcal per serving
    • **Protein**: 19g
    • **Fat**: 11g
    • **Carbs**: 2g
    • **Serving Size**: 1 chicken breast

    Frequently Asked Questions

    Q: Can I freeze the cooked chicken?

    A: Absolutely! Freeze in a single layer on a baking sheet before transferring to a freezer-safe bag for up to 3 months.

    Q: What can I serve with this chicken?

    A: Pair it with roasted vegetables or a quinoa salad for a balanced meal.

    Q: Can I use bone-in chicken for this recipe?

    A: Yes, but cooking times will vary. Ensure the internal temperature reaches 165ºF (74ºC).

    Q: How can I tell if the chicken is done without a thermometer?

    A: Cut into the thickest part of the breast. The juices should run clear, not pink.

  • GAINS: Lighter Meatloaf for Serious Muscle!

    GAINS: Lighter Meatloaf for Serious Muscle!

    Introduction & My Personal Story

    Meatloaf has always held a special place in my heart. Growing up, it was a staple in our home, lovingly prepared by my grandmother on Sundays. Her meatloaf was the stuff of legends—moist, flavorful, and comforting. But as I ventured into the culinary world and began my journey as a chef, I realized that the traditional meatloaf needed a little revamp to fit my new, healthier lifestyle. Enter the Gains: Lighter Meatloaf for Serious Muscle. This isn’t just any meatloaf; it’s a high-protein, low-fat powerhouse designed to fuel muscle growth and aid recovery.

    In my 5 years of experience as a chef, I’ve learned that meals should be both nutritious and delicious. This meatloaf is a testament to that philosophy. It’s crafted with lean ground chicken, enriched with nutrient-dense ingredients like cottage cheese and carrots, and spiced just right to tantalize your taste buds. I remember the first time I experimented with this recipe—I was skeptical. Could a lighter meatloaf really match the rich flavors of the classic? To my delight, it did and then some. Not only did it satisfy my nostalgic cravings, but it also provided the protein punch I needed after a grueling workout.

    Now, I’m thrilled to share this recipe with you. Whether you’re a seasoned athlete or someone just looking to incorporate more protein into your diet, this meatloaf is sure to become a favorite. Let’s dive into the details and get cooking!

    Why You’ll Love This Recipe

    Detailed Ingredients

    Here’s what you’ll need to make this high-protein, lighter meatloaf:

    • 1 lb. ground chicken – Look for lean ground chicken at your local market.
    • 1 cup panko breadcrumbs – Provides structure without being heavy.
    • ½ small onion, minced – Adds moisture and flavor.
    • ¼ cup grated carrot – A sneaky way to add vitamins.
    • 1 Tbsp chopped parsley – Freshness and color.
    • 1 large egg – Binds everything together.
    • 1 cup small-curd cottage cheese – Boosts protein and keeps it moist.
    • 2 Tbsp ketchup – Classic meatloaf flavor.
    • 1 Tbsp Dijon mustard – A hint of tang.
    • 1 Tbsp Worcestershire sauce – Adds depth.
    • 1 tsp garlic powder – Essential seasoning.
    • 1 tsp paprika – For a warm, smoky flavor.
    • 1 tsp salt – Enhances all the flavors.
    • ½ tsp black pepper – Just the right kick.

    Step-by-Step Instructions

    Step 1: Preheat Your Oven

    Set your oven to 375°F (190°C). Line a baking sheet with parchment paper to prevent sticking and ensure easy cleanup.

    Step 2: Mix the Ingredients

    In a large mixing bowl, combine 1 lb. ground chicken, 1 cup panko breadcrumbs, ½ small minced onion, ¼ cup grated carrot, 1 Tbsp chopped parsley, 1 large egg, 1 cup small-curd cottage cheese, 2 Tbsp ketchup, 1 Tbsp Dijon mustard, 1 Tbsp Worcestershire sauce, 1 tsp garlic powder, 1 tsp paprika, 1 tsp salt, and ½ tsp black pepper. Mix gently with your hands or a spatula until just combined. Avoid over-mixing, which can make the meatloaf dense.

    Step 3: Shape the Loaf

    Transfer the mixture onto your prepared baking sheet. Form it into an 8 x 5-inch loaf. Chef’s Tip: Wet your hands slightly to prevent sticking while shaping the loaf.

    Step 4: Prepare the Glaze

    In a small bowl, mix together ¼ cup ketchup, 1 Tbsp brown sugar, 1 tsp Worcestershire sauce, and 1 tsp apple cider vinegar. Brush half of this glaze over the top of the meatloaf.

    Step 5: First Bake

    Place the meatloaf in the oven and bake for 40 minutes. This initial bake will cook the meatloaf through and set the structure.

    Step 6: Second Glaze and Final Bake

    Remove the meatloaf from the oven and brush with the remaining glaze. Return it to the oven and bake for another 10-15 minutes, or until the internal temperature reaches 165°F (74°C). This ensures the meatloaf is safe to eat and perfectly cooked.

    Step 7: Rest and Serve

    Let the meatloaf rest for 10 minutes before slicing. This resting period allows the juices to redistribute, keeping the meatloaf moist. Serve warm and enjoy your protein-packed meal.

    Common Mistakes to Avoid

    • Over-mixing: This can lead to a tough meatloaf. Mix just until the ingredients are combined.
    • Skipping the rest period: Resting is crucial to allow the juices to set, preventing a dry loaf.
    • Not checking temperature: Use a meat thermometer to ensure it reaches 165°F for safety.

    How to Store & Reheat

    Storage: Allow the meatloaf to cool completely, then wrap it tightly in plastic wrap or aluminum foil. Store in the refrigerator for up to 3-4 days.

    Reheating: Preheat your oven to 350°F (175°C). Place the slices on a baking sheet covered with foil to prevent drying out. Heat for about 10-15 minutes or until warmed through.

    Ingredient Substitutions

    • Ground Chicken: You can substitute with lean ground turkey for a similar nutritional profile.
    • Panko Breadcrumbs: Gluten-free breadcrumbs work well for those with gluten sensitivities.
    • Cottage Cheese: Greek yogurt can be used as an alternative to maintain moisture and protein content.

    Nutrition Facts

    • Calories: 232 kcal per slice
    • Protein: 20g per slice
    • Fat: 8g per slice
    • Carbohydrates: 16g per slice
    • Serving Size: 1 slice (1/8 of loaf)

    Frequently Asked Questions

    • Can I freeze the meatloaf? Yes, once cooled, wrap it tightly in plastic wrap and foil, then freeze for up to 3 months.
    • What can I serve with this meatloaf? Pair it with steamed vegetables or a fresh salad for a balanced meal.
    • Is this meatloaf suitable for meal prep? Absolutely! It keeps well in the fridge and is easy to reheat.
    • Can I make this meatloaf spicier? Add a pinch of cayenne pepper or some chopped jalapeños to the mix.

  • GAINS: Transform Leftover Chicken into Muscle Meals!

    GAINS: Transform Leftover Chicken into Muscle Meals!

    Introduction & My Personal Story

    When I think about leftover chicken, I’m instantly transported back to my early days as a young chef, bustling in the kitchen of a local fitness club. It was a time when every dish had to not only taste fantastic but also pack a punch of nutrition. Back then, I was tasked with creating meals that could fuel the bodybuilders and athletes who frequented the gym. One of my most cherished memories is the day I transformed a humble leftover rotisserie chicken into a powerhouse meal that had everyone asking for seconds.

    In my 5 years of experience, I’ve learned that leftover chicken is nothing short of a culinary gift. It’s versatile, packed with protein, and the perfect base for transforming mundane meals into muscle-building masterpieces. I remember one particular afternoon when we had a surplus of roasted chicken. With a little creativity and a lot of love, I whipped up a high-protein chicken stew that not only satisfied hungry athletes but also became a staple in our menu lineup. It was a moment that solidified my belief in the power of leftover chicken and its ability to fuel our bodies efficiently.

    Now, I want to share with you how you can turn your leftover chicken into meals that are not only delicious but also perfect for anyone looking to build muscle and maintain a healthy lifestyle. Whether you’re a seasoned athlete or just starting your fitness journey, these recipes will help you make the most out of what you already have in your fridge.

    Why You’ll Love This Recipe

    • High in Protein: Perfect for muscle growth and recovery.
    • Cost-Effective: Utilizes leftovers, saving money and reducing waste.
    • Quick and Easy: Minimal prep time for maximum nutrition.
    • Versatile: Can be adapted for soups, salads, casseroles, and more.
    • Delicious and Nutritious: Packed with flavor and essential nutrients.

    Detailed Ingredients

    Here’s what you’ll need to transform your leftover chicken into a meal that supports your fitness goals:

    • Cooked Chicken: About 2-3 cups of shredded or chopped chicken. Look for juicy pieces with a bit of crispy skin if you enjoy extra texture.
    • Chicken Broth: 2 cups, preferably low-sodium to control your salt intake.
    • Mixed Vegetables: 1 cup of your choice (e.g., bell peppers, carrots, broccoli). Fresh or frozen works well.
    • Whole Grains: 1 cup of cooked rice or quinoa for casseroles.
    • Leafy Greens: 2 cups for salads, such as spinach or kale.
    • Spices and Herbs: Salt, pepper, garlic powder, and your favorite herbs like thyme or basil.
    • Olive Oil: 2 tablespoons for sautéing and adding healthy fats.
    • Salsa or Tomato Sauce: 1 cup for those Mexican-inspired dishes.

    Step-by-Step Instructions

    The key to a successful leftover chicken dish is in the details. Follow these steps to create a meal that’s both satisfying and nutritious:

    Step 1: Prep the Chicken

    Begin by shredding or chopping your leftover chicken into bite-sized pieces. If it’s a bit dry, don’t worry – the cooking process will rehydrate it. Chef’s Tip: Keep a bit of the skin if you enjoy a richer flavor and texture.

    Step 2: Decide Your Dish

    Depending on your mood and ingredients on hand, choose your culinary path:

    • For Soups: In a pot, combine chicken, chicken broth, and mixed vegetables. Bring to a boil, then simmer for about 20 minutes. Season with salt, pepper, and herbs.
    • For Salads: Toss chicken with leafy greens, a handful of nuts, and a protein-rich dressing. Add a squeeze of lemon for freshness.
    • For Skillets: Sauté chicken with vegetables in olive oil over medium heat. Add spices to taste and serve hot.
    • For Casseroles: Layer chicken with cooked grains, vegetables, and sauce. Bake in a preheated oven at 180°C (350°F) for 25 minutes.
    • For Tacos or Quesadillas: Mix chicken with salsa and wrap in tortillas. Grill until the tortillas are slightly crispy.

    Step 3: Enhance the Flavor

    Use your favorite spices and herbs to bring out the best in your chicken. Garlic powder, thyme, and a dash of chili can elevate the taste significantly. Chef’s Tip: Don’t be afraid to experiment with different seasonings to keep your meals exciting.

    Step 4: Serve and Enjoy

    Portion out your creation and enjoy your meal. Whether it’s a comforting soup or a hearty casserole, you’ve got a high-protein dish that’s perfect for post-workout recovery.

    Common Mistakes to Avoid

    • Overcooking the Chicken: Leftover chicken can dry out quickly. Keep cooking times to a minimum.
    • Skipping the Seasoning: Always taste and adjust seasoning to enhance flavor.
    • Using Too Much Salt: Be mindful of salt, especially if using pre-seasoned chicken or broth.
    • Ignoring Texture: Balance textures by combining crispy, soft, and crunchy ingredients.

    How to Store & Reheat

    Proper storage is essential to maintain the quality of your leftover chicken dishes:

    • Refrigeration: Store in an airtight container for up to 3 days.
    • Freezing: Freeze portions in freezer-safe bags for up to 3 months. Thaw in the refrigerator overnight before reheating.
    • Reheating: Reheat in a pan over medium heat or in the microwave, adding a splash of broth or water to maintain moisture.

    Ingredient Substitutions

    If you need to make swaps, here are some safe substitutions:

    • Chicken: Use turkey or tofu for a vegetarian option.
    • Broth: Vegetable broth works as a great alternative.
    • Grains: Substitute with couscous or barley.
    • Leafy Greens: Arugula or romaine lettuce can replace spinach or kale.

    Nutrition Facts

    • Calories: Approximately 350 kcal per serving
    • Protein: 35g
    • Fat: 15g
    • Carbohydrates: 25g
    • Serving Size: 1 bowl or plate

    Frequently Asked Questions

    Q: Can I use raw chicken instead of leftover chicken?

    A: Absolutely, just make sure to cook it thoroughly before adding it to your dish.

    Q: What’s the best way to keep the chicken moist?

    A: Use a bit of broth or sauce when reheating to add moisture back into the chicken.

    Q: Can I add more vegetables?

    A: Yes, feel free to add as many vegetables as you like to boost the nutritional value.

    Q: Is it okay to use canned vegetables?

    A: Yes, but be sure to rinse them to reduce sodium content.