Tag: Fuel

  • Brain Fuel: Nut-Free Granola Bars

    Brain Fuel: Nut-Free Granola Bars

    Introduction & My Personal Story

    Ah, the sweet scent of nostalgia. I remember the first time I realized the importance of having a quick, brain-boosting snack on hand. It was during my early days as a chef, about five years ago, in the bustling kitchen of a downtown café. The pace was relentless, the orders never-ending, and my energy levels were dropping faster than a soufflé on a bumpy road. That’s when I discovered the magic of homemade granola bars, specifically nut-free granola bars. These little wonders became my go-to snack, providing the perfect blend of energy and focus needed to power through those hectic shifts.

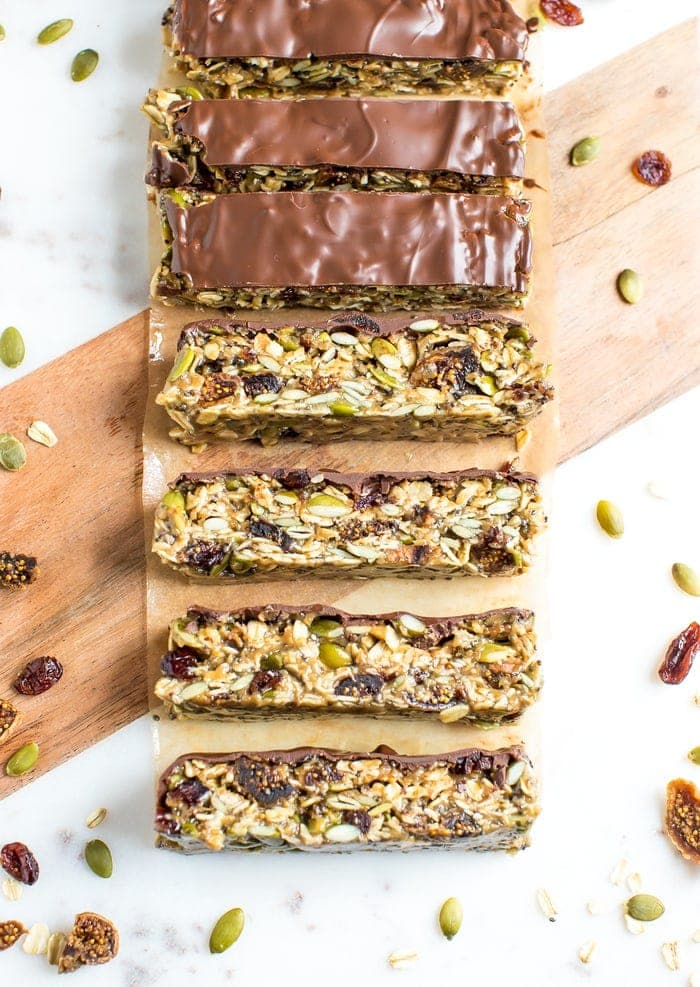
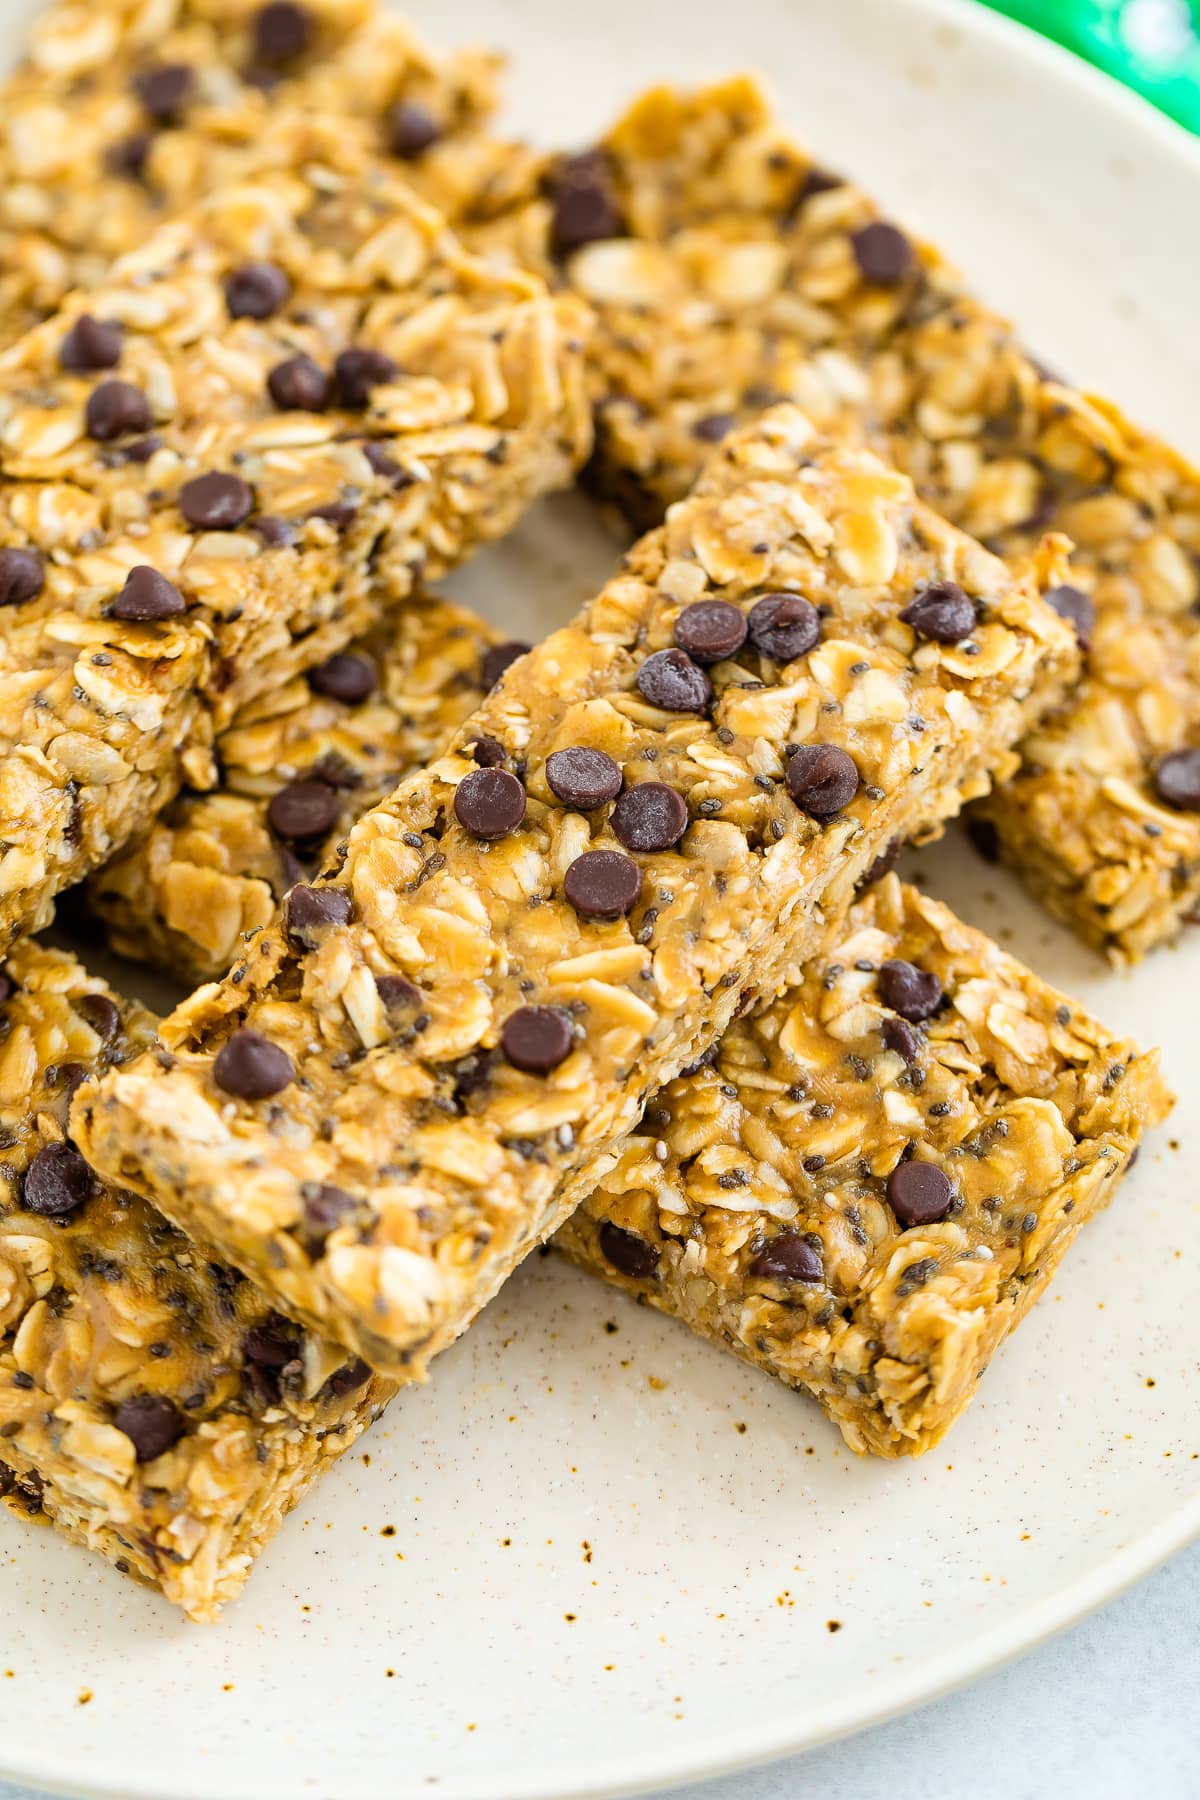
    As someone who has always been conscious of dietary restrictions, I wanted to create a recipe that could be enjoyed by everyone, including those with nut allergies. After experimenting with various ingredients, I finally landed on a combination that was not only delicious but also packed with nutrients. The key players? **Old-fashioned rolled oats**, **SunButter**, and **sunflower seeds**. Together, they create a chewy, satisfying bar that’s free from nuts but full of flavor. Now, I can’t imagine a day in the kitchen without them. They’ve become a staple in my routine, a little piece of culinary comfort that reminds me of those early days and the lessons learned along the way.

    Why You’ll Love This Recipe

    • Allergen-friendly: Perfect for those with nut allergies.
    • Quick and easy: Ready in just 15 minutes of prep time.
    • Nutritious: Packed with protein, fiber, and Omega-3s.
    • Customizable: Easily swap ingredients to suit your taste.
    • Portable: Ideal for lunch boxes or on-the-go snacking.

    Detailed Ingredients

    • 2 cups old-fashioned rolled oats (240g) – Opt for gluten-free if needed.
    • 1 cup SunButter (240g) – Choose organic for the best nutrition.
    • 1/2 cup honey (170g) – Natural sweetener and binding agent.
    • 1/2 cup sunflower seeds (70g) – Provides a crunchy texture.
    • 1/4 cup chia seeds (40g) – Boosts protein and fiber content.
    • 1/2 cup mini chocolate chips (90g) – Use allergen-friendly varieties.
    • 1/2 teaspoon sea salt – Enhances overall flavor.
    • 1 teaspoon vanilla extract – Adds a flavorful boost.

    Step-by-Step Instructions

    Step 1: Start by lining an 8×8-inch square baking pan with parchment paper. This will prevent sticking and make it easier to remove the bars once set. If needed, use binder clips to secure the parchment in place.

    Step 2: In a large mixing bowl, combine the **rolled oats**, **sunflower seeds**, **chocolate chips**, and **chia seeds**. Stir until the ingredients are well distributed. Chef’s Tip: Mixing the dry ingredients first ensures even distribution of flavors.

    Step 3: Add the **SunButter**, **honey**, **vanilla extract**, and **sea salt** to the dry mixture. Stir vigorously until the mixture is thick and well combined. It should have a sticky, cohesive texture.

    Step 4: Transfer the mixture into the prepared baking pan. Use your hands or the back of a spoon to press it down firmly, ensuring an even layer. Chef’s Tip: The firmer you press, the better the bars will hold together once set.

    Step 5: Sprinkle additional mini chocolate chips on top and press them in lightly. This adds a touch of sweetness and visual appeal.

    Step 6: Refrigerate the pan for at least 2 hours. This allows the bars to firm up and makes them easier to cut. Patience is key here!

    Step 7: Once set, remove the block of granola from the pan and place it on a cutting board. Use a sharp knife to slice into 10 even bars.

    Step 8: Store the granola bars in an airtight container in the fridge for up to 1 week, or freeze them individually for up to 2 months. They’re perfect for a quick grab-and-go snack!

    Common Mistakes to Avoid

    One common mistake when making these bars is not pressing the mixture firmly enough in the pan. This can result in crumbly bars that fall apart. Be sure to apply even pressure when pressing the mixture down.

    Another issue is not allowing enough time for the bars to set in the fridge. Rushing this step can lead to soft, sticky bars that are difficult to cut. Give them the full 2 hours to firm up properly.

    How to Store & Reheat

    To store these granola bars, place them in an airtight container and keep them in the fridge for up to 1 week. If you prefer to make a larger batch, consider freezing individual bars. Wrap each bar in parchment paper and place them in a freezer-safe bag. They can be stored in the freezer for up to 2 months.

    To reheat, simply allow a frozen bar to thaw at room temperature for about 15-20 minutes. Alternatively, pop it in the microwave for about 10 seconds for a warm, chewy treat.

    Ingredient Substitutions

    If you’re looking to swap out ingredients, here are some safe substitutions:

    • SunButter: Can be replaced with pumpkin seed butter for a similar nut-free alternative.
    • Honey: Maple syrup can be used as a vegan option.
    • Chia seeds: Flaxseeds offer a comparable nutritional profile and texture.
    • Mini chocolate chips: Dried fruits like cranberries or raisins can add natural sweetness.

    Nutrition Facts

    • Calories: 302 kcal per bar
    • Protein: 9g
    • Fat: 18g
    • Carbohydrates: 29g
    • Serving Size: 1 bar

    Frequently Asked Questions

    Q: Can I make these bars vegan?

    A: Absolutely! Simply swap the honey for maple syrup to make them vegan-friendly.

    Q: How long do these bars last at room temperature?

    A: While it’s best to store them in the fridge, they can last at room temperature for up to 2 days in a cool, dry place.

    Q: Can I add protein powder to these bars?

    A: Yes, you can add a scoop of your favorite protein powder. Just reduce the amount of oats slightly to maintain the right consistency.

    Q: Are these bars suitable for kids?

    A: Definitely! They’re a great nut-free option for school snacks and lunchboxes.


  • 5-MIN FUEL: Protein-Packed Iced Pumpkin Spice Latte!

    5-MIN FUEL: Protein-Packed Iced Pumpkin Spice Latte!

    Introduction & My Personal Story

    Ah, the delightful chill of autumn air and the vibrant colors of falling leaves. It’s a season that brings back memories of cozy sweaters, weekend strolls through pumpkin patches, and, of course, the aromatic allure of pumpkin spice. In my 5 years of experience as a chef and food enthusiast, I’ve had the pleasure of experimenting with countless recipes, but few have captured my heart quite like the Protein-Packed Iced Pumpkin Spice Latte. I remember the first time I stumbled upon this concoction. It was a brisk October morning, and I had just finished a grueling workout. I craved something that would refuel my body and satisfy my autumn cravings. That’s when it hit me – why not combine the comforting flavors of pumpkin spice with a protein boost? The result was nothing short of magical. Each sip was a delightful dance of creamy, spiced goodness, perfectly chilled and invigorating. It quickly became my go-to post-workout drink and a staple in my autumn routine. Now, I’m excited to share this recipe with you, hoping it brings as much joy and energy to your day as it does to mine.

    Why You’ll Love This Recipe

    • Quick and easy to make – ready in just 5 minutes!
    • Packed with protein for a post-workout boost.
    • Perfectly captures the essence of fall with its pumpkin spice flavor.
    • Low in calories yet satisfying.
    • Customizable to suit your dietary preferences.

    Detailed Ingredients

    • 1 cup (240ml) unsweetened vanilla almond milk
    • 1/2 cup (120ml) cold brew coffee or chilled espresso
    • 1 scoop (approximately 30g) vanilla protein powder
    • 1/4 cup (60g) pumpkin puree
    • 1 teaspoon pumpkin pie spice
    • Ice cubes to fill your glass
    • Optional: whipped cream for topping
    • Optional: extra pumpkin pie spice or cinnamon for garnish

    Chef’s Tip: When selecting your pumpkin puree, opt for 100% pure pumpkin to avoid any added sugars. Freshly brewed coffee will provide a richer flavor, but store-bought cold brew is a convenient alternative.

    Step-by-Step Instructions

    Step 1: Preparing the Ingredients

    Start by gathering all your ingredients on the countertop. This ensures a smooth and efficient blending process. Make sure your coffee is chilled if you’re using espresso. If you’re using cold brew, you’re good to go.

    Step 2: Blending

    In a blender, combine the almond milk, cold brew coffee, vanilla protein powder, pumpkin puree, and pumpkin pie spice. Blend on high speed for about 30 seconds. You’re aiming for a creamy, frothy consistency. If your blender struggles, pause and give it a gentle shake to redistribute the ingredients before blending again.

    Step 3: Serving

    Fill a tall glass with ice cubes. Pour the blended mixture over the ice, allowing it to cascade gently. This helps maintain the frothy texture while cooling the drink instantly.

    Step 4: Optional Garnish

    If you’re feeling a bit indulgent, top your latte with a dollop of whipped cream. Sprinkle a pinch of pumpkin pie spice or cinnamon on top for that classic fall touch.

    Step 5: Enjoy

    Sip immediately to savor the refreshing blend of flavors. It’s the perfect way to kickstart your day or recharge after a workout.

    Common Mistakes to Avoid

    One common mistake is using warm coffee, which can melt the ice and dilute the drink. Always ensure your coffee is well-chilled. Another pitfall is over-blending; this can break down the frothiness, leaving you with a flat texture. Blend just until the ingredients are well combined and frothy. Finally, using flavored protein powder can overwhelm the pumpkin spice, so stick to vanilla for the best balance.

    How to Store & Reheat

    While this latte is best enjoyed fresh, you can prepare the blended mixture ahead of time. Store it in an airtight container in the refrigerator for up to 24 hours. When ready to serve, give it a good shake and pour over fresh ice. Avoid reheating as it compromises the flavor and texture.

    Ingredient Substitutions

    For those with dietary restrictions, here are some substitutions:

    • Almond milk: Swap with oat milk or soy milk for a nut-free version.
    • Vanilla protein powder: Use a plant-based protein powder to keep it vegan.
    • Pumpkin puree: Sweet potato puree can be a creative alternative, though it will alter the flavor slightly.
    • Cold brew coffee: Decaf coffee works if you’re avoiding caffeine.

    Nutrition Facts

    • Calories: 229 kcal
    • Protein: 20g
    • Fat: 3g
    • Carbohydrates: 30g
    • Serving Size: 1 drink

    Frequently Asked Questions

    • Can I make this latte hot?
      Yes, simply warm the almond milk and use hot espresso instead of cold brew. Blend without ice and enjoy warm.
    • Is this recipe suitable for vegans?
      Absolutely, as long as you use plant-based protein powder and whipped cream.
    • What if I don’t have pumpkin pie spice?
      Mix cinnamon, nutmeg, ginger, and cloves in equal parts to create your own blend.
    • Can I add sweeteners?
      Feel free to add a dash of maple syrup or honey to sweeten to your taste.

  • 5-MIN FUEL: Whip Up Starbucks-Style Protein Cold Foam!

    5-MIN FUEL: Whip Up Starbucks-Style Protein Cold Foam!

    Introduction & My Personal Story

    When I think back to my early days as a chef, the hustle and bustle of morning routines always fascinated me. People rushing to grab their morning coffee, the aroma of freshly brewed beans wafting through the air—it was an experience in itself. But it wasn’t just the coffee that caught my attention. It was the innovation around it. One particular creation that stood out was the Starbucks-style Protein Cold Foam. Imagine my delight when, after years of experimentation, I managed to whip up a quick and delicious version of this treat right at home.

    In my 5 years of experience as a chef, I’ve learned that the best recipes are those that combine efficiency with flavor. This Protein Cold Foam does exactly that. It takes me back to those early mornings when I’d sip on a frothy coffee, feeling energized and ready to conquer the day. The smooth, creamy foam paired with the robust flavor of cold brew is a match made in heaven. It’s not just a drink; it’s a morning ritual that sets the tone for a productive day.

    Creating this recipe has been a journey of discovery. From testing various protein powders to finding the perfect frothing technique, every step has been an adventure. Now, I’m thrilled to share this recipe with you, so you too can enjoy a Starbucks-style Protein Cold Foam in the comfort of your home, without the wait or the hefty price tag.

    Why You’ll Love This Recipe

    • Quick & Easy: Ready in just 5 minutes, perfect for busy mornings.
    • High in Protein: Gives you the energy boost you need to start your day.
    • Cost-Effective: Enjoy a premium coffee experience without breaking the bank.
    • Customizable: Adjust sweetness and flavor to your preference.
    • Healthy Alternative: Offers a nutritious start without excess calories.

    Detailed Ingredients

    • 1 cup Cold Brew Coffee: Opt for a strong, robust blend for the best flavor.
    • ½ cup Nonfat Milk: Alternatively, use almond or oat milk if you prefer a dairy-free option.
    • 1 scoop Protein Powder (about 30g): Choose a flavor that complements coffee, like vanilla or chocolate.
    • Optional Sweetener: Use a zero-calorie sweetener like stevia or monk fruit to taste.

    Step-by-Step Instructions

    Step 1: Prepare the Cold Brew

    Brew your cold coffee in advance or use a cold brew concentrate. Ensure it’s chilled and ready to go. Pour 1 cup of cold brew into a tall glass, leaving room for the foam.

    Step 2: Mix the Protein Foam

    In a blender, combine ½ cup of nonfat milk and 1 scoop of protein powder. For a richer texture, use a high-speed blender. Blend on high until the mixture is frothy and thick, about 30 seconds. Chef’s Tip: Make sure the protein powder is fully dissolved to avoid any grainy texture.

    Step 3: Froth to Perfection

    Check the consistency of your foam. It should be creamy and smooth. If you find it’s too runny, blend for an additional 10-15 seconds. The ideal foam should hold its shape for a few seconds after pouring.

    Step 4: Assemble Your Drink

    Gently layer the protein foam over your cold brew coffee. Pour slowly to create a beautiful separation between the coffee and the foam. This layering not only looks impressive but ensures every sip is a delightful mix of coffee and foam.

    Step 5: Sweeten & Serve

    If desired, add your chosen sweetener and stir gently. Serve immediately and enjoy your homemade Starbucks-style Protein Cold Foam!

    Common Mistakes to Avoid

    • Using Warm Milk: Always use cold milk to help the foam stabilize better.
    • Over-Blending: This can break down the foam. Blend just until you achieve the right consistency.
    • Wrong Protein Powder: Some powders don’t dissolve well or alter the taste negatively. Choose a high-quality, complementary flavor.

    How to Store & Reheat

    This drink is best enjoyed fresh. However, if you need to store it, keep the coffee and foam separate. Store the cold brew in the fridge for up to 3 days. The foam can be stored in an airtight container for up to 24 hours, but it may lose some of its fluffiness. Re-blend before serving to restore texture.

    Ingredient Substitutions

    • Milk: Substitute with almond or coconut milk for a dairy-free option.
    • Protein Powder: Use plant-based protein if you prefer a vegan version.
    • Sweetener: Try honey or agave syrup if you’re not counting calories.

    Nutrition Facts

    • Calories: 100 kcal
    • Protein: 15g
    • Fat: 1g
    • Carbohydrates: 8g
    • Serving Size: 1 drink

    Frequently Asked Questions

    • Can I use flavored protein powder? Yes, flavors like vanilla or chocolate work well!
    • Is it necessary to use a blender? For the best foam texture, a blender is recommended.
    • Can I make this ahead of time? It’s best fresh, but you can store components separately.
    • How can I make it sweeter? Add more sweetener to taste, but do it gradually.

  • 5-MIN FUEL: Apple Cinnamon Bliss Overnight Oats!

    5-MIN FUEL: Apple Cinnamon Bliss Overnight Oats!

    Introduction & My Personal Story

    One chilly autumn morning, I found myself rummaging through my pantry, craving something that would not only fuel my day but also embrace the flavors of the season. That’s when I stumbled upon the idea of creating Apple Cinnamon Bliss Overnight Oats. In my 5 years of experience as a chef, I’ve learned that the simplest ingredients often create the most profound flavors, and this recipe is a testament to that. As a child, my grandmother used to make warm apple pies, and the aroma would fill the entire house with a comforting scent of apples and cinnamon. Those memories inspired me to capture that essence in a quick and nourishing breakfast. This dish became my go-to when I needed a no-fuss, nutritious start to my day, allowing me to savor those nostalgic flavors in a modern, time-saving way. Join me as we dive into this delightful recipe that has been a staple in my kitchen for years.

    Why You’ll Love This Recipe

    • Quick and easy prep: Ready in just 5 minutes!
    • Perfect for busy mornings: No cooking required.
    • Nutritious and satisfying: Keeps you full until lunch.
    • Customizable: Easily adjust to your taste and dietary needs.
    • Meal prep friendly: Make multiple servings in advance.

    Detailed Ingredients

    • 1 cup thick-cut rolled oats (gluten-free if needed)
    • 1 cup unsweetened almond milk
    • 1/2 cup apple juice
    • 2 tablespoons almond butter
    • 1/4 cup dried apples, chopped
    • 1 teaspoon ground cinnamon
    • 1/4 teaspoon salt
    • Optional toppings: chopped nuts, fresh apple slices, or a drizzle of honey

    Step-by-Step Instructions

    Step 1: Blend the Ingredients

    Start by gathering your ingredients. In a blender, combine the almond butter, almond milk, and apple juice. Add in the chopped dried apples. Blend on high until the mixture is smooth and creamy. This will serve as the flavorful liquid base for your overnight oats.

    Step 2: Assemble the Oats

    In a mason jar or airtight container, add the thick-cut rolled oats. Pour the blended apple mixture over the oats. Sprinkle in the ground cinnamon and a pinch of salt. Stir well to ensure the oats are fully coated with the liquid and cinnamon is evenly distributed.

    Step 3: Chill Overnight

    Seal the container with a lid and place it in the refrigerator. Allow the oats to soak and absorb the flavors overnight, or for at least 6 hours. This is where the magic happens as the oats soften and the flavors meld together.

    Step 4: Serve and Enjoy

    The next morning, give your oats a good stir. If you prefer a looser consistency, add a splash of almond milk. Top with your choice of chopped nuts, fresh apple slices, or a drizzle of honey for added texture and sweetness. Enjoy your nutritious breakfast!

    Common Mistakes to Avoid

    Using Instant Oats: Instant oats can become mushy when soaked overnight. Use thick-cut rolled oats for the best texture.

    Skipping the Stir: Make sure to stir the oats before refrigerating to distribute flavors evenly.

    Not Sealing Properly: Ensure your container is airtight to prevent the oats from drying out.

    How to Store & Reheat

    Store the prepared overnight oats in an airtight container in the refrigerator. They will keep well for up to 3 days. If you need to reheat them, transfer to a microwave-safe bowl and microwave on medium power for 1-2 minutes, stirring halfway through. You may need to add a splash of almond milk to reach the desired consistency.

    Ingredient Substitutions

    Oats: For a gluten-free option, ensure your oats are certified gluten-free.

    Almond Milk: Substitute with any plant-based milk such as soy, oat, or coconut milk.

    Almond Butter: Peanut butter or sunflower seed butter are excellent alternatives.

    Dried Apples: Use fresh apple slices if preferred, but note they may release more liquid.

    Nutrition Facts

    • Calories: 221 kcal
    • Protein: 6 g
    • Fat: 9 g
    • Carbs: 31 g
    • Serving Size: 1 cup

    Frequently Asked Questions

    Can I make this recipe vegan?

    Absolutely! This recipe is already vegan since it uses plant-based milk and almond butter.

    How can I make this recipe nut-free?

    Use sunflower seed butter and a nut-free milk alternative like oat or rice milk.

    Can I sweeten the oats?

    Yes, if you prefer sweeter oats, add a tablespoon of maple syrup or honey.

    Are overnight oats safe to eat cold?

    Yes, they are safe and delicious to eat cold, especially in the warmer months.

    Can I add protein powder?

    Certainly! Stir in a scoop of your favorite protein powder for an extra protein boost.

  • Brain Fuel: Choco-Chia Mousse

    Brain Fuel: Choco-Chia Mousse

    Introduction & My Personal Story

    When I think of comfort food that’s also a brain booster, my mind drifts to the creamy, delightful flavors of Chocolate Chia Mousse. My journey with this recipe began a few years back during a particularly hectic week. I was juggling a new job, late-night deadlines, and trying to maintain a healthy lifestyle. In the midst of the chaos, I stumbled upon the magic of chia seeds and their incredible nutritional benefits. It was then that I decided to marry them with my love for chocolate, creating a dessert that was not only indulgent but also packed with nutrients.

    In my 5 years of experience as a chef, I have found that the best recipes are those that balance taste with health benefits. This mousse became my go-to recipe for a quick yet satisfying dessert that didn’t leave me feeling guilty. I remember the first time I served it to friends, their eyes widened with surprise at how something so delicious could be so healthy. The secret? The Omega-3s and fiber from the chia seeds, combined with the rich taste of cocoa, created a dessert that was both satisfying and energizing.

    Now, every time I make this mousse, I am reminded of those hectic days and how a simple dish can bring a sense of calm and focus. It’s a recipe that’s close to my heart, and I’m thrilled to share it with you. Whether you’re looking to boost your productivity or simply indulge in a tasty treat, this Choco-Chia Mousse is sure to become a staple in your kitchen.

    Why You’ll Love This Recipe

    • Quick and easy to prepare with minimal ingredients.
    • Packed with Omega-3s and fiber for brain health.
    • Rich chocolate flavor without the guilt.
    • Perfect for breakfast, dessert, or a mid-day snack.
    • Customizable with your favorite toppings.

    Detailed Ingredients

    • 1 cup (240 ml) unsweetened almond milk
    • 1/3 cup (60 g) chia seeds
    • 2 tablespoons (30 ml) pure maple syrup
    • 2 tablespoons (10 g) unsweetened cocoa powder
    • 1 teaspoon (5 ml) vanilla extract
    • Pinch of salt

    When shopping, look for fresh, plump chia seeds and high-quality cocoa powder for the best flavor. Organic maple syrup is recommended for its pure taste.

    Step-by-Step Instructions

    Step 1: Blend Ingredients

    Begin by pouring 1 cup of unsweetened almond milk into a high-powered blender. Add 1/3 cup of chia seeds, 2 tablespoons of pure maple syrup, 2 tablespoons of cocoa powder, 1 teaspoon of vanilla extract, and a pinch of salt. Start blending at a low speed, gradually increasing to high. Blend until the chia seeds are nearly undetectable, and the mixture is smooth and silky. Scrape down the sides of the blender as needed to ensure everything is well incorporated.

    Step 2: Set and Chill

    Once blended, the mousse should be thick and creamy. If you prefer it chilled, transfer the mixture to a resealable container. Cover and refrigerate for 3-4 hours, allowing the chia seeds to absorb the liquid and thicken the mousse further. Chef’s Tip: For a quicker set, place the mousse in the freezer for 30 minutes before refrigerating.

    Step 3: Serve and Enjoy

    Once the mousse has set, give it a quick stir to ensure a consistent texture. Serve in individual bowls or glasses, and feel free to top with fresh berries, a sprinkle of nuts, or a dollop of whipped cream if you’re feeling indulgent. Enjoy this nutritious treat as a dessert or a pick-me-up snack!

    Common Mistakes to Avoid

    • Not blending long enough: Ensure the chia seeds are fully broken down for a smooth texture.
    • Using low-quality cocoa: Opt for high-quality cocoa powder for the best chocolate flavor.
    • Skipping the chill time: Allow the mousse to set properly for the best consistency.

    How to Store & Reheat

    Store any leftover mousse in an airtight container in the refrigerator for up to 5 days. If you wish to enjoy it warm, gently reheat in the microwave on low power for 20-30 seconds, stirring in between to maintain its creamy texture. However, this mousse is best enjoyed chilled.

    Ingredient Substitutions

    • Almond milk: Substitute with any plant-based milk like coconut or oat milk.
    • Maple syrup: Use honey or agave syrup if preferred.
    • Cocoa powder: Swap with cacao powder for a more intense chocolate flavor.

    Nutrition Facts

    • Calories: 233 kcal (per 1/3 recipe)
    • Protein: 6g
    • Fat: 12g
    • Carbohydrates: 25g
    • Serving Size: 1/3 of the recipe

    Frequently Asked Questions

    • Can I make this recipe vegan? Yes! This recipe is naturally vegan as it uses plant-based milk and maple syrup.
    • How can I make the mousse thicker? Add an additional tablespoon of chia seeds if you prefer a thicker consistency.
    • Can I use regular milk instead of almond milk? Absolutely, but keep in mind this will change the nutritional profile slightly.
    • Is this recipe gluten-free? Yes, all ingredients used are naturally gluten-free.
    • Can I add protein powder? Yes, a scoop of chocolate or vanilla protein powder can be added for extra protein.

  • 5-MIN FUEL: Raspberry Cottage Cheese Power Oatmeal!

    5-MIN FUEL: Raspberry Cottage Cheese Power Oatmeal!

    Introduction & My Personal Story

    Growing up, breakfast was always a cherished ritual in my family. My mother would whip up hearty meals that not only filled our bellies but also fueled us for the day ahead. One of my fondest memories was the comforting aroma of baked oatmeal wafting through the house on chilly mornings. This particular recipe, Raspberry Cottage Cheese Power Oatmeal, holds a special place in my heart. It was born out of my need for a quick, nutritious breakfast that could keep up with my hectic lifestyle. In my 5 years of experience as a chef, I have learned that simplicity doesn’t have to compromise flavor or nutrition.

    On a particularly busy morning, I remember having just a few minutes to prepare breakfast before a long day in the kitchen. I had some fresh raspberries, oats, and cottage cheese on hand, and a lightbulb moment led to the creation of this dish. The first bite was a revelation—a perfect balance of creamy, tangy, and sweet. It was like a warm hug in a bowl, and I couldn’t wait to share it with others. This quick and delicious meal has since become a staple in my household and is a favorite among my friends and family.

    Why You’ll Love This Recipe

    • Ready in just 5 minutes, perfect for busy mornings.
    • High in protein and fiber for sustained energy.
    • Uses simple ingredients that you likely have on hand.
    • Customizable to suit your taste and dietary needs.
    • Delicious hot or cold, making it versatile for any season.

    Detailed Ingredients

    • 1 cup (90g) rolled oats – Look for whole grain oats for maximum fiber.
    • 1/2 cup (120g) cottage cheese – Choose a low-fat variety for a lighter option.
    • 1 cup (240ml) almond milk – Unsweetened is best to control sweetness.
    • 1/2 cup (75g) fresh raspberries – Pick firm, bright red berries.
    • 1 tablespoon (15ml) maple syrup – Adds a natural sweetness.
    • 1 tablespoon (10g) ground flaxseed – Provides extra fiber and omega-3s.
    • 1 teaspoon (4g) baking powder – Helps the oatmeal rise and become fluffy.
    • 1/2 teaspoon (1g) ground cinnamon – Adds warmth and depth to the flavor.
    • Pinch of salt – Balances the sweetness and enhances flavors.

    Step-by-Step Instructions

    Step 1: Preheat and Prepare
    Preheat your oven to 375°F (190°C). Grease an 8×8-inch baking dish with a bit of oil or non-stick spray. This ensures your oatmeal doesn’t stick and makes cleanup a breeze.

    Step 2: Mix Dry Ingredients
    In a large bowl, combine the rolled oats, ground flaxseed, baking powder, cinnamon, and a pinch of salt. Stir them together until evenly mixed. Chef’s Tip: Mixing dry ingredients first ensures even distribution of baking powder, which is key for a uniform rise.

    Step 3: Blend Wet Ingredients
    In a blender or food processor, blend the cottage cheese, maple syrup, almond milk, and a splash of vanilla extract until smooth. This creates a creamy base that will bind the oats together.

    Step 4: Combine and Fold
    Pour the wet mixture into the bowl with the dry ingredients. Fold in the fresh raspberries gently to avoid crushing them. Ensure everything is well mixed but avoid overmixing, which can make the oats dense.

    Step 5: Pour and Swirl
    Pour the oatmeal mixture into the prepared baking dish, smoothing the top with a spatula. For an extra touch, add dollops of more cottage cheese and a few teaspoons of warmed raspberry jam on top, swirling them gently with a knife for a marbled effect.

    Step 6: Bake
    Place the dish in the oven and bake for 40-50 minutes or until the top is golden brown and firm to the touch. Let it cool for a few minutes before slicing. Chef’s Tip: A toothpick inserted into the center should come out clean when it’s done.

    Common Mistakes to Avoid

    • Overmixing: This can lead to a dense texture. Mix just until combined.
    • Using expired baking powder: Fresh baking powder is crucial for a proper rise.
    • Skipping the grease: Ensure your baking dish is well-greased to prevent sticking.
    • Not preheating the oven: A properly preheated oven ensures even cooking.

    How to Store & Reheat

    Store any leftovers in an airtight container in the refrigerator for up to 5 days. For longer storage, freeze individual portions wrapped in plastic wrap and placed in a freezer bag for up to 3 months.

    To reheat, simply microwave a portion on high for 1-2 minutes or until warmed through. If frozen, thaw overnight in the refrigerator before reheating.

    Ingredient Substitutions

    • Oats: Use quick oats if you’re short on time; they’ll cook faster.
    • Cottage Cheese: Greek yogurt can be used for a similar creamy texture.
    • Almond Milk: Substitute with any milk of your choice, such as cow’s milk or oat milk.
    • Maple Syrup: Honey or agave syrup are great alternatives.
    • Raspberries: Blueberries or strawberries can be used for a different flavor profile.

    Nutrition Facts

    • Calories: 299 kcal per serving
    • Protein: 12g
    • Fat: 5g
    • Carbs: 50g
    • Serving Size: 1/6 of the dish

    Frequently Asked Questions

    • Can I make this oatmeal ahead of time?
      Yes, you can prep the mixture the night before and bake it in the morning for a fresh breakfast.
    • Is this recipe gluten-free?
      Ensure your oats are certified gluten-free to make this dish suitable for those with gluten sensitivities.
    • Can I use frozen raspberries?
      Yes, but thaw and drain them first to prevent excess moisture.
    • What can I serve with this oatmeal?
      A dollop of yogurt or a sprinkle of nuts adds extra protein and crunch.
    • How do I make it vegan?
      Swap cottage cheese with a plant-based yogurt and use a vegan milk alternative.

  • Brain Fuel: Fig Tahini Bars

    Brain Fuel: Fig Tahini Bars

    Introduction & My Personal Story

    Growing up in a bustling household, I often found myself searching for snacks that were both nutritious and delicious. My mother, a culinary enthusiast herself, introduced me to the wonders of figs and tahini at a young age. She would often prepare these delectable bars as a quick energy boost for us kids during our study sessions. Fast forward to my years as a professional chef, I revisited this childhood favorite with a twist, creating what I now call “Brain Fuel: Fig Tahini Bars”. These bars are a nostalgic nod to my past, yet a modern take on fueling the mind and body. In my 5 years of experience as a chef, I’ve come to appreciate how certain ingredients can significantly impact our focus and energy levels. The combination of figs, rich in fiber, and tahini, packed with healthy fats, creates a perfect balance for sustained energy. Whether you’re gearing up for a busy workday or need a mid-afternoon pick-me-up, these bars are a testament to how food can be both functional and flavorful. Let me walk you through this recipe that has been a staple in my kitchen and hopefully, will become a staple in yours too.

    Why You’ll Love This Recipe

    • Quick and Easy: No baking required, ready in just 15 minutes.
    • Nutritious: Packed with Omega-3s, fiber, and healthy fats.
    • Customizable: Easily swap ingredients to suit dietary needs.
    • Great for On-the-Go: Perfect for busy mornings or a quick snack.
    • Kid-Friendly: A healthy treat that children will love.

    Detailed Ingredients

    For these bars, you’ll need to gather the following ingredients. Be sure to select quality produce for the best results.

    • 1 cup old-fashioned rolled oats (100g) – Look for oats that are whole and not instant for better texture.
    • 1 cup dried figs, chopped (150g) – Ensure they are soft and pliable for easy mixing.
    • ½ cup pepitas (pumpkin seeds) (65g) – These should be fresh and free of any added salt.
    • ½ cup tahini (120ml) – Choose a smooth, well-mixed tahini for even consistency.
    • ¼ cup honey (60ml) – Opt for raw honey if possible for a richer flavor.
    • 2 tbsp ground flaxseed (14g) – Provides essential Omega-3 fatty acids.
    • 2 tbsp chia seeds (24g) – Adds a nutritional punch with fiber and protein.
    • 1 tsp vanilla extract (5ml) – Pure vanilla extract will impart the best aroma.
    • ½ tsp cinnamon (1g) – Freshly ground cinnamon will enhance the sweetness.
    • ¼ tsp sea salt (1g) – Balances the flavors beautifully.
    • ½ cup chocolate chips (optional) (90g) – Use dark chocolate for a healthier option.
    • 1 tsp coconut oil (optional) (5ml) – Helps in melting the chocolate smoothly.

    Step-by-Step Instructions

    Now that you have your ingredients ready, let’s dive into the preparation of these bars.

    Step 1: Prepare the Pan

    Line a loaf pan with parchment paper, allowing some overhang on the sides. This will make it easier to lift the bars out once set. A 9×5 inch pan works perfectly for this recipe.

    Step 2: Combine Ingredients

    In a large mixing bowl, add the **rolled oats**, **chopped figs**, **pepitas**, **tahini**, **honey**, **ground flaxseed**, **chia seeds**, **vanilla extract**, **cinnamon**, and **sea salt**. Using a sturdy spatula, mix all the ingredients until they are well combined. The mixture should be sticky and hold together when pressed.

    Step 3: Form the Bars

    Transfer the combined mixture into the prepared loaf pan. Use the back of a spoon or your hands to press the mixture firmly and evenly into the pan. It’s important to compact it well to ensure the bars hold together.

    Step 4: Melt Chocolate (Optional)

    If you’re adding a chocolate layer, place the **chocolate chips** and **coconut oil** in a microwave-safe bowl. Heat in 30-second intervals, stirring after each, until the chocolate is fully melted and smooth.

    Step 5: Add Topping

    Pour the melted chocolate over the pressed mixture in the pan. Use the back of a spoon to spread it evenly across the surface. This will create a delicious chocolate layer on top of the bars.

    Step 6: Chill and Cut

    Place the pan in the refrigerator for about 30 minutes to allow the bars to set. Once they are firm, lift them out of the pan using the parchment paper and cut into 8 equal bars.

    Step 7: Storage

    Store these bars in an airtight container in the refrigerator for up to a week. They taste best when enjoyed cold or at room temperature.

    Common Mistakes to Avoid

    • Not pressing the mixture firmly enough: This can cause the bars to crumble. Make sure to compact the mixture well in the pan.
    • Using instant oats: These can make the bars too soft. Stick to old-fashioned rolled oats for the right texture.
    • Skipping the chilling step: Allowing the bars to set in the fridge is crucial for them to hold their shape.
    • Forgotten parchment paper: This makes removing the bars difficult. Always line your pan.

    How to Store & Reheat

    To keep your Fig Tahini Bars fresh, store them in an airtight container in the refrigerator. They will stay fresh for up to a week. If you prefer them warm, you can let them sit at room temperature for a few minutes before eating. However, avoid microwaving as it can melt the chocolate topping and alter the texture.

    Ingredient Substitutions

    Whether you’re out of an ingredient or need to adjust for dietary preferences, here are some substitutions you can make:

    • Dried figs: Swap with dried apricots or dates for a different flavor.
    • Tahini: Use almond butter or sunflower seed butter for a nutty twist.
    • Honey: Agave syrup or maple syrup can work as vegan alternatives.
    • Pepitas: Substitute with sunflower seeds or chopped nuts.

    Nutrition Facts

    • Calories: 241 kcal per bar
    • Protein: 7g
    • Fat: 12g
    • Carbohydrates: 28g
    • Serving Size: 1 bar

    Frequently Asked Questions

    • Can I freeze these bars? Yes, you can freeze them for up to 3 months. Wrap each bar individually and store in a freezer-safe bag.
    • Are these bars gluten-free? Yes, as long as you use certified gluten-free oats, these bars are gluten-free.
    • Is there a way to make these bars less sweet? You can reduce the amount of honey or use a less sweet dried fruit like apricots.
    • Can I omit the chocolate topping? Absolutely, the bars are delicious even without the chocolate layer.
    • What’s the best way to cut the bars? Use a sharp knife and clean it between cuts for neat edges.

  • 5-MIN FUEL: Blueberry Bliss Cottage Cheese Bake!

    5-MIN FUEL: Blueberry Bliss Cottage Cheese Bake!

    Introduction & My Personal Story

    Let me take you back to a crisp, breezy morning. It was one of those days when the alarm jolted me awake, and I realized I had exactly 20 minutes before heading out the door. With my chef’s hat slightly askew and my mind racing through possibilities, I needed something quick, nutritious, and undeniably delicious. That’s when the Blueberry Bliss Cottage Cheese Bake came to life in my kitchen.

    In my 5 years of experience as a chef, I’ve come to appreciate the beauty of a recipe that not only fuels the body but also soothes the soul. This dish, with its creamy, tangy cottage cheese, sweet bursts of blueberries, and the comforting aroma of cinnamon, quickly became a staple in my morning routine. Not only does it come together in a flash, but it also offers a delightful balance of flavors and textures.

    This recipe is a nod to the busy hustlers who, like me, crave a breakfast that doesn’t sacrifice taste for speed. Whether you’re a student racing to class, a professional dashing to the office, or a parent juggling morning chaos, this bake is your morning’s saving grace. Let me guide you through this culinary gem that feels like a warm hug on a chilly morning.

    Why You’ll Love This Recipe

    • Quick and easy: Ready in under 10 minutes of prep.
    • High in protein: Thanks to the **cottage cheese** and **eggs**.
    • Rich in antioxidants: Packed with **blueberries**.
    • Minimal cleanup: One bowl and a blender are all you need.
    • Perfect for meal prep: Make ahead and enjoy all week.

    Detailed Ingredients

    • 1 cup (226g) **cottage cheese** – Look for full-fat for creaminess.
    • 2 large **eggs** – Fresh, free-range for the best flavor.
    • 3 tablespoons **maple syrup** – Pure, not imitation, for natural sweetness.
    • 1 teaspoon **vanilla extract** – Adds depth to the flavor.
    • 1/2 cup (60g) **oat flour** – Gluten-free option, or sub with whole wheat flour.
    • 1 teaspoon **baking powder** – Ensures a light, fluffy bake.
    • 1/2 teaspoon **cinnamon** – For warmth and spice.
    • Pinch of **salt** – Balances the sweetness.
    • 1 cup (150g) **blueberries** – Fresh or frozen, but fresh gives the best texture.

    Step-by-Step Instructions

    Step 1: Preheat and Prepare
    Start by preheating your oven to 350°F (175°C). Lightly grease an 8×8-inch baking dish with butter or non-stick spray. This helps the bake come out smoothly without sticking, ensuring a perfect slice every time.

    Step 2: Blend the Base
    In a blender, combine the **cottage cheese**, **eggs**, **maple syrup**, and **vanilla extract**. Blend until the mixture is smooth and creamy. This step is crucial for integrating the ingredients, giving the bake its signature fluffy texture.

    Step 3: Mix the Dry Ingredients
    Add the **oat flour**, **baking powder**, **cinnamon**, and **salt** to the blender. Blend again until everything is just combined. Be careful not to over-blend, as this can result in a dense bake.

    Step 4: Incorporate the Blueberries
    Gently stir in the **blueberries** using a spatula. Reserve a handful to sprinkle on top. This ensures that every bite is bursting with juicy, sweet berries.

    Step 5: Bake to Perfection
    Pour the batter into your prepared baking dish. Sprinkle the reserved blueberries over the top. Bake in the preheated oven for 35-40 minutes, or until the top is golden and a toothpick inserted into the center comes out clean. Chef’s Tip: The edges should be slightly pulling away from the sides of the dish.

    Step 6: Cool and Serve
    Allow the bake to cool for at least 5 minutes before slicing. Serve warm, optionally drizzled with a little extra **maple syrup** for added sweetness.

    Common Mistakes to Avoid

    While this recipe is straightforward, a few common mistakes can trip you up:

    • Over-blending: Mixing too long can make the bake dense.
    • Using low-fat cottage cheese: Opt for full-fat to achieve a richer texture.
    • Skipping the preheat: Make sure your oven is fully preheated to ensure even cooking.
    • Not greasing the dish: This step is crucial to prevent sticking.

    How to Store & Reheat

    Store any leftovers in an airtight container in the refrigerator for up to 5 days. To reheat, simply microwave individual slices for about 20-30 seconds. If you prefer a crispy top, you can also reheat in a preheated oven at 350°F for 5-10 minutes.

    Ingredient Substitutions

    If you’re out of certain ingredients or have dietary restrictions, here are some substitutions:

    • Cottage cheese: Swap with ricotta cheese for a similar texture.
    • Oat flour: Use almond flour for a nutty flavor or regular flour if gluten isn’t an issue.
    • Maple syrup: Honey or agave syrup can be used as alternatives.
    • Blueberries: Try raspberries or chopped strawberries for a twist.

    Nutrition Facts

    Here’s the nutritional breakdown per serving (1 slice, assuming 9 slices):

    • Calories: 248 kcal
    • Protein: 12g
    • Fat: 8g
    • Carbohydrates: 30g
    • Serving Size: 1 slice

    Frequently Asked Questions

    • Can I use frozen blueberries?
      Yes, but be sure to thaw and drain them to prevent excess moisture in the bake.
    • Is this recipe gluten-free?
      Yes, if you use oat flour or any gluten-free flour alternative.
    • How can I make it vegan?
      Substitute eggs with flaxseed eggs and use a dairy-free cottage cheese alternative.
    • Can I add other fruits?
      Absolutely! Feel free to experiment with your favorite fruits, such as peaches or apples.
    • What’s the best way to serve this?
      It’s delicious on its own or paired with a dollop of Greek yogurt or a sprinkle of nuts.

  • Brain Fuel: Almond Butter Bliss

    Brain Fuel: Almond Butter Bliss

    Introduction & My Personal Story

    There’s something truly magical about the comforting aroma of roasted almonds wafting through the kitchen. It takes me back to my childhood, sitting at the kitchen counter, watching my grandmother meticulously prepare her famous almond butter. She always said it was her secret weapon for staying sharp and energetic throughout the day. As I grew older and embarked on my culinary journey, I realized just how right she was. Almond butter isn’t just delicious; it’s a powerhouse of nutrients that fuels both body and mind.

    In my 5 years of experience as a chef, I’ve experimented with countless variations of almond butter, but nothing quite compares to the pure, unadulterated bliss of homemade. It’s a simple process, yet incredibly rewarding. Each batch holds a special place in my heart, much like the fond memories of those afternoons with my grandmother. Today, I’m excited to share with you my perfected recipe for Almond Butter Bliss—a true brain fuel that will elevate your daily routine.

    Why You’ll Love This Recipe

    • **Superior Flavor**: Homemade almond butter offers a rich, nutty taste that store-bought versions simply can’t match.
    • **One Ingredient Wonder**: Made with just raw almonds, it’s as pure as it gets.
    • **Versatile Uses**: Perfect for spreading on toast, blending into smoothies, or even baking.
    • **Nutrient-Packed**: High in healthy fats, protein, and essential vitamins.
    • **Customizable**: Adjust the texture and flavors to suit your preferences.

    Detailed Ingredients

    To create your own Almond Butter Bliss, you’ll need the following ingredients:

    • Raw Almonds: 4 cups (approximately 600 grams). Look for fresh, high-quality almonds with a uniform color and no visible blemishes.
    • Neutral Oil: Optional, 1-2 teaspoons (e.g., avocado oil or coconut oil) for achieving the desired smoothness.
    • Optional Add-ins: Maple syrup, honey, cinnamon, vanilla extract, or cocoa powder for added flavor.

    Step-by-Step Instructions

    Let’s dive into the step-by-step process of making Almond Butter Bliss:

    Step 1: Preheat and Roast

    Begin by preheating your oven to 350°F (175°C). Spread the raw almonds evenly on a baking sheet. Roast them for 8-10 minutes, keeping a close eye to ensure they don’t burn. You’ll know they’re ready when they turn a light golden brown and emit a warm, nutty aroma. Allow them to cool to room temperature before moving to the next step.

    Step 2: Process the Almonds

    Transfer the cooled almonds to a food processor fitted with the S blade. Process the almonds for 15-25 minutes. Initially, the almonds will break down into a coarse meal. As you continue, they’ll form a ball, and eventually, a smooth almond butter will emerge. Stop periodically to scrape down the sides of the processor to ensure even blending. Patience is key here!

    Step 3: Adjust Texture with Oil

    If after 20 minutes your almond butter is still grainy, add 1 teaspoon of neutral oil at a time until you achieve the creamy texture you desire. Remember, the goal is a silky smooth consistency that spreads easily.

    Step 4: Blender Alternative

    If you have a high-powered blender like a Vitamix, you can achieve the same results with less processing time. Blend the full 4 cups of almonds, adding oil as needed, until smooth. This method is quicker but requires a powerful blender to handle the task.

    Common Mistakes to Avoid

    Making almond butter is straightforward, but there are a few pitfalls to watch out for:

    • Over-Roasting: Be cautious not to roast the almonds too long, as burnt almonds will result in a bitter butter.
    • Impatience: Processing time can vary. Don’t rush the process; let the almonds blend until smooth.
    • Adding Oil Prematurely: Only add oil if necessary, as almonds naturally release their own oils.

    How to Store & Reheat

    To keep your Almond Butter Bliss fresh and ready to use:

    • Storage: Transfer the almond butter to an airtight container and store it in the refrigerator. It will last for up to two weeks.
    • Reheating: If your almond butter becomes too firm in the fridge, let it sit at room temperature for a few minutes before using.

    Ingredient Substitutions

    Here are some safe substitutions if you’re looking to tweak the recipe:

    • Raw Almonds: You can use roasted almonds, but reduce the roasting time to avoid overcooking.
    • Neutral Oil: Substitute with any mild-flavored oil, such as grapeseed or light olive oil.
    • Flavor Add-ins: Experiment with different spices or sweeteners to suit your taste.

    Nutrition Facts

    Here’s a breakdown of the nutrition per 2-tablespoon serving:

    • Calories: 106 kcal
    • Protein: 3g
    • Fat: 9g
    • Carbs: 4g
    • Serving Size: 2 tablespoons

    Frequently Asked Questions

    • Can I use a blender instead of a food processor? Yes, but ensure it’s a high-powered blender to handle the dense almonds.
    • How can I make the almond butter sweeter? Add a teaspoon of maple syrup or honey during processing.
    • Is it necessary to add oil? Not always. Almonds release their own oils, but a small amount can help achieve a smoother texture.
    • Can I freeze almond butter? Yes, it can be frozen for up to 3 months. Thaw it in the refrigerator before use.
    • What if my almond butter is too thick? Gradually add oil, one teaspoon at a time, until the desired consistency is reached.

  • 5-MIN FUEL: Kodiak Mix Sheet Pan Pancakes

    5-MIN FUEL: Kodiak Mix Sheet Pan Pancakes

    Introduction & My Personal Story

    There’s something magical about waking up on a lazy Sunday morning to the smell of freshly baked pancakes. But let’s face it, not everyone has the luxury of leisurely mornings. That’s where my 5-Minute Fuel: Kodiak Mix Sheet Pan Pancakes come into play. My journey with this recipe began during a particularly hectic phase of my life. In my 5 years of experience as a chef, I’ve learned that sometimes, simplicity is the key to deliciousness.

    I remember the first time I stumbled upon the concept of sheet pan pancakes. It was a revelation! No more standing by the stove flipping pancakes one by one. Instead, I could whip up a batch, pop them in the oven, and have breakfast ready in a flash. The first time I tried these Kodiak Mix pancakes, I was hooked. The blend of whole grains and protein in the mix provided a hearty start to my day, and the convenience was unbeatable.

    These sheet pan pancakes have since become a staple in my household. Whether I’m rushing to get the kids ready for school or preparing for a busy workday, this recipe saves the day every time. It’s the perfect blend of nutrition and speed, and I can’t wait to share it with you.

    Why You’ll Love This Recipe

    • Quick and easy preparation – ready in under 10 minutes of prep time.
    • Minimal cleanup – just one sheet pan to wash.
    • Customizable with your choice of toppings.
    • Packed with protein and whole grains for sustained energy.
    • Perfect for meal prep – make ahead and enjoy throughout the week.

    Detailed Ingredients

    • 2 cups **Kodiak pancake mix**
    • 1 1/2 cups **milk** (whole or any milk substitute)
    • 2 large **eggs**
    • 1 teaspoon **vanilla extract**
    • 2 tablespoons **melted butter**
    • Optional toppings: **fresh berries**, **chocolate chips**, **nuts**

    When shopping for ingredients, look for the **Kodiak pancake mix** that contains whole grains and protein. Fresh berries should be plump and vibrant, and always check the expiration date on your milk and eggs.

    Step-by-Step Instructions

    Step 1: Preheat your oven to 350°F (175°C). Lightly grease a quarter sheet pan with butter or non-stick spray. This prevents the pancakes from sticking and ensures an even bake.

    Step 2: In a large mixing bowl, combine 2 cups of **Kodiak pancake mix**, 1 1/2 cups of **milk**, 2 large **eggs**, 1 teaspoon of **vanilla extract**, and 2 tablespoons of **melted butter**. Stir until just combined. Be careful not to overmix; a few lumps are perfectly normal.

    Step 3: Pour the batter into the prepared sheet pan. Use a spatula to spread the batter evenly across the pan, ensuring it reaches all the edges for uniform thickness.

    Step 4: Now comes the fun part – toppings! Sprinkle your choice of **fresh berries**, **chocolate chips**, or **nuts** over the batter. This is where you can get creative and cater to your family’s preferences.

    Step 5: Bake in the preheated oven for 18-20 minutes. You’ll know it’s done when the edges are lightly golden, and a toothpick inserted into the center comes out clean. If you’re unsure, give it a couple more minutes – but keep an eye on it!

    Step 6: Once baked, remove the sheet pan from the oven and allow it to cool slightly. Cut into squares and serve warm with maple syrup or your favorite pancake toppings.

    Common Mistakes to Avoid

    One common mistake is overmixing the batter, which can result in dense pancakes. Remember, a few lumps are your friend here. Another issue is uneven spreading of the batter; make sure it’s evenly distributed to avoid undercooked spots. Finally, be cautious with toppings – too many can weigh down the batter and affect the baking time.

    How to Store & Reheat

    Store any leftover pancakes in an airtight container in the refrigerator for up to 3 days. For longer storage, place them in a freezer-safe bag and freeze for up to a month. To reheat, simply pop them in the toaster or microwave until warmed through. Chef’s Tip: Reheat in the oven at 300°F for a few minutes for that fresh-baked texture.

    Ingredient Substitutions

    If you’re out of **milk**, feel free to use almond milk, soy milk, or any other milk substitute. No **butter**? Coconut oil or vegetable oil works just fine. For a dairy-free version, use plant-based butter and milk alternatives. And if you’re avoiding eggs, a flaxseed or chia seed egg substitute can do the trick.

    Nutrition Facts

    • Calories: 288 kcal (per serving)
    • Protein: 14g
    • Fat: 8g
    • Carbohydrates: 38g
    • Serving Size: 1 square (1/8 of the sheet pan)

    Frequently Asked Questions

    • Can I make these pancakes gluten-free? Yes, simply use a gluten-free pancake mix.
    • What other toppings can I use? Try sliced bananas, shredded coconut, or even a sprinkle of cinnamon.
    • Can I make this recipe vegan? Absolutely! Use a plant-based pancake mix, milk, and butter substitute.
    • How can I make the pancakes fluffier? Add an extra half teaspoon of baking powder to the mix.
    • Is this recipe child-friendly? Definitely, kids love customizing their own toppings!