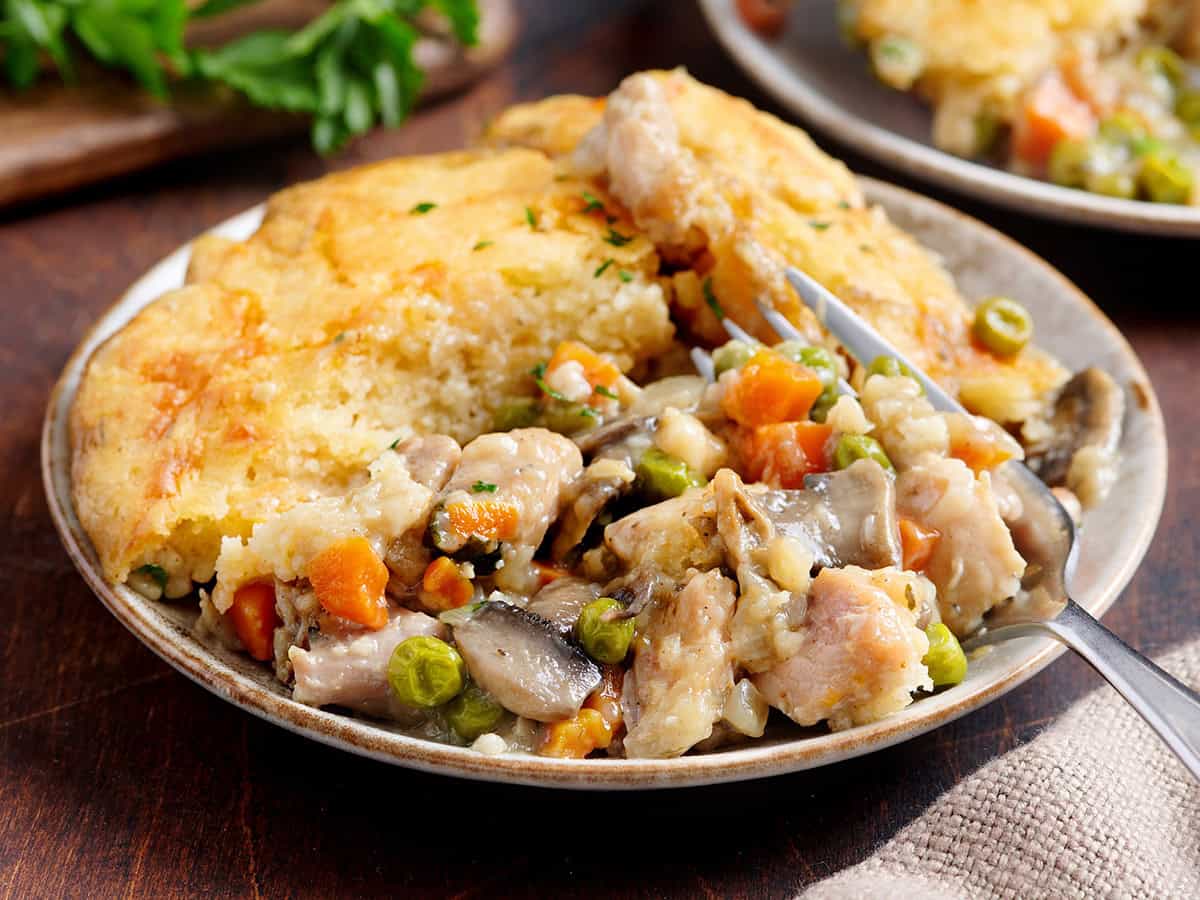
Introduction & My Personal Story
As a chef and fitness enthusiast, I’ve always been on the lookout for hearty meals that not only satisfy the taste buds but also fuel the body for muscle growth. One dish that holds a special place in my heart is the Cheesy Chicken Cobbler. It all started five years ago when I was juggling long shifts at a bustling restaurant and intense gym sessions. I needed something quick, nutritious, and delicious to keep my energy levels up. That’s when I stumbled upon the idea of a cobbler but with a savory twist.
It was a chilly evening, and I remember standing in my small kitchen, determined to create a dish that could be both a comfort food and a muscle-building powerhouse. I combined the creamy and cheesy elements of a cobbler with high-protein ingredients like chicken thighs and cheddar cheese. The first bite was a revelation. The rich flavors melded together perfectly, and it became my go-to meal for recovery days. Over time, I’ve fine-tuned the recipe, ensuring it not only packs a punch in flavor but also supports muscle repair. This Cheesy Chicken Cobbler has been a staple in my diet, and I’m excited to share it with you today.
Why You’ll Love This Recipe
- High Protein: With 32g of protein per serving, it’s perfect for muscle growth and recovery.
- Flavorful: The combination of cheddar cheese, garlic, and Cajun seasoning makes every bite a delight.
- Easy to Make: Straightforward steps with no complicated techniques.
- Comfort Food: Warm, cheesy, and satisfying—ideal for a cozy meal.
- Meal Prep Friendly: Make it ahead and enjoy throughout the week.
Detailed Ingredients
- 1 lb boneless, skinless chicken thighs – Cut into bite-sized pieces. Look for fresh, pinkish color with no unpleasant odor.
- 2 Tbsp vegetable oil
- 8 oz sliced mushrooms – Choose firm, unblemished mushrooms.
- 1 cup diced onion – About one medium onion.
- 2 cloves minced garlic
- 1½ cups chicken broth – Opt for low-sodium to control salt levels.
- ½ cup milk – Whole milk for creaminess.
- ½ tsp dried thyme
- ½ tsp poultry seasoning
- 3 Tbsp cornstarch
- ¼ cup cold water
- 1½ cups frozen peas and carrots – Convenient and nutritious.
- 1¼ cups all-purpose flour
- 2 tsp baking powder
- 1 cup milk
- 6 Tbsp melted butter
- ½ cup shredded cheddar cheese – Go for sharp cheddar for a more pronounced flavor.
- ½ tsp garlic powder
- ¼ tsp Cajun seasoning
- ½ tsp dried parsley
Step-by-Step Instructions
Step 1: Preheat the Oven
Start by preheating your oven to 400°F (200°C). This ensures the cobbler bakes evenly and the topping turns golden brown.
Step 2: Brown the Chicken
Heat 1 tablespoon of vegetable oil in a cast-iron or oven-safe skillet over medium heat. Season the chicken thighs with a generous pinch of salt and pepper. Cook the chicken pieces until they are golden brown and nearly cooked through, about 6 minutes. Remove them from the skillet and set aside. Chef’s Tip: Using chicken thighs instead of breasts keeps the dish moist and flavorful.
Step 3: Sauté the Veggies
Add the remaining tablespoon of oil to the skillet. Stir in the sliced mushrooms, diced onion, and minced garlic. Sauté for about 5 minutes, or until the vegetables are softened and the onions are translucent.
Step 4: Make the Sauce
Pour in the chicken broth and milk, then add the dried thyme and poultry seasoning. Bring the mixture to a gentle simmer, allowing the flavors to meld.
Step 5: Thicken the Filling
In a small bowl, whisk together the cornstarch and cold water until smooth. Stir this slurry into the simmering sauce, cooking for 2-3 minutes until it thickens to a creamy consistency. Adjust the consistency by adding more broth or water if needed.
Step 6: Add Chicken and Veggies
Return the cooked chicken to the skillet, along with the frozen peas and carrots. Stir to combine everything evenly.
Step 7: Prepare the Topping
In a separate bowl, whisk together the all-purpose flour and baking powder. Add the milk and melted butter, mixing until smooth. Fold in the shredded cheddar cheese, garlic powder, Cajun seasoning, and dried parsley.
Step 8: Assemble
Pour the topping evenly over the hot filling in the skillet. Be careful not to stir it in, as you want the topping to sit on top and bake into a crust.
Step 9: Bake
Place the skillet in the preheated oven and bake for 25-30 minutes. The topping should be golden brown and bubbly when done.
Step 10: Rest & Serve
Allow the cobbler to rest for 10 minutes before serving. For an extra kick, brush the top with the remaining melted butter.
Common Mistakes to Avoid
Overcooking the Chicken: Avoid cooking the chicken fully in the browning step; it will finish cooking in the oven.
Skipping the Slurry: The cornstarch slurry is key for thickening the sauce. Don’t skip it!
Stirring the Topping: Pour the topping over the filling without stirring to ensure it bakes into a proper crust.
How to Store & Reheat
Store any leftovers in an airtight container in the refrigerator for up to 3 days. To reheat, cover the cobbler with foil and warm in a 350°F oven for about 15 minutes, or until heated through.
Ingredient Substitutions
- Chicken Thighs: Substitute with chicken breasts if preferred, but note they may be less juicy.
- Cheddar Cheese: Try mozzarella or a cheese blend for a different flavor profile.
- Vegetable Oil: Olive oil or canola oil can be used as alternatives.
- All-Purpose Flour: Whole wheat flour can be used, though it may alter the texture slightly.
Nutrition Facts
- Calories: 629 kcal
- Protein: 32g
- Fat: 35g
- Carbohydrates: 45g
- Serving Size: 1 serving (1/6 of the recipe)
Frequently Asked Questions
Can I freeze the cobbler?
Yes, you can freeze the baked cobbler. Allow it to cool completely, then wrap tightly in plastic wrap and foil. It will keep for up to 3 months. Thaw in the refrigerator before reheating.
Is there a gluten-free option?
Yes, substitute the all-purpose flour with a gluten-free flour blend to make the topping gluten-free.
What other vegetables can I add?
Feel free to add bell peppers, zucchini, or spinach for extra nutrition and color.
Can I make this dish vegetarian?
Absolutely! Replace the chicken with chickpeas or your favorite plant-based protein, and use vegetable broth instead of chicken broth.