Author: Muxudo

  • GAINS: Lighter Meatloaf for Serious Muscle!

    GAINS: Lighter Meatloaf for Serious Muscle!

    Introduction & My Personal Story

    Meatloaf has always held a special place in my heart. Growing up, it was a staple in our home, lovingly prepared by my grandmother on Sundays. Her meatloaf was the stuff of legends—moist, flavorful, and comforting. But as I ventured into the culinary world and began my journey as a chef, I realized that the traditional meatloaf needed a little revamp to fit my new, healthier lifestyle. Enter the Gains: Lighter Meatloaf for Serious Muscle. This isn’t just any meatloaf; it’s a high-protein, low-fat powerhouse designed to fuel muscle growth and aid recovery.

    In my 5 years of experience as a chef, I’ve learned that meals should be both nutritious and delicious. This meatloaf is a testament to that philosophy. It’s crafted with lean ground chicken, enriched with nutrient-dense ingredients like cottage cheese and carrots, and spiced just right to tantalize your taste buds. I remember the first time I experimented with this recipe—I was skeptical. Could a lighter meatloaf really match the rich flavors of the classic? To my delight, it did and then some. Not only did it satisfy my nostalgic cravings, but it also provided the protein punch I needed after a grueling workout.

    Now, I’m thrilled to share this recipe with you. Whether you’re a seasoned athlete or someone just looking to incorporate more protein into your diet, this meatloaf is sure to become a favorite. Let’s dive into the details and get cooking!

    Why You’ll Love This Recipe

    Detailed Ingredients

    Here’s what you’ll need to make this high-protein, lighter meatloaf:

    • 1 lb. ground chicken – Look for lean ground chicken at your local market.
    • 1 cup panko breadcrumbs – Provides structure without being heavy.
    • ½ small onion, minced – Adds moisture and flavor.
    • ¼ cup grated carrot – A sneaky way to add vitamins.
    • 1 Tbsp chopped parsley – Freshness and color.
    • 1 large egg – Binds everything together.
    • 1 cup small-curd cottage cheese – Boosts protein and keeps it moist.
    • 2 Tbsp ketchup – Classic meatloaf flavor.
    • 1 Tbsp Dijon mustard – A hint of tang.
    • 1 Tbsp Worcestershire sauce – Adds depth.
    • 1 tsp garlic powder – Essential seasoning.
    • 1 tsp paprika – For a warm, smoky flavor.
    • 1 tsp salt – Enhances all the flavors.
    • ½ tsp black pepper – Just the right kick.

    Step-by-Step Instructions

    Step 1: Preheat Your Oven

    Set your oven to 375°F (190°C). Line a baking sheet with parchment paper to prevent sticking and ensure easy cleanup.

    Step 2: Mix the Ingredients

    In a large mixing bowl, combine 1 lb. ground chicken, 1 cup panko breadcrumbs, ½ small minced onion, ¼ cup grated carrot, 1 Tbsp chopped parsley, 1 large egg, 1 cup small-curd cottage cheese, 2 Tbsp ketchup, 1 Tbsp Dijon mustard, 1 Tbsp Worcestershire sauce, 1 tsp garlic powder, 1 tsp paprika, 1 tsp salt, and ½ tsp black pepper. Mix gently with your hands or a spatula until just combined. Avoid over-mixing, which can make the meatloaf dense.

    Step 3: Shape the Loaf

    Transfer the mixture onto your prepared baking sheet. Form it into an 8 x 5-inch loaf. Chef’s Tip: Wet your hands slightly to prevent sticking while shaping the loaf.

    Step 4: Prepare the Glaze

    In a small bowl, mix together ¼ cup ketchup, 1 Tbsp brown sugar, 1 tsp Worcestershire sauce, and 1 tsp apple cider vinegar. Brush half of this glaze over the top of the meatloaf.

    Step 5: First Bake

    Place the meatloaf in the oven and bake for 40 minutes. This initial bake will cook the meatloaf through and set the structure.

    Step 6: Second Glaze and Final Bake

    Remove the meatloaf from the oven and brush with the remaining glaze. Return it to the oven and bake for another 10-15 minutes, or until the internal temperature reaches 165°F (74°C). This ensures the meatloaf is safe to eat and perfectly cooked.

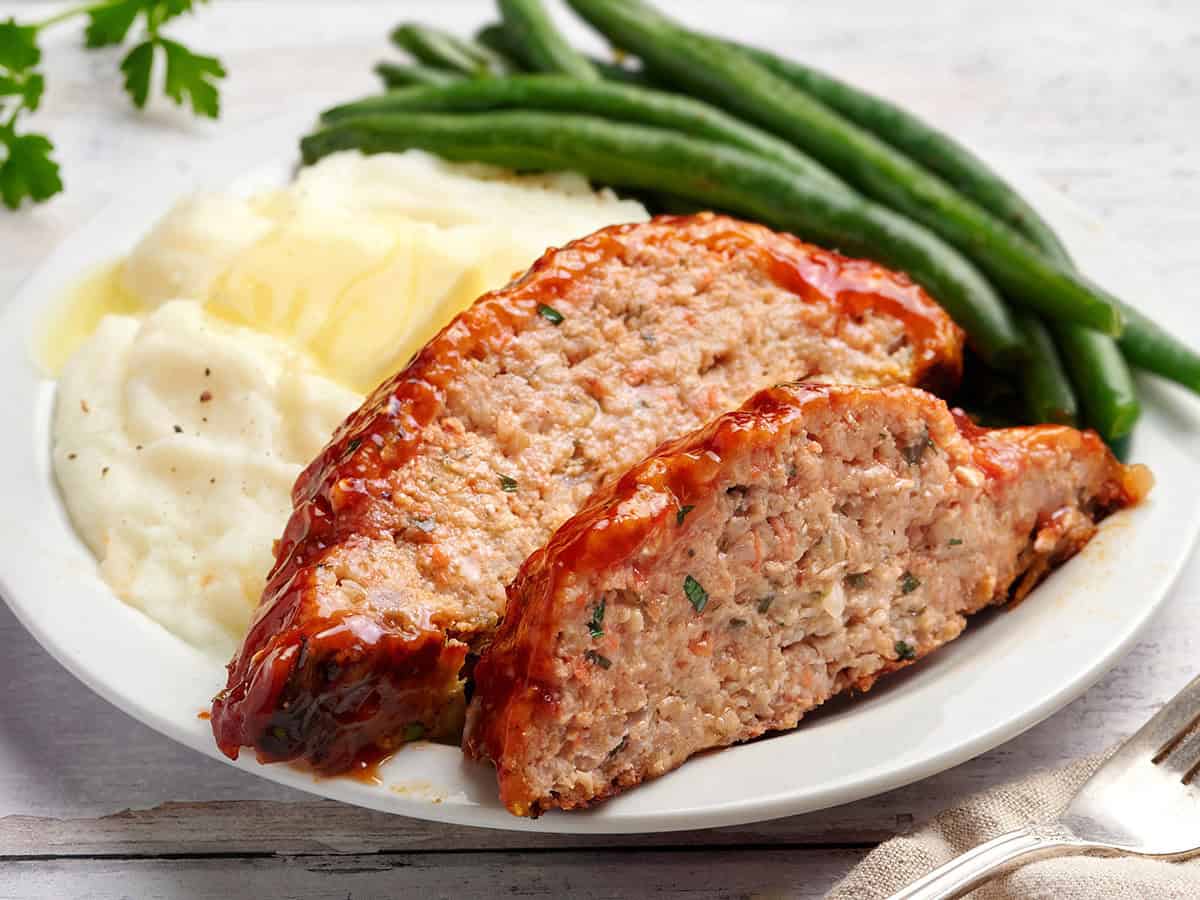
    Step 7: Rest and Serve

    Let the meatloaf rest for 10 minutes before slicing. This resting period allows the juices to redistribute, keeping the meatloaf moist. Serve warm and enjoy your protein-packed meal.

    Common Mistakes to Avoid

    • Over-mixing: This can lead to a tough meatloaf. Mix just until the ingredients are combined.
    • Skipping the rest period: Resting is crucial to allow the juices to set, preventing a dry loaf.
    • Not checking temperature: Use a meat thermometer to ensure it reaches 165°F for safety.

    How to Store & Reheat

    Storage: Allow the meatloaf to cool completely, then wrap it tightly in plastic wrap or aluminum foil. Store in the refrigerator for up to 3-4 days.

    Reheating: Preheat your oven to 350°F (175°C). Place the slices on a baking sheet covered with foil to prevent drying out. Heat for about 10-15 minutes or until warmed through.

    Ingredient Substitutions

    • Ground Chicken: You can substitute with lean ground turkey for a similar nutritional profile.
    • Panko Breadcrumbs: Gluten-free breadcrumbs work well for those with gluten sensitivities.
    • Cottage Cheese: Greek yogurt can be used as an alternative to maintain moisture and protein content.

    Nutrition Facts

    • Calories: 232 kcal per slice
    • Protein: 20g per slice
    • Fat: 8g per slice
    • Carbohydrates: 16g per slice
    • Serving Size: 1 slice (1/8 of loaf)

    Frequently Asked Questions

    • Can I freeze the meatloaf? Yes, once cooled, wrap it tightly in plastic wrap and foil, then freeze for up to 3 months.
    • What can I serve with this meatloaf? Pair it with steamed vegetables or a fresh salad for a balanced meal.
    • Is this meatloaf suitable for meal prep? Absolutely! It keeps well in the fridge and is easy to reheat.
    • Can I make this meatloaf spicier? Add a pinch of cayenne pepper or some chopped jalapeños to the mix.

  • LATE NIGHT FUEL: Homemade Egg Rolls That Outshine Takeout (and Cost Just Pennies!)

    LATE NIGHT FUEL: Homemade Egg Rolls That Outshine Takeout (and Cost Just Pennies!)

    Introduction & My Personal Story

    There was a time, during my culinary school days, when late-night cravings would often strike amidst marathon study sessions. The cafeteria was closed, and my options were limited, but my hunger was fierce. It was during these late hours that I stumbled upon the perfect solution: **Homemade Egg Rolls**. They were not only a delicious treat but also a cost-effective way to fuel my brain for those long nights. I remember the first time I decided to make them from scratch, outshining any takeout I had ever tried. The crispiness of the baked wrapper, the savory filling of vegetables, and the aroma filling my tiny student kitchen were simply unforgettable. Over time, these egg rolls became my go-to recipe, and I discovered that they were not just a snack but a symbol of those hardworking nights. In my 5 years of experience as a chef, I’ve refined this recipe to perfection, making it a reliable companion for anyone needing a late-night boost.

    Why You’ll Love This Recipe

    • Cost-Effective: These egg rolls cost just pennies compared to takeout.
    • Healthier Option: Baked instead of fried, they offer all the crunch without the guilt.
    • Customizable: Easily adaptable with your favorite ingredients.
    • Easy Preparation: Simple steps make it accessible for any skill level.
    • Perfect for Meal Prep: Make a batch and store for later cravings.

    Detailed Ingredients

    Here’s what you’ll need to make these delicious egg rolls:

    • 1 tablespoon vegetable oil (15 ml)
    • 3 medium green onions, sliced (about 45 grams)
    • 2 small garlic cloves, minced (about 6 grams)
    • 1 inch fresh ginger, peeled and grated (about 10 grams)
    • 4 ounces mushrooms, cleaned and sliced (about 115 grams)
    • 2 medium carrots, peeled and grated (about 100 grams)
    • 1 small head green cabbage, cored and thinly sliced (about 450 grams)
    • ½ tablespoon cornstarch (7 grams)
    • ¼ cup soy sauce (60 ml)
    • 1 teaspoon sesame oil (5 ml)
    • 20 egg roll wrappers
    • Non-stick cooking spray

    When shopping, look for fresh and crisp vegetables. The cabbage should be firm, and the mushrooms clean and free of spots.

    Step-by-Step Instructions

    Here’s how to make these egg rolls, step-by-step:

    Step 1: Prep Your Veggies

    Start by cleaning and cutting all your vegetables. Grate the carrots and ginger, and slice the green onions and mushrooms. This prep work will ensure a smooth cooking process.

    Step 2: Sauté Aromatics

    In a large skillet, heat the vegetable oil over medium heat. Add the sliced green onions, minced garlic, and grated ginger. Sauté for about 1-2 minutes until they’re softened and fragrant. Chef’s Tip: Keep an eye on the garlic to ensure it doesn’t burn, which can turn it bitter.

    Step 3: Add Mushrooms

    Next, add the sliced mushrooms to the skillet. Cook them until they release their moisture and start to brown slightly, about 5 minutes.

    Step 4: Mix in Other Veggies

    Add the grated carrots and sliced cabbage to the skillet. Stir everything together and cook until the cabbage wilts and becomes tender, around 10 minutes.

    Step 5: Prepare the Sauce

    In a small bowl, dissolve the cornstarch in the soy sauce. Pour this mixture over the veggies in the skillet, stirring to create a light glaze. Add the sesame oil and turn off the heat. Taste the mixture and adjust the seasoning if needed.

    Step 6: Fill the Egg Rolls

    Lay an egg roll wrapper on a clean surface. Place about 1/4 cup of the filling slightly off-center. Fold the bottom corner over the filling, then fold the sides in, and roll it up tightly. Use a little water to seal the edges.

    Step 7: Preheat the Oven

    Preheat your oven to 425°F (220°C). Line a baking sheet with aluminum foil and lightly spray it with non-stick cooking spray. Place the egg rolls on the sheet and lightly spray the tops as well.

    Step 8: Bake

    Bake the egg rolls for 20-25 minutes, turning them halfway through, until they’re golden brown and crispy. Let them cool slightly before serving.

    Common Mistakes to Avoid

    Here are some pitfalls to watch out for:

    • Overstuffing: This can cause the rolls to burst while baking. Stick to about 1/4 cup of filling per wrapper.
    • Not sealing properly: Use enough water to ensure the edges are sealed, preventing leaks.
    • Skipping the flip: Flipping the rolls halfway ensures even browning.

    How to Store & Reheat

    To store leftover egg rolls, let them cool completely and place them in an airtight container. They will keep in the refrigerator for up to 3 days. For longer storage, freeze them for up to 2 months.

    To reheat, preheat your oven to 350°F (175°C) and bake the egg rolls for about 10 minutes until heated through and crispy.

    Ingredient Substitutions

    If you’re missing an ingredient or need to adapt the recipe, here are some substitutions:

    • Mushrooms: Substitute with bell peppers or zucchini for a different texture.
    • Green Cabbage: Use napa cabbage or even bok choy.
    • Soy Sauce: Tamari or coconut aminos work as gluten-free alternatives.

    Nutrition Facts

    • Calories: 150 per egg roll
    • Protein: 4 grams
    • Fat: 3 grams
    • Carbs: 25 grams
    • Serving Size: 1 egg roll

    Frequently Asked Questions

    • Can I fry these egg rolls instead of baking?
      Yes, you can fry them in vegetable oil until golden brown for a crispier texture.
    • Can I make these egg rolls ahead of time?
      Absolutely! Assemble them and keep them in the fridge for up to a day before baking.
    • What dipping sauce pairs well with these egg rolls?
      A sweet chili sauce or soy sauce with a splash of lime is delicious.
    • Are these egg rolls vegan?
      Yes, they are vegan as long as you use vegan-friendly egg roll wrappers.
    • Can I add protein to this recipe?
      Certainly! Add cooked shrimp, chicken, or tofu for extra protein.

  • CHEAT DAY: Indulgent High-Protein Buckeyes You Can’t Resist!

    CHEAT DAY: Indulgent High-Protein Buckeyes You Can’t Resist!

    Introduction & My Personal Story

    Every once in a while, we all deserve a little indulgence, and for me, that indulgence comes in the form of High-Protein Buckeyes. Growing up in Ohio, Buckeyes were a staple in our household during the holidays. My mother would always make a batch, and the sweet, nutty aroma would fill the kitchen, drawing everyone in like a magnet. As a kid, I was always fascinated by the process of dipping those peanut butter balls into chocolate, leaving just a small circle of peanut butter visible on top, mimicking the nut of the Buckeye tree.

    Fast forward to now, with my culinary experience, I wanted to reinvent this classic treat. My twist? Amping up the protein content without sacrificing any of that nostalgic flavor. In my 5 years of experience as a chef, I’ve learned that balance is key, especially when it comes to cheat day treats. These High-Protein Buckeyes are not only a nod to my childhood but also a testament to how you can enjoy the flavors you love while still being mindful of your nutritional goals. Join me as we dive into this delightful recipe that’s both a treat for your taste buds and a boost for your protein intake.

    Why You’ll Love This Recipe

    • High-Protein: Each Buckeye is packed with protein, making it a perfect post-workout snack.
    • No-Bake: Quick and easy to prepare, no oven needed.
    • Guilt-Free Indulgence: Enjoy your cheat day without derailing your diet completely.
    • Simple Ingredients: Uses common pantry staples you likely already have.
    • Customizable: Easy to tweak to suit dietary restrictions or preferences.

    Detailed Ingredients

    • **Medjool Dates**: 200 grams (about 12 dates). Look for plump, moist dates for the best texture.
    • **Oat Flour**: 1 cup (120 grams). Ensure it’s finely ground for a smooth consistency.
    • **Vanilla Protein Powder**: 1/2 cup (about 60 grams). Choose a high-quality brand for best flavor.
    • **Natural Salted Peanut Butter**: 1 cup (240 grams). Creamy texture works best.
    • **Dark Chocolate Chips**: 1 cup (175 grams). Opt for at least 70% cocoa for a rich taste.
    • **Coconut Oil**: 2 tablespoons (30 ml). Helps the chocolate set smoothly.

    Step-by-Step Instructions

    Step 1: Blend the Base

    Start by placing the **Medjool Dates**, **Oat Flour**, **Vanilla Protein Powder**, and **Peanut Butter** into a food processor. Blend until the mixture forms a thick, sticky dough. If it appears too dry, add 1–2 teaspoons of water and blend again. The dough should be pliable and moist, but not overly wet. Chef’s Tip: If your dates are a bit dry, soak them in warm water for 10 minutes before blending.

    Step 2: Form the Balls

    Using a tablespoon, scoop out portions of the mixture and roll them into smooth balls. Place each ball on a parchment-lined baking sheet. Insert a toothpick into the center of each ball to make dipping easier. Freeze the balls for about 10-15 minutes until firm.

    Step 3: Melt the Chocolate

    While the balls are chilling, melt the **Dark Chocolate Chips** with the **Coconut Oil**. You can do this in a microwave in 30-second intervals, stirring in between, or use a double boiler on the stove. The chocolate should be smooth and glossy. Pour it into a narrow cup to make dipping easier.

    Step 4: Dip and Decorate

    Remove the balls from the freezer. Holding the toothpick, dip each ball halfway into the melted chocolate, leaving the top exposed to mimic a Buckeye. Place them back on the parchment-lined sheet, and twist out the toothpick. Use a small knife or your finger to smooth over the hole left by the toothpick.

    Step 5: Chill and Enjoy

    Allow the chocolate to set by placing the sheet in the fridge. Once the chocolate is firm, your High-Protein Buckeyes are ready to enjoy! Chef’s Tip: For an extra touch, sprinkle a pinch of sea salt on top before the chocolate sets.

    Common Mistakes to Avoid

    • Dry Dough: If your dough is too dry, it won’t hold together well. Ensure your dates are fresh and moist, and add a bit of water if needed.
    • Overheating Chocolate: Chocolate can seize if overheated. Melt it gently and stir frequently for a smooth finish.
    • Skipping the Freeze: Don’t skip the freezing step, as it helps the balls hold their shape during dipping.

    How to Store & Reheat

    Store these Buckeyes in an airtight container in the fridge for up to two weeks. For longer storage, you can freeze them for up to three months. To enjoy, simply let them thaw at room temperature for a few minutes, or enjoy them cold for a firmer texture.

    Ingredient Substitutions

    • Medjool Dates: Swap with prunes or figs if desired, though the flavor will slightly change.
    • Oat Flour: Almond flour can be used for a gluten-free option.
    • Peanut Butter: Almond or cashew butter works great for those with peanut allergies.
    • Dark Chocolate Chips: Use milk or white chocolate for a different flavor profile.

    Nutrition Facts

    Serving Size: 1 Buckeye

    • Calories: 150
    • Protein: 5g
    • Fat: 9g
    • Carbs: 15g

    Frequently Asked Questions

    Q: Can I make these Buckeyes vegan?

    A: Absolutely! Use a plant-based protein powder and ensure your chocolate is dairy-free.

    Q: How can I make these gluten-free?

    A: Simply swap the oat flour for a certified gluten-free oat flour or almond flour.

    Q: Can I add other flavors?

    A: Yes, you can add a touch of cinnamon or vanilla extract to the dough for extra flavor.

    Q: What if I don’t have a food processor?

    A: You can mix the ingredients by hand, but ensure the dates are finely chopped for easier blending.

  • 5-MIN FUEL: Love at First Bite White Bean Skillet!

    5-MIN FUEL: Love at First Bite White Bean Skillet!

    Introduction & My Personal Story

    There’s something magical about a dish that can be whipped up in a flash yet tastes like it’s been simmering for hours. My 5-Minute Fuel: Love at First Bite White Bean Skillet is exactly that kind of dish. It takes me back to my college days when time was of the essence, and sustenance needed to be both quick and nourishing. I remember those late nights spent cramming for exams, my mind craving something more than just caffeine. I stumbled upon this recipe almost by accident, combining the ingredients I had on hand in a moment of desperation. Little did I know, it would become a staple in my kitchen.

    In my 5 years of experience as a chef, I’ve learned that the simplest dishes often bring the most joy. This white bean skillet is no exception. Its creamy texture and rich flavors are a testament to the beauty of minimalism in cooking. Whether you’re a busy professional or a parent juggling multiple tasks, this dish provides the perfect balance of ease and satisfaction. It’s a dish that has seen me through countless busy weeks, and I promise it will become a favorite in your household too.

    Why You’ll Love This Recipe

    • Quick and Easy: Ready in under 10 minutes.
    • Nutritious: Packed with protein and fiber from the white beans.
    • Versatile: Can be served with crusty bread, over rice, or even pasta.
    • Flavorful: Rich in herbs and spices, creating a delightful taste.
    • Minimal Cleanup: Only requires one skillet.

    Detailed Ingredients

    • 2 tablespoons sun-dried tomato oil (or olive oil)
    • 1 medium onion, diced (about 150 grams)
    • 3 cloves garlic, minced
    • 1/2 teaspoon red pepper flakes
    • 2 cans (15 oz each) white beans, with liquid
    • 1 cup vegetable broth
    • 1/2 cup sun-dried tomatoes, chopped
    • 1 teaspoon salt
    • 1 teaspoon Italian seasoning
    • 1 cup thawed spinach, squeezed dry
    • 1/2 cup heavy cream
    • 1/4 cup grated Parmesan cheese
    • Fresh basil for garnish

    Step-by-Step Instructions

    Step 1: Gather Ingredients – Before you start cooking, make sure all your ingredients are prepped and ready to go. This will make the cooking process smoother and faster. Chef’s Tip: Use the oil from the jar of sun-dried tomatoes for extra flavor.

    Step 2: Heat Oil – In a large skillet, heat the sun-dried tomato oil over medium heat. You’ll want the oil to shimmer but not smoke, indicating it’s the perfect temperature to start sautéing.

    Step 3: Sauté Aromatics – Add the diced onion, minced garlic, and red pepper flakes to the skillet. Cook for 2-3 minutes until the onions are translucent and the garlic is fragrant. Stir occasionally to prevent burning.

    Step 4: Combine Ingredients – Stir in the white beans (including their liquid), vegetable broth, chopped sun-dried tomatoes, salt, and Italian seasoning. Increase the heat slightly and bring to a gentle boil.

    Step 5: Simmer – Reduce the heat to low and let the mixture simmer for about 15 minutes. This allows the flavors to meld together beautifully. You’ll notice the liquid reducing and thickening slightly.

    Step 6: Add Creaminess – Stir in the thawed spinach, heavy cream, and Parmesan cheese. Allow the mixture to simmer for an additional 5 minutes until it’s creamy and the spinach is fully incorporated.

    Step 7: Serve Up – Spoon the white bean skillet into bowls and garnish with fresh basil. Serve warm with crusty bread or over rice. Enjoy the comforting, rich flavors!

    Common Mistakes to Avoid

    • Skipping the Sauté: The sauté step builds the flavor base. Don’t rush it.
    • Overcooking the Beans: They should be tender but not mushy. Keep an eye on the simmer time.
    • Using Stale Spices: Ensure your spices are fresh for maximum flavor.
    • Forgetting to Adjust Seasoning: Taste before serving and adjust salt and pepper as needed.

    How to Store & Reheat

    To store, transfer the leftovers to an airtight container and refrigerate for up to 3 days. For longer storage, place in a freezer-safe container and freeze for up to 2 months.

    To reheat, simply warm on the stove over medium heat until heated through. If the mixture is too thick, add a splash of broth or water. For frozen portions, thaw in the refrigerator overnight before reheating.

    Ingredient Substitutions

    • Beans: You can swap white beans for chickpeas or cannellini beans.
    • Heavy Cream: Substitute with coconut milk for a dairy-free option.
    • Spinach: Kale or swiss chard can be used if preferred.
    • Parmesan Cheese: Nutritional yeast can be used for a vegan option.

    Nutrition Facts

    • Calories: 313 kcal per serving
    • Protein: 12g
    • Fat: 16g
    • Carbs: 32g
    • Serving Size: 1 cup

    Frequently Asked Questions

    • Can I use fresh tomatoes instead of sun-dried? Yes, but you may need to add a bit more salt to compensate for the reduced intensity of flavor.
    • Is this dish suitable for meal prep? Absolutely! It’s perfect for preparing in advance and reheats well.
    • What can I serve this dish with? It’s great with crusty bread, over rice, or tossed with pasta.
    • Can I make this dish vegan? Yes, simply substitute the heavy cream with coconut milk and the Parmesan with nutritional yeast.

  • Focus Win: Conquer Mindless Snacking!

    Focus Win: Conquer Mindless Snacking!

    Introduction & My Personal Story

    Growing up, my relationship with snacking was akin to a rollercoaster ride—filled with ups, downs, and unexpected turns. As a child, I was the kid with crumbs on his shirt, always reaching for the next snack without a second thought. Fast forward to my 20s, and I began to notice how these mindless munching habits affected my focus and energy levels. It wasn’t until I embarked on my culinary journey, over 5 years ago, that I truly understood the impact of mindful eating. In the hustle and bustle of a professional kitchen, maintaining energy and mental clarity is non-negotiable. I’ve learned that strategic snacking isn’t about deprivation; it’s about making choices that fuel your brain and body, rather than bogging them down. This realization led me to develop a game plan for conquering mindless snacking, a plan I’m thrilled to share with you today. Let’s transform your snack time into a focused, performance-enhancing ritual.

    Why You’ll Love This Recipe

    • Boosts focus and mental clarity with **Omega-3 rich** snacks.
    • Easy to integrate into daily routines.
    • Helps maintain energy levels throughout the day.
    • Promotes mindful eating habits.
    • Customizable to suit dietary needs and preferences.

    Detailed Ingredients

    For this snacking strategy, you’ll need a variety of ingredients to keep your snacks balanced and nutritious:

    • **Walnuts** – 50g (rich in Omega-3 fatty acids)
    • **Almonds** – 50g (high in protein and healthy fats)
    • **Greek Yogurt** – 1 cup (245g, packed with protein)
    • **Berries** – 1 cup (150g, for natural sweetness and antioxidants)
    • **Chia Seeds** – 2 tablespoons (30g, for fiber and Omega-3s)
    • **Dark Chocolate** – 30g (at least 70% cocoa, for a mood boost)
    • **Hummus** – ½ cup (120g, for protein and fiber)
    • **Carrot Sticks** – 1 cup (120g, crunchy and satisfying)

    When selecting these ingredients, opt for unsalted nuts and plain Greek yogurt to keep added sugars and sodium low. Fresh, organic berries are ideal for maximum flavor and nutrients.

    Step-by-Step Instructions

    Let’s dive into how you can conquer mindless snacking with these steps:

    Step 1: Plan Your Snacks

    Begin by planning out your snacks for the week. Consider times you typically feel hungry and prepare portions in advance. For example, mix **walnuts** and **almonds** together in small containers for a quick grab-and-go option. Chef’s Tip: Use a kitchen scale to ensure portions are consistent, which helps in managing calorie intake.

    Step 2: Create a Snacking Ritual

    Allocate specific times for snacks and treat them like mini meals. Pour your **Greek yogurt** into a bowl, top with **berries** and **chia seeds**, and savor each bite. This practice not only enhances enjoyment but helps you recognize fullness signals. In my 5 years of experience, I’ve found that removing distractions, like phones or TVs, is key to mindful eating.

    Step 3: Smart Snack Choices

    Pair **hummus** with **carrot sticks** for a crunchy, satisfying snack. The fiber from carrots and protein from hummus work together to keep you full longer. Chef’s Tip: Try adding a sprinkle of smoked paprika to your hummus for an extra burst of flavor.

    Step 4: Control Your Environment

    Store **dark chocolate** in a drawer rather than on the counter to avoid temptation. When you do indulge, allow yourself a small piece and savor it slowly. This prevents overeating and satisfies cravings effectively.

    Step 5: Address Triggers

    Identify times when you’re drawn to snack out of boredom or stress. Replace this habit with a walk or a few minutes of deep breathing exercises. Over time, these healthier responses will become second nature.

    Common Mistakes to Avoid

    Avoid these pitfalls to ensure your snacking strategy is successful:

    • Skipping Meals: This often leads to excessive hunger and poor snack choices. Stick to regular meal times.
    • Mindless Eating: Eating directly from the bag or container can lead to overconsumption. Always portion snacks beforehand.
    • Ignoring Thirst: Dehydration is often mistaken for hunger. Keep a water bottle handy and stay hydrated.
    • Choosing Sugary Snacks: High sugar snacks cause energy crashes. Opt for whole foods and natural sugars.

    How to Store & Reheat

    Proper storage is crucial for maintaining the freshness of your snacks:

    • Store **nuts** in an airtight container in a cool, dry place for up to 3 months.
    • Keep **Greek yogurt** and **berries** refrigerated and consume within a week.
    • **Hummus** should be stored in the refrigerator and used within 5 days.
    • **Dark chocolate** can be stored at room temperature, away from direct sunlight, for several months.

    Ingredient Substitutions

    Here’s how you can swap ingredients while maintaining nutritional balance:

    • **Walnuts** can be substituted with **flaxseeds** for a similar Omega-3 boost.
    • **Almonds** can be replaced with **sunflower seeds** if you need a nut-free option.
    • **Greek yogurt** can be swapped with **cottage cheese** for a similar protein content.
    • **Berries** can be replaced with **sliced apples** or **pears** for a different flavor profile.

    Nutrition Facts

    • Calories: 200 kcal per serving
    • Protein: 8g
    • Fat: 15g
    • Carbs: 12g
    • Serving Size: 1 snack portion

    Frequently Asked Questions

    • Q: Can I prepare snacks in advance?
      A: Absolutely! Preparing snacks ahead of time can help you avoid reaching for unhealthy options.
    • Q: What if I have nut allergies?
      A: Substitute nuts with seeds like pumpkin or sunflower seeds to maintain nutritional benefits.
    • Q: How do I handle cravings?
      A: Drink a glass of water first, wait 10 minutes, and then decide if you’re truly hungry.
    • Q: Are these snacks suitable for kids?
      A: Yes, these snacks are nutritious and can be adjusted to suit a child’s taste preferences.

  • ZERO PREP: Instant Herby Green Goddess Dressing (Way Better Than Store-Bought!)

    ZERO PREP: Instant Herby Green Goddess Dressing (Way Better Than Store-Bought!)

    Introduction & My Personal Story

    There’s something magical about a dressing that can come together in minutes and transform a simple salad into a gourmet meal. My love affair with the Green Goddess Dressing began years ago in a bustling San Francisco café. I was on a culinary tour, determined to try every local specialty. When I first tasted their version of this dressing, it was a revelation. The bright, fresh flavors of herbs paired with the creamy base were nothing short of extraordinary. I spent the next few years perfecting my own version, striving to capture that same essence without the fuss. In my 5 years of experience as a chef, I’ve learned that the best recipes are often the simplest. This Instant Herby Green Goddess Dressing is my go-to for quick, flavorful meals. It’s not just about the taste—it’s about the ease and the joy of creating something wonderful in a flash. Whether you’re a busy professional or a culinary enthusiast, this dressing is a game-changer.

    Why You’ll Love This Recipe

    • Quick and easy: Ready in under 5 minutes.
    • No cooking required: Perfect for hot days or when you’re short on time.
    • Versatile: Use it as a dip, dressing, or spread.
    • Fresh and flavorful: Packed with herbs and vibrant ingredients.
    • Healthier than store-bought: No preservatives, just pure goodness.

    Detailed Ingredients

    • 3 green onions, chopped
    • ½ cup fresh cilantro, roughly chopped
    • ½ cup fresh parsley, roughly chopped
    • 1 teaspoon dried dill
    • 1 cup fresh spinach, washed
    • ¼ cup fresh lemon juice
    • 2 large garlic cloves, peeled
    • 1 teaspoon salt
    • ½ teaspoon black pepper
    • ½ cup mayonnaise
    • ½ tablespoon honey
    • ⅓ cup olive oil

    Chef’s Tip: When selecting your herbs, look for vibrant green leaves without wilted edges. Freshness is key to a flavorful dressing.

    Step-by-Step Instructions

    1. Gather Your Ingredients: Make sure all ingredients are prepped and ready. This means your herbs are washed and roughly chopped, your garlic is peeled, and your spices are measured out. This step is crucial for a seamless process.

    2. Add to Processor: Place the green onions, cilantro, parsley, dill, spinach, lemon juice, garlic, salt, and pepper into a food processor. Pulse several times until the mixture is finely chopped. You may need to scrape down the sides to ensure even chopping.

    3. Mix in Mayo & Honey: Add the mayonnaise and honey to the chopped mixture. Process until the ingredients are well blended and the mixture is smooth. This should take about 30 seconds.

    4. Stream Oil: With the processor running on low, slowly stream in the olive oil. This will emulsify the dressing, giving it a creamy texture. It’s important to add the oil slowly to achieve the right consistency.

    5. Serve or Store: Your Green Goddess Dressing is ready to enjoy immediately. If not using right away, transfer it to an airtight container and store it in the refrigerator for up to a week.

    Common Mistakes to Avoid

    Too Much Garlic: While garlic adds a great flavor, too much can overpower the dressing. Stick to the recommended amount for balance.

    Not Chopping Herbs: Coarsely chopped herbs won’t blend well. Ensure they’re finely chopped for a smooth dressing.

    Adding Oil Too Quickly: Pouring the oil too fast can prevent proper emulsification. Slow and steady wins the race.

    How to Store & Reheat

    Store your dressing in an airtight container in the refrigerator. It will keep fresh for up to 7 days. If the dressing separates, give it a good shake or stir before using. Since it’s a cold dressing, there’s no need to reheat, just bring it to room temperature for about 10 minutes before serving to enhance the flavors.

    Ingredient Substitutions

    If you need to make substitutions, here are some safe swaps:

    • Mayonnaise: Swap with Greek yogurt for a lighter version.
    • Cilantro: If you’re not a fan, use more parsley or add basil.
    • Honey: Substitute with agave syrup or maple syrup for a different sweetness.
    • Olive Oil: Can be replaced with avocado oil for a different flavor profile.

    Nutrition Facts

    • Calories: 80 per tablespoon
    • Protein: 0.5g
    • Fat: 8g
    • Carbs: 1.5g
    • Serving Size: 1 tablespoon

    Frequently Asked Questions

    Q: Can I freeze this dressing?

    A: Freezing isn’t recommended as it can alter the texture and flavor. It’s best enjoyed fresh.

    Q: What dishes go well with Green Goddess Dressing?

    A: It’s versatile! Use it on salads, as a dip for veggies, or as a spread for sandwiches.

    Q: How can I make this vegan?

    A: Simply swap the mayonnaise with vegan mayo and use agave syrup instead of honey.

    Q: Is there a way to make it spicier?

    A: Add a pinch of cayenne pepper or a chopped jalapeño for a kick.

  • GAINS: Transform Leftover Chicken into Muscle Meals!

    GAINS: Transform Leftover Chicken into Muscle Meals!

    Introduction & My Personal Story

    When I think about leftover chicken, I’m instantly transported back to my early days as a young chef, bustling in the kitchen of a local fitness club. It was a time when every dish had to not only taste fantastic but also pack a punch of nutrition. Back then, I was tasked with creating meals that could fuel the bodybuilders and athletes who frequented the gym. One of my most cherished memories is the day I transformed a humble leftover rotisserie chicken into a powerhouse meal that had everyone asking for seconds.

    In my 5 years of experience, I’ve learned that leftover chicken is nothing short of a culinary gift. It’s versatile, packed with protein, and the perfect base for transforming mundane meals into muscle-building masterpieces. I remember one particular afternoon when we had a surplus of roasted chicken. With a little creativity and a lot of love, I whipped up a high-protein chicken stew that not only satisfied hungry athletes but also became a staple in our menu lineup. It was a moment that solidified my belief in the power of leftover chicken and its ability to fuel our bodies efficiently.

    Now, I want to share with you how you can turn your leftover chicken into meals that are not only delicious but also perfect for anyone looking to build muscle and maintain a healthy lifestyle. Whether you’re a seasoned athlete or just starting your fitness journey, these recipes will help you make the most out of what you already have in your fridge.

    Why You’ll Love This Recipe

    • High in Protein: Perfect for muscle growth and recovery.
    • Cost-Effective: Utilizes leftovers, saving money and reducing waste.
    • Quick and Easy: Minimal prep time for maximum nutrition.
    • Versatile: Can be adapted for soups, salads, casseroles, and more.
    • Delicious and Nutritious: Packed with flavor and essential nutrients.

    Detailed Ingredients

    Here’s what you’ll need to transform your leftover chicken into a meal that supports your fitness goals:

    • Cooked Chicken: About 2-3 cups of shredded or chopped chicken. Look for juicy pieces with a bit of crispy skin if you enjoy extra texture.
    • Chicken Broth: 2 cups, preferably low-sodium to control your salt intake.
    • Mixed Vegetables: 1 cup of your choice (e.g., bell peppers, carrots, broccoli). Fresh or frozen works well.
    • Whole Grains: 1 cup of cooked rice or quinoa for casseroles.
    • Leafy Greens: 2 cups for salads, such as spinach or kale.
    • Spices and Herbs: Salt, pepper, garlic powder, and your favorite herbs like thyme or basil.
    • Olive Oil: 2 tablespoons for sautéing and adding healthy fats.
    • Salsa or Tomato Sauce: 1 cup for those Mexican-inspired dishes.

    Step-by-Step Instructions

    The key to a successful leftover chicken dish is in the details. Follow these steps to create a meal that’s both satisfying and nutritious:

    Step 1: Prep the Chicken

    Begin by shredding or chopping your leftover chicken into bite-sized pieces. If it’s a bit dry, don’t worry – the cooking process will rehydrate it. Chef’s Tip: Keep a bit of the skin if you enjoy a richer flavor and texture.

    Step 2: Decide Your Dish

    Depending on your mood and ingredients on hand, choose your culinary path:

    • For Soups: In a pot, combine chicken, chicken broth, and mixed vegetables. Bring to a boil, then simmer for about 20 minutes. Season with salt, pepper, and herbs.
    • For Salads: Toss chicken with leafy greens, a handful of nuts, and a protein-rich dressing. Add a squeeze of lemon for freshness.
    • For Skillets: Sauté chicken with vegetables in olive oil over medium heat. Add spices to taste and serve hot.
    • For Casseroles: Layer chicken with cooked grains, vegetables, and sauce. Bake in a preheated oven at 180°C (350°F) for 25 minutes.
    • For Tacos or Quesadillas: Mix chicken with salsa and wrap in tortillas. Grill until the tortillas are slightly crispy.

    Step 3: Enhance the Flavor

    Use your favorite spices and herbs to bring out the best in your chicken. Garlic powder, thyme, and a dash of chili can elevate the taste significantly. Chef’s Tip: Don’t be afraid to experiment with different seasonings to keep your meals exciting.

    Step 4: Serve and Enjoy

    Portion out your creation and enjoy your meal. Whether it’s a comforting soup or a hearty casserole, you’ve got a high-protein dish that’s perfect for post-workout recovery.

    Common Mistakes to Avoid

    • Overcooking the Chicken: Leftover chicken can dry out quickly. Keep cooking times to a minimum.
    • Skipping the Seasoning: Always taste and adjust seasoning to enhance flavor.
    • Using Too Much Salt: Be mindful of salt, especially if using pre-seasoned chicken or broth.
    • Ignoring Texture: Balance textures by combining crispy, soft, and crunchy ingredients.

    How to Store & Reheat

    Proper storage is essential to maintain the quality of your leftover chicken dishes:

    • Refrigeration: Store in an airtight container for up to 3 days.
    • Freezing: Freeze portions in freezer-safe bags for up to 3 months. Thaw in the refrigerator overnight before reheating.
    • Reheating: Reheat in a pan over medium heat or in the microwave, adding a splash of broth or water to maintain moisture.

    Ingredient Substitutions

    If you need to make swaps, here are some safe substitutions:

    • Chicken: Use turkey or tofu for a vegetarian option.
    • Broth: Vegetable broth works as a great alternative.
    • Grains: Substitute with couscous or barley.
    • Leafy Greens: Arugula or romaine lettuce can replace spinach or kale.

    Nutrition Facts

    • Calories: Approximately 350 kcal per serving
    • Protein: 35g
    • Fat: 15g
    • Carbohydrates: 25g
    • Serving Size: 1 bowl or plate

    Frequently Asked Questions

    Q: Can I use raw chicken instead of leftover chicken?

    A: Absolutely, just make sure to cook it thoroughly before adding it to your dish.

    Q: What’s the best way to keep the chicken moist?

    A: Use a bit of broth or sauce when reheating to add moisture back into the chicken.

    Q: Can I add more vegetables?

    A: Yes, feel free to add as many vegetables as you like to boost the nutritional value.

    Q: Is it okay to use canned vegetables?

    A: Yes, but be sure to rinse them to reduce sodium content.

  • LATE NIGHT FUEL: Sip Your Way to Cozy with This Comforting Homemade Golden Milk ✨

    LATE NIGHT FUEL: Sip Your Way to Cozy with This Comforting Homemade Golden Milk ✨

    Introduction & My Personal Story

    Picture this: It’s a chilly night, and the moonlight is spilling through the windows. After a long day, I find myself craving something comforting yet nourishing. That’s when I remember the first time I discovered the magic of Golden Milk. About five years ago, during a culinary trip to India, I was introduced to this warm, golden elixir. It was a late night in Jaipur, the air was filled with the scent of spices, and I was exhausted after a day of exploring. A local chef offered me a cup of golden milk, and with the first sip, I was enveloped in warmth and comfort. The blend of turmeric, cinnamon, and ginger was unlike anything I had tasted before, and I knew I had stumbled upon something special.

    Fast forward to today, as a chef with five years of experience, I’ve perfected this recipe to suit late-night hustlers like you and me. It’s not just a drink; it’s an experience—a hug in a mug that recharges the spirit and fuels the night’s endeavors. Whether you’re burning the midnight oil on a project or simply winding down after a long day, this homemade Golden Milk is your go-to beverage for those cozy, late-night moments.

    Why You’ll Love This Recipe

    • Rich in antioxidants from **turmeric** and **cinnamon**.
    • Helps promote relaxation and better sleep.
    • Easy to make with ingredients you likely have at home.
    • Customizable to suit your taste preferences and dietary needs.
    • Offers a caffeine-free energy boost for late-night productivity.

    Detailed Ingredients

    • 1½ teaspoons turmeric – Look for organic turmeric for the best flavor and health benefits.
    • 1 teaspoon vanilla extract – Pure vanilla extract enhances the flavor profile.
    • ½ teaspoon cinnamon – Ground cinnamon adds warmth and sweetness.
    • ¼ teaspoon cardamom – Freshly ground cardamom is preferred for its aromatic qualities.
    • ¼ teaspoon black pepper – Essential for activating the curcumin in turmeric.
    • 1 can coconut milk (400ml) – Full-fat coconut milk gives a creamy texture.
    • 2 cups milk (almond, coconut, or whole) – Choose your preferred milk for the base.
    • Honey – Add to taste for sweetness.
    • Fresh ginger – A thumb-sized piece, grated for a spicy kick.

    Step-by-Step Instructions

    Step 1: Gather Ingredients
    Before starting, ensure you have all the ingredients ready. This will make the process smoother and more enjoyable. Measure out **turmeric**, **vanilla extract**, **cinnamon**, **cardamom**, and **black pepper**. Open your can of **coconut milk** and have your chosen **milk** ready. Grate the **fresh ginger** and have **honey** on standby for later.

    Step 2: Combine in a Pot
    In a medium-sized saucepan, combine the **turmeric**, **vanilla extract**, **cinnamon**, **cardamom**, **black pepper**, **coconut milk**, and your chosen **milk**. Set the heat to low. Chef’s Tip: Keep the heat low to gently infuse the spices without boiling, which can alter the flavors. Simmer for about 5 minutes, whisking occasionally to ensure everything is well mixed.

    Step 3: Add Ginger
    Add the grated **fresh ginger** to the pot. Whisk the mixture to incorporate the ginger thoroughly. You should start to smell the fragrant spices coming together, a sign that the flavors are melding beautifully.

    Step 4: Strain Mixture
    After simmering, strain the mixture into a bowl using a fine mesh sieve to remove the ginger fibers and any undissolved spices. This step ensures a smooth and creamy texture for your golden milk.

    Step 5: Return to Pot
    Pour the strained mixture back into the pot. Heat gently and add **honey** to taste. Whisk until the honey is completely dissolved. Chef’s Tip: Taste as you go to balance the sweetness according to your preference.

    Step 6: Serve Hot
    Pour the Golden Milk into your favorite mug and enjoy it hot. It’s the perfect companion for late-night reading or a quiet moment of reflection.

    Common Mistakes to Avoid

    • Boiling the Milk: Keep the heat low to prevent the milk from boiling, which can cause the spices to become bitter.
    • Skipping the Strain: Always strain the mixture to remove any gritty texture from undissolved spices.
    • Not Adjusting Sweetness: Honey is to taste, so don’t skip tasting to ensure it’s just right for you.

    How to Store & Reheat

    Store any leftover Golden Milk in an airtight container in the refrigerator for up to 3 days. To reheat, pour the desired amount into a saucepan and warm over low heat, stirring occasionally. Avoid microwaving as it can alter the texture and flavor.

    Ingredient Substitutions

    • Milk Alternatives: Use any plant-based milk like oat or soy if you prefer to keep it vegan.
    • Sweeteners: Replace honey with maple syrup or agave nectar for a vegan option.
    • Spice Variations: Add a pinch of nutmeg or cloves for a different spice profile.

    Nutrition Facts

    • Calories: 210 per serving
    • Protein: 2g
    • Fat: 12g
    • Carbs: 23g
    • Serving Size: 1 cup

    Frequently Asked Questions

    Q: Can I make Golden Milk in advance?
    A: Absolutely! Make a batch and store it in the fridge for up to 3 days. Reheat gently on the stove before serving.

    Q: Is Golden Milk suitable for kids?
    A: Yes, but adjust the spices according to their taste preference and consult with a pediatrician if necessary.

    Q: Can I use ground ginger instead of fresh?
    A: You can, but fresh ginger offers a more vibrant flavor. If using ground, start with ¼ teaspoon and adjust to taste.

    Q: What are the benefits of drinking Golden Milk?
    A: It’s known for its anti-inflammatory properties, aids digestion, and can help with relaxation and sleep.

  • CHEAT DAY: Irresistible Cranberry Orange Protein Delights

    CHEAT DAY: Irresistible Cranberry Orange Protein Delights

    Introduction & My Personal Story

    Let me take you back to a crisp autumn afternoon when I first stumbled upon the magical combination of cranberries and oranges. I was visiting a local farmer’s market, enjoying the vibrant array of fresh produce when I was struck by a wave of nostalgia. The sweet-tart scent of cranberries mingling with the citrusy aroma of fresh oranges immediately transported me back to my grandmother’s kitchen. She used to make a delightful cranberry-orange bread that would fill the house with warmth and joy. Those memories inspired me to create a modern twist on her classic recipe, but with a healthy, protein-packed spin. Enter the Cranberry Orange Protein Delights – a no-bake treat that satisfies both your sweet tooth and your nutritional needs. In my 5 years of experience as a chef, I’ve found that these little delights are perfect for a cheat day, a quick snack, or even a post-workout boost. They’re easy to make, require no baking, and are infused with the nostalgic flavors of cranberries and oranges. So, join me in this culinary journey and let’s create some delicious memories together.

    Why You’ll Love This Recipe

    • Quick and Easy: No baking required, ready in under 30 minutes.
    • Nutritious and Delicious: Packed with protein and healthy fats.
    • Customizable: Easily swap ingredients to suit dietary preferences.
    • Perfect for On-The-Go: A convenient snack for busy days.
    • Great for Meal Prep: Make a batch and enjoy throughout the week.

    Detailed Ingredients

    To make these Irresistible Cranberry Orange Protein Delights, gather the following ingredients:

    • 1 cup (90g) rolled oats
    • 1/2 cup (60g) vanilla protein powder
    • 1/2 cup (125g) cashew butter
    • 1/4 cup (60ml) maple syrup
    • Zest of 1 large orange
    • 1 teaspoon vanilla extract
    • 1/2 teaspoon ground ginger
    • 1/4 teaspoon sea salt
    • 1/3 cup (50g) chopped dried cranberries
    • 1/3 cup (60g) white chocolate chips
    • Optional: Splash of almond milk, if needed

    When shopping, look for fresh, plump cranberries and a bright, fragrant orange for the best zest. Quality cashew butter and vanilla protein powder will elevate the flavor and texture of these delights.

    Step-by-Step Instructions

    Step 1: Mix the Base
    In a large mixing bowl, combine the rolled oats, vanilla protein powder, cashew butter, maple syrup, orange zest, vanilla extract, ground ginger, and sea salt. Use a spatula or your hands to mix until the ingredients form a dough. It might feel thick at first, but keep mixing until everything is well integrated.

    Step 2: Add Festive Elements
    Fold in the chopped dried cranberries and white chocolate chips to the dough. Ensure they are evenly distributed for a consistent burst of flavor in each bite.

    Step 3: Adjust Consistency
    If the mixture seems too dry, add a splash of almond milk and mix again. The dough should be moist enough to hold together when pressed but not sticky.

    Step 4: Shape the Balls
    Using a cookie scoop, portion out the dough and roll each piece into a ball with your hands. Aim for uniform sizes to ensure even chilling.

    Step 5: Chill and Enjoy
    Place the rolled balls on a tray lined with parchment paper. Chill them in the refrigerator for 15-20 minutes to set. Once chilled, enjoy these protein delights as a quick snack or a guilt-free dessert.

    Common Mistakes to Avoid

    One common mistake is not mixing the dough thoroughly, which can result in uneven flavors. Make sure to mix until all ingredients are well incorporated. Another issue could be dryness in the mixture; if this happens, don’t hesitate to add a bit more almond milk to reach the desired consistency. Lastly, avoid using low-quality protein powder as it can affect both the taste and texture of the protein balls.

    How to Store & Reheat

    Store these protein balls in an airtight container in the refrigerator for up to 1 week. If you want to keep them longer, freeze them for up to 3 months. To enjoy, simply remove from the fridge and let them sit at room temperature for a few minutes, or if frozen, thaw in the fridge overnight.

    Ingredient Substitutions

    If you’re looking to change things up, here are some substitutions:

    • Swap cashew butter with almond butter or peanut butter for a different nutty flavor.
    • Use honey or agave syrup instead of maple syrup for a different sweetness profile.
    • Try dark chocolate chips in place of white chocolate chips for a richer taste.
    • For a gluten-free version, ensure your rolled oats are certified gluten-free.

    Nutrition Facts

    Here’s the nutritional breakdown for one serving (1 ball):

    • Calories: 120
    • Protein: 5g
    • Fat: 6g
    • Carbohydrates: 14g
    • Serving Size: 1 ball

    Frequently Asked Questions

    Q: Can I use a different type of protein powder?
    A: Yes, feel free to use your favorite protein powder, whether it’s whey, pea, or hemp. Just keep in mind that the flavor and texture might vary slightly.

    Q: Are these protein balls suitable for vegans?
    A: Absolutely! Just ensure your protein powder and chocolate chips are vegan-friendly.

    Q: How can I make these balls nut-free?
    A: Substitute the cashew butter with sunflower seed butter or tahini for a nut-free option.

    Q: Can I add other ingredients to the mix?
    A: Of course! Feel free to incorporate chia seeds, flaxseeds, or even a handful of nuts for added texture and nutrition.

  • 5-MIN FUEL: Lentil & Cranberry Power Salad!

    5-MIN FUEL: Lentil & Cranberry Power Salad!

    Introduction & My Personal Story

    There’s something incredibly satisfying about a dish that not only fuels your body but also delights your taste buds. The 5-MINUTE FUEL: Lentil and Cranberry Power Salad is one such recipe that has a special place in my heart. I first stumbled upon this gem of a salad five years ago when I was knee-deep in culinary school. With tight schedules and endless cooking experiments, I needed something quick yet nourishing to keep me going. This salad became my go-to. The earthy lentils paired with the sweet bursts of dried cranberries and crunchy walnuts were just what I needed to power through long days.

    In my 5 years of experience as a chef, I have found that a well-balanced salad can be a game changer. This particular recipe has not only become a staple in my personal diet but also a favorite among my clients and friends. There’s a certain nostalgia that hits me every time I make it, reminding me of those formative days in the kitchen, learning and experimenting. It’s a simple dish, but one that packs a punch in terms of flavor and nutrition, and I’m thrilled to share it with you today.

    Why You’ll Love This Recipe

    • Quick & Easy: Ready in just 5 minutes if you have pre-cooked lentils.
    • Nutritious: Packed with protein, fiber, and essential nutrients.
    • Flavorful: A delicious combination of earthy, sweet, and tangy flavors.
    • Versatile: Perfect as a main dish or a side.
    • Meal Prep Friendly: Keeps well in the fridge for quick meals throughout the week.

    Detailed Ingredients

    To make the Lentil and Cranberry Power Salad, you’ll need the following ingredients:

    • Lentils: 1 cup of dried lentils (about 200 grams). Look for lentils that are firm and free of debris.
    • Spinach: 2 cups of fresh spinach (around 60 grams), washed and dried.
    • Dried Cranberries: 1/2 cup (about 60 grams), look for unsweetened varieties if you prefer less sugar.
    • Apple: 1 medium-sized apple (about 150 grams), diced. Choose a crisp variety like Granny Smith or Honeycrisp.
    • Feta Cheese: 1/4 cup (about 40 grams), crumbled.
    • Walnuts: 1/4 cup (about 30 grams), roughly chopped.
    • Olive Oil: 3 tablespoons for the vinaigrette.
    • Lemon Juice: 2 tablespoons, freshly squeezed.
    • Apple Cider Vinegar: 1 tablespoon.
    • Dijon Mustard: 1 teaspoon.
    • Sugar: 1 teaspoon.
    • Garlic Powder: 1/2 teaspoon.
    • Salt & Pepper: To taste.

    Step-by-Step Instructions

    Here’s how you can whip up this delightful salad:

    Step 1: Cook the Lentils

    Begin by rinsing 1 cup of dried lentils under cold water to remove any dirt or debris. In a medium-sized pot, bring 3 cups of water to a boil. Add the lentils, cover, and reduce the heat to simmer. Let them cook for about 20 minutes or until tender. Chef’s Tip: Lentils should be cooked but not mushy, with a slight bite to them.

    Step 2: Prepare the Vinaigrette

    While the lentils are cooking, prepare the vinaigrette. In a small bowl, whisk together 2 tablespoons of lemon juice, 1 tablespoon of apple cider vinegar, 1 teaspoon of Dijon mustard, 1 teaspoon of sugar, 1/2 teaspoon of garlic powder, and a pinch of salt and pepper. Gradually drizzle in 3 tablespoons of olive oil while whisking continuously until the dressing is smooth and emulsified.

    Step 3: Assemble the Salad

    Once the lentils are cooked, drain them and rinse with cold water to stop the cooking process. In a large mixing bowl, combine the lentils with 2 cups of fresh spinach. Add 1/2 cup of dried cranberries, 1 diced apple, 1/4 cup of crumbled feta cheese, and 1/4 cup of chopped walnuts. Pour the vinaigrette over the salad and toss gently to combine all the ingredients.

    Step 4: Serve

    Transfer the salad to a serving platter or individual bowls. Serve immediately or let it chill in the fridge for 30 minutes to allow the flavors to meld. This salad is a great make-ahead option and tastes even better the next day!

    Common Mistakes to Avoid

    • Overcooking Lentils: Keep an eye on the lentils as they cook. Overcooked lentils can become mushy and lose their texture.
    • Not Rinsing Lentils: Rinsing lentils after cooking helps to cool them quickly and prevents further cooking.
    • Skipping the Vinaigrette Emulsification: Gradually adding the olive oil while whisking is crucial for a smooth dressing.

    How to Store & Reheat

    Store any leftover salad in an airtight container in the refrigerator for up to 3 days. The flavors will continue to develop, making it even more delicious over time. If you plan to store it for longer, keep the dressing separate and add it just before serving. This will prevent the salad from becoming soggy.

    Ingredient Substitutions

    • Lentils: Feel free to use canned lentils if you’re short on time. Just make sure to rinse them well.
    • Spinach: Arugula or mixed greens can be used for a different flavor profile.
    • Dried Cranberries: Swap with raisins or chopped dried apricots for a different sweetness.
    • Feta Cheese: Goat cheese or blue cheese can be used for a stronger flavor.
    • Walnuts: Pecans or almonds can be used for a different crunch.

    Nutrition Facts

    • Calories: 288 kcal
    • Protein: 12g
    • Fat: 13g
    • Carbohydrates: 34g
    • Serving Size: 1 bowl (approximately 250g)

    Frequently Asked Questions

    • Can I make this salad vegan? Yes, simply omit the feta cheese or replace it with a vegan cheese alternative.
    • What type of lentils should I use? Green or brown lentils work best as they hold their shape better than red lentils.
    • Can I add protein to this salad? Absolutely! Grilled chicken or tofu are great additions for extra protein.
    • Is this salad gluten-free? Yes, all the ingredients listed are naturally gluten-free.