Tag: Summer

  • CHEAT DAY: Irresistibly Creamy Frozen Delight for Summer!

    CHEAT DAY: Irresistibly Creamy Frozen Delight for Summer!

    Introduction & My Personal Story

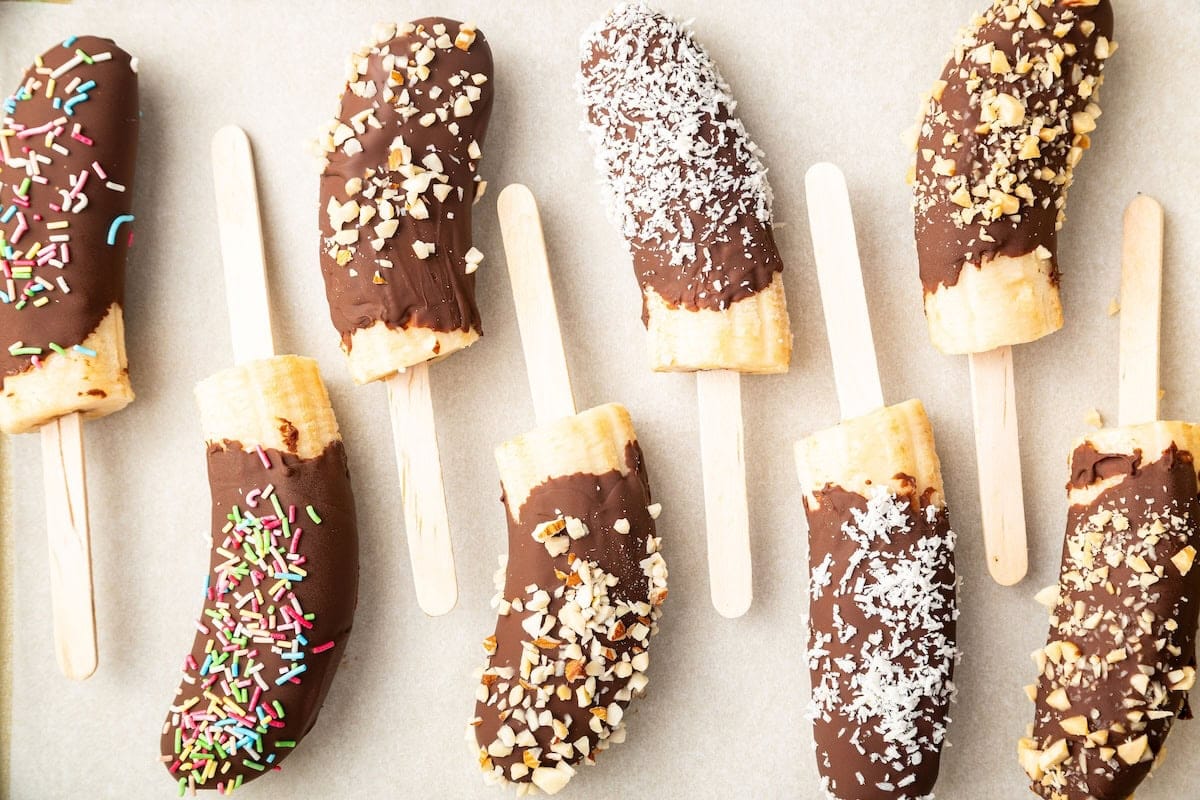
    There’s something magical about the simple pleasure of a frozen treat on a hot summer day. Growing up, my family had a tradition of making frozen desserts during the peak of summer. My favorite was the Chocolate-Covered Bananas. These were no ordinary treats; they were a delightful combination of creamy banana, rich chocolate, and a crunch from various toppings. I remember watching my mom prepare them, her hands expertly dipping each banana half into a glossy pool of melted chocolate. The anticipation of that first bite, the snap of the chocolate giving way to the soft banana underneath, was pure bliss.

    As a chef with over 5 years of experience, I’ve recreated and refined this childhood classic, ensuring it’s as indulgent as it is easy to make. It’s a perfect cheat day treat that feels like a reward without the guilt. Whether you’re lounging by the pool or enjoying a backyard barbecue, these frozen delights are guaranteed to be a hit. Let’s dive into this irresistibly creamy frozen delight and make your summer a little sweeter.

    Why You’ll Love This Recipe

    • Quick and easy to prepare with minimal ingredients.
    • No baking required – perfect for those hot summer days.
    • Customizable with your favorite toppings.
    • A healthy treat that satisfies your sweet tooth.
    • Great for kids and adults alike.

    Detailed Ingredients

    To make these Chocolate-Covered Bananas, you’ll need:

    • 4 medium ripe bananas (approximately 500g), peeled and halved.
    • 200g of dark chocolate chips (choose high-quality for best results).
    • 2 tablespoons of coconut oil (about 30ml) to help the chocolate set smoothly.
    • Optional toppings: crushed nuts, sprinkles, shredded coconut, or sea salt.
    • 8 bamboo skewers or popsicle sticks.

    When selecting bananas, opt for those that are ripe but not overly soft. The skin should be yellow with minimal brown spots, ensuring a sweet yet firm texture.

    Step-by-Step Instructions

    Step 1: Prepare Your Setup

    First, line a small baking sheet with parchment paper. This will prevent the bananas from sticking and make cleanup a breeze.

    Step 2: Prepare the Bananas

    Peel each banana and cut them in half. Insert a bamboo skewer or popsicle stick into the cut end of each banana half. Lay them out on the prepared baking sheet, ensuring they’re not touching each other. Place the tray in the freezer for about 1 hour or until the bananas are completely solid. This step is crucial as it allows the chocolate to set quickly upon dipping.

    Step 3: Melt the Chocolate

    In a microwave-safe bowl, combine the chocolate chips and coconut oil. Microwave on high for 1 minute, then stir. Continue heating in 30-second increments, stirring in between, until the chocolate is fully melted and smooth. Be cautious not to overheat as chocolate can burn easily. Chef’s Tip: If you prefer a stovetop method, melt the chocolate and coconut oil using a double boiler for more controlled heat.

    Step 4: Dip the Bananas

    Remove the bananas from the freezer. Working quickly, dip each frozen banana half into the melted chocolate, turning to coat evenly. Let any excess chocolate drip off. Immediately sprinkle your choice of toppings over the chocolate before it sets. Return each coated banana to the parchment-lined tray.

    Step 5: Set and Serve

    Once all bananas are coated, return the tray to the freezer for at least 15 minutes to allow the chocolate to set completely. Enjoy your Chocolate-Covered Bananas immediately for the best texture, or store them for later indulgence.

    Common Mistakes to Avoid

    Skipping the Freezing Step: Ensure the bananas are fully frozen before dipping. This helps the chocolate set quickly and prevents it from sliding off.

    Overheating Chocolate: Use gentle heat to melt the chocolate. Burnt chocolate is bitter and clumpy.

    Not Using Enough Coconut Oil: The oil helps the chocolate set smoothly. Without it, the chocolate may crack or become too thick.

    How to Store & Reheat

    To store your Chocolate-Covered Bananas, wait until the chocolate is fully set. Transfer them to a freezer-safe container lined with parchment paper. They will stay fresh for up to 3 months. To enjoy, simply take them out of the freezer and let them sit for a few minutes to soften slightly before biting in.

    Ingredient Substitutions

    If you need to make substitutions, here are some safe swaps:

    • Bananas: Try using strawberries or apple slices for a different fruit twist.
    • Dark Chocolate: Milk or white chocolate can be used, but keep in mind they are sweeter.
    • Coconut Oil: Substitute with butter or shortening if necessary, though the flavor and texture may vary slightly.

    Nutrition Facts

    • Calories: 180 per serving
    • Protein: 2g
    • Fat: 10g
    • Carbohydrates: 25g
    • Serving Size: 1 banana half

    Frequently Asked Questions

    Q: Can I use different fruits?

    A: Absolutely! Strawberries, apple slices, or even pineapple chunks work well.

    Q: How long can I keep these in the freezer?

    A: They can be stored for up to 3 months in a freezer-safe container.

    Q: What can I use instead of coconut oil?

    A: You can use butter or shortening, but it may alter the flavor slightly.

    Q: Can I make these vegan?

    A: Use vegan chocolate chips and ensure your toppings are also vegan-friendly.

    Q: Can I add spices to the chocolate?

    A: Yes, a pinch of cinnamon or cayenne pepper can add a delightful twist.

  • NO-BAKE REWARD: Irresistibly Creamy Frozen Delight for Summer!

    NO-BAKE REWARD: Irresistibly Creamy Frozen Delight for Summer!

    Introduction & My Personal Story

    Ah, summer! The season of sun, fun, and frozen treats. One of my fondest memories as a child was spending lazy afternoons at my grandmother’s house, where she would whip up the most delightful, no-bake desserts. Her kitchen was a haven of creativity, and while she had a treasure trove of recipes, there was one that stood out – the frozen s’mores. These weren’t your ordinary s’mores. They were a creamy, chocolatey, and irresistibly cool version that required no fire or fuss. Just layers of crunchy graham crackers, rich chocolate, and a creamy filling that melted in your mouth. Fast forward to today, in my 5 years of experience as a chef, I’ve managed to recreate that magic with a modern twist. My version, the **No-Bake Protein Frozen S’mores**, is not only a nod to those nostalgic days but also a perfect treat for those who crave something sweet yet nutritious. This treat is perfect for a cheat day or just a sunny afternoon indulgence, offering a balance of flavor and protein-packed goodness.

    Why You’ll Love This Recipe

    • **No-Bake**: Perfect for hot days when you don’t want to turn on the oven.
    • **Protein-Packed**: A guilt-free indulgence that supports your fitness goals.
    • **Quick to Make**: Minimal preparation time with maximum reward.
    • **Customizable**: Easily adapt with your favorite flavors and add-ins.
    • **Kid-Friendly**: A fun and easy recipe to make with the little ones.

    Detailed Ingredients

    • **Graham Crackers**: 200g (about 20 crackers). Look for whole grain options for added fiber.
    • **Chocolate Chips**: 150g (about 1 cup). Choose high-quality dark chocolate for a richer taste.
    • **Coco Whip**: 250ml (1 cup), thawed. Opt for the unsweetened version if watching sugar intake.
    • **Vanilla Protein Powder**: 50g (about 1/2 cup). Use a brand with a creamy texture for best results.

    Step-by-Step Instructions

    Step 1: Prepare Your Pan

    Line an 8×8-inch baking dish with parchment paper, ensuring there’s enough overhang on the sides. This will make it easier to lift out the frozen bars later. Chef’s Tip: Secure the parchment with binder clips to keep it in place while assembling.

    Step 2: Layer the Graham Crackers

    Arrange your **graham crackers** in a single layer, upside down, to cover the bottom of the pan completely. Some slight overlapping is fine, but aim for a snug fit.

    Step 3: Melt the Chocolate

    In a microwave-safe bowl, melt the **chocolate chips** in 30-second intervals, stirring in between, until smooth. Alternatively, you can use a double boiler over low heat. Pour the melted chocolate over the graham crackers and spread evenly with a spatula.

    Step 4: Prepare the Filling

    In a medium bowl, combine the thawed **coco whip** and **vanilla protein powder**. Stir until smooth and fully incorporated. Gently spread this mixture over the chocolate layer, ensuring even coverage.

    Step 5: Add the Top Layer

    Place the remaining graham crackers over the filling, pressing down lightly to secure them in place. This will form the top layer of your frozen s’mores.

    Step 6: Freeze

    Freeze the assembled dish for at least 2 hours, or until firm. Chef’s Tip: For the best texture, allow it to freeze overnight.

    Step 7: Serve and Enjoy

    Use the parchment overhang to lift the bars out of the dish. Slice into squares and serve immediately. Store any leftovers in an airtight container in the freezer.

    Common Mistakes to Avoid

    • Skipping the Parchment Paper: This makes removing the bars a hassle. Always line your dish.
    • Overcooking Chocolate: Chocolate can seize if overheated. Use low heat and stir frequently.
    • Uneven Layers: Spread each layer evenly to ensure every bite has a balance of flavors.

    How to Store & Reheat

    Store the frozen s’mores in an airtight container, using parchment paper between layers to prevent sticking. They are best consumed within 2 weeks. If they become too firm, let them sit at room temperature for 2–5 minutes before enjoying.

    Ingredient Substitutions

    • Graham Crackers: Substitute with digestive biscuits for a similar texture.
    • Chocolate Chips: Use white or milk chocolate for a sweeter version.
    • Coco Whip: Replace with regular whipped cream if dairy is not a concern.
    • Vanilla Protein Powder: Choose chocolate or peanut butter flavored protein for a different twist.

    Nutrition Facts

    • Calories: 250 per serving
    • Protein: 8g
    • Fat: 12g
    • Carbs: 30g
    • Serving Size: 1 square (based on 16 servings)

    Frequently Asked Questions

    Q: Can I make these in advance?

    A: Absolutely! These can be made a day ahead and stored in the freezer until you’re ready to serve.

    Q: What if I don’t have protein powder?

    A: You can omit it, though the protein content will be lower. Consider adding a tablespoon of peanut butter for flavor and some protein.

    Q: Can I add nuts or other toppings?

    A: Yes! Chopped nuts, shredded coconut, or sprinkles can be added between layers for extra texture.

    Q: Is there a vegan option?

    A: Use vegan graham crackers, chocolate, and protein powder to make this recipe completely plant-based.