Tag: Salad

  • Brain Fuel: Beet & Arugula Salad

    Brain Fuel: Beet & Arugula Salad

    Introduction & My Personal Story

    There’s something magical about a dish that transports you back to a cherished moment in time. For me, this Beet & Arugula Salad does just that. I remember the first time I tasted this delightful combination. It was a sunny afternoon in the heart of Tuscany, where I was invited to a local family’s vineyard. The air was filled with the sweet aroma of ripe grapes, and the table was adorned with an array of vibrant dishes. However, it was the salad that stole the show.

    As I took my first bite, the earthy sweetness of the beets paired with the peppery arugula and the tangy balsamic vinaigrette was a revelation. It was as if each ingredient was a note in a harmonious melody, perfectly balanced and utterly satisfying. This experience left a lasting impression on me, and I’ve been recreating this salad ever since, tweaking it here and there to suit my taste.

    In my 5 years of experience as a chef, I’ve learned that food is more than just nourishment; it’s a way to connect with others, to share stories and create memories. This Beet & Arugula Salad is not just a recipe; it’s a piece of my culinary journey, and I’m excited to share it with you. Whether you’re looking for a healthy meal option or a dish to impress your guests, this salad is sure to become a favorite in your kitchen.

    Why You’ll Love This Recipe

    • Quick and easy to prepare, perfect for busy weeknights.
    • Loaded with nutrients to boost your brainpower and energy levels.
    • Versatile and adaptable to suit various dietary preferences.
    • A vibrant, colorful dish that will impress your dinner guests.
    • Perfect balance of flavors and textures, from earthy beets to creamy cheese.

    Detailed Ingredients

    • Beets: 500 grams, choose firm and smooth beets for best quality.
    • Lemon Juice: 2 tablespoons, or substitute with white vinegar.
    • Raw Pecans: 100 grams, look for whole pecans for optimal crunch.
    • Baby Arugula: 150 grams, vibrant green leaves with a peppery taste.
    • Gorgonzola or Feta Cheese: 100 grams, choose based on your preference for creaminess.
    • Balsamic Vinaigrette: 60 ml, a high-quality balsamic will enhance the flavor.

    Step-by-Step Instructions

    1. Boil the Beets

    Start by washing the beets thoroughly under running water to remove any dirt. Place them in a large saucepan, cover with water, and add 2 tablespoons of lemon juice. This will help retain their vibrant color. Bring the water to a boil over high heat, then reduce to a simmer. Allow the beets to cook until they’re tender when pierced with a fork, approximately 45 minutes to 1 hour. Once done, drain the water and let them cool under cold running water. This makes peeling the beets much easier. Peel them gently with your hands and cut them into quarters.

    2. Toast the Pecans

    While the beets are cooking, take your raw pecans and place them in a dry skillet over medium-low heat. Stir occasionally and let them toast for about 2 to 5 minutes. You’ll know they’re ready when they release a fragrant nutty aroma. Be cautious not to burn them. Once toasted, remove from heat and let them cool.

    3. Assemble the Salad

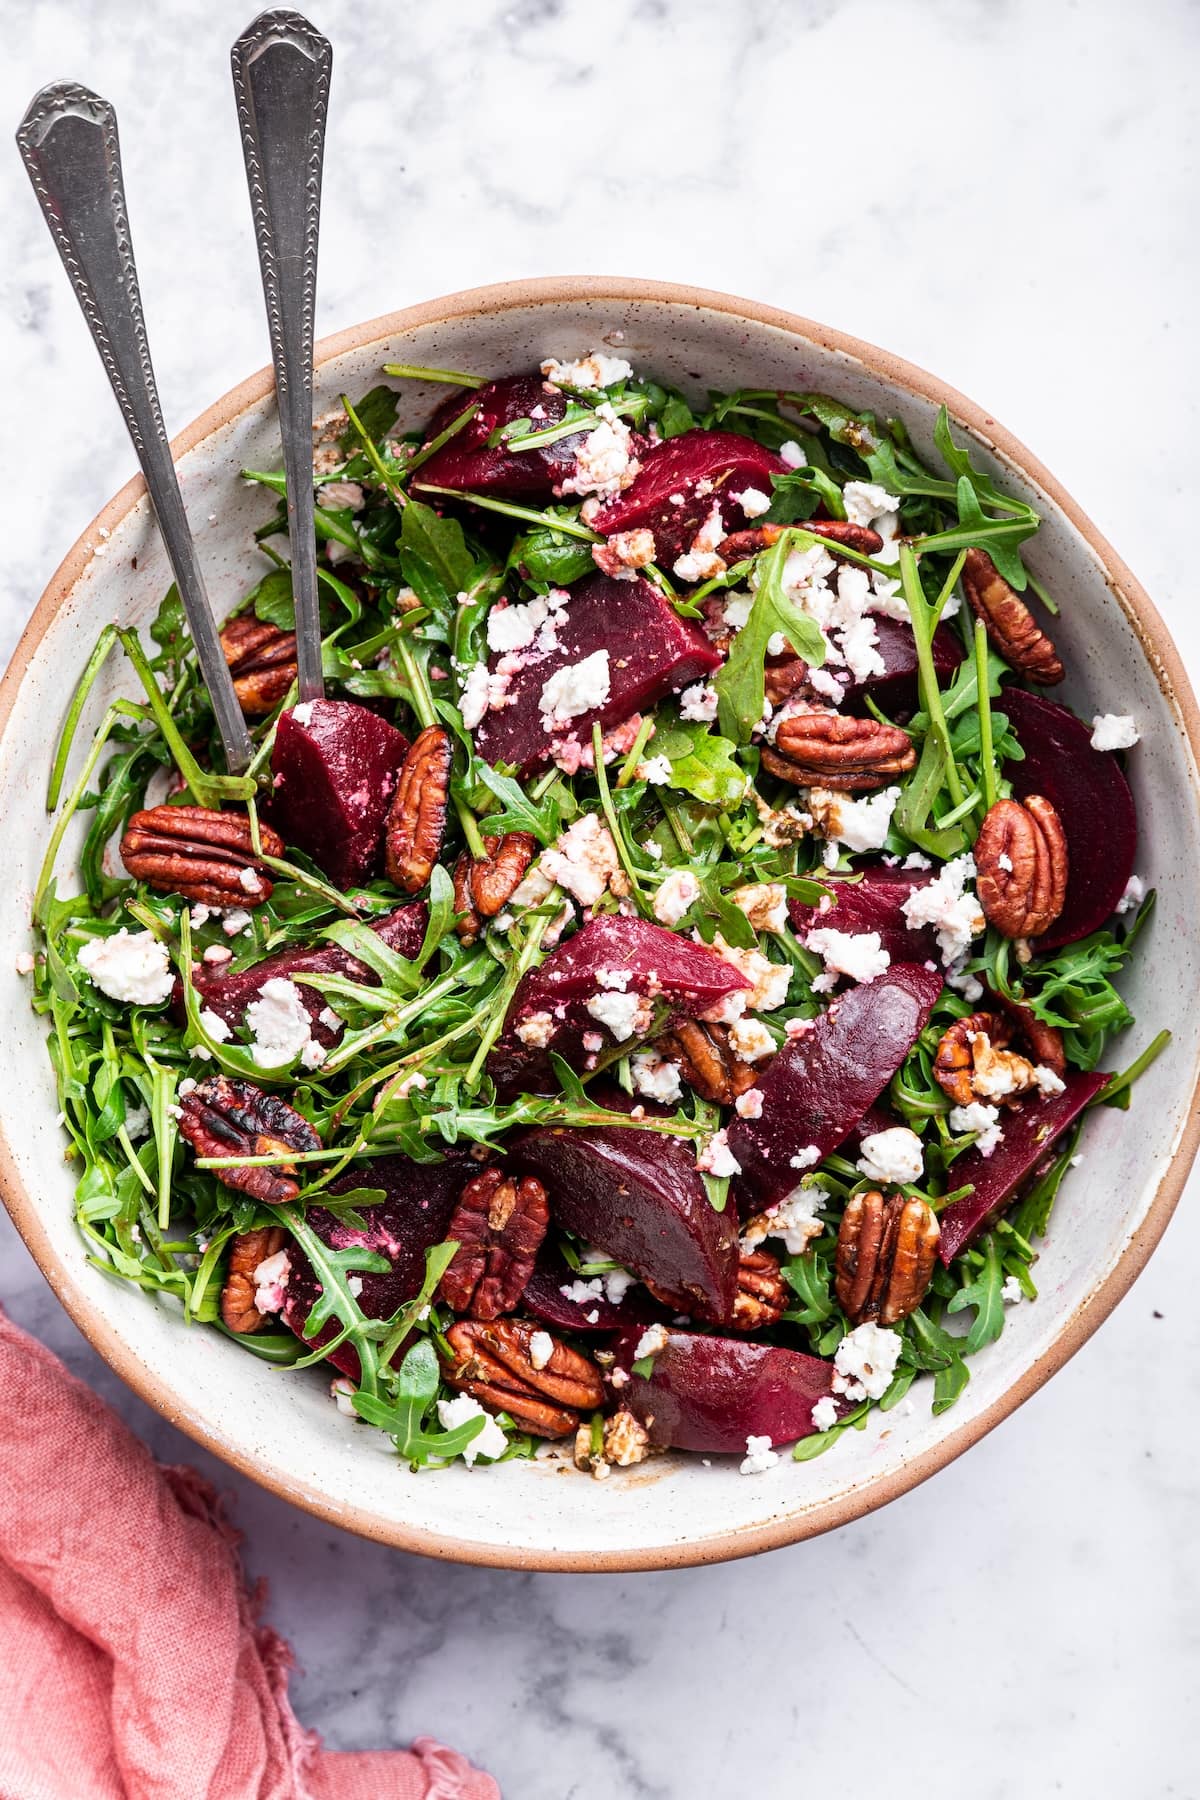
    On a large serving platter or in a salad bowl, spread the baby arugula evenly as your base. Layer the quartered beets on top, followed by the toasted pecans. Crumble your choice of cheese—be it Gorgonzola or Feta—over the salad. Each component should be visible and well-distributed for an appealing presentation.

    4. Dress & Serve

    Finally, drizzle the balsamic vinaigrette over the assembled salad. Toss gently to ensure everything is coated just right. Serve immediately and watch as your guests enjoy every bite.

    Common Mistakes to Avoid

    One common mistake is overcooking the beets, which can lead to a mushy texture. Keep a close eye on them and test for doneness with a fork. Another pitfall is burning the pecans; always toast them on medium-low heat and stir frequently. Lastly, using a low-quality balsamic vinaigrette can dull the flavors of the salad. Opt for a good quality balsamic for the best result.

    How to Store & Reheat

    Store any leftovers in an airtight container in the refrigerator. This salad is best consumed within 2 days to maintain freshness. If you need to reheat it, do so gently in a skillet over low heat, just enough to take the chill off without wilting the arugula.

    Ingredient Substitutions

    If you need to make substitutions, here are some safe swaps:

    • Beets: Swap with roasted sweet potatoes for a different sweet flavor profile.
    • Pecans: Use walnuts or almonds if you prefer or have them on hand.
    • Gorgonzola or Feta Cheese: Goat cheese can be a great alternative for a tangy twist.
    • Balsamic Vinaigrette: A simple olive oil and lemon dressing can be used if you’re out of balsamic.

    Nutrition Facts

    • Calories: 370 kcal
    • Protein: 11g
    • Fat: 22g
    • Carbohydrates: 35g
    • Serving Size: 1 plate (approximately 200g)

    Frequently Asked Questions

    Can I use canned beets instead of fresh?

    Yes, canned beets can be a convenient substitute. Just be sure to drain and rinse them thoroughly before using.

    Is this salad suitable for vegans?

    To make it vegan, simply omit the cheese or replace it with a vegan cheese alternative.

    What can I serve this salad with?

    This salad pairs beautifully with grilled chicken or fish for a complete meal.

    Can I prepare this salad in advance?

    You can prepare the components ahead of time, but it’s best to assemble the salad just before serving to keep the arugula fresh and crisp.

    How can I enhance the flavor of the vinaigrette?

    Add a teaspoon of Dijon mustard or a splash of honey to the balsamic vinaigrette for extra depth and sweetness.

  • CHEAT DAY: Indulgent Snickers Salad Protein Bowl Delight

    CHEAT DAY: Indulgent Snickers Salad Protein Bowl Delight

    Introduction & My Personal Story

    Ah, the indulgence of a cheat day. The very thought can bring a smile to your face, especially when it involves a dish as delightful as the Snickers Salad Protein Bowl. It all started about five years ago when I was deep into my culinary journey, experimenting with flavors and textures that could satisfy cravings without completely derailing my nutrition goals. I stumbled upon the idea of combining the irresistible flavors of a Snickers bar with the creamy goodness of a protein-packed salad. It seemed almost too good to be true, but the result was nothing short of magical.

    In my 5 years of experience, I’ve learned that a cheat day isn’t just about indulgence; it’s a reward for your dedication and hard work. This Snickers Salad Protein Bowl became my go-to treat, especially after a week of disciplined eating. The creamy texture of Greek yogurt and cottage cheese, combined with the crunch of apples and the decadent taste of peanut butter and protein bars, was a revelation. It’s not just a dish; it’s a celebration of flavors that indulges your senses without the guilt. Every bite reminds me of those early days of discovery, where culinary experimentation met nutritional mindfulness.

    Why You’ll Love This Recipe

    • Quick & Easy: No cooking required, ready in just 10 minutes.
    • High Protein: Packed with Greek yogurt and cottage cheese.
    • Decadent Flavor: Tastes like your favorite candy bar.
    • Customizable: Easy to swap ingredients based on preference.
    • Perfect for Cheat Days: Satisfies cravings while providing nutrients.

    Detailed Ingredients

    • 5.3 oz Greek yogurt – Opt for plain or vanilla for best results.
    • 1 cup cottage cheese – Choose low-fat or full-fat based on preference.
    • 1 apple – A crisp variety like Granny Smith or Honeycrisp works well.
    • 2 tbsp PB2 powder – Look for it in the health food section.
    • 1 Barebells Salty Peanut protein bar – Can be found in most health stores.
    • Peanut butter – Natural or smooth, for drizzling.

    Step-by-Step Instructions

    Step 1: Start by preparing your ingredients. Chop the apple into small, bite-sized pieces. This adds a fresh, juicy crunch to your bowl. Chef’s Tip: Leave the skin on for added fiber and color.

    Step 2: In a medium-sized bowl, combine the Greek yogurt and cottage cheese. Stir them together until you have a smooth, creamy base. The blend of these two ingredients is the secret to a protein-packed foundation.

    Step 3: Sprinkle in the PB2 powder. This will give a subtle peanut butter flavor without the added fat. Mix thoroughly until the powder is fully incorporated.

    Step 4: Gently fold in the chopped apple pieces. Ensure they are evenly distributed throughout the mixture. The apple provides a natural sweetness and a delightful texture contrast.

    Step 5: Chop the Barebells Salty Peanut protein bar into small chunks. Add these to the bowl, stirring gently to combine. These chunks mimic the nougat and peanut crunch of a Snickers bar.

    Step 6: For the final touch, drizzle with your choice of peanut butter. This adds a rich, indulgent layer to your protein bowl. Serve immediately to enjoy at the peak of freshness.

    Common Mistakes to Avoid

    • Overmixing: Stir gently to avoid breaking down the apple pieces and protein bar chunks.
    • Using flavored yogurt: Stick to plain or vanilla to control sweetness levels.
    • Skipping the PB2 powder: It provides essential flavor without excess calories.
    • Incorrect apple variety: Use crisp apples to maintain texture.

    How to Store & Reheat

    Store any leftovers in an airtight container in the refrigerator. The Snickers Salad Protein Bowl is best consumed within 24 hours to enjoy its full flavor and texture. If you need to store it longer, it’s best not to add the peanut butter drizzle until just before serving. This dish does not require reheating, as it’s meant to be enjoyed chilled.

    Ingredient Substitutions

    • Greek yogurt: Substitute with plain skyr or a plant-based yogurt for a dairy-free option.
    • Cottage cheese: Use ricotta cheese or a vegan alternative if needed.
    • PB2 powder: Regular peanut butter or almond butter can be used, but adjust quantities for taste.
    • Protein bar: Any nut-based protein bar can replace the Barebells bar.

    Nutrition Facts

    • Calories: 450 per serving
    • Protein: 35g
    • Fat: 15g
    • Carbs: 45g
    • Serving Size: 1 bowl

    Frequently Asked Questions

    • Can I use a different fruit instead of apple? Yes, pears or bananas can work well.
    • Is there a vegan version of this recipe? Yes, use plant-based yogurt, ricotta, and a vegan protein bar.
    • How can I make it even more indulgent? Add a drizzle of chocolate syrup or caramel sauce.
    • Can I prepare this in advance? It’s best made fresh, but you can prep the yogurt and cheese mix a day ahead.
    • What if I don’t have PB2 powder? Regular peanut butter will work, just adjust the quantity for flavor.

  • 5-MINUTE FUEL: Zucchini & Corn Salad – A Fresh, No-Cook Delight!

    5-MINUTE FUEL: Zucchini & Corn Salad – A Fresh, No-Cook Delight!

    Introduction & My Personal Story

    I remember the first time I stumbled upon the idea of a zucchini and corn salad. It was a hot summer afternoon, and I was searching for something refreshing yet satisfying. As a chef, I’m always on the lookout for recipes that offer maximum flavor with minimal fuss. This particular salad became a staple in my kitchen during those sweltering months. The crunch of fresh corn, the subtle sweetness of zucchini, and the nutty bite of toasted almonds create a harmony that’s hard to resist. In my 5 years of experience, I’ve learned that sometimes the simplest dishes can leave the most lasting impressions. This salad, requiring no cooking, is a testament to that. It’s perfect for those days when you want to enjoy the flavors of summer without breaking a sweat. I recall serving it at a family barbecue, and it was an instant hit. Everyone marveled at the freshness and the burst of flavors. Now, whenever I make this dish, it brings back memories of laughter, sunshine, and the joy of sharing good food with loved ones.

    Why You’ll Love This Recipe

    • Quick and easy – ready in just 5 minutes.
    • No cooking required, perfect for hot days.
    • Uses fresh, seasonal ingredients.
    • Minimal cleanup, saving you time and effort.
    • Customizable with various toppings and dressings.

    Detailed Ingredients

    • 2 medium-sized **zucchinis** (about 300g), fresh and firm.
    • 2 ears of **corn**, husked and kernels shaved off.
    • 1/2 cup **sliced almonds**, lightly toasted.
    • 1 **lemon**, juiced.
    • 1/4 cup fresh **mint**, finely chopped.
    • 1/4 teaspoon **chili flakes**.
    • 3 tablespoons **olive oil**.
    • Salt and pepper to taste.
    • Optional: 1/4 cup grated **Parmesan cheese** for added flavor.

    Step-by-Step Instructions

    Step 1: Prepare the Ingredients
    Start by washing the **zucchinis** thoroughly. Cut them into long planks about 1/4 inch thick, then slice these planks into bite-sized pieces. This ensures that each piece retains its crunch and blends well with the other ingredients.

    Step 2: Shuck the Corn
    Hold the **corn** vertically on a cutting board and use a sharp knife to shave the kernels off. Fresh corn adds a sweet crunch, but if you prefer, you can use canned or frozen corn as a substitute.

    Step 3: Toast the Almonds
    Chef’s Tip: Toasting enhances the almonds’ flavor. In a dry pan over medium heat, add the **sliced almonds** and stir frequently for about 3-5 minutes until they are golden and fragrant. Keep a close eye to prevent burning.

    Step 4: Make the Dressing
    In a small bowl, combine the juice of one **lemon**, **olive oil**, **chili flakes**, and chopped **mint**. Season with salt and pepper. Whisk until everything is well combined. This dressing is light yet vibrant, complementing the salad perfectly.

    Step 5: Assemble the Salad
    In a large serving bowl, combine the **zucchini**, **corn**, and **toasted almonds**. If using, add the grated **Parmesan cheese**. Pour the dressing over the salad and toss gently to ensure everything is coated evenly.

    Common Mistakes to Avoid

    Overcooking the Almonds: Toast them just until they’re golden. They can burn quickly if left unattended.

    Using Old Ingredients: Freshness is key for this salad. Ensure your **zucchini** and **corn** are fresh for the best flavor.

    Overdressing: Add the dressing gradually. You can always add more, but you can’t take it away.

    How to Store & Reheat

    Since this is a no-cook salad, it’s best enjoyed fresh. However, if you need to store it, place it in an airtight container and refrigerate for up to 2 days. The **zucchini** may release some water, so toss it again before serving.

    Reheating isn’t necessary, as this salad is meant to be served cold. If you want to freshen it up, add a squeeze of **lemon** juice before serving.

    Ingredient Substitutions

    • Almonds: Swap with walnuts or pecans if preferred.
    • Corn: Use canned or frozen corn when fresh is unavailable.
    • Lemon: Lime juice can be a zesty alternative.
    • Mint: Try basil or cilantro for a different flavor profile.

    Nutrition Facts

    • Calories: 210 per serving
    • Protein: 5g
    • Fat: 15g
    • Carbohydrates: 18g
    • Serving Size: Approximately 1 cup

    Frequently Asked Questions

    Can I make this salad ahead of time?
    Yes, you can prepare the ingredients and dressing separately, then combine them just before serving to maintain freshness.

    Is this salad vegan?
    Yes, as long as you omit the **Parmesan cheese** or use a vegan alternative.

    How can I add more protein?
    Consider adding chickpeas or grilled chicken for a protein boost.

    What other vegetables can I add?
    Try adding cherry tomatoes or cucumber for additional flavor and texture.

  • CHEAT DAY: Irresistible High-Protein Apple Salad Delight!

    CHEAT DAY: Irresistible High-Protein Apple Salad Delight!

    Introduction & My Personal Story

    Ah, the glorious cheat day! A day where the usual rules of disciplined eating are momentarily set aside, allowing for a culinary indulgence that satisfies the soul. One dish that has consistently been my go-to for these special occasions is the Irresistible High-Protein Apple Salad Delight. My journey with this recipe began quite serendipitously during my early days as a chef. In my 5 years of experience, I’ve learned that sometimes the simplest ingredients can create the most profound experiences.

    It was a sunny afternoon, and I was experimenting with various high-protein recipes in my cozy kitchen. I had just returned from the market with a bag full of fresh, crisp apples. Their vibrant color and sweet aroma were irresistible. I decided to pair them with some creamy Greek yogurt, a staple in my kitchen for its high protein content and velvety texture. As I mixed in some honey and a handful of crunchy walnuts, a sprinkle of cinnamon added a warm, inviting aroma that filled the room. The result was a delightful blend of flavors and textures that was both nourishing and indulgent.

    From that day on, this salad has become a cherished part of my cheat day repertoire. It’s a dish that embodies the perfect balance between health and indulgence, making it a favorite not only for me but also for my friends and family. Let me take you through this culinary experience, so you too can enjoy this delightful treat on your next cheat day.

    Why You’ll Love This Recipe

    • Quick and easy to prepare, perfect for a cheat day indulgence.
    • Packed with protein from the Greek yogurt, keeping you full and satisfied.
    • The combination of sweet apples and crunchy walnuts creates a tantalizing texture.
    • Honey and cinnamon add a natural sweetness and warmth without being overpowering.
    • Chill time of just 30 minutes enhances the flavors, making it a refreshing treat.

    Detailed Ingredients

    • 3 large apples, preferably Honeycrisp or Fuji, chopped (about 450 grams)
    • 1 cup (240 grams) Greek yogurt, plain and unsweetened
    • 2 tablespoons (30 ml) honey, plus extra for drizzling
    • 1/2 cup (60 grams) walnuts, roughly chopped
    • 1 teaspoon cinnamon
    • A pinch of salt to enhance flavors

    Step-by-Step Instructions

    Step 1: Start by washing the apples thoroughly. Core and chop them into bite-sized pieces. Chef’s Tip: Leave the skin on for added fiber and nutrition.

    Step 2: In a large mixing bowl, combine the chopped apples with 1 cup of Greek yogurt. The yogurt should be thick and creamy, which helps in binding all the ingredients together.

    Step 3: Add 2 tablespoons of honey to the mixture. Honey not only sweetens the salad but also adds a lovely floral note. If you prefer a sweeter salad, feel free to add an extra drizzle.

    Step 4: Toss in 1/2 cup of roughly chopped walnuts. These add a delightful crunch and are a great source of healthy fats.

    Step 5: Sprinkle 1 teaspoon of cinnamon over the mixture. This spice complements the sweetness of the apples and honey, adding depth to the flavor profile.

    Step 6: Gently fold the ingredients together until well combined. Be careful not to overmix, as you want to maintain the texture of the apples and walnuts.

    Step 7: Cover the bowl with plastic wrap and refrigerate for at least 30 minutes. This chilling time allows the flavors to meld beautifully, creating a refreshing and satisfying dish.

    Step 8: Serve the salad in individual bowls, topped with additional walnuts and a drizzle of honey for an extra touch of indulgence.

    Common Mistakes to Avoid

    • Overmixing: This can lead to a mushy texture. Gently fold the ingredients to maintain the integrity of the apples and walnuts.
    • Using too much honey: While it adds sweetness, too much can overpower the other flavors. Start with the recommended amount and adjust to taste.
    • Skipping the chill time: This step is crucial for the flavors to develop fully. Don’t rush it!

    How to Store & Reheat

    To store the salad, transfer it to an airtight container and refrigerate. It will keep well for up to 3 days. Since it’s a cold salad, reheating isn’t necessary. Simply give it a good stir before serving to redistribute any settled ingredients.

    Ingredient Substitutions

    • Apples: If you prefer a different flavor, pears can be a great substitute.
    • Greek yogurt: For a dairy-free option, use coconut yogurt.
    • Walnuts: Pecans or almonds can be used if you have a preference for different nuts.
    • Honey: Maple syrup is a suitable alternative for a different sweetness profile.

    Nutrition Facts

    • Calories: 280 per serving
    • Protein: 8 grams
    • Fat: 12 grams
    • Carbohydrates: 35 grams
    • Serving Size: Approximately 1 cup

    Frequently Asked Questions

    Q: Can I make this salad in advance?

    A: Yes, it’s perfect for meal prep. Just store it in the fridge and give it a good stir before serving.

    Q: Can I use flavored yogurt?

    A: While plain yogurt is recommended to control the sweetness, you can use lightly flavored yogurt if desired. Just adjust the honey accordingly.

    Q: What type of apples work best?

    A: Crisp and sweet varieties like Honeycrisp or Fuji are ideal for their texture and flavor.

    Q: Is this salad gluten-free?

    A: Absolutely! All the ingredients are naturally gluten-free.

  • ZERO PREP: Upgraded Classic Tuna Salad in a Snap!

    ZERO PREP: Upgraded Classic Tuna Salad in a Snap!

    Introduction & My Personal Story

    Let me take you back to a time when I was just starting out in the culinary world. My first kitchen job was at a small, bustling deli in the heart of the city. Our menu was filled with classic sandwiches and salads, but the one dish that always seemed to fly off the shelves was our Tuna Salad. Now, there’s nothing groundbreaking about a Tuna Salad, but what set ours apart was the simplicity and the slight twist we added to the classic recipe. It became my go-to dish when life got hectic, and I needed something quick, nutritious, and satisfying. Fast forward to now, with more than 5 years of experience under my belt, I’ve refined this recipe into what I like to call the “Upgraded Classic Tuna Salad in a Snap!” It’s perfect for those who have zero time to prep but still want something delicious. This dish brings back warm memories of those early kitchen days and the joy of creating something delightful with minimal effort. I’m thrilled to share this with you, hoping it becomes your quick-fix favorite too.

    Why You’ll Love This Recipe

    • Ready in under 5 minutes with no cooking required.
    • Minimal cleanup means more time for you.
    • Packed with protein and healthy fats from tuna and walnuts.
    • Versatile: Enjoy it as a sandwich, salad, or with crackers.
    • Perfect for meal prep, stays fresh in the fridge for up to 4 days.

    Detailed Ingredients

    • 2 cans of tuna (in water or oil, 200g each): Look for firm chunks for the best texture.
    • 1 cup celery (diced, about 100g): Crisp and fresh, adding a nice crunch.
    • ¼ cup walnuts (chopped, about 30g): Adds a nutty flavor and healthy fats.
    • 2 green onions (sliced): For a subtle onion flavor without overpowering the dish.
    • ½ cup mayonnaise (120ml): Creamy base to hold everything together.
    • 1 tablespoon lemon juice (15ml): Freshly squeezed for a bright, tangy kick.
    • Salt and pepper to taste: Adjust according to your preference.

    Step-by-Step Instructions

    Step 1: Drain the Tuna – Open the cans of tuna and drain them thoroughly. Press down with the lid or use a strainer to ensure all the liquid is removed. This will prevent your salad from becoming soggy.

    Step 2: Mix the Ingredients – In a large mixing bowl, combine the drained tuna, diced celery, chopped walnuts, sliced green onions, mayonnaise, and lemon juice. Use a fork to flake the tuna and mix everything evenly.

    Step 3: Season – Add salt and pepper to taste. Start with a pinch and increase as needed. Remember, you can always add more, but you can’t take it out once it’s in!

    Step 4: Serve – Once everything is well combined, your tuna salad is ready to serve. Enjoy it in a sandwich, over a bed of greens, or with some crunchy crackers.

    Common Mistakes to Avoid

    Over-mixing: Be gentle when mixing the ingredients to maintain a good texture. Too much mixing can make the tuna mushy.

    Excess moisture: Ensure the tuna is well-drained to avoid a watery salad.

    Over-seasoning: Always start with less salt and pepper and adjust gradually.

    How to Store & Reheat

    Store your tuna salad in an airtight container in the refrigerator. It will stay fresh for up to 4 days. While this dish is typically served cold, if you prefer it warm, gently reheat it in a microwave-safe dish for 30 seconds to 1 minute. Be careful not to overheat, as this can alter the texture.

    Ingredient Substitutions

    If you’re missing an ingredient or need to make a swap, here are some safe substitutions:

    • Greek yogurt can replace mayonnaise for a lighter option.
    • Almonds or pecans can substitute walnuts if you prefer a different nut.
    • Lime juice can be used instead of lemon juice for a slightly different citrus flavor.
    • Red onion can replace green onions for a sharper taste.

    Nutrition Facts

    • Calories: 350 per serving
    • Protein: 25g
    • Fat: 22g
    • Carbohydrates: 8g
    • Serving Size: 1 cup

    Frequently Asked Questions

    • Can I make this tuna salad ahead of time? Yes, it’s perfect for meal prep and will last in the fridge for up to 4 days.
    • Is there a way to make it spicier? Add a pinch of cayenne pepper or some chopped jalapeños for a kick.
    • What if I’m allergic to nuts? Simply omit the walnuts or replace them with sunflower seeds for crunch.
    • Can I use fresh tuna instead of canned? Absolutely! Just cook and flake the fresh tuna before using it in the recipe.


  • 5-MIN FUEL: Lentil & Cranberry Power Salad!

    5-MIN FUEL: Lentil & Cranberry Power Salad!

    Introduction & My Personal Story

    There’s something incredibly satisfying about a dish that not only fuels your body but also delights your taste buds. The 5-MINUTE FUEL: Lentil and Cranberry Power Salad is one such recipe that has a special place in my heart. I first stumbled upon this gem of a salad five years ago when I was knee-deep in culinary school. With tight schedules and endless cooking experiments, I needed something quick yet nourishing to keep me going. This salad became my go-to. The earthy lentils paired with the sweet bursts of dried cranberries and crunchy walnuts were just what I needed to power through long days.

    In my 5 years of experience as a chef, I have found that a well-balanced salad can be a game changer. This particular recipe has not only become a staple in my personal diet but also a favorite among my clients and friends. There’s a certain nostalgia that hits me every time I make it, reminding me of those formative days in the kitchen, learning and experimenting. It’s a simple dish, but one that packs a punch in terms of flavor and nutrition, and I’m thrilled to share it with you today.

    Why You’ll Love This Recipe

    • Quick & Easy: Ready in just 5 minutes if you have pre-cooked lentils.
    • Nutritious: Packed with protein, fiber, and essential nutrients.
    • Flavorful: A delicious combination of earthy, sweet, and tangy flavors.
    • Versatile: Perfect as a main dish or a side.
    • Meal Prep Friendly: Keeps well in the fridge for quick meals throughout the week.

    Detailed Ingredients

    To make the Lentil and Cranberry Power Salad, you’ll need the following ingredients:

    • Lentils: 1 cup of dried lentils (about 200 grams). Look for lentils that are firm and free of debris.
    • Spinach: 2 cups of fresh spinach (around 60 grams), washed and dried.
    • Dried Cranberries: 1/2 cup (about 60 grams), look for unsweetened varieties if you prefer less sugar.
    • Apple: 1 medium-sized apple (about 150 grams), diced. Choose a crisp variety like Granny Smith or Honeycrisp.
    • Feta Cheese: 1/4 cup (about 40 grams), crumbled.
    • Walnuts: 1/4 cup (about 30 grams), roughly chopped.
    • Olive Oil: 3 tablespoons for the vinaigrette.
    • Lemon Juice: 2 tablespoons, freshly squeezed.
    • Apple Cider Vinegar: 1 tablespoon.
    • Dijon Mustard: 1 teaspoon.
    • Sugar: 1 teaspoon.
    • Garlic Powder: 1/2 teaspoon.
    • Salt & Pepper: To taste.

    Step-by-Step Instructions

    Here’s how you can whip up this delightful salad:

    Step 1: Cook the Lentils

    Begin by rinsing 1 cup of dried lentils under cold water to remove any dirt or debris. In a medium-sized pot, bring 3 cups of water to a boil. Add the lentils, cover, and reduce the heat to simmer. Let them cook for about 20 minutes or until tender. Chef’s Tip: Lentils should be cooked but not mushy, with a slight bite to them.

    Step 2: Prepare the Vinaigrette

    While the lentils are cooking, prepare the vinaigrette. In a small bowl, whisk together 2 tablespoons of lemon juice, 1 tablespoon of apple cider vinegar, 1 teaspoon of Dijon mustard, 1 teaspoon of sugar, 1/2 teaspoon of garlic powder, and a pinch of salt and pepper. Gradually drizzle in 3 tablespoons of olive oil while whisking continuously until the dressing is smooth and emulsified.

    Step 3: Assemble the Salad

    Once the lentils are cooked, drain them and rinse with cold water to stop the cooking process. In a large mixing bowl, combine the lentils with 2 cups of fresh spinach. Add 1/2 cup of dried cranberries, 1 diced apple, 1/4 cup of crumbled feta cheese, and 1/4 cup of chopped walnuts. Pour the vinaigrette over the salad and toss gently to combine all the ingredients.

    Step 4: Serve

    Transfer the salad to a serving platter or individual bowls. Serve immediately or let it chill in the fridge for 30 minutes to allow the flavors to meld. This salad is a great make-ahead option and tastes even better the next day!

    Common Mistakes to Avoid

    • Overcooking Lentils: Keep an eye on the lentils as they cook. Overcooked lentils can become mushy and lose their texture.
    • Not Rinsing Lentils: Rinsing lentils after cooking helps to cool them quickly and prevents further cooking.
    • Skipping the Vinaigrette Emulsification: Gradually adding the olive oil while whisking is crucial for a smooth dressing.

    How to Store & Reheat

    Store any leftover salad in an airtight container in the refrigerator for up to 3 days. The flavors will continue to develop, making it even more delicious over time. If you plan to store it for longer, keep the dressing separate and add it just before serving. This will prevent the salad from becoming soggy.

    Ingredient Substitutions

    • Lentils: Feel free to use canned lentils if you’re short on time. Just make sure to rinse them well.
    • Spinach: Arugula or mixed greens can be used for a different flavor profile.
    • Dried Cranberries: Swap with raisins or chopped dried apricots for a different sweetness.
    • Feta Cheese: Goat cheese or blue cheese can be used for a stronger flavor.
    • Walnuts: Pecans or almonds can be used for a different crunch.

    Nutrition Facts

    • Calories: 288 kcal
    • Protein: 12g
    • Fat: 13g
    • Carbohydrates: 34g
    • Serving Size: 1 bowl (approximately 250g)

    Frequently Asked Questions

    • Can I make this salad vegan? Yes, simply omit the feta cheese or replace it with a vegan cheese alternative.
    • What type of lentils should I use? Green or brown lentils work best as they hold their shape better than red lentils.
    • Can I add protein to this salad? Absolutely! Grilled chicken or tofu are great additions for extra protein.
    • Is this salad gluten-free? Yes, all the ingredients listed are naturally gluten-free.

  • Focus Win: Beet Power Salad

    Focus Win: Beet Power Salad

    Introduction & My Personal Story

    There’s something magical about the vibrant colors and earthy sweetness of beets that takes me back to my grandmother’s kitchen. I remember the first time I helped her prepare a beet salad; the kitchen smelled of fresh herbs and the sound of her knife slicing through the beets was rhythmic and soothing. It was a sunny afternoon, and the light streamed in through the window, casting a warm glow over the kitchen table. As we worked, she shared stories of her childhood, weaving tales of family gatherings and festive meals. This Beet Power Salad is a nod to those cherished memories, a modern twist on a classic that nourished my family for generations.

    In my 5 years of experience as a chef, I’ve learned that food isn’t just about sustenance; it’s about connection and joy. This salad is a testament to that philosophy. Packed with nutrient-dense ingredients, it not only fuels the body but also feeds the soul. Whether you’re looking for a quick lunch or a dish to impress your friends, this Beet Power Salad is a winner. It’s easy to make, incredibly satisfying, and a feast for the eyes with its vibrant colors. Join me as we dive into this delightful recipe that combines tradition with a modern twist.

    Why You’ll Love This Recipe

    • Nutritious: Packed with antioxidants, vitamins, and plant-based protein.
    • Convenient: Perfect for meal prep and on-the-go lunches.
    • Versatile: Easy to customize with your favorite ingredients.
    • Delicious: A balance of sweet, savory, and crunchy textures.
    • Visually Stunning: A colorful addition to any meal lineup.

    Detailed Ingredients

    Let’s talk ingredients. For this salad, quality matters. Here’s what you’ll need:

    • Beets: 2 medium-sized beets (about 300g), roasted or steamed. Look for firm, unblemished bulbs.
    • Carrots: 2 large carrots (about 150g), shredded. Choose bright orange, firm carrots.
    • Quinoa: 1 cup (about 185g), cooked. Opt for organic if possible.
    • Brussels Sprouts: 150g, thinly sliced. Fresh, tightly packed sprouts are best.
    • Golden Raisins: 1/4 cup (about 40g). Look for plump, golden raisins.
    • Goat Cheese: 100g, crumbled. Choose fresh, creamy goat cheese.
    • Cashews: 1/2 cup (about 75g), roughly chopped. Raw or roasted, your choice.
    • Spinach: 100g baby spinach. Fresh, crisp leaves are ideal.
    • Garlic Tahini Dressing: Blend 1/4 cup tahini, 2 tablespoons apple cider vinegar, juice of 1 lemon, 1 tablespoon tamari, 1 tablespoon nutritional yeast, and 1 clove garlic, minced.

    Step-by-Step Instructions

    Ready to get cooking? Here’s how to bring this Beet Power Salad to life:

    1. Prepare the Quinoa

    Rinse 1 cup of quinoa under cold water to remove any bitterness. In a medium saucepan, combine quinoa with 2 cups of water and a pinch of salt. Bring to a boil, then reduce heat to low, cover, and simmer for about 15 minutes, or until the water is absorbed and the quinoa is fluffy. Remove from heat and let it cool.

    2. Roast the Beets

    Preheat your oven to 200°C (400°F). Wrap each beet in aluminum foil and place them on a baking sheet. Roast for 45-60 minutes, or until they are tender when pierced with a fork. Allow them to cool, then peel and cut into small cubes.

    3. Prepare the Vegetables

    While the beets are roasting, shred the carrots and thinly slice the Brussels sprouts. Set them aside in separate bowls.

    4. Make the Dressing

    In a blender, combine 1/4 cup tahini, 2 tablespoons apple cider vinegar, the juice of 1 lemon, 1 tablespoon tamari, 1 tablespoon nutritional yeast, and 1 clove of minced garlic. Blend until smooth and creamy. Adjust the seasoning with salt and pepper to taste.

    5. Assemble the Salad

    In a large bowl, combine the cooked quinoa, roasted beet cubes, shredded carrots, sliced Brussels sprouts, golden raisins, and baby spinach. Toss with the dressing until everything is well coated.

    6. Add the Finishing Touches

    Sprinkle the crumbled goat cheese and chopped cashews over the salad. Gently toss to combine. Serve immediately or store in the fridge for later.

    Common Mistakes to Avoid

    • Overcooking Quinoa: Quinoa should be fluffy, not mushy. Make sure to simmer it just until the water is absorbed.
    • Undercooked Beets: Be sure to roast the beets until they are fork-tender to bring out their natural sweetness.
    • Soggy Salad: Avoid adding too much dressing at once. Start with half and add more as needed.
    • Skipping the Rinse: Rinsing quinoa is crucial to remove its natural coating, which can be bitter.

    How to Store & Reheat

    Store any leftover salad in an airtight container in the refrigerator for up to 3 days. If you plan to store it longer, keep the dressing separate and add it just before serving to prevent sogginess. To reheat, simply bring it to room temperature or give it a quick toss in a hot pan to warm through.

    Ingredient Substitutions

    • Quinoa: Swap with couscous or bulgur for a different texture.
    • Goat Cheese: Use feta or omit for a dairy-free version.
    • Cashews: Substitute with almonds or walnuts for a similar crunch.
    • Spinach: Kale or arugula can be used as alternatives.

    Nutrition Facts

    • Calories: 379 kcal (per serving)
    • Protein: 19g
    • Fat: 22g
    • Carbohydrates: 36g
    • Serving Size: 1 large salad

    Frequently Asked Questions

    • Can I prepare this salad ahead of time? Absolutely! It’s perfect for meal prep. Just keep the dressing separate until you’re ready to eat.
    • Is this salad suitable for vegans? Yes, simply omit the goat cheese or replace it with a vegan alternative.
    • How do I make the salad more filling? Add grilled chicken or chickpeas for extra protein.
    • Can I use canned beets? Yes, but fresh roasted beets offer the best flavor and texture.
    • What’s the best way to shred carrots? A box grater or food processor works great for quick shredding.