Tag: Recipe

  • 5-MIN FUEL: Easy Copycat Starbucks Pumpkin Bread Recipe!

    5-MIN FUEL: Easy Copycat Starbucks Pumpkin Bread Recipe!

    Introduction & My Personal Story

    Ah, the aroma of freshly baked pumpkin bread. It takes me back to my first autumn in Seattle, where every street corner seemed to boast a Starbucks. The crisp air was filled with the scent of pumpkin spice, and I found myself drawn into the cozy embrace of the local coffee shop. One bite of their pumpkin bread and I was hooked. It was moist, perfectly spiced, and had just the right amount of sweetness. In my 5 years of experience as a chef, I’ve recreated countless dishes, but this one holds a special place in my heart.

    The beauty of this Starbucks Pumpkin Bread recipe is in its simplicity and speed. You don’t need to be a master baker to whip up this delightful treat. It’s become a staple in my kitchen, especially during the busy months when time is of the essence. I often find myself baking this quick bread for gatherings or as a comforting treat on a lazy Sunday morning. The joy of sharing it with family and friends is an added bonus. Let me guide you through this easy, copycat recipe that tastes just like the original, perhaps even better!

    Why You’ll Love This Recipe

    • Ready in under 10 minutes prep time.
    • Uses simple, pantry-friendly ingredients.
    • Delivers that classic pumpkin spice flavor.
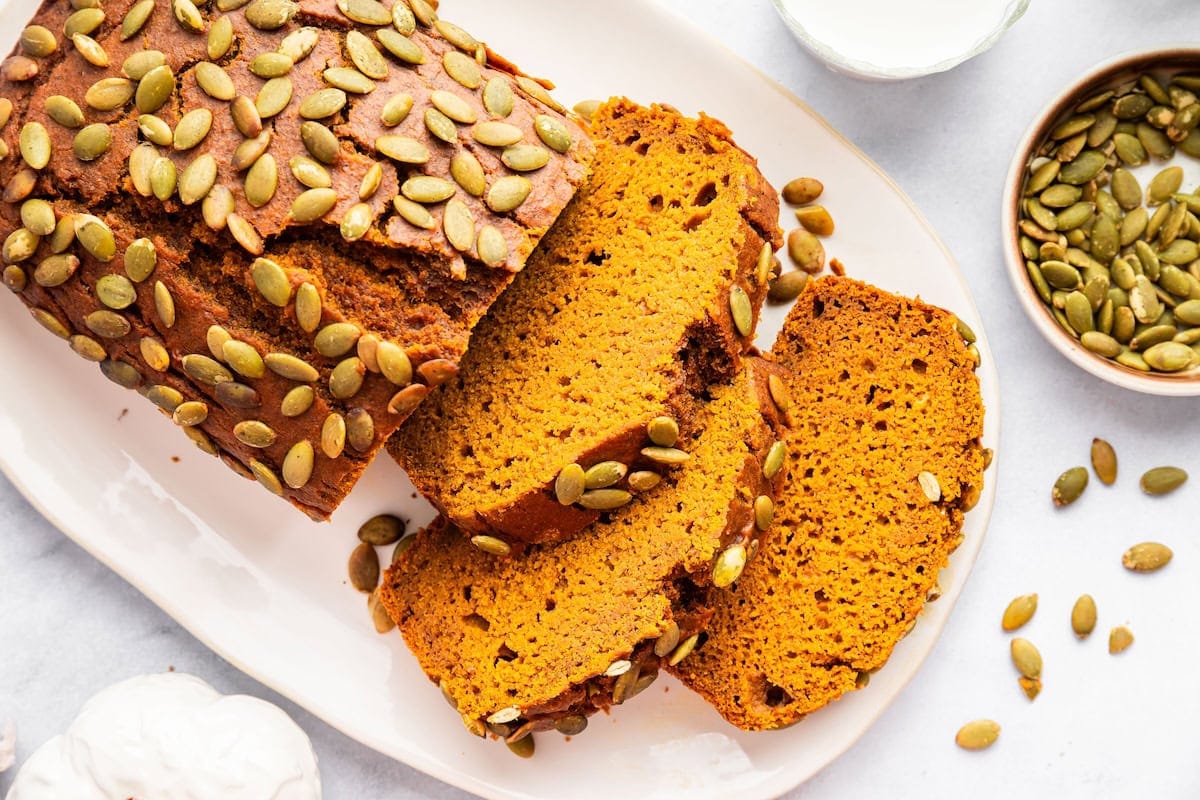
    • Moist, tender texture with a delightful crunch from pepitas.
    • Perfect for breakfast, a snack, or dessert.

    Detailed Ingredients

    For this recipe, you’ll need the following ingredients:

    • 1 cup (240g) pumpkin puree – Look for 100% pure pumpkin, not the pie filling.
    • 3/4 cup (150g) coconut sugar – Adds a rich, caramel-like sweetness.
    • 2 large eggs – Ensure they’re at room temperature for better mixing.
    • 1/2 cup (120ml) olive oil – Provides a moist crumb.
    • 1 teaspoon vanilla extract – Opt for pure vanilla for the best flavor.
    • 1 and 3/4 cups (220g) all-purpose flour – Gives structure to the bread.
    • 1 teaspoon baking soda – Helps the bread rise.
    • 1/2 teaspoon baking powder – Adds lightness.
    • 1/2 teaspoon salt – Balances the sweetness.
    • 2 teaspoons pumpkin pie spice – A blend of cinnamon, nutmeg, ginger, and cloves.
    • 1/4 cup (30g) pepitas – For a nutty topping.

    Step-by-Step Instructions

    Step 1: Preheat and Prepare

    Start by preheating your oven to 350°F (175°C). Grease a 9×5-inch loaf pan or line it with parchment paper for easy removal. Chef’s Tip: A properly preheated oven ensures even baking.

    Step 2: Mix Wet Ingredients

    In a large mixing bowl, combine the pumpkin puree, coconut sugar, eggs, olive oil, and vanilla extract. Whisk until the mixture is smooth and well combined. The olive oil gives the bread its tender crumb, so make sure it’s thoroughly mixed.

    Step 3: Combine Dry Ingredients

    In another bowl, whisk together the flour, baking soda, baking powder, salt, and pumpkin pie spice. Gradually add the dry ingredients to the wet mixture, stirring until just combined. Be careful not to overmix, as this can lead to a dense loaf.

    Step 4: Pour and Sprinkle

    Pour the batter into the prepared loaf pan, using a spatula to smooth the top. Sprinkle the pepitas evenly over the surface. These seeds add a delightful crunch and a bit of visual flair.

    Step 5: Bake

    Bake in the preheated oven for 50 to 60 minutes. To check if the bread is done, insert a toothpick into the center; it should come out clean. If the top is browning too quickly, cover it loosely with foil. Chef’s Tip: Every oven is different, so keep an eye on it during the last 10 minutes of baking.

    Step 6: Cool and Slice

    Allow the bread to cool in the pan for 10 to 15 minutes before transferring it to a wire rack to cool completely. This step is crucial to prevent the bread from becoming soggy. Once cooled, slice and serve.

    Common Mistakes to Avoid

    • Overmixing the batter: This can result in a tough, dense loaf. Mix just until the ingredients are combined.
    • Skipping the parchment paper: Makes removal clean and easy, preventing breakage.
    • Not checking the doneness: Ovens vary, so always use a toothpick to ensure it’s fully baked.

    How to Store & Reheat

    Store your pumpkin bread in an airtight container at room temperature for up to 3 days. To extend its freshness, you can refrigerate it for up to a week. For longer storage, wrap it tightly in plastic wrap and freeze for up to 3 months. When ready to enjoy, thaw at room temperature or reheat slices in the microwave for 15-20 seconds for that fresh-baked feel.

    Ingredient Substitutions

    • Flour: Substitute with whole wheat flour for a denser texture.
    • Sugar: Swap coconut sugar with brown sugar for a similar flavor.
    • Oil: Use melted coconut oil or vegetable oil if preferred.
    • Pepitas: Replace with chopped walnuts or pecans for a nutty variation.

    Nutrition Facts

    • Calories: 206 kcal per slice
    • Protein: 3g
    • Fat: 10g
    • Carbs: 28g
    • Serving Size: 1 slice (1/10 of the loaf)

    Frequently Asked Questions

    Can I use fresh pumpkin instead of canned?

    Yes, you can use fresh pumpkin puree. Just ensure it’s well-cooked and drained to achieve a similar consistency to canned.

    How can I make this bread gluten-free?

    Substitute the all-purpose flour with a 1:1 gluten-free baking blend. Ensure it contains xanthan gum for best results.

    Can I add chocolate chips?

    Absolutely! Stir in 1/2 cup of chocolate chips into the batter for a sweet twist.

    What if I don’t have pumpkin pie spice?

    You can make your own by combining 1 teaspoon cinnamon, 1/2 teaspoon nutmeg, 1/4 teaspoon ginger, and a pinch of cloves.

    Is this recipe suitable for vegans?

    You can make it vegan by replacing the eggs with flax eggs (2 tablespoons flaxseed meal + 5 tablespoons water) and using a plant-based oil.

  • 5-MIN FUEL: Your Ultimate Crustless Quiche Recipe!

    5-MIN FUEL: Your Ultimate Crustless Quiche Recipe!

    Introduction & My Personal Story

    Ah, the crustless quiche! Just the mention of it takes me back to my bustling college days. I remember those early mornings when I had just five minutes to whip up breakfast before dashing off to class. Back then, I was on a tight budget and even tighter schedule, so I had to get creative in the kitchen. That’s when I stumbled upon the idea of a crustless quiche. It was simple, quick, and packed with the energy I needed to keep me going through a long day of lectures and study sessions.

    The first time I made it, I was skeptical. Could something so easy really taste good? But as I pulled that golden, fluffy quiche out of the oven, the aroma was irresistible. One bite, and I was hooked. The combination of **eggs**, **ham**, **broccoli**, and **cheese** created a flavor explosion that was both satisfying and nourishing. Over the years, this recipe has been my go-to for busy mornings, lazy brunches, and even late-night snacks. It’s a dish that feels like a warm hug, reminding me of those formative years when I learned to balance life, studies, and my passion for cooking.

    Why You’ll Love This Recipe

    • Quick and easy – Ready in just 5 minutes of prep!
    • No crust – Fewer carbs and gluten-free.
    • Versatile – Customize with your favorite ingredients.
    • Great for meal prep – Make ahead and enjoy all week.
    • Perfect for any meal – Breakfast, lunch, or dinner.

    Detailed Ingredients

    To make this delicious crustless quiche, you’ll need:

    • **5 large eggs** – Fresh and free-range if possible.
    • **1 cup (240 ml) whole milk** – For a rich and creamy texture.
    • **1/4 teaspoon salt** – Enhance the natural flavors.
    • **1/4 teaspoon black pepper** – Freshly ground for best taste.
    • **1/4 teaspoon garlic powder** – Adds a subtle kick.
    • **1 cup (150 g) chopped cooked ham** – Look for a quality cut at the deli.
    • **1 cup (150 g) chopped broccoli** – Fresh or frozen, just make sure it’s thawed.
    • **1/2 cup (75 g) chopped onion** – Adds sweetness and depth.
    • **1 cup (100 g) shredded cheese** – Cheddar or your favorite blend.

    Step-by-Step Instructions

    Step 1: Preheat and Prep

    Start by preheating your oven to 375°F (190°C). While the oven heats, grease a 9-inch pie dish with a bit of butter or non-stick spray. This will ensure your quiche releases easily after baking.

    Step 2: Whisk the Mixture

    In a large bowl, crack the **eggs** and add the **milk**. Whisk together until fully combined. Add the **salt**, **pepper**, and **garlic powder**, whisking again to incorporate the seasonings evenly. Chef’s Tip: Whisking thoroughly ensures a light, airy texture.

    Step 3: Add the Fillings

    Stir in the **chopped ham**, **broccoli**, and **onion**. Make sure these ingredients are evenly distributed throughout the egg mixture. Finally, fold in the **shredded cheese**, ensuring it’s well combined. In my 5 years of experience, I’ve found that mixing the cheese into the egg mixture, rather than just sprinkling it on top, prevents it from burning and gives a more uniform flavor.

    Step 4: Pour and Bake

    Carefully pour the mixture into your prepared pie dish, spreading it evenly with a spatula. Place it in the oven and bake for 35–40 minutes, or until the quiche is set and a knife inserted into the center comes out clean. The top should be lightly golden, and the quiche should have a slight jiggle when you gently shake the dish.

    Step 5: Cool and Serve

    Remove from the oven and let it cool for 5–10 minutes. This resting time allows the quiche to set further and makes slicing easier. Serve warm, garnished with fresh herbs if desired.

    Common Mistakes to Avoid

    Even a simple dish like this can have pitfalls. Here are some common mistakes and how to avoid them:

    • Overbaking: This can lead to a dry, rubbery texture. Keep an eye on the quiche during the last 5 minutes of baking.
    • Uneven Cooking: Make sure ingredients are evenly distributed to avoid uneven cooking.
    • Using Too Much Liquid: Stick to the recipe’s milk-to-egg ratio to prevent a soggy quiche.
    • Skipping the Grease: Always grease your dish to ensure the quiche releases easily.

    How to Store & Reheat

    Once your quiche has cooled completely, cover it tightly with plastic wrap or transfer slices to an airtight container. It will keep in the refrigerator for up to 4 days. For longer storage, you can freeze slices individually wrapped in plastic wrap and then foil, for up to 2 months.

    To reheat, place a slice in the microwave for 1-2 minutes or until heated through. If frozen, thaw in the refrigerator overnight before reheating.

    Ingredient Substitutions

    If you don’t have all the ingredients on hand, here are some safe swaps:

    • Milk: Substitute with almond milk or soy milk for a dairy-free option.
    • Ham: Use cooked bacon or sausage for a different flavor profile.
    • Broccoli: Spinach or kale can be a great alternative for greens.
    • Cheese: Try using feta, mozzarella, or Swiss cheese for a unique taste.

    Nutrition Facts

    Here’s the nutritional breakdown per slice (assuming 6 slices):

    • **Calories:** 293 kcal
    • **Protein:** 18g
    • **Fat:** 20g
    • **Carbohydrates:** 7g
    • **Serving Size:** 1 slice

    Frequently Asked Questions

    • Can I make this quiche ahead of time? Absolutely! It’s perfect for meal prep. Make it the night before and reheat in the morning.
    • Can I make this quiche vegetarian? Yes, simply omit the ham and add more vegetables or a vegetarian protein like tofu.
    • What can I serve with this quiche? It’s great on its own, but you can pair it with a fresh salad or some whole grain toast.
    • How do I know when the quiche is done? The center should be set, and a knife inserted should come out clean.
    • Can I use egg substitutes? Yes, liquid egg substitutes work well if you’re looking to reduce cholesterol.