Tag: NoBake

  • CHEAT DAY: Irresistible Cranberry Orange Protein Delights

    CHEAT DAY: Irresistible Cranberry Orange Protein Delights

    Introduction & My Personal Story

    Let me take you back to a crisp autumn afternoon when I first stumbled upon the magical combination of cranberries and oranges. I was visiting a local farmer’s market, enjoying the vibrant array of fresh produce when I was struck by a wave of nostalgia. The sweet-tart scent of cranberries mingling with the citrusy aroma of fresh oranges immediately transported me back to my grandmother’s kitchen. She used to make a delightful cranberry-orange bread that would fill the house with warmth and joy. Those memories inspired me to create a modern twist on her classic recipe, but with a healthy, protein-packed spin. Enter the Cranberry Orange Protein Delights – a no-bake treat that satisfies both your sweet tooth and your nutritional needs. In my 5 years of experience as a chef, I’ve found that these little delights are perfect for a cheat day, a quick snack, or even a post-workout boost. They’re easy to make, require no baking, and are infused with the nostalgic flavors of cranberries and oranges. So, join me in this culinary journey and let’s create some delicious memories together.

    Why You’ll Love This Recipe

    • Quick and Easy: No baking required, ready in under 30 minutes.
    • Nutritious and Delicious: Packed with protein and healthy fats.
    • Customizable: Easily swap ingredients to suit dietary preferences.
    • Perfect for On-The-Go: A convenient snack for busy days.
    • Great for Meal Prep: Make a batch and enjoy throughout the week.

    Detailed Ingredients

    To make these Irresistible Cranberry Orange Protein Delights, gather the following ingredients:

    • 1 cup (90g) rolled oats
    • 1/2 cup (60g) vanilla protein powder
    • 1/2 cup (125g) cashew butter
    • 1/4 cup (60ml) maple syrup
    • Zest of 1 large orange
    • 1 teaspoon vanilla extract
    • 1/2 teaspoon ground ginger
    • 1/4 teaspoon sea salt
    • 1/3 cup (50g) chopped dried cranberries
    • 1/3 cup (60g) white chocolate chips
    • Optional: Splash of almond milk, if needed

    When shopping, look for fresh, plump cranberries and a bright, fragrant orange for the best zest. Quality cashew butter and vanilla protein powder will elevate the flavor and texture of these delights.

    Step-by-Step Instructions

    Step 1: Mix the Base
    In a large mixing bowl, combine the rolled oats, vanilla protein powder, cashew butter, maple syrup, orange zest, vanilla extract, ground ginger, and sea salt. Use a spatula or your hands to mix until the ingredients form a dough. It might feel thick at first, but keep mixing until everything is well integrated.

    Step 2: Add Festive Elements
    Fold in the chopped dried cranberries and white chocolate chips to the dough. Ensure they are evenly distributed for a consistent burst of flavor in each bite.

    Step 3: Adjust Consistency
    If the mixture seems too dry, add a splash of almond milk and mix again. The dough should be moist enough to hold together when pressed but not sticky.

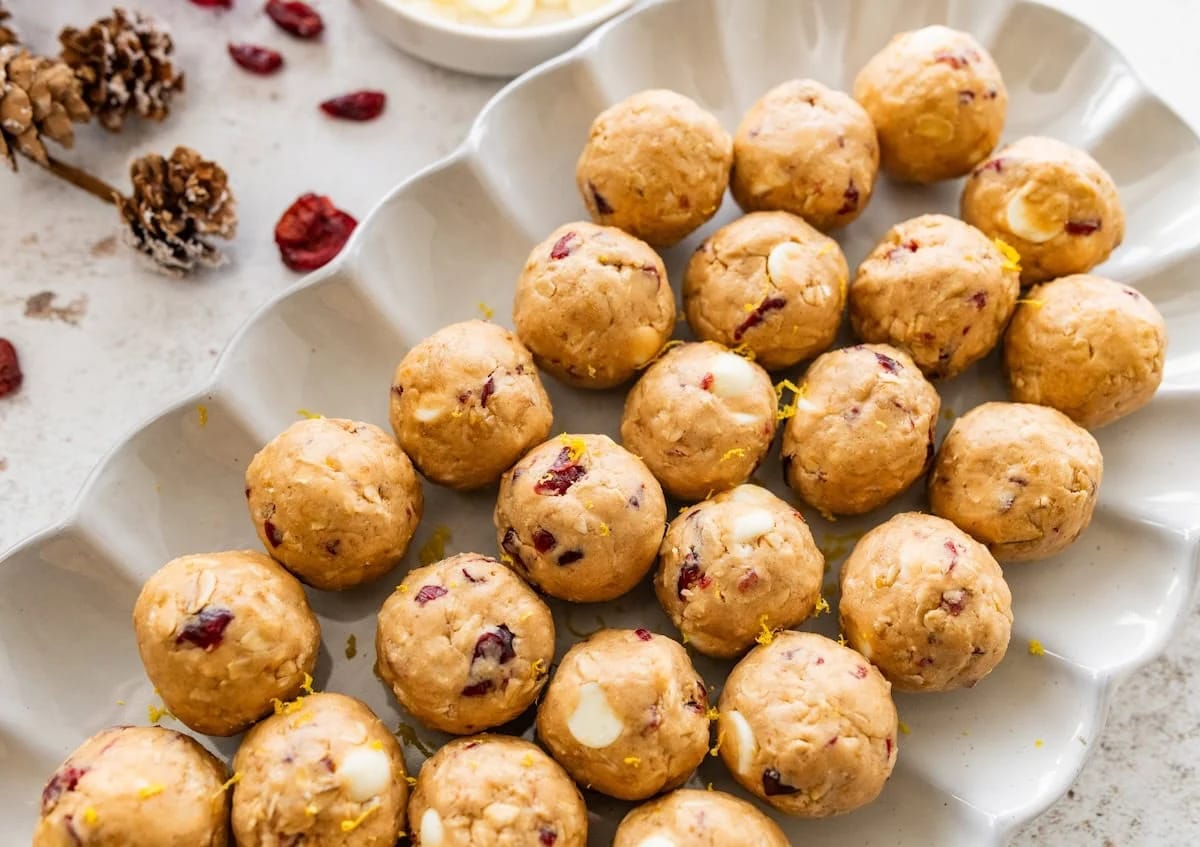
    Step 4: Shape the Balls
    Using a cookie scoop, portion out the dough and roll each piece into a ball with your hands. Aim for uniform sizes to ensure even chilling.

    Step 5: Chill and Enjoy
    Place the rolled balls on a tray lined with parchment paper. Chill them in the refrigerator for 15-20 minutes to set. Once chilled, enjoy these protein delights as a quick snack or a guilt-free dessert.

    Common Mistakes to Avoid

    One common mistake is not mixing the dough thoroughly, which can result in uneven flavors. Make sure to mix until all ingredients are well incorporated. Another issue could be dryness in the mixture; if this happens, don’t hesitate to add a bit more almond milk to reach the desired consistency. Lastly, avoid using low-quality protein powder as it can affect both the taste and texture of the protein balls.

    How to Store & Reheat

    Store these protein balls in an airtight container in the refrigerator for up to 1 week. If you want to keep them longer, freeze them for up to 3 months. To enjoy, simply remove from the fridge and let them sit at room temperature for a few minutes, or if frozen, thaw in the fridge overnight.

    Ingredient Substitutions

    If you’re looking to change things up, here are some substitutions:

    • Swap cashew butter with almond butter or peanut butter for a different nutty flavor.
    • Use honey or agave syrup instead of maple syrup for a different sweetness profile.
    • Try dark chocolate chips in place of white chocolate chips for a richer taste.
    • For a gluten-free version, ensure your rolled oats are certified gluten-free.

    Nutrition Facts

    Here’s the nutritional breakdown for one serving (1 ball):

    • Calories: 120
    • Protein: 5g
    • Fat: 6g
    • Carbohydrates: 14g
    • Serving Size: 1 ball

    Frequently Asked Questions

    Q: Can I use a different type of protein powder?
    A: Yes, feel free to use your favorite protein powder, whether it’s whey, pea, or hemp. Just keep in mind that the flavor and texture might vary slightly.

    Q: Are these protein balls suitable for vegans?
    A: Absolutely! Just ensure your protein powder and chocolate chips are vegan-friendly.

    Q: How can I make these balls nut-free?
    A: Substitute the cashew butter with sunflower seed butter or tahini for a nut-free option.

    Q: Can I add other ingredients to the mix?
    A: Of course! Feel free to incorporate chia seeds, flaxseeds, or even a handful of nuts for added texture and nutrition.

  • CHEAT DAY: Irresistible 2-Ingredient Dessert Everyone’s Raving About!

    CHEAT DAY: Irresistible 2-Ingredient Dessert Everyone’s Raving About!

    Introduction & My Personal Story

    There are days when you just need a break from the hustle and bustle, and a cheat day is the perfect excuse to indulge in something sweet without the guilt. My journey with the No-Bake 2-Ingredient Yogurt Cheesecake began on a lazy Sunday afternoon. I remember it vividly. It was one of those days when the sun was shining just right, and I was in the mood for something sweet but didn’t want to spend hours in the kitchen. That’s when I stumbled upon this simple yet delightful dessert recipe.

    In my 5 years of experience as a chef, I’ve learned that sometimes the most delicious dishes come from the most unexpected combinations. This dessert is a testament to that philosophy. I had some Greek yogurt sitting in my fridge and a bottle of honey from a local farmer’s market. It was a moment of inspiration. Combining these two ingredients resulted in a creamy, tangy, and slightly sweet cheesecake that was not only effortless but also incredibly satisfying.

    Since that day, this recipe has become a staple in my kitchen, especially when I’m in need of a quick dessert fix or when guests drop by unexpectedly. It’s a crowd-pleaser, and I’m thrilled to share it with you. Let’s dive into the details of this irresistible treat that I guarantee will become a favorite in your household too!

    Why You’ll Love This Recipe

    • Quick and easy with just two main ingredients.
    • No baking required, perfect for hot summer days.
    • Customizable with your choice of sweetener.
    • Light and refreshing, thanks to the Greek yogurt base.
    • Perfect for a guilt-free cheat day indulgence.

    Detailed Ingredients

    For this No-Bake 2-Ingredient Yogurt Cheesecake, you will need:

    • 2 cups of Greek yogurt: Opt for full-fat for creaminess. Look for brands that have a thick consistency and minimal added sugar.
    • 1 cup of sweetener: Choose between honey, maple syrup, or agave nectar. Ensure it’s high-quality for the best flavor.

    Step-by-Step Instructions

    Let’s break down the process to ensure you achieve the perfect cheesecake every time.

    Step 1: Mix the Ingredients

    In a large mixing bowl, combine 2 cups of Greek yogurt with 1 cup of your chosen sweetener. Use a whisk or an electric mixer to blend them until the mixture is smooth and creamy. Chef’s Tip: Ensure there are no lumps for a silky texture.

    Step 2: Prepare the Pan

    Lightly grease a cake pan or line it with parchment paper. This prevents the cheesecake from sticking, making it easier to remove once set.

    Step 3: Pour and Smooth

    Pour the yogurt mixture into the prepared pan. Use a spatula to smooth the top, ensuring an even surface. This will help the cheesecake set uniformly.

    Step 4: Chill and Set

    Cover the pan with plastic wrap and place it in the refrigerator. Let it chill for at least 2 hours. The longer it chills, the firmer the texture will be. Chef’s Tip: Overnight chilling results in a more stable cheesecake.

    Step 5: Serve and Enjoy

    Once set, carefully remove the cheesecake from the pan. Slice it into pieces and serve. You can garnish with fresh fruits like berries or a drizzle of additional honey for extra sweetness.

    Common Mistakes to Avoid

    Even with a simple recipe, things can go awry. Here’s what to watch out for:

    • Using low-fat yogurt: This can result in a watery texture. Stick to full-fat for best results.
    • Skipping the chilling time: The cheesecake needs time to firm up. Be patient and let it chill for at least 2 hours.
    • Not mixing thoroughly: Lumps can ruin the texture. Ensure the yogurt and sweetener are well combined.

    How to Store & Reheat

    Store any leftover cheesecake in an airtight container in the refrigerator. It will keep for up to 5 days. Since this is a no-bake dessert, reheating isn’t necessary. Simply remove from the fridge and enjoy directly.

    Ingredient Substitutions

    If you need to make swaps, here’s how you can do it safely:

    • Greek yogurt: Can be substituted with coconut yogurt for a dairy-free version.
    • Sweetener: Swap honey with maple syrup or agave nectar. Adjust the quantity to taste as some sweeteners are more potent than others.

    Nutrition Facts

    • Calories: 200 per serving
    • Protein: 10g
    • Fat: 5g
    • Carbs: 30g
    • Serving Size: 1 slice (1/8 of the cheesecake)

    Frequently Asked Questions

    • Can I use flavored yogurt? Yes, but it will alter the taste. Plain Greek yogurt is recommended for a neutral base.
    • What if my cheesecake doesn’t set? Ensure it chills for a longer period. If it’s still runny, try adding a bit of gelatin to the mixture next time.
    • Can I add toppings? Absolutely! Fresh fruits, nuts, or a drizzle of chocolate syrup can enhance the flavor.
    • Is this dessert suitable for vegans? Swap Greek yogurt with a plant-based alternative and use agave nectar as the sweetener.

  • CHEAT DAY: Irresistible High-Protein S’mores You’ll Crave!

    CHEAT DAY: Irresistible High-Protein S’mores You’ll Crave!

    Introduction & My Personal Story

    Ah, the joy of a cheat day! For me, it’s not just about indulging in something delicious but about reliving a cherished memory. My journey with these **High-Protein S’mores** began during a camping trip with close friends. I remember the crackling campfire, the laughter, and the challenge of making the perfect s’more without burning it. As the gooey marshmallow sandwiched between graham crackers and chocolate melted in my mouth, I was transported back to a simpler time full of joy and camaraderie. Fast forward to my culinary career, I wanted to recreate that nostalgic delight but with a twist – a healthier, protein-packed version that I could enjoy on any cheat day without the guilt.

    In my 5 years of experience as a chef, I’ve learned that indulging doesn’t mean sacrificing nutrition. These **High-Protein S’mores** are a testament to that philosophy. They’re a no-bake treat that combines the classic flavors of s’mores with a boost of protein, making them not just a treat for the taste buds but also a little reward for the body. Every time I make them, I’m reminded of those nights under the stars, and I hope this recipe brings a bit of that magic into your home.

    Why You’ll Love This Recipe

    • **No-Bake Simplicity**: Perfect for when you want a quick and easy treat without turning on the oven.
    • **High-Protein**: Packed with protein to satisfy your cravings and keep you full longer.
    • **Guilt-Free Indulgence**: Enjoy a sweet treat without the guilt, thanks to its healthier ingredients.
    • **Customizable**: Easily tweak the ingredients to fit your dietary needs or taste preferences.
    • **Kid-Friendly**: A fun and delicious treat that’s perfect for the whole family.

    Detailed Ingredients

    Here’s what you’ll need to gather for this delightful cheat day treat:

    • **Butter**: 1 tablespoon. Look for unsalted butter for better control over the saltiness.
    • **Mini Marshmallows**: 5 ounces. Opt for fresh marshmallows that are soft and squishy.
    • **Honey Graham Catalina Crunch Cereal**: 9 ounces. This provides the crunch and a touch of sweetness.
    • **Mini Chocolate Chips**: 2-3 tablespoons. Choose high-quality semi-sweet or dark chocolate for a richer flavor.

    Step-by-Step Instructions

    Let’s dive into making these **High-Protein S’mores** step by step:

    Step 1: Prepare Your Pan
    Line an 8×8-inch baking dish with parchment paper or lightly grease it. This will make it easy to remove the s’mores once they’re set.

    Step 2: Melt the Marshmallows
    In a medium saucepan over medium-low heat, melt 1 tablespoon of butter. Add 5 ounces of mini marshmallows and stir continuously. The key here is to keep the heat low and stir patiently until the marshmallows are completely melted and smooth. Chef’s Tip: Be careful not to overheat to prevent the marshmallows from becoming too sticky and difficult to mix.

    Step 3: Mix in the Cereal
    Immediately add 9 ounces of Honey Graham Catalina Crunch cereal to the saucepan. Gently fold the cereal into the melted marshmallow mixture until it’s evenly coated. You’ll want to work quickly here to ensure everything combines well before the marshmallow cools down too much.

    Step 4: Add Chocolate Chips
    Let the mixture cool for about 30–60 seconds. This slight cooling prevents the chocolate chips from melting completely. Fold in 2-3 tablespoons of mini chocolate chips, ensuring they’re well distributed throughout the mixture.

    Step 5: Transfer and Set
    Transfer the mixture to your prepared pan. Use a spatula or parchment paper to lightly press it into an even layer. For an extra chocolatey touch, sprinkle any remaining chocolate chips on top and gently press them in.

    Step 6: Let It Cool
    Allow the mixture to cool at room temperature for about 30-60 minutes. This will give it time to set before you cut it into squares.

    Common Mistakes to Avoid

    • **Overheating the Marshmallows**: Keep the heat low to prevent the marshmallows from becoming too sticky.
    • **Skipping the Cooling Step**: Letting the mixture cool slightly before adding chocolate chips is essential to prevent them from melting completely.
    • **Uneven Mixing**: Make sure to fold the cereal and marshmallow mixture thoroughly to ensure every piece is coated.

    How to Store & Reheat

    • Room Temperature: Store in an airtight container for up to 3 days.
    • Refrigerator: Keep chilled for up to 7 days for a firmer, chewy texture.
    • Freezer: Freeze squares in a freezer-safe container for up to 2 months. Thaw at room temperature before eating.

    Ingredient Substitutions

    • **Butter**: Substitute with coconut oil or a plant-based margarine for a vegan option.
    • **Mini Marshmallows**: Use vegan marshmallows if needed.
    • **Honey Graham Catalina Crunch Cereal**: Swap with any high-protein cereal of your choice.
    • **Mini Chocolate Chips**: Use dairy-free chocolate chips for a vegan-friendly treat.

    Nutrition Facts

    • **Calories**: Approximately 150 per serving.
    • **Protein**: 5 grams.
    • **Fat**: 6 grams.
    • **Carbs**: 20 grams.
    • **Serving Size**: 1 square (based on 16 squares per batch).

    Frequently Asked Questions

    • Can I make these s’mores gluten-free?
      Yes, just ensure the cereal and marshmallows you use are certified gluten-free.
    • What’s the best way to cut the s’mores?
      Use a sharp knife and cut while they are still slightly warm for cleaner edges.
    • Can I add nuts or other mix-ins?
      Absolutely! Chopped nuts or dried fruit can add extra flavor and texture.
    • How can I make these s’mores more indulgent?
      Drizzle with melted chocolate or add a layer of peanut butter before setting.
    • Are these safe for kids?
      Yes, they’re a fun and tasty treat for kids, but be mindful of the sugar content.