Tag: HustleRecipes

  • CHEAT DAY: Irresistible Chocolate Protein Delights Everyone Craves!

    CHEAT DAY: Irresistible Chocolate Protein Delights Everyone Craves!

    Introduction & My Personal Story

    As a chef with over 5 years of experience, I’ve come to recognize the irreplaceable joy of creating dishes that not only satisfy cravings but also align with a healthy lifestyle. One such creation that has become a staple in my kitchen is the **Irresistible Chocolate Protein Delights**. I remember the first time I crafted these little bites of heaven. It was a chilly Saturday afternoon, and my family was craving something sweet yet nutritious. As I stood in the kitchen, surrounded by a medley of ingredients, I had a lightbulb moment. Why not combine the indulgence of chocolate with the powerhouse of protein?

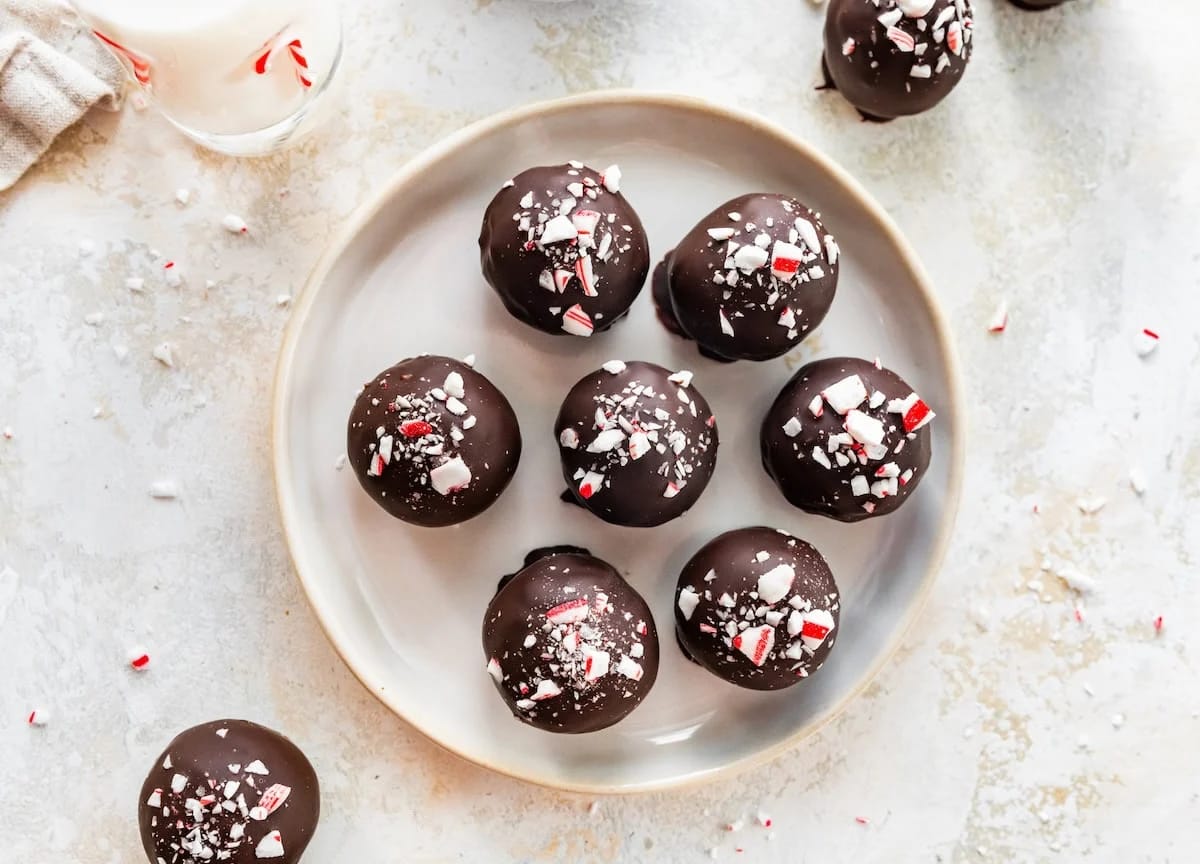
    What emerged was nothing short of a revelation. The rich aroma of **cacao powder** blended seamlessly with the creamy texture of **almond butter**, while the subtle sweetness of **Medjool dates** added a natural depth. Each bite was a burst of flavor, perfectly complemented by the slight crunch of flaky sea salt. My family couldn’t get enough, and soon, these protein delights became the go-to treat for our cheat days. Crafting these balls is now a cherished ritual, a moment of creativity and indulgence that brings us all together.

    Why You’ll Love This Recipe

    • Quick and easy to make – no baking required!
    • Packed with protein to keep you fueled and satisfied.
    • Rich in chocolate flavor with a hint of sea salt.
    • Perfect for a guilt-free cheat day indulgence.
    • Easy to store and enjoy throughout the week.

    Detailed Ingredients

    • 1 cup **Medjool dates**, pitted (approx. 200g)
    • 1/2 cup **oat flour** (60g)
    • 1/4 cup **cacao powder** (25g)
    • 1/2 cup **chocolate protein powder** (60g)
    • 2 tablespoons **maple syrup** (30ml)
    • 1/4 cup **almond or cashew butter** (60g)
    • 1/4 teaspoon **sea salt**
    • 1/2 cup **dark chocolate chips** (85g)
    • 1 tablespoon **coconut oil** (15ml)
    • Flaky sea salt for sprinkling

    Step-by-Step Instructions

    Step 1: Combine Ingredients

    Start by adding your **Medjool dates**, **oat flour**, **cacao powder**, **chocolate protein powder**, **maple syrup**, **almond butter**, and **sea salt** into a food processor. Ensure the dates are pitted to avoid any unpleasant surprises. Chef’s Tip: If your dates are a bit dry, soak them in warm water for 10 minutes before using.

    Step 2: Blend

    Blend the mixture until you achieve a sticky dough. You may need to scrape down the sides of the food processor a few times to ensure everything is well combined. If the mixture seems too dry, gradually add 1–2 teaspoons of water until the desired consistency is reached.

    Step 3: Form Balls

    Using your hands or a small cookie scoop, form the dough into 12 equal balls. Each should be about the size of a golf ball. Chef’s Tip: Lightly oil your hands to prevent the dough from sticking while you roll.

    Step 4: Prepare Chocolate Coating

    In a microwave-safe bowl, combine the **dark chocolate chips** and **coconut oil**. Heat in 30-second intervals, stirring in between, until the chocolate is fully melted and smooth. Be careful not to overheat, as chocolate can burn easily.

    Step 5: Dip Balls

    Carefully dip each protein ball into the melted chocolate, allowing any excess to drip off. Place them on a parchment-lined tray for easy cleanup.

    Step 6: Finish

    Immediately sprinkle the tops with flaky sea salt. This not only adds a delightful crunch but also enhances the chocolate’s richness. Chill the balls in the fridge or freezer for 10–15 minutes to set the chocolate coating.

    Common Mistakes to Avoid

    • **Overblending**: Blending too long can cause the mixture to become too oily. Pulse just until the dough forms.
    • **Skipping the Soak**: If your dates are dry, not soaking them can lead to a crumbly texture.
    • **Chocolate Overheating**: Always melt chocolate slowly to avoid burning. Stir frequently.

    How to Store & Reheat

    Store your **Chocolate Protein Delights** in an airtight container in the refrigerator for up to 1 week. For longer storage, freeze them for up to 3 months. To enjoy, simply let them sit at room temperature for a few minutes to soften slightly.

    Ingredient Substitutions

    • **Dates**: Substitute with figs or prunes for a different flavor profile.
    • **Oat Flour**: Almond flour can be used for a gluten-free option.
    • **Almond Butter**: Peanut butter or sunflower seed butter work well too.

    Nutrition Facts

    • Calories: 150 per ball
    • Protein: 5g
    • Fat: 7g
    • Carbs: 18g
    • Serving Size: 1 ball

    Frequently Asked Questions

    Q: Can I use a different type of protein powder?

    A: Absolutely! Feel free to use any protein powder you like, but be aware it might slightly change the flavor and texture.

    Q: How can I make these vegan?

    A: Ensure your protein powder and chocolate chips are vegan-friendly. Most other ingredients are naturally vegan.

    Q: What if I don’t have a food processor?

    A: A high-power blender could work, but you may need to blend in batches. Alternatively, chop the dates finely and mix by hand.

    Q: How do I prevent the balls from sticking together?

    A: Store them in layers with parchment paper in between to avoid sticking.

  • NO-BAKE REWARD: Irresistibly Creamy Frozen Delight for Summer!

    NO-BAKE REWARD: Irresistibly Creamy Frozen Delight for Summer!

    Introduction & My Personal Story

    Ah, summer! The season of sun, fun, and frozen treats. One of my fondest memories as a child was spending lazy afternoons at my grandmother’s house, where she would whip up the most delightful, no-bake desserts. Her kitchen was a haven of creativity, and while she had a treasure trove of recipes, there was one that stood out – the frozen s’mores. These weren’t your ordinary s’mores. They were a creamy, chocolatey, and irresistibly cool version that required no fire or fuss. Just layers of crunchy graham crackers, rich chocolate, and a creamy filling that melted in your mouth. Fast forward to today, in my 5 years of experience as a chef, I’ve managed to recreate that magic with a modern twist. My version, the **No-Bake Protein Frozen S’mores**, is not only a nod to those nostalgic days but also a perfect treat for those who crave something sweet yet nutritious. This treat is perfect for a cheat day or just a sunny afternoon indulgence, offering a balance of flavor and protein-packed goodness.

    Why You’ll Love This Recipe

    • **No-Bake**: Perfect for hot days when you don’t want to turn on the oven.
    • **Protein-Packed**: A guilt-free indulgence that supports your fitness goals.
    • **Quick to Make**: Minimal preparation time with maximum reward.
    • **Customizable**: Easily adapt with your favorite flavors and add-ins.
    • **Kid-Friendly**: A fun and easy recipe to make with the little ones.

    Detailed Ingredients

    • **Graham Crackers**: 200g (about 20 crackers). Look for whole grain options for added fiber.
    • **Chocolate Chips**: 150g (about 1 cup). Choose high-quality dark chocolate for a richer taste.
    • **Coco Whip**: 250ml (1 cup), thawed. Opt for the unsweetened version if watching sugar intake.
    • **Vanilla Protein Powder**: 50g (about 1/2 cup). Use a brand with a creamy texture for best results.

    Step-by-Step Instructions

    Step 1: Prepare Your Pan

    Line an 8×8-inch baking dish with parchment paper, ensuring there’s enough overhang on the sides. This will make it easier to lift out the frozen bars later. Chef’s Tip: Secure the parchment with binder clips to keep it in place while assembling.

    Step 2: Layer the Graham Crackers

    Arrange your **graham crackers** in a single layer, upside down, to cover the bottom of the pan completely. Some slight overlapping is fine, but aim for a snug fit.

    Step 3: Melt the Chocolate

    In a microwave-safe bowl, melt the **chocolate chips** in 30-second intervals, stirring in between, until smooth. Alternatively, you can use a double boiler over low heat. Pour the melted chocolate over the graham crackers and spread evenly with a spatula.

    Step 4: Prepare the Filling

    In a medium bowl, combine the thawed **coco whip** and **vanilla protein powder**. Stir until smooth and fully incorporated. Gently spread this mixture over the chocolate layer, ensuring even coverage.

    Step 5: Add the Top Layer

    Place the remaining graham crackers over the filling, pressing down lightly to secure them in place. This will form the top layer of your frozen s’mores.

    Step 6: Freeze

    Freeze the assembled dish for at least 2 hours, or until firm. Chef’s Tip: For the best texture, allow it to freeze overnight.

    Step 7: Serve and Enjoy

    Use the parchment overhang to lift the bars out of the dish. Slice into squares and serve immediately. Store any leftovers in an airtight container in the freezer.

    Common Mistakes to Avoid

    • Skipping the Parchment Paper: This makes removing the bars a hassle. Always line your dish.
    • Overcooking Chocolate: Chocolate can seize if overheated. Use low heat and stir frequently.
    • Uneven Layers: Spread each layer evenly to ensure every bite has a balance of flavors.

    How to Store & Reheat

    Store the frozen s’mores in an airtight container, using parchment paper between layers to prevent sticking. They are best consumed within 2 weeks. If they become too firm, let them sit at room temperature for 2–5 minutes before enjoying.

    Ingredient Substitutions

    • Graham Crackers: Substitute with digestive biscuits for a similar texture.
    • Chocolate Chips: Use white or milk chocolate for a sweeter version.
    • Coco Whip: Replace with regular whipped cream if dairy is not a concern.
    • Vanilla Protein Powder: Choose chocolate or peanut butter flavored protein for a different twist.

    Nutrition Facts

    • Calories: 250 per serving
    • Protein: 8g
    • Fat: 12g
    • Carbs: 30g
    • Serving Size: 1 square (based on 16 servings)

    Frequently Asked Questions

    Q: Can I make these in advance?

    A: Absolutely! These can be made a day ahead and stored in the freezer until you’re ready to serve.

    Q: What if I don’t have protein powder?

    A: You can omit it, though the protein content will be lower. Consider adding a tablespoon of peanut butter for flavor and some protein.

    Q: Can I add nuts or other toppings?

    A: Yes! Chopped nuts, shredded coconut, or sprinkles can be added between layers for extra texture.

    Q: Is there a vegan option?

    A: Use vegan graham crackers, chocolate, and protein powder to make this recipe completely plant-based.

  • NO-BAKE REWARD: Irresistibly Creamy Pumpkin Delight!

    NO-BAKE REWARD: Irresistibly Creamy Pumpkin Delight!

    Introduction & My Personal Story

    Ah, the magic of autumn! There’s something undeniably comforting about this time of year, with its crisp air and vibrant foliage. It’s a season that calls for cozy gatherings and indulgent treats. One of my all-time favorites is the No-Bake Reward: Irresistibly Creamy Pumpkin Delight. This dessert isn’t just a recipe; it’s a cherished tradition that takes me back to my childhood kitchen, where my grandmother would whip up the most delightful pumpkin creations. I remember the warmth of the kitchen, the aromatic scent of spices, and the joy of sneaking a spoonful of the creamy filling when she wasn’t looking.

    In my 5 years of experience as a chef, I’ve come to appreciate the beauty of no-bake desserts. They’re perfect for those days when you crave something sweet but don’t want to spend hours in the kitchen. This pumpkin delight has become a staple in my repertoire, especially during the holiday season. It’s the kind of dessert that brings people together, sparking conversations and creating memories. Every time I make it, I’m reminded of those cherished moments with my grandmother, and I hope it brings the same warmth and joy to your home.

    Why You’ll Love This Recipe

    • Quick and easy to prepare, with no baking required.
    • Rich, creamy texture that melts in your mouth.
    • Packed with the warm flavors of autumn spices.
    • Perfect for holiday gatherings or a cozy night in.
    • Can be made ahead of time, saving you stress on busy days.

    Detailed Ingredients

    • 1 cup (240g) of **pumpkin puree** – Look for canned puree with no added sugar.
    • 1 cup (240g) of **cream cheese**, softened – Opt for full-fat for the creamiest texture.
    • 1 cup (240g) of **whipped topping** – Make sure it’s thawed if using frozen.
    • 1 teaspoon of **vanilla extract** – Pure extract for the best flavor.
    • 1 teaspoon of **pumpkin pie spice** – A blend of cinnamon, nutmeg, ginger, and cloves.
    • 1 package of **graham crackers** – Approximately 200g, for layering.
    • 1 cup (240ml) of **milk** – For dipping the graham crackers.
    • Additional whipped topping and crushed graham crackers for garnish (optional).

    Step-by-Step Instructions

    Step 1: Begin by preparing your pumpkin filling. In a large mixing bowl, combine 1 cup of **pumpkin puree**, 1 cup of **cream cheese**, and 1 cup of **whipped topping**. Use an electric mixer on medium speed to blend until the mixture is smooth and creamy. Chef’s Tip: Ensure your cream cheese is at room temperature to avoid lumps.

    Step 2: Add 1 teaspoon of **vanilla extract** and 1 teaspoon of **pumpkin pie spice** to the mixture. Blend again until the spices are well incorporated, and the filling is fragrant and evenly spiced.

    Step 3: In a shallow bowl, pour 1 cup of **milk**. Dip each **graham cracker** quickly into the milk, just enough to moisten but not soggy. Line the bottom of a 9×13-inch dish with a layer of these dipped crackers.

    Step 4: Spread half of the pumpkin mixture over the graham cracker layer. Use a spatula to evenly distribute and smooth the filling.

    Step 5: Repeat the process with another layer of dipped **graham crackers**, followed by the remaining pumpkin mixture. Smooth out the top layer with a spatula.

    Step 6: For a finishing touch, spread additional **whipped topping** over the top. If desired, sprinkle with crushed graham crackers for added texture and visual appeal.

    Step 7: Cover the dish with plastic wrap and refrigerate for at least 4 hours, or until the dessert is set and the flavors have melded together. Chef’s Tip: This dessert tastes even better when left overnight, allowing the crackers to soften and the spices to deepen.

    Step 8: Slice, serve, and savor each creamy, spiced bite!

    Common Mistakes to Avoid

    • **Over-soaking the graham crackers**: A quick dip is all that’s needed. Too much milk can make them mushy.
    • **Lumpy filling**: Ensure the cream cheese is fully softened before mixing to achieve a smooth consistency.
    • **Skipping chill time**: The dessert needs at least 4 hours to set properly and develop flavors.

    How to Store & Reheat

    To store the Pumpkin Delight, cover it tightly with plastic wrap or transfer to an airtight container. It will keep in the refrigerator for up to 3 days. While this dessert is best enjoyed cold, if you prefer a slightly warmer treat, allow it to sit at room temperature for about 15 minutes before serving.

    Ingredient Substitutions

    • **Dairy-free**: Substitute cream cheese and whipped topping with plant-based alternatives.
    • **Gluten-free**: Use gluten-free graham crackers for those with dietary restrictions.
    • **Low-sugar**: Opt for a sugar-free whipped topping and check the label on your pumpkin puree for added sugars.

    Nutrition Facts

    • Calories: 250 per serving
    • Protein: 3g
    • Fat: 15g
    • Carbs: 28g
    • Serving Size: 1 slice (approx. 1/12 of the recipe)

    Frequently Asked Questions

    • Can I use fresh pumpkin instead of canned? Yes, simply roast and puree fresh pumpkin for a homemade touch.
    • How far in advance can I make this? It’s best made a day ahead to allow flavors to meld and the dessert to set.
    • Can I freeze this dessert? Freezing is not recommended as it may alter the texture.
    • What can I use instead of graham crackers? Vanilla wafers or digestive biscuits work well as substitutes.

  • CHEAT DAY: Irresistible High-Protein Apple Salad Delight!

    CHEAT DAY: Irresistible High-Protein Apple Salad Delight!

    Introduction & My Personal Story

    Ah, the glorious cheat day! A day where the usual rules of disciplined eating are momentarily set aside, allowing for a culinary indulgence that satisfies the soul. One dish that has consistently been my go-to for these special occasions is the Irresistible High-Protein Apple Salad Delight. My journey with this recipe began quite serendipitously during my early days as a chef. In my 5 years of experience, I’ve learned that sometimes the simplest ingredients can create the most profound experiences.

    It was a sunny afternoon, and I was experimenting with various high-protein recipes in my cozy kitchen. I had just returned from the market with a bag full of fresh, crisp apples. Their vibrant color and sweet aroma were irresistible. I decided to pair them with some creamy Greek yogurt, a staple in my kitchen for its high protein content and velvety texture. As I mixed in some honey and a handful of crunchy walnuts, a sprinkle of cinnamon added a warm, inviting aroma that filled the room. The result was a delightful blend of flavors and textures that was both nourishing and indulgent.

    From that day on, this salad has become a cherished part of my cheat day repertoire. It’s a dish that embodies the perfect balance between health and indulgence, making it a favorite not only for me but also for my friends and family. Let me take you through this culinary experience, so you too can enjoy this delightful treat on your next cheat day.

    Why You’ll Love This Recipe

    • Quick and easy to prepare, perfect for a cheat day indulgence.
    • Packed with protein from the Greek yogurt, keeping you full and satisfied.
    • The combination of sweet apples and crunchy walnuts creates a tantalizing texture.
    • Honey and cinnamon add a natural sweetness and warmth without being overpowering.
    • Chill time of just 30 minutes enhances the flavors, making it a refreshing treat.

    Detailed Ingredients

    • 3 large apples, preferably Honeycrisp or Fuji, chopped (about 450 grams)
    • 1 cup (240 grams) Greek yogurt, plain and unsweetened
    • 2 tablespoons (30 ml) honey, plus extra for drizzling
    • 1/2 cup (60 grams) walnuts, roughly chopped
    • 1 teaspoon cinnamon
    • A pinch of salt to enhance flavors

    Step-by-Step Instructions

    Step 1: Start by washing the apples thoroughly. Core and chop them into bite-sized pieces. Chef’s Tip: Leave the skin on for added fiber and nutrition.

    Step 2: In a large mixing bowl, combine the chopped apples with 1 cup of Greek yogurt. The yogurt should be thick and creamy, which helps in binding all the ingredients together.

    Step 3: Add 2 tablespoons of honey to the mixture. Honey not only sweetens the salad but also adds a lovely floral note. If you prefer a sweeter salad, feel free to add an extra drizzle.

    Step 4: Toss in 1/2 cup of roughly chopped walnuts. These add a delightful crunch and are a great source of healthy fats.

    Step 5: Sprinkle 1 teaspoon of cinnamon over the mixture. This spice complements the sweetness of the apples and honey, adding depth to the flavor profile.

    Step 6: Gently fold the ingredients together until well combined. Be careful not to overmix, as you want to maintain the texture of the apples and walnuts.

    Step 7: Cover the bowl with plastic wrap and refrigerate for at least 30 minutes. This chilling time allows the flavors to meld beautifully, creating a refreshing and satisfying dish.

    Step 8: Serve the salad in individual bowls, topped with additional walnuts and a drizzle of honey for an extra touch of indulgence.

    Common Mistakes to Avoid

    • Overmixing: This can lead to a mushy texture. Gently fold the ingredients to maintain the integrity of the apples and walnuts.
    • Using too much honey: While it adds sweetness, too much can overpower the other flavors. Start with the recommended amount and adjust to taste.
    • Skipping the chill time: This step is crucial for the flavors to develop fully. Don’t rush it!

    How to Store & Reheat

    To store the salad, transfer it to an airtight container and refrigerate. It will keep well for up to 3 days. Since it’s a cold salad, reheating isn’t necessary. Simply give it a good stir before serving to redistribute any settled ingredients.

    Ingredient Substitutions

    • Apples: If you prefer a different flavor, pears can be a great substitute.
    • Greek yogurt: For a dairy-free option, use coconut yogurt.
    • Walnuts: Pecans or almonds can be used if you have a preference for different nuts.
    • Honey: Maple syrup is a suitable alternative for a different sweetness profile.

    Nutrition Facts

    • Calories: 280 per serving
    • Protein: 8 grams
    • Fat: 12 grams
    • Carbohydrates: 35 grams
    • Serving Size: Approximately 1 cup

    Frequently Asked Questions

    Q: Can I make this salad in advance?

    A: Yes, it’s perfect for meal prep. Just store it in the fridge and give it a good stir before serving.

    Q: Can I use flavored yogurt?

    A: While plain yogurt is recommended to control the sweetness, you can use lightly flavored yogurt if desired. Just adjust the honey accordingly.

    Q: What type of apples work best?

    A: Crisp and sweet varieties like Honeycrisp or Fuji are ideal for their texture and flavor.

    Q: Is this salad gluten-free?

    A: Absolutely! All the ingredients are naturally gluten-free.

  • CHEAT DAY: Decadent Oreo Balls with a Hidden Twist!

    CHEAT DAY: Decadent Oreo Balls with a Hidden Twist!

    Introduction & My Personal Story

    Ah, the sweet allure of a cheat day. There’s something about indulging in a little decadence that makes all the hard work seem worth it. Let me take you back to a time when I stumbled upon my now-famous Decadent Oreo Balls with a Hidden Twist. It was a lazy Saturday afternoon, and I was in the mood for something sweet yet satisfying. I wanted to create a treat that was not only delicious but also had a surprise element—a hidden twist that would leave everyone guessing. My fondness for Oreos, combined with my love for experimenting in the kitchen, led to the birth of these delightful no-bake treats.

    In my 5 years of experience as a chef, I’ve learned that the best recipes often come from moments of spontaneous creativity. That day, I decided to incorporate a bit of cottage cheese into the mix—something I hadn’t seen done before. The result was a creamier, tangier filling that perfectly complemented the sweetness of the Oreos. These Oreo balls quickly became a family favorite, and now I’m thrilled to share this indulgent recipe with you. So, grab your apron, and let’s dive into this cheat day delight!

    Why You’ll Love This Recipe

    • No-Bake: No oven required, making it perfect for a quick treat.
    • Surprise Twist: The addition of cottage cheese adds a creamy tanginess.
    • Customizable: Top with your favorite toppings like sprinkles or crushed Oreos.
    • Simple Ingredients: Requires only a few pantry staples.
    • Quick Chill Time: Ready to enjoy in under an hour.

    Detailed Ingredients

    • Oreos: 36 cookies (about 300 grams), finely crushed.
    • Cream Cheese: 225 grams (8 oz), softened to room temperature.
    • Cottage Cheese: 100 grams, for that secret twist.
    • Chocolate Chips: 300 grams (10 oz), choose your favorite (dark, milk, or white).
    • Coconut Oil: 1 tablespoon, to help melt the chocolate smoothly.
    • Optional Toppings: Sprinkles, crushed Oreos, or sea salt.

    Step-by-Step Instructions

    Step 1: Prepare the Oreos

    Start by placing your Oreos in a food processor. Pulse them until they are finely ground. You want a consistency similar to sand. If you don’t have a food processor, a rolling pin and a ziplock bag will do the trick.

    Step 2: Blend the Mixture

    In a large mixing bowl, combine the crushed Oreos with the softened cream cheese and cottage cheese. Use a spatula or a stand mixer to blend until smooth. The mixture should be well combined with no visible chunks of cream cheese.

    Step 3: Form the Balls

    Scoop out about 1 tablespoon of the mixture and roll it into a ball using your hands. Place each ball on a baking sheet lined with parchment paper. Once all the balls are formed, place the tray in the freezer for about 30 minutes. This will help them firm up for dipping.

    Step 4: Melt the Chocolate

    In a microwave-safe bowl, combine the chocolate chips with the coconut oil. Microwave in 30-second increments, stirring in between, until the chocolate is completely melted and smooth. Alternatively, you can use a double boiler.

    Step 5: Dip the Balls

    Remove the Oreo balls from the freezer. Using a fork, dip each ball into the melted chocolate, ensuring it is fully coated. Let the excess chocolate drip off before placing it back on the parchment-lined sheet.

    Step 6: Add Toppings

    While the chocolate is still wet, sprinkle your choice of toppings—be it sprinkles, extra crushed Oreos, or a pinch of sea salt. This is where you can get creative and personalize each treat.

    Step 7: Final Chill

    Place the coated Oreo balls in the refrigerator for about 15–20 minutes, or until the chocolate is set. Then, they’re ready to serve!

    Common Mistakes to Avoid

    • Skipping the Chill: Don’t rush the chilling process; it’s crucial for firming up the balls before dipping.
    • Overheating Chocolate: Be careful not to burn the chocolate. Use short intervals when microwaving and stir often.
    • Too Much Filling: Avoid overfilling with cream cheese, which can make the balls too soft.

    How to Store & Reheat

    Once your Oreo balls are set, store them in an airtight container in the refrigerator. They will keep well for up to a week. If you prefer them warm, let them sit at room temperature for a few minutes before enjoying. However, they are best served chilled.

    Ingredient Substitutions

    • Oreos: Substitute with any chocolate sandwich cookie.
    • Cream Cheese: Use mascarpone for a richer taste.
    • Chocolate Chips: Use baking chocolate or candy melts as alternatives.

    Nutrition Facts

    • Calories: 150 per ball
    • Protein: 2 grams
    • Fat: 10 grams
    • Carbs: 15 grams
    • Serving Size: 1 ball

    Frequently Asked Questions

    Q: Can I make these Oreo balls in advance?

    A: Absolutely! They can be made a day or two in advance and stored in the fridge.

    Q: Can I use low-fat cream cheese?

    A: Yes, but the texture might be slightly different. Full-fat cream cheese gives the best results.

    Q: What if I don’t have a food processor?

    A: You can crush the Oreos using a rolling pin and a ziplock bag.

    Q: Can I freeze the Oreo balls?

    A: Yes, they can be frozen for up to a month. Thaw in the refrigerator before serving.

  • CHEAT DAY: Decadent Chocolate Peppermint Protein Delights!

    CHEAT DAY: Decadent Chocolate Peppermint Protein Delights!

    Introduction & My Personal Story

    Let me take you back to a crisp winter’s afternoon, the kind that demands a cozy sweater and a warm mug of cocoa. I was browsing through a local market when the festive scents of peppermint and chocolate wafted through the air, instantly evoking memories of holidays past. This was the moment the idea for my Decadent Chocolate Peppermint Protein Delights was born. In my 5 years of experience as a chef, I’ve always believed that indulgence and nutrition can coexist harmoniously, and these protein balls are a testament to that belief. They remind me of the joy of sneaking a piece of peppermint bark from the holiday cookie tray, but with a nutritious twist that aligns with my fitness goals. What started as a simple experiment in my kitchen has evolved into a beloved cheat day indulgence, offering the perfect balance of rich chocolate, refreshing peppermint, and a protein punch. These little delights have become a staple in my home, especially during the festive season, and I’m thrilled to share the recipe with you.

    Why You’ll Love This Recipe

    • No-Bake: No oven required, making it a quick and easy treat.
    • High-Protein: Each ball is packed with protein to fuel your day.
    • Festive Flavor: Chocolate and peppermint create a classic holiday taste.
    • Healthy Indulgence: Satisfies sweet cravings without derailing your diet.
    • Make-Ahead: Perfect for preparing in advance and storing for a quick snack.

    Detailed Ingredients

    • 1 cup (150g) **Medjool dates**, pitted
    • 1/2 cup (60g) **oat flour**
    • 1/4 cup (25g) **cacao powder**
    • 1/2 cup (50g) **chocolate protein powder**
    • 2 tablespoons **maple syrup**
    • 1/4 cup (60g) **nut butter** (almond or peanut)
    • 1/4 teaspoon **sea salt**
    • 1 teaspoon **peppermint extract**
    • 1/2 cup (90g) **dark chocolate chips**
    • 1 tablespoon **coconut oil**
    • 2 tablespoons **crushed candy canes** or **flaky sea salt** for topping

    Step-by-Step Instructions

    Step 1: Begin by gathering your ingredients. Ensure your **Medjool dates** are pitted and soft. If they feel a bit dry, soak them in warm water for about 10 minutes to rehydrate.

    Step 2: In a food processor, combine the **dates**, **oat flour**, **cacao powder**, **chocolate protein powder**, **maple syrup**, **nut butter**, **sea salt**, and **peppermint extract**. Blend the mixture until it forms a thick, sticky dough. Chef’s Tip: If your dough seems too dry, add a splash of water and pulse again until the desired consistency is achieved.

    Step 3: Using your hands, scoop out portions of the mixture and roll them into evenly sized balls. Place each ball onto a parchment-lined plate or tray. This should yield approximately 12-15 balls, depending on size.

    Step 4: In a microwave-safe bowl, combine the **dark chocolate chips** and **coconut oil**. Microwave in 30-second intervals, stirring between each, until the chocolate is fully melted and smooth. Stir in the **peppermint extract** to enhance the flavor.

    Step 5: Dip each protein ball into the melted chocolate, allowing any excess to drip off before placing it back on the parchment. Immediately sprinkle with **crushed candy canes** or **flaky sea salt** for a festive touch.

    Step 6: Refrigerate the chocolate-coated balls for about 15-20 minutes, or until the chocolate has set and hardened.

    Common Mistakes to Avoid

    • Dry Dough: If the dough is too dry, it won’t hold together. Add a bit more water or syrup to achieve the right consistency.
    • Over-Melting Chocolate: Be cautious not to overheat the chocolate as it can seize. Use short intervals in the microwave and stir often.
    • Uneven Balls: For uniform balls, use a small cookie scoop to portion the dough evenly.

    How to Store & Reheat

    Store these protein delights in an airtight container in the refrigerator for up to one week. For longer storage, you can freeze them for up to three months. To enjoy, simply take them out of the freezer and let them sit at room temperature for a few minutes before eating.

    Ingredient Substitutions

    • Dates: If you don’t have Medjool dates, use regular dates or dried figs, but ensure they’re soft.
    • Nut Butter: Swap almond or peanut butter with sunflower seed butter for a nut-free option.
    • Oat Flour: You can substitute with almond flour for a gluten-free version.

    Nutrition Facts

    • Calories: 150 per ball
    • Protein: 6g
    • Fat: 7g
    • Carbohydrates: 20g
    • Serving Size: 1 ball

    Frequently Asked Questions

    • Can I make these vegan? Yes, ensure all ingredients, including chocolate chips and protein powder, are vegan-friendly.
    • What if I don’t have a food processor? You can try using a blender, but you may need to work in smaller batches.
    • How do I make the balls firmer? Refrigerate them for longer before dipping in chocolate.
    • Can I add other flavors? Absolutely! Try adding a dash of vanilla extract or a pinch of cinnamon for variation.

  • CHEAT DAY: Sinfully Delicious Snickerdoodle Protein Balls!

    CHEAT DAY: Sinfully Delicious Snickerdoodle Protein Balls!

    Introduction & My Personal Story

    Ah, the blissful aroma of cinnamon and sugar wafting through the kitchen. If there’s one cheat day indulgence that never fails to bring a smile to my face, it’s **Snickerdoodle Protein Balls**. My journey with these little bites of heaven began a few years ago when I was trying to find a way to satisfy my sweet tooth without completely derailing my fitness goals. In my 5 years of experience as a chef, I’ve learned that the key to enjoying your food is all about balance and creativity. So, I set out to craft a recipe that offers the best of both worlds: the nostalgic taste of a classic snickerdoodle cookie paired with the nutritious boost of a protein-packed snack.

    I remember my first attempt at these delightful treats. I was skeptical, unsure if I could truly capture the essence of a snickerdoodle in a healthy form. But as I rolled the dough into perfect little spheres and coated them in a cinnamon-sugar mix, I knew I was onto something special. The first bite was a revelation—a delightful, chewy texture with just the right amount of sweetness. These **Snickerdoodle Protein Balls** became an instant hit not only with me but with everyone I shared them with. Now, they’re a staple in my kitchen, especially when I need a quick, satisfying treat that doesn’t compromise my health goals.

    Why You’ll Love This Recipe

    • Quick and easy: No baking required, ready in under 30 minutes.
    • Nutritious: Packed with protein to fuel your day.
    • Customizable: Easily adjust ingredients to suit dietary needs.
    • Convenient: Perfect for meal prep and on-the-go snacking.
    • Delicious: All the flavors of a classic snickerdoodle in a guilt-free form.

    Detailed Ingredients

    • 1 cup rolled oats (100g) – Look for gluten-free if needed.
    • 1/2 cup oat flour (60g) – Provides a smooth texture.
    • 1/2 cup vanilla protein powder (60g) – Choose your favorite brand for best results.
    • 1/2 cup cashew butter (120g) – Creamy and rich, or swap with almond butter.
    • 1/4 cup maple syrup (60ml) – Adds natural sweetness.
    • 1 tsp vanilla extract – For that classic snickerdoodle flavor.
    • 1 tsp ground cinnamon – Essential for the snickerdoodle taste.
    • 1/4 tsp salt – Enhances all the flavors.
    • 2-3 tbsp almond milk – To adjust the dough consistency.
    • 1/4 cup coconut sugar (50g) – For the coating.

    Step-by-Step Instructions

    Step 1: Gather and Measure – Before you begin, gather all your ingredients and measure them out precisely. This will make the process smooth and ensure consistency in your protein balls.

    Step 2: Mix the Base – In a medium bowl, combine **rolled oats**, **oat flour**, **vanilla protein powder**, **cashew butter**, **maple syrup**, **vanilla extract**, **cinnamon**, and **salt**. Stir with a sturdy spoon until a thick dough forms. If the mixture feels too dry, gradually add **almond milk** until it comes together. The dough should be pliable but not sticky.

    Step 3: Form the Balls – Using a small cookie scoop or tablespoon, portion out the dough and roll it between your hands to form smooth balls, about 1 inch in diameter. This recipe should yield approximately 12-15 balls.

    Step 4: Prepare the Coating – In a shallow bowl, mix together **coconut sugar** and an extra dash of **cinnamon**. This will give your protein balls that iconic snickerdoodle finish.

    Step 5: Coat the Balls – Roll each **protein ball** in the cinnamon sugar mixture until fully coated. Ensure an even coating for the best flavor and texture.

    Step 6: Chill and Enjoy – Place the coated balls in the fridge for 15-20 minutes to firm up. This step is crucial for the flavors to meld together and for the balls to hold their shape.

    Common Mistakes to Avoid

    • Overmixing the dough: This can lead to a tough texture. Mix just until combined.
    • Skipping the chilling step: Without chilling, the balls may fall apart.
    • Using dry ingredients: Ensure your nut butter is creamy and fresh for the best consistency.

    How to Store & Reheat

    Refrigerate: Store your **Snickerdoodle Protein Balls** in an airtight container in the fridge for up to one week. This keeps them fresh and chewy.

    Freeze: For longer storage, place the balls in a freezer-safe container. They can be frozen for up to three months. To enjoy, simply thaw them in the fridge overnight or at room temperature for about 30 minutes.

    Ingredient Substitutions

    • Nut Butter: Swap cashew butter with almond or peanut butter for a different flavor profile.
    • Sweetener: Replace maple syrup with honey or agave for a different sweetness level.
    • Flour: Use almond flour instead of oat flour for a grain-free option.

    Nutrition Facts

    • Calories: 150 per ball
    • Protein: 5g
    • Fat: 7g
    • Carbohydrates: 18g
    • Serving Size: 1 ball

    Frequently Asked Questions

    • Can I make these vegan? Yes, use a plant-based protein powder and ensure your sweeteners are vegan-friendly.
    • How can I make this recipe gluten-free? Use certified gluten-free oats and oat flour.
    • What if I don’t have coconut sugar? Regular granulated sugar or brown sugar can be used for the coating.
    • Are these suitable for kids? Absolutely! They’re a great healthy snack option for children.
    • Can I double the recipe? Yes, this recipe scales well. Just ensure you have a large enough bowl for mixing.

  • CHEAT DAY: Sugar Cookie Protein Balls that Delight!

    CHEAT DAY: Sugar Cookie Protein Balls that Delight!

    Introduction & My Personal Story

    Ah, sugar cookies! They take me back to the comforting aroma of my grandmother’s kitchen. Every Sunday after church, she’d bake a batch of the most delightful sugar cookies, filling the house with a sweet, buttery fragrance that could only be described as pure joy. Fast forward a few decades, and as a professional chef with a passion for health-conscious cooking, I’ve found a way to enjoy the nostalgia of those sugar cookies while keeping my fitness goals in check. Enter the **Sugar Cookie Protein Balls**! These little delights are the perfect cheat day treat that won’t derail your health journey. In my 5 years of experience crafting protein-packed snacks, these protein balls are a standout. They offer the same satisfying sweetness and buttery flavor of traditional sugar cookies, but with the added benefit of muscle-building protein. Whether you’re a fitness enthusiast or just someone who loves a guilt-free treat, these no-bake wonders are sure to become a staple in your kitchen.

    Why You’ll Love This Recipe

    • Quick and easy – no oven required!
    • Packed with protein to support muscle recovery.
    • Perfect for a cheat day without the guilt.
    • Customizable with your favorite add-ins.
    • Kid-friendly and great for on-the-go snacking.

    Detailed Ingredients

    For the best **Sugar Cookie Protein Balls**, you’ll need the following ingredients:

    • 1 cup of sugar cookie protein powder: Look for a high-quality protein powder that mimics the taste of sugar cookies.
    • 1/2 cup of almond flour: Provides a nutty flavor and a nice texture. Ensure it’s finely ground.
    • 1/4 cup of natural sweetener: Options include stevia, monk fruit, or erythritol.
    • 1/4 cup of almond butter: Choose a creamy variety for smooth consistency.
    • 1/4 cup of unsweetened almond milk: Adds moisture and helps bind the ingredients together.
    • 1/4 cup of mini chocolate chips: For a touch of indulgence. Dark chocolate works best.

    Step-by-Step Instructions

    Step 1: Start by grabbing a large mixing bowl. Add **1 cup of sugar cookie protein powder**, **1/2 cup of almond flour**, and **1/4 cup of natural sweetener**. Mix these dry ingredients together until they are evenly combined.

    Step 2: Next, incorporate the wet ingredients. Add **1/4 cup of almond butter** and **1/4 cup of unsweetened almond milk** into the bowl. Using a spatula or your hands, mix everything together until a dough begins to form. The consistency should be slightly sticky but firm enough to hold its shape.

    Step 3: Time to add a bit of fun! Gently fold in **1/4 cup of mini chocolate chips**. Make sure they’re evenly distributed throughout the dough for a bite of chocolate in every ball.

    Step 4: Roll the dough into small balls, about 1 inch in diameter. Chef’s Tip: Lightly dampen your hands with water to prevent the dough from sticking.

    Step 5: Place the rolled balls onto a parchment-lined tray. Ensure they are not touching, as this will help them chill evenly.

    Step 6: Refrigerate the protein balls for at least 30 minutes. This allows them to firm up and enhances the flavors.

    Common Mistakes to Avoid

    • Using the wrong protein powder: Not all protein powders are created equal. Make sure to use one specifically flavored like sugar cookies for the best taste.
    • Skipping the chilling step: This is crucial for the balls to hold their shape and achieve the right texture.
    • Overmixing: Mixing too vigorously can make the dough too dense. Stir just until combined.
    • Inadequate binding: If the dough is too crumbly, add a touch more almond milk.

    How to Store & Reheat

    These protein balls are best stored in an airtight container in the refrigerator. They will stay fresh for up to a week. If you want to keep them longer, they can be frozen for up to 3 months. Just thaw them in the fridge overnight before enjoying. Since these are no-bake treats, there’s no need to reheat them. Simply grab and enjoy!

    Ingredient Substitutions

    • Almond flour: Can be replaced with oat flour for a different texture.
    • Almond butter: Swap with peanut butter or sunflower seed butter if you have allergies.
    • Almond milk: Any plant-based milk like soy or coconut milk will work.
    • Chocolate chips: Use white chocolate chips or dried fruit for variation.

    Nutrition Facts

    • Calories: 150 per ball
    • Protein: 10g
    • Fat: 7g
    • Carbs: 12g
    • Serving Size: 1 ball

    Frequently Asked Questions

    Q: Can I make these protein balls vegan?

    A: Absolutely! Just ensure your protein powder is plant-based and use vegan chocolate chips.

    Q: How many protein balls should I eat for a snack?

    A: One to two balls make for a satisfying snack that can help curb hunger between meals.

    Q: Can I use a different type of flour?

    A: Yes, just keep in mind that the texture and taste might vary slightly with different flours.

    Q: What if my dough is too sticky?

    A: Add a bit more almond flour until the desired consistency is achieved.

  • CHEAT DAY: Holiday Cookie-Inspired Gingerbread Protein Balls!

    CHEAT DAY: Holiday Cookie-Inspired Gingerbread Protein Balls!

    Introduction & My Personal Story

    Ah, the holidays — a time when the air is filled with the comforting aroma of gingerbread and every corner of my kitchen seems to beckon with the promise of sweet indulgence. My journey with gingerbread protein balls started quite by accident during a particularly hectic December, about five years ago. The festive season was in full swing, and I was knee-deep in cookie dough, trying to balance a healthy lifestyle with the irresistible allure of holiday treats.

    One snowy afternoon, as I was preparing a batch of gingerbread cookies, it struck me — why not create a healthier, protein-packed version of these beloved treats? And just like that, the idea for these gingerbread protein balls was born. In my 5 years of experience, I’ve found that these little delights perfectly encapsulate the cozy, spicy flavors of traditional gingerbread, but with an added boost of protein to keep me energized through the holiday hustle. Every time I make them, I’m transported back to that snowy day, the kitchen filled with the warm, spicy scent of ginger and cinnamon. It’s a smell that feels like a hug from the past, reminding me of the joy of creating something both delicious and nourishing.

    Why You’ll Love This Recipe

    • Quick and easy to prepare — no baking required.
    • Packed with protein to keep you full and satisfied.
    • Perfect for a post-workout snack or a midday energy boost.
    • Combines the nostalgic flavors of gingerbread with a healthy twist.
    • Great for meal prep — make a batch and enjoy throughout the week.

    Detailed Ingredients

    Here’s everything you’ll need to whip up these festive gingerbread protein balls:

    • 1 cup (100 grams) rolled oats
    • 1/2 cup (60 grams) **vanilla protein powder**
    • 1/2 cup (125 grams) **cashew butter**
    • 1/4 cup (60 ml) **maple syrup**
    • 2 tablespoons (30 ml) **molasses**
    • 1 teaspoon **vanilla extract**
    • 1 teaspoon ground **ginger**
    • 1 teaspoon ground **cinnamon**
    • 1/4 teaspoon ground **nutmeg**
    • 1/4 teaspoon ground **cloves**
    • 1/4 teaspoon **salt**
    • 1/2 cup (90 grams) **white chocolate chips**
    • 1 tablespoon (15 ml) **coconut oil**

    When shopping, look for fresh spices and high-quality protein powder to ensure the best flavor and texture.

    Step-by-Step Instructions

    Let’s dive into the process of creating these delightful gingerbread protein balls, step by step.

    Step 1: Mix Ingredients

    In a medium bowl, combine 1 cup of rolled oats, 1/2 cup of vanilla protein powder, 1/2 cup of cashew butter, 1/4 cup of maple syrup, 2 tablespoons of molasses, and 1 teaspoon of vanilla extract. Add in the spices: 1 teaspoon each of ground ginger and cinnamon, along with 1/4 teaspoon each of ground nutmeg and cloves. Don’t forget the 1/4 teaspoon of salt to balance the sweetness. Stir these ingredients together until they form a cohesive, soft dough. It should have a sticky texture but be firm enough to hold its shape. If the dough feels too dry, add a splash more of maple syrup or water.

    Step 2: Form Balls

    With the dough ready, use a small cookie scoop or a tablespoon to portion it out. Roll each portion between your palms to form smooth, round balls. Aim for uniformity to ensure even chilling and a consistent bite. Place the formed balls on a plate or baking sheet lined with parchment paper to prevent sticking.

    Step 3: Melt Chocolate

    In a microwave-safe bowl, combine 1/2 cup of white chocolate chips with 1 tablespoon of coconut oil. Microwave in 15-second intervals, stirring in between, until the chocolate is fully melted and smooth. Be cautious not to overheat, as white chocolate can scorch easily.

    Step 4: Drizzle & Chill

    Drizzle the melted chocolate over the protein balls using a spoon for an artistic touch. If you’re feeling fancy, use a piping bag for precision. Once drizzled, transfer the plate to the refrigerator and allow the balls to chill for at least 30 minutes. This step is crucial for the chocolate to set and the flavors to meld together. Once firm, they’re ready to enjoy!

    Common Mistakes to Avoid

    Even the simplest recipes can have their pitfalls. Here are some common mistakes to watch out for:

    • Dry Dough: If your dough is too dry, add a bit more maple syrup or water to reach the right consistency.
    • Overheating Chocolate: Melt the chocolate slowly to avoid scorching. Stir frequently to ensure even melting.
    • Skipping Chill Time: Chilling is essential for the balls to hold their shape and for the chocolate to set properly.

    How to Store & Reheat

    To store your gingerbread protein balls, place them in an airtight container. They will keep well in the refrigerator for up to a week. If you’d like to enjoy them later, they can also be frozen for up to a month. To thaw, simply transfer them to the fridge overnight. There’s no need to reheat these treats — they’re best enjoyed chilled or at room temperature.

    Ingredient Substitutions

    Need to make a swap? Here are some safe substitutions:

    • Cashew Butter: Swap with almond butter or peanut butter for a different flavor profile.
    • Maple Syrup: Use honey or agave syrup as an alternative sweetener.
    • White Chocolate Chips: Dark chocolate or milk chocolate chips can be used if you prefer a less sweet option.

    Nutrition Facts

    Here’s a breakdown of the nutritional content per serving (based on a batch of 20 balls):

    • Calories: 120
    • Protein: 5 grams
    • Fat: 7 grams
    • Carbohydrates: 10 grams
    • Serving Size: 1 ball

    Frequently Asked Questions

    • Can I use another type of protein powder? Yes, any protein powder should work, but it may alter the flavor slightly.
    • Are these gluten-free? If you use certified gluten-free oats and protein powder, they can be.
    • Can I add extras like nuts or seeds? Certainly! Chopped nuts or seeds can add texture and extra nutrition.
    • How long can I store them? Up to a week in the fridge, or a month in the freezer.
    • What if I don’t like gingerbread spices? You can adjust the spice levels to your taste or try a different flavor combination.


  • CHEAT DAY: Indulgent High-Protein Buckeyes You Can’t Resist!

    CHEAT DAY: Indulgent High-Protein Buckeyes You Can’t Resist!

    Introduction & My Personal Story

    Every once in a while, we all deserve a little indulgence, and for me, that indulgence comes in the form of High-Protein Buckeyes. Growing up in Ohio, Buckeyes were a staple in our household during the holidays. My mother would always make a batch, and the sweet, nutty aroma would fill the kitchen, drawing everyone in like a magnet. As a kid, I was always fascinated by the process of dipping those peanut butter balls into chocolate, leaving just a small circle of peanut butter visible on top, mimicking the nut of the Buckeye tree.

    Fast forward to now, with my culinary experience, I wanted to reinvent this classic treat. My twist? Amping up the protein content without sacrificing any of that nostalgic flavor. In my 5 years of experience as a chef, I’ve learned that balance is key, especially when it comes to cheat day treats. These High-Protein Buckeyes are not only a nod to my childhood but also a testament to how you can enjoy the flavors you love while still being mindful of your nutritional goals. Join me as we dive into this delightful recipe that’s both a treat for your taste buds and a boost for your protein intake.

    Why You’ll Love This Recipe

    • High-Protein: Each Buckeye is packed with protein, making it a perfect post-workout snack.
    • No-Bake: Quick and easy to prepare, no oven needed.
    • Guilt-Free Indulgence: Enjoy your cheat day without derailing your diet completely.
    • Simple Ingredients: Uses common pantry staples you likely already have.
    • Customizable: Easy to tweak to suit dietary restrictions or preferences.

    Detailed Ingredients

    • **Medjool Dates**: 200 grams (about 12 dates). Look for plump, moist dates for the best texture.
    • **Oat Flour**: 1 cup (120 grams). Ensure it’s finely ground for a smooth consistency.
    • **Vanilla Protein Powder**: 1/2 cup (about 60 grams). Choose a high-quality brand for best flavor.
    • **Natural Salted Peanut Butter**: 1 cup (240 grams). Creamy texture works best.
    • **Dark Chocolate Chips**: 1 cup (175 grams). Opt for at least 70% cocoa for a rich taste.
    • **Coconut Oil**: 2 tablespoons (30 ml). Helps the chocolate set smoothly.

    Step-by-Step Instructions

    Step 1: Blend the Base

    Start by placing the **Medjool Dates**, **Oat Flour**, **Vanilla Protein Powder**, and **Peanut Butter** into a food processor. Blend until the mixture forms a thick, sticky dough. If it appears too dry, add 1–2 teaspoons of water and blend again. The dough should be pliable and moist, but not overly wet. Chef’s Tip: If your dates are a bit dry, soak them in warm water for 10 minutes before blending.

    Step 2: Form the Balls

    Using a tablespoon, scoop out portions of the mixture and roll them into smooth balls. Place each ball on a parchment-lined baking sheet. Insert a toothpick into the center of each ball to make dipping easier. Freeze the balls for about 10-15 minutes until firm.

    Step 3: Melt the Chocolate

    While the balls are chilling, melt the **Dark Chocolate Chips** with the **Coconut Oil**. You can do this in a microwave in 30-second intervals, stirring in between, or use a double boiler on the stove. The chocolate should be smooth and glossy. Pour it into a narrow cup to make dipping easier.

    Step 4: Dip and Decorate

    Remove the balls from the freezer. Holding the toothpick, dip each ball halfway into the melted chocolate, leaving the top exposed to mimic a Buckeye. Place them back on the parchment-lined sheet, and twist out the toothpick. Use a small knife or your finger to smooth over the hole left by the toothpick.

    Step 5: Chill and Enjoy

    Allow the chocolate to set by placing the sheet in the fridge. Once the chocolate is firm, your High-Protein Buckeyes are ready to enjoy! Chef’s Tip: For an extra touch, sprinkle a pinch of sea salt on top before the chocolate sets.

    Common Mistakes to Avoid

    • Dry Dough: If your dough is too dry, it won’t hold together well. Ensure your dates are fresh and moist, and add a bit of water if needed.
    • Overheating Chocolate: Chocolate can seize if overheated. Melt it gently and stir frequently for a smooth finish.
    • Skipping the Freeze: Don’t skip the freezing step, as it helps the balls hold their shape during dipping.

    How to Store & Reheat

    Store these Buckeyes in an airtight container in the fridge for up to two weeks. For longer storage, you can freeze them for up to three months. To enjoy, simply let them thaw at room temperature for a few minutes, or enjoy them cold for a firmer texture.

    Ingredient Substitutions

    • Medjool Dates: Swap with prunes or figs if desired, though the flavor will slightly change.
    • Oat Flour: Almond flour can be used for a gluten-free option.
    • Peanut Butter: Almond or cashew butter works great for those with peanut allergies.
    • Dark Chocolate Chips: Use milk or white chocolate for a different flavor profile.

    Nutrition Facts

    Serving Size: 1 Buckeye

    • Calories: 150
    • Protein: 5g
    • Fat: 9g
    • Carbs: 15g

    Frequently Asked Questions

    Q: Can I make these Buckeyes vegan?

    A: Absolutely! Use a plant-based protein powder and ensure your chocolate is dairy-free.

    Q: How can I make these gluten-free?

    A: Simply swap the oat flour for a certified gluten-free oat flour or almond flour.

    Q: Can I add other flavors?

    A: Yes, you can add a touch of cinnamon or vanilla extract to the dough for extra flavor.

    Q: What if I don’t have a food processor?

    A: You can mix the ingredients by hand, but ensure the dates are finely chopped for easier blending.