Tag: grab and go meals

  • 5-MINUTE FUEL: Zucchini & Corn Salad – A Fresh, No-Cook Delight!

    5-MINUTE FUEL: Zucchini & Corn Salad – A Fresh, No-Cook Delight!

    Introduction & My Personal Story

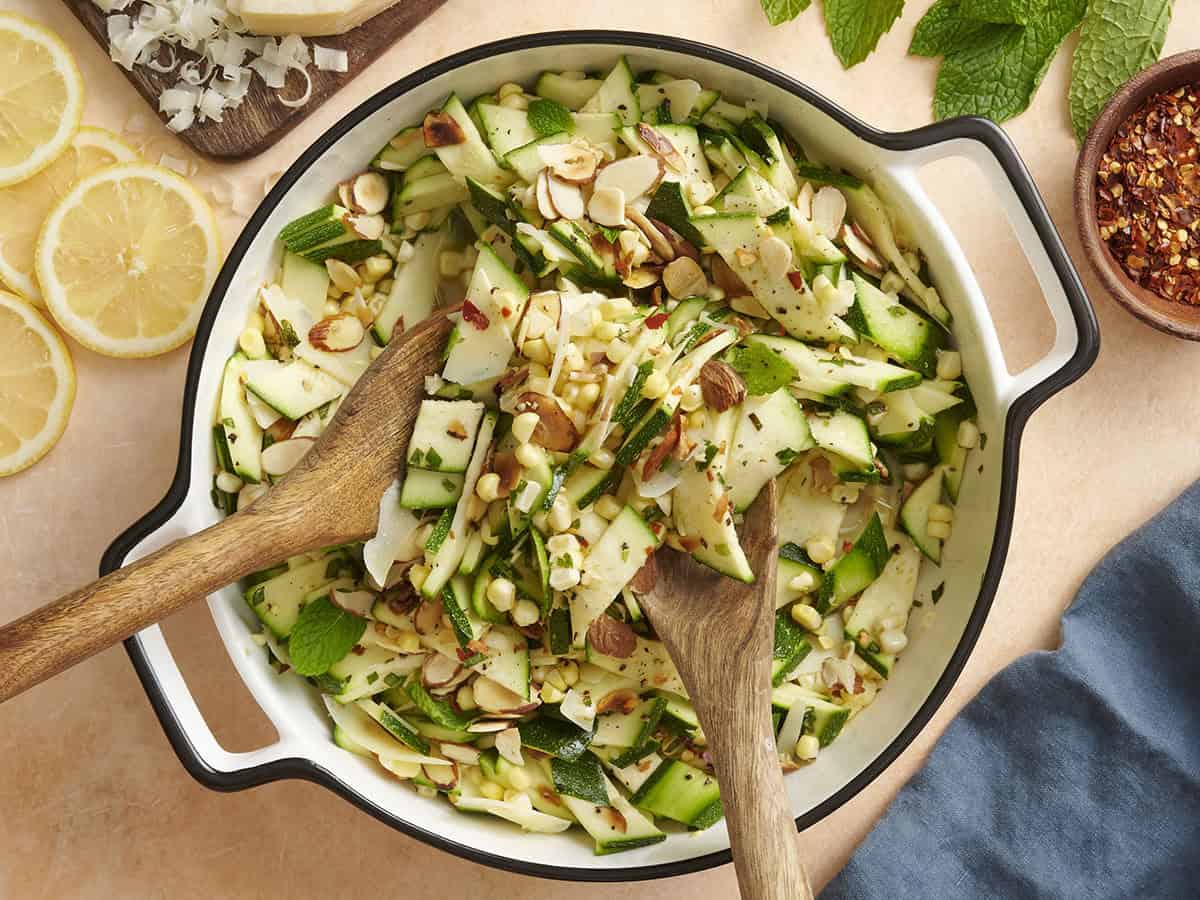
    I remember the first time I stumbled upon the idea of a zucchini and corn salad. It was a hot summer afternoon, and I was searching for something refreshing yet satisfying. As a chef, I’m always on the lookout for recipes that offer maximum flavor with minimal fuss. This particular salad became a staple in my kitchen during those sweltering months. The crunch of fresh corn, the subtle sweetness of zucchini, and the nutty bite of toasted almonds create a harmony that’s hard to resist. In my 5 years of experience, I’ve learned that sometimes the simplest dishes can leave the most lasting impressions. This salad, requiring no cooking, is a testament to that. It’s perfect for those days when you want to enjoy the flavors of summer without breaking a sweat. I recall serving it at a family barbecue, and it was an instant hit. Everyone marveled at the freshness and the burst of flavors. Now, whenever I make this dish, it brings back memories of laughter, sunshine, and the joy of sharing good food with loved ones.

    Why You’ll Love This Recipe

    • Quick and easy – ready in just 5 minutes.
    • No cooking required, perfect for hot days.
    • Uses fresh, seasonal ingredients.
    • Minimal cleanup, saving you time and effort.
    • Customizable with various toppings and dressings.

    Detailed Ingredients

    • 2 medium-sized **zucchinis** (about 300g), fresh and firm.
    • 2 ears of **corn**, husked and kernels shaved off.
    • 1/2 cup **sliced almonds**, lightly toasted.
    • 1 **lemon**, juiced.
    • 1/4 cup fresh **mint**, finely chopped.
    • 1/4 teaspoon **chili flakes**.
    • 3 tablespoons **olive oil**.
    • Salt and pepper to taste.
    • Optional: 1/4 cup grated **Parmesan cheese** for added flavor.

    Step-by-Step Instructions

    Step 1: Prepare the Ingredients
    Start by washing the **zucchinis** thoroughly. Cut them into long planks about 1/4 inch thick, then slice these planks into bite-sized pieces. This ensures that each piece retains its crunch and blends well with the other ingredients.

    Step 2: Shuck the Corn
    Hold the **corn** vertically on a cutting board and use a sharp knife to shave the kernels off. Fresh corn adds a sweet crunch, but if you prefer, you can use canned or frozen corn as a substitute.

    Step 3: Toast the Almonds
    Chef’s Tip: Toasting enhances the almonds’ flavor. In a dry pan over medium heat, add the **sliced almonds** and stir frequently for about 3-5 minutes until they are golden and fragrant. Keep a close eye to prevent burning.

    Step 4: Make the Dressing
    In a small bowl, combine the juice of one **lemon**, **olive oil**, **chili flakes**, and chopped **mint**. Season with salt and pepper. Whisk until everything is well combined. This dressing is light yet vibrant, complementing the salad perfectly.

    Step 5: Assemble the Salad
    In a large serving bowl, combine the **zucchini**, **corn**, and **toasted almonds**. If using, add the grated **Parmesan cheese**. Pour the dressing over the salad and toss gently to ensure everything is coated evenly.

    Common Mistakes to Avoid

    Overcooking the Almonds: Toast them just until they’re golden. They can burn quickly if left unattended.

    Using Old Ingredients: Freshness is key for this salad. Ensure your **zucchini** and **corn** are fresh for the best flavor.

    Overdressing: Add the dressing gradually. You can always add more, but you can’t take it away.

    How to Store & Reheat

    Since this is a no-cook salad, it’s best enjoyed fresh. However, if you need to store it, place it in an airtight container and refrigerate for up to 2 days. The **zucchini** may release some water, so toss it again before serving.

    Reheating isn’t necessary, as this salad is meant to be served cold. If you want to freshen it up, add a squeeze of **lemon** juice before serving.

    Ingredient Substitutions

    • Almonds: Swap with walnuts or pecans if preferred.
    • Corn: Use canned or frozen corn when fresh is unavailable.
    • Lemon: Lime juice can be a zesty alternative.
    • Mint: Try basil or cilantro for a different flavor profile.

    Nutrition Facts

    • Calories: 210 per serving
    • Protein: 5g
    • Fat: 15g
    • Carbohydrates: 18g
    • Serving Size: Approximately 1 cup

    Frequently Asked Questions

    Can I make this salad ahead of time?
    Yes, you can prepare the ingredients and dressing separately, then combine them just before serving to maintain freshness.

    Is this salad vegan?
    Yes, as long as you omit the **Parmesan cheese** or use a vegan alternative.

    How can I add more protein?
    Consider adding chickpeas or grilled chicken for a protein boost.

    What other vegetables can I add?
    Try adding cherry tomatoes or cucumber for additional flavor and texture.

  • ZERO PREP: Budget-Friendly Pesto Hack for Big Flavor!

    ZERO PREP: Budget-Friendly Pesto Hack for Big Flavor!

    Introduction & My Personal Story

    There’s a certain magic in the air when I reminisce about the first time I stumbled upon this Budget-Friendly Pesto Hack. Picture this: I was fresh out of culinary school, strapped for cash, yet eager to whip up something that would dazzle my friends at our monthly potluck. The challenge was real—how to create big flavor with minimal resources. In my 5 years of experience as a chef, I’ve learned that necessity truly is the mother of invention, and often, the simplest dishes turn out to be the most memorable.

    One lazy Sunday, I found myself staring blankly into my pantry. I had some fresh basil, a handful of baby spinach, a few cloves of garlic, and some sunflower seeds that had been languishing in a jar. Parmesan cheese was a staple in my fridge, and I always kept a bottle of good olive oil on hand. With a dash of imagination and a squeeze of lemon juice, I dared to craft my very own pesto without the traditional pine nuts and expensive Parmesan. The result? A pesto that was not only budget-friendly but required zero prep and was bursting with flavor. It was a hit at the potluck, and to this day, it’s my go-to recipe when I need something quick, delicious, and satisfying.

    Why You’ll Love This Recipe

    • Quick and easy to make with zero prep time required.
    • Uses affordable and accessible ingredients.
    • Packed with fresh, vibrant flavors.
    • Versatile and can be used in a variety of dishes.
    • Minimal cleanup, perfect for busy days.

    Detailed Ingredients

    Let’s dive into the components that make this pesto shine. Here’s what you’ll need:

    • Fresh basil: 2 cups, loosely packed. Look for bright green leaves without any brown spots.
    • Baby spinach: 1 cup, loosely packed. Opt for fresh, crisp leaves.
    • Garlic: 2 cloves, peeled. Choose firm cloves for the best flavor.
    • Sunflower seeds: 1/4 cup. Toast them lightly for added depth.
    • Parmesan cheese: 1/2 cup, grated. Aged Parmesan will give the best results.
    • Olive oil: 1/2 cup. Use extra virgin for its rich taste.
    • Lemon juice: 1 tablespoon, freshly squeezed. Adds brightness and acidity.
    • Salt: 1/2 teaspoon, or to taste.

    Step-by-Step Instructions

    Ready to whip up this delightful pesto? Follow these steps:

    Step 1: Prepare Your Ingredients

    First, gather all your ingredients. Make sure to wash and dry the basil and spinach thoroughly. A salad spinner works wonders here, ensuring no excess water dilutes your pesto.

    Step 2: Toast the Sunflower Seeds

    Chef’s Tip: Toasting sunflower seeds enhances their nutty flavor. Simply heat them in a dry skillet over medium heat for 3-4 minutes, stirring frequently. They’ll be ready when they’re golden brown and fragrant.

    Step 3: Blend the Dry Ingredients

    Add the prepared garlic, toasted sunflower seeds, and Parmesan cheese to a food processor. Pulse until everything is finely chopped, forming a coarse mixture.

    Step 4: Incorporate the Greens

    Add the basil and spinach to the processor. Pulse again until the greens are roughly chopped and well combined with the other ingredients.

    Step 5: Add the Liquid Ingredients

    With the processor running, drizzle in the lemon juice and olive oil. Blend until the mixture is smooth and creamy. Season with salt to taste.

    Step 6: Serve and Enjoy

    Your pesto is ready to go! Use it immediately as a sauce for pasta, a spread for sandwiches, or a topping for grilled proteins. Store leftovers in an airtight container in the fridge.

    Common Mistakes to Avoid

    • Skipping the toasting step: This is crucial for intensifying the flavor of the sunflower seeds.
    • Over-processing: Blend just until smooth. Over-processing can lead to a greasy pesto.
    • Not drying the greens: Excess water can make your pesto watery.

    How to Store & Reheat

    Store your pesto in an airtight container in the refrigerator for up to a week. For longer storage, freeze it in ice cube trays and transfer the cubes to a freezer bag. This way, you can thaw just what you need. To reheat, simply let it come to room temperature or gently warm it in a saucepan over low heat.

    Ingredient Substitutions

    • Basil and spinach: Swap with arugula or kale for a peppery twist.
    • Sunflower seeds: Replace with almonds or walnuts if preferred.
    • Parmesan cheese: Use nutritional yeast for a vegan option.

    Nutrition Facts

    • Calories: 180 per serving
    • Protein: 4g
    • Fat: 18g
    • Carbs: 3g
    • Serving Size: 2 tablespoons

    Frequently Asked Questions

    • Can I make this pesto vegan? Absolutely! Substitute the Parmesan cheese with nutritional yeast for a cheesy flavor without the dairy.
    • How can I make the pesto spicier? Add a pinch of red pepper flakes for a bit of heat.
    • Is it necessary to use a food processor? While a food processor is ideal, a blender or mortar and pestle can work in a pinch.
    • What dishes pair well with this pesto? It’s perfect for pasta, pizza, sandwiches, or as a dip for veggies.
    • Can I use dried basil instead of fresh? Fresh basil is recommended for the best flavor, but in a pinch, you can use dried—just reduce the quantity significantly.

  • ZERO PREP: Zesty Homemade Cocktail Sauce for Instant Party Fun!

    ZERO PREP: Zesty Homemade Cocktail Sauce for Instant Party Fun!

    Introduction & My Personal Story

    There’s something magical about a sauce that can elevate a dish and bring people together. My journey with this Zesty Homemade Cocktail Sauce dates back to a summer when I was just starting out in my culinary career. It was my first big family gathering after I took the leap into the world of cooking. I was tasked with preparing shrimp cocktail for a party of twenty, and I knew the real star would be the sauce. I remember standing in the kitchen, surrounded by the hustle and bustle of family chatter, as I meticulously mixed ingredients, tasting and adjusting until it was just right. The first bite was a revelation—a perfect balance of tangy, spicy, and savory. It was a hit, and from that moment, I knew I had a secret weapon in my culinary arsenal. In my 5 years of experience, I’ve learned that sometimes the simplest recipes, like this cocktail sauce, can make the biggest impact. It’s a quick, no-cook solution for any party or quick snack, and it’s been a staple in my kitchen ever since.

    Why You’ll Love This Recipe

    • Quick and Easy: Ready in under 5 minutes with zero cooking required.
    • Minimal Ingredients: Only 7 pantry staples needed.
    • Customizable: Adjust the heat and tang to your liking.
    • Versatile: Perfect for shrimp, oysters, fries, and more.
    • Party Favorite: A guaranteed hit at any gathering.

    Detailed Ingredients

    • ½ cup ketchup: Look for a brand with natural ingredients for the best base flavor.
    • 2 tbsp prepared horseradish: Fresh and pungent, this adds the signature kick.
    • Juice of ½ lemon: Freshly squeezed for that bright, zesty flavor.
    • ½ tbsp Worcestershire sauce: Adds depth and umami.
    • ¼ tsp hot sauce: Choose your favorite brand to control the heat level.
    • ⅛ tsp salt: Enhances all the flavors.
    • ⅛ tsp black pepper: Freshly ground for a subtle spice.

    Step-by-Step Instructions

    Step 1: Gather Your Ingredients
    Before you start, ensure all your ingredients are measured and ready. This makes the process smooth and stress-free, which is ideal when you’re in a rush. Chef’s Tip: Use fresh lemon juice for the best flavor burst.

    Step 2: Combine the Ingredients
    In a medium-sized mixing bowl, add the ½ cup ketchup, 2 tbsp prepared horseradish, and the juice of ½ lemon. Stir gently with a spoon until the mixture is smooth and the ketchup and horseradish are well blended.

    Step 3: Add the Flavor Boosters
    Pour in the ½ tbsp Worcestershire sauce and ¼ tsp hot sauce. These two ingredients will add depth and a slight heat to your sauce. Mix thoroughly until everything is well incorporated.

    Step 4: Season to Perfection
    Finally, sprinkle in ⅛ tsp salt and ⅛ tsp black pepper. Stir again, ensuring that the seasoning is evenly distributed. Taste and adjust any flavors if necessary. Chef’s Tip: Let it sit for a few minutes to allow the flavors to meld.

    Step 5: Serve or Store
    Your cocktail sauce is now ready to enjoy! Serve it immediately with your favorite seafood or store it in an airtight container in the refrigerator for later use. It’s best consumed within a week for optimal freshness.

    Common Mistakes to Avoid

    • Overpowering Heat: Be cautious with the hot sauce. Start with a small amount and adjust to taste.
    • Skipping Fresh Lemon Juice: Bottled lemon juice lacks the vibrant flavor of fresh. Always opt for fresh.
    • Not Mixing Well: Ensure all ingredients are thoroughly combined to avoid uneven flavor distribution.

    How to Store & Reheat

    Store your cocktail sauce in an airtight container in the refrigerator. It will keep for up to one week. If you find the sauce has thickened after refrigeration, let it sit at room temperature for a few minutes and stir before serving. This sauce is not suitable for freezing as it can alter the texture and flavor.

    Ingredient Substitutions

    • Ketchup: Substitute with tomato paste and a pinch of sugar for a thicker, less sweet version.
    • Prepared Horseradish: If unavailable, mix freshly grated horseradish with a touch of vinegar.
    • Worcestershire Sauce: Soy sauce with a dash of vinegar can be a quick alternative.
    • Hot Sauce: Use cayenne pepper or chili flakes if you prefer dry heat.

    Nutrition Facts

    • Calories: 30 per 2-tablespoon serving
    • Protein: 0g
    • Fat: 0g
    • Carbs: 8g
    • Serving Size: 2 tablespoons

    Frequently Asked Questions

    • Can I make this sauce in advance?
      Absolutely! It can be made a day ahead and stored in the fridge.
    • Is this sauce gluten-free?
      Yes, ensure your Worcestershire sauce and ketchup are gluten-free.
    • How can I make it less spicy?
      Reduce or omit the hot sauce to suit your taste.
    • Can I use lime instead of lemon?
      Yes, lime juice can offer a slightly different but still delicious citrus note.
    • What can I serve this with besides seafood?
      Try it with fries, chicken tenders, or as a burger topping.

  • 5-MINUTE FUEL: Dreamy Chocolate Buttercream with Just 5 Ingredients!

    5-MINUTE FUEL: Dreamy Chocolate Buttercream with Just 5 Ingredients!

    Introduction & My Personal Story

    Chocolate buttercream frosting holds a special place in my heart. It takes me back to my grandmother’s kitchen, where the aroma of chocolate and the warmth of her love blended perfectly. Every Sunday, she would bake a batch of her famous chocolate cupcakes, always topped with this dreamy chocolate buttercream. As a child, I would eagerly wait for her to hand me the spoon to lick off the remnants of the sweet, creamy frosting. Fast forward to today, and I’ve spent the last five years mastering this deceptively simple yet utterly satisfying recipe. It’s a go-to for both beginners and seasoned bakers alike. The magic lies in its simplicity and the quality of ingredients. With just five ingredients, you can whip up a decadent frosting in mere minutes. Whether you’re a busy parent, a professional on the go, or someone who simply cherishes a quick yet delicious treat, this chocolate buttercream is your ticket to delightful indulgence. Let me guide you through this easy yet luxurious recipe that promises to transform your cakes, cupcakes, or even just a spoon into something extraordinary.

    Why You’ll Love This Recipe

    • Quick and easy: Ready in just 5 minutes.
    • Minimal ingredients: Requires only 5 pantry staples.
    • No cooking required: Perfect for hot days or quick fixes.
    • Versatile: Ideal for cakes, cupcakes, or as a dessert topping.
    • Rich and creamy: Delivers a luscious chocolate flavor every time.

    Detailed Ingredients

    • 1 cup (227g) unsalted butter, softened to room temperature. Look for a high-fat content butter for the creamiest texture.
    • 3 cups (375g) powdered sugar. Make sure it’s sifted to avoid lumps.
    • 1/2 cup (50g) cocoa powder. Use a high-quality unsweetened cocoa for the best flavor.
    • 2 teaspoons vanilla extract. Pure vanilla extract is recommended over imitation for a richer taste.
    • 2-4 tablespoons milk. Whole milk works best, but any milk can be used depending on preference and dietary needs.

    Step-by-Step Instructions

    Step 1: Begin by ensuring your butter is at room temperature. This is crucial for achieving the right texture. It should be soft enough to press a finger into, but not melted. In my 5 years of experience, I’ve found that this step can make or break your frosting.

    Step 2: In a large mixing bowl, beat the softened butter on high speed for about 2-3 minutes using a hand mixer or a stand mixer fitted with a paddle attachment. The butter should become pale and fluffy, a sign that it’s well-aerated.

    Step 3: Gradually add the powdered sugar and cocoa powder. It’s best to do this in small increments to prevent a sugary dust cloud. Start mixing on low speed until the ingredients are incorporated, then increase to medium speed. The mixture should start to come together and look thick and creamy.

    Step 4: Add the vanilla extract and half of the milk to the butter mixture. Mix on medium speed until everything is well combined. If the frosting seems too thick, add more milk, a tablespoon at a time, until you reach your desired consistency. The frosting should be smooth and spreadable.

    Step 5: Taste the frosting and adjust any ingredients if needed. Sometimes a pinch more cocoa or sugar might be required based on personal preference.

    Step 6: Your chocolate buttercream is now ready to use. Spread it generously over your cake, cupcakes, or even brownies. Chef’s Tip: Use an offset spatula for a smooth, professional finish.

    Common Mistakes to Avoid

    • Using cold butter: Butter that’s too cold won’t whip properly, resulting in a dense frosting.
    • Skipping the sifting of powdered sugar: This can lead to a lumpy frosting, which is not ideal for spreading.
    • Overmixing: While it’s important to mix until smooth, overmixing can incorporate too much air, making the frosting too airy.

    How to Store & Reheat

    Store any leftover buttercream in an airtight container in the refrigerator for up to one week. When you’re ready to use it again, let it come to room temperature. You may need to beat it again to restore its creamy texture. For longer storage, you can freeze the frosting for up to three months. Thaw in the refrigerator overnight and beat before using.

    Ingredient Substitutions

    • Butter: Margarine or vegan butter can be used for a dairy-free version.
    • Powdered sugar: For a less sweet option, reduce the amount by 1/2 cup and adjust cocoa to taste.
    • Cocoa powder: Dutch-processed cocoa can be used for a richer chocolate flavor.
    • Milk: Any milk alternative like almond, soy, or oat milk can replace regular milk.

    Nutrition Facts

    • Calories: 230 per serving
    • Protein: 1g
    • Fat: 12g
    • Carbs: 29g
    • Serving Size: 2 tablespoons

    Frequently Asked Questions

    Q: Can I make this frosting ahead of time?

    A: Absolutely! You can make it a day or two in advance and store it in the fridge. Just be sure to let it come to room temperature before using.

    Q: My frosting is too runny, what should I do?

    A: If your frosting is too runny, try adding more powdered sugar, a tablespoon at a time, until it thickens to your desired consistency.

    Q: How can I make the frosting more chocolatey?

    A: Add more cocoa powder for a deeper chocolate flavor. Start with an additional tablespoon and adjust to taste.

    Q: Can I use this frosting for piping?

    A: Yes, this frosting holds its shape well and is perfect for piping decorations on cakes and cupcakes.

  • ZERO PREP: Instant Chips & Guac Cravings Satisfied!

    ZERO PREP: Instant Chips & Guac Cravings Satisfied!

    Introduction & My Personal Story

    Ah, guacamole! It takes me back to those bustling Sunday afternoons in my tiny kitchen, where the aroma of fresh cilantro and lime would wrap around me like a warm hug. In my 5 years of experience as a chef, I’ve learned that sometimes the most satisfying dishes are the simplest. This recipe for Instant Chips & Guac has been my go-to snack for those unexpected cravings. I remember one particular day when I had a house full of friends and nothing prepared. A quick rummage through my pantry and fridge, and I managed to whip up this zero-prep guacamole that left everyone asking for seconds. The secret is in using the freshest ingredients and the right balance of flavors. Every bite is a creamy, tangy explosion that feels like a mini fiesta in your mouth. Whether it’s game day, a casual get-together, or just a quiet evening at home, this dish never fails to impress. It’s a testament to the fact that you don’t need hours in the kitchen to create something truly delicious.

    Why You’ll Love This Recipe

    • **Quick and Easy:** Ready in under 5 minutes, no cooking required.
    • **Fresh and Flavorful:** Bursting with the natural taste of ripe avocados and zesty lime.
    • **Minimal Cleanup:** Just a bowl and a fork, and you’re done!
    • **Versatile Snack:** Perfect for parties, solo snacking, or as a side dish.
    • **Healthy:** Packed with healthy fats, vitamins, and antioxidants.

    Detailed Ingredients

    • **3 ripe avocados** (about 450 grams) – Look for avocados that give slightly to pressure, indicating ripeness.
    • **1 lime** (about 2 tablespoons of juice) – Choose limes that are firm yet slightly soft to the touch.
    • **2 Roma tomatoes** (about 150 grams) – Opt for firm, red tomatoes for the best flavor.
    • **¼ red onion** (about 30 grams) – Adds a lovely crunch and sharpness.
    • **1 jalapeño** (optional) – For those who like a bit of heat.
    • **2 tablespoons fresh cilantro** – Fresh cilantro brings a burst of herby freshness.
    • **2 garlic cloves** – Use fresh garlic for the best punch of flavor.
    • **Salt** – A pinch to enhance all the flavors.

    Step-by-Step Instructions

    Step 1: Prepare the Avocados

    Slice the avocados in half lengthwise, remove the pits, and scoop the flesh into a mixing bowl. Chef’s Tip: To prevent browning, keep the pit in the bowl until ready to serve. Mash the avocados using a fork until you reach your desired consistency. Some prefer it chunky, while others like it smooth.

    Step 2: Add the Fresh Ingredients

    Dice the Roma tomatoes and ¼ red onion finely. If using, chop the jalapeño, removing seeds for less heat. Mince the garlic cloves and roughly chop the cilantro. Add these ingredients to the mashed avocados.

    Step 3: Season and Mix

    Squeeze the juice of one lime over the mixture, and add a pinch of salt. Stir everything together until well combined. Taste and adjust the lime juice and salt according to your preference. Chef’s Tip: Let it sit for a couple of minutes to let the flavors meld together.

    Step 4: Serve or Store

    Enjoy your guacamole immediately with your favorite chips, or cover it tightly with plastic wrap (press it directly onto the surface of the guac to prevent browning) and store in the fridge for up to 3 days.

    Common Mistakes to Avoid

    • **Using Unripe Avocados:** They won’t mash well and lack the creamy texture needed.
    • **Over-mixing:** This can make the guac too smooth and lose its chunky texture.
    • **Not Enough Lime Juice:** It not only adds flavor but also helps prevent browning.
    • **Skipping Salt:** It’s essential for bringing out the flavors of the other ingredients.

    How to Store & Reheat

    To store guacamole, place it in an airtight container and press plastic wrap directly onto the surface to minimize air exposure. Store in the refrigerator for up to 3 days. To reheat, though not typically necessary, you can let it sit at room temperature for about 30 minutes before serving to bring back some of the flavors.

    Ingredient Substitutions

    • **Avocados:** No true substitute, but if you’re out, try a similar dip with mashed peas for a different twist.
    • **Lime Juice:** Lemon juice can be used in a pinch.
    • **Cilantro:** If you’re not a fan, parsley can be used, though it changes the flavor profile.
    • **Jalapeño:** For a milder option, use bell pepper, or skip entirely for no heat.

    Nutrition Facts

    • **Calories:** 250 per serving
    • **Protein:** 3 grams
    • **Fat:** 22 grams
    • **Carbs:** 15 grams
    • **Serving Size:** 1/4 of the recipe

    Frequently Asked Questions

    Q: Can I make guacamole ahead of time?

    A: Yes, but it’s best enjoyed fresh. If making ahead, store as directed to minimize browning.

    Q: What chips go best with guacamole?

    A: Tortilla chips are a classic choice, but pita chips or vegetable sticks work well too.

    Q: How can I make my guacamole spicier?

    A: Add more jalapeño or a dash of cayenne pepper for extra heat.

    Q: Is guacamole healthy?

    A: Yes, it’s high in healthy fats and contains plenty of vitamins and minerals.

  • ZERO PREP: Upgraded Classic Tuna Salad in a Snap!

    ZERO PREP: Upgraded Classic Tuna Salad in a Snap!

    Introduction & My Personal Story

    Let me take you back to a time when I was just starting out in the culinary world. My first kitchen job was at a small, bustling deli in the heart of the city. Our menu was filled with classic sandwiches and salads, but the one dish that always seemed to fly off the shelves was our Tuna Salad. Now, there’s nothing groundbreaking about a Tuna Salad, but what set ours apart was the simplicity and the slight twist we added to the classic recipe. It became my go-to dish when life got hectic, and I needed something quick, nutritious, and satisfying. Fast forward to now, with more than 5 years of experience under my belt, I’ve refined this recipe into what I like to call the “Upgraded Classic Tuna Salad in a Snap!” It’s perfect for those who have zero time to prep but still want something delicious. This dish brings back warm memories of those early kitchen days and the joy of creating something delightful with minimal effort. I’m thrilled to share this with you, hoping it becomes your quick-fix favorite too.

    Why You’ll Love This Recipe

    • Ready in under 5 minutes with no cooking required.
    • Minimal cleanup means more time for you.
    • Packed with protein and healthy fats from tuna and walnuts.
    • Versatile: Enjoy it as a sandwich, salad, or with crackers.
    • Perfect for meal prep, stays fresh in the fridge for up to 4 days.

    Detailed Ingredients

    • 2 cans of tuna (in water or oil, 200g each): Look for firm chunks for the best texture.
    • 1 cup celery (diced, about 100g): Crisp and fresh, adding a nice crunch.
    • ¼ cup walnuts (chopped, about 30g): Adds a nutty flavor and healthy fats.
    • 2 green onions (sliced): For a subtle onion flavor without overpowering the dish.
    • ½ cup mayonnaise (120ml): Creamy base to hold everything together.
    • 1 tablespoon lemon juice (15ml): Freshly squeezed for a bright, tangy kick.
    • Salt and pepper to taste: Adjust according to your preference.

    Step-by-Step Instructions

    Step 1: Drain the Tuna – Open the cans of tuna and drain them thoroughly. Press down with the lid or use a strainer to ensure all the liquid is removed. This will prevent your salad from becoming soggy.

    Step 2: Mix the Ingredients – In a large mixing bowl, combine the drained tuna, diced celery, chopped walnuts, sliced green onions, mayonnaise, and lemon juice. Use a fork to flake the tuna and mix everything evenly.

    Step 3: Season – Add salt and pepper to taste. Start with a pinch and increase as needed. Remember, you can always add more, but you can’t take it out once it’s in!

    Step 4: Serve – Once everything is well combined, your tuna salad is ready to serve. Enjoy it in a sandwich, over a bed of greens, or with some crunchy crackers.

    Common Mistakes to Avoid

    Over-mixing: Be gentle when mixing the ingredients to maintain a good texture. Too much mixing can make the tuna mushy.

    Excess moisture: Ensure the tuna is well-drained to avoid a watery salad.

    Over-seasoning: Always start with less salt and pepper and adjust gradually.

    How to Store & Reheat

    Store your tuna salad in an airtight container in the refrigerator. It will stay fresh for up to 4 days. While this dish is typically served cold, if you prefer it warm, gently reheat it in a microwave-safe dish for 30 seconds to 1 minute. Be careful not to overheat, as this can alter the texture.

    Ingredient Substitutions

    If you’re missing an ingredient or need to make a swap, here are some safe substitutions:

    • Greek yogurt can replace mayonnaise for a lighter option.
    • Almonds or pecans can substitute walnuts if you prefer a different nut.
    • Lime juice can be used instead of lemon juice for a slightly different citrus flavor.
    • Red onion can replace green onions for a sharper taste.

    Nutrition Facts

    • Calories: 350 per serving
    • Protein: 25g
    • Fat: 22g
    • Carbohydrates: 8g
    • Serving Size: 1 cup

    Frequently Asked Questions

    • Can I make this tuna salad ahead of time? Yes, it’s perfect for meal prep and will last in the fridge for up to 4 days.
    • Is there a way to make it spicier? Add a pinch of cayenne pepper or some chopped jalapeños for a kick.
    • What if I’m allergic to nuts? Simply omit the walnuts or replace them with sunflower seeds for crunch.
    • Can I use fresh tuna instead of canned? Absolutely! Just cook and flake the fresh tuna before using it in the recipe.


  • ZERO PREP: Studio-Approved Cold Brew in a Flash!

    ZERO PREP: Studio-Approved Cold Brew in a Flash!

    Introduction & My Personal Story

    Ah, cold brew coffee. Just the thought takes me back to those early mornings in my cozy little kitchen, where the sun barely peeked through the windows, and the world was still asleep. In my 5 years of experience as a chef and food blogger, I’ve come to appreciate the magic of a well-made cold brew. It’s not just coffee; it’s a ritual, a moment of peace before the hustle and bustle of the day begins.

    I remember the first time I attempted to make cold brew at home. I was skeptical, thinking it was going to be a complicated process, but I was pleasantly surprised by its simplicity. The rich aroma of freshly ground coffee filled the air as I mixed it with cold water, and I couldn’t help but feel a sense of accomplishment. It was a drink that not only woke me up but also became a cherished part of my morning routine.

    Over time, I’ve perfected the art of making cold brew, and it’s become a staple in my kitchen. Whether it’s a hot summer day or a chilly winter morning, a glass of cold brew never fails to bring comfort and joy. Now, I’m excited to share my studio-approved, zero-prep cold brew recipe with you. Let’s dive in!

    Why You’ll Love This Recipe

    • No heat required – perfect for hot days.
    • Minimal cleanup – less time washing, more time sipping.
    • Zero prep – just mix, shake, and wait.
    • Customizable strength – dilute as you like.
    • Rich, smooth flavor – no bitterness.

    Detailed Ingredients

    To make the perfect cold brew, you’ll need the following ingredients:

    • 1 cup coarsely ground coffee (about 85 grams): Look for a medium to dark roast for a robust flavor. If buying pre-ground, ensure it’s coarsely ground.
    • 5 cups cold water (about 1.2 liters): Filtered water is best for a clean taste.

    Step-by-Step Instructions

    Step 1: Grind Your Beans

    If you’re using whole beans, grind them to a coarse consistency. You want the grounds to be similar in texture to sea salt. This ensures a smooth brew without over-extraction. Chef’s Tip: Use a burr grinder for consistent results.

    Step 2: Mix and Shake

    Grab a large mason jar and add 1 cup of coarsely ground coffee. Pour in 4 cups of cold water. In a smaller jar, combine ¼ cup ground coffee with 1 cup cold water. Secure the lids and shake well to ensure all grounds are saturated.

    Step 3: The Waiting Game

    Place the jars in the refrigerator and let them steep for 24 hours. This slow brewing process extracts the rich flavors without the bitterness you get from hot brewing.

    Step 4: Strain and Store

    After 24 hours, strain the coffee through a fine mesh strainer or a nut milk bag to remove the grounds. Be patient and let gravity do the work for the best clarity. Pour the filtered coffee back into the jars for storage. Chef’s Tip: Double strain if you prefer a cleaner brew.

    Step 5: Serve It Up

    To enjoy, pour over ice. You can dilute with water or milk according to your taste. Add a splash of vanilla or a sprinkle of cinnamon for a little extra flavor.

    Common Mistakes to Avoid

    • Using fine grounds: This can lead to over-extraction and a bitter taste.
    • Not shaking enough: Ensure all grounds are saturated to avoid uneven brewing.
    • Steeping too long: More than 24 hours can result in a harsh flavor.
    • Skipping the strain: Always strain thoroughly to avoid gritty coffee.

    How to Store & Reheat

    Store your cold brew in an airtight container in the refrigerator. It will stay fresh for up to two weeks. If you prefer your coffee warm, gently heat it on the stove, but avoid boiling to preserve the flavor profile.

    Ingredient Substitutions

    • Decaf coffee: For a caffeine-free version, simply use decaf coffee beans.
    • Flavored coffee: Try hazelnut or vanilla-flavored beans for a twist.
    • Non-dairy milk: Substitute with almond, oat, or coconut milk for a creamy finish.

    Nutrition Facts

    • Serving Size: 1 cup
    • Calories: 2
    • Protein: 0g
    • Fat: 0g
    • Carbs: 0g

    Frequently Asked Questions

    • Can I use pre-ground coffee? Yes, but ensure it’s coarsely ground for best results.
    • How long can I keep cold brew in the fridge? Up to two weeks in an airtight container.
    • Is cold brew stronger than regular coffee? It can be, depending on the brew ratio. Dilute to your preference.
    • Can I sweeten my cold brew? Absolutely! Add simple syrup or your choice of sweetener.
    • Does cold brew have less acidity? Yes, it’s typically smoother and less acidic than hot-brewed coffee.

  • ZERO PREP: Instant Herby Green Goddess Dressing (Way Better Than Store-Bought!)

    ZERO PREP: Instant Herby Green Goddess Dressing (Way Better Than Store-Bought!)

    Introduction & My Personal Story

    There’s something magical about a dressing that can come together in minutes and transform a simple salad into a gourmet meal. My love affair with the Green Goddess Dressing began years ago in a bustling San Francisco café. I was on a culinary tour, determined to try every local specialty. When I first tasted their version of this dressing, it was a revelation. The bright, fresh flavors of herbs paired with the creamy base were nothing short of extraordinary. I spent the next few years perfecting my own version, striving to capture that same essence without the fuss. In my 5 years of experience as a chef, I’ve learned that the best recipes are often the simplest. This Instant Herby Green Goddess Dressing is my go-to for quick, flavorful meals. It’s not just about the taste—it’s about the ease and the joy of creating something wonderful in a flash. Whether you’re a busy professional or a culinary enthusiast, this dressing is a game-changer.

    Why You’ll Love This Recipe

    • Quick and easy: Ready in under 5 minutes.
    • No cooking required: Perfect for hot days or when you’re short on time.
    • Versatile: Use it as a dip, dressing, or spread.
    • Fresh and flavorful: Packed with herbs and vibrant ingredients.
    • Healthier than store-bought: No preservatives, just pure goodness.

    Detailed Ingredients

    • 3 green onions, chopped
    • ½ cup fresh cilantro, roughly chopped
    • ½ cup fresh parsley, roughly chopped
    • 1 teaspoon dried dill
    • 1 cup fresh spinach, washed
    • ¼ cup fresh lemon juice
    • 2 large garlic cloves, peeled
    • 1 teaspoon salt
    • ½ teaspoon black pepper
    • ½ cup mayonnaise
    • ½ tablespoon honey
    • ⅓ cup olive oil

    Chef’s Tip: When selecting your herbs, look for vibrant green leaves without wilted edges. Freshness is key to a flavorful dressing.

    Step-by-Step Instructions

    1. Gather Your Ingredients: Make sure all ingredients are prepped and ready. This means your herbs are washed and roughly chopped, your garlic is peeled, and your spices are measured out. This step is crucial for a seamless process.

    2. Add to Processor: Place the green onions, cilantro, parsley, dill, spinach, lemon juice, garlic, salt, and pepper into a food processor. Pulse several times until the mixture is finely chopped. You may need to scrape down the sides to ensure even chopping.

    3. Mix in Mayo & Honey: Add the mayonnaise and honey to the chopped mixture. Process until the ingredients are well blended and the mixture is smooth. This should take about 30 seconds.

    4. Stream Oil: With the processor running on low, slowly stream in the olive oil. This will emulsify the dressing, giving it a creamy texture. It’s important to add the oil slowly to achieve the right consistency.

    5. Serve or Store: Your Green Goddess Dressing is ready to enjoy immediately. If not using right away, transfer it to an airtight container and store it in the refrigerator for up to a week.

    Common Mistakes to Avoid

    Too Much Garlic: While garlic adds a great flavor, too much can overpower the dressing. Stick to the recommended amount for balance.

    Not Chopping Herbs: Coarsely chopped herbs won’t blend well. Ensure they’re finely chopped for a smooth dressing.

    Adding Oil Too Quickly: Pouring the oil too fast can prevent proper emulsification. Slow and steady wins the race.

    How to Store & Reheat

    Store your dressing in an airtight container in the refrigerator. It will keep fresh for up to 7 days. If the dressing separates, give it a good shake or stir before using. Since it’s a cold dressing, there’s no need to reheat, just bring it to room temperature for about 10 minutes before serving to enhance the flavors.

    Ingredient Substitutions

    If you need to make substitutions, here are some safe swaps:

    • Mayonnaise: Swap with Greek yogurt for a lighter version.
    • Cilantro: If you’re not a fan, use more parsley or add basil.
    • Honey: Substitute with agave syrup or maple syrup for a different sweetness.
    • Olive Oil: Can be replaced with avocado oil for a different flavor profile.

    Nutrition Facts

    • Calories: 80 per tablespoon
    • Protein: 0.5g
    • Fat: 8g
    • Carbs: 1.5g
    • Serving Size: 1 tablespoon

    Frequently Asked Questions

    Q: Can I freeze this dressing?

    A: Freezing isn’t recommended as it can alter the texture and flavor. It’s best enjoyed fresh.

    Q: What dishes go well with Green Goddess Dressing?

    A: It’s versatile! Use it on salads, as a dip for veggies, or as a spread for sandwiches.

    Q: How can I make this vegan?

    A: Simply swap the mayonnaise with vegan mayo and use agave syrup instead of honey.

    Q: Is there a way to make it spicier?

    A: Add a pinch of cayenne pepper or a chopped jalapeño for a kick.

  • ZERO PREP: 1-Minute Homemade Poultry Seasoning That Will Change the Game!

    ZERO PREP: 1-Minute Homemade Poultry Seasoning That Will Change the Game!

    Introduction & My Personal Story

    Ah, poultry seasoning—a staple in my kitchen that holds more than just a blend of spices. I remember when I first discovered the magic of this seasoning. It was a chilly autumn evening, and my grandmother was preparing her famous roast chicken. The aroma that wafted through the house was nothing short of enchanting. As a young culinary enthusiast, I was captivated by the symphony of scents and flavors. I watched her closely, noticing how she meticulously measured out each ingredient, combining them with a gentle touch. The result was a roast chicken that was both comforting and flavorful, with a seasoning blend that danced on the palate. Fast forward to today, in my 5 years of experience as a chef, I’ve learned to appreciate the simplicity and versatility of a good poultry seasoning. It’s the secret weapon I reach for when I want to elevate my dishes without spending hours in the kitchen. Whether you’re a seasoned cook or just starting out, this zero-prep, 1-minute homemade poultry seasoning is a game-changer. Trust me, once you try it, you’ll wonder how you ever cooked without it.

    Why You’ll Love This Recipe

    • Quick and Easy: Ready in just 1 minute with zero prep.
    • Customizable: Adjust the spices to suit your taste.
    • Cost-Effective: Uses common pantry staples.
    • Versatile: Perfect for chicken, turkey, and more.
    • Long Shelf Life: Store it for months and use it as needed.
    • No Heat Required: A simple mix-and-store recipe.

    Detailed Ingredients

    For this homemade poultry seasoning, you’ll need the following ingredients:

    • 1 Tbsp dried thyme – Look for vibrant green leaves, indicating freshness.
    • 1 Tbsp dried basil – Opt for a sweet aroma and deep green color.
    • 1 Tbsp dried oregano – Choose a brand with a robust, peppery scent.
    • 1 Tbsp paprika – Go for a bright red color, which signifies quality.
    • 2 tsp dried rosemary – Look for whole leaves, not crushed.
    • 1 tsp onion powder – Ensure it’s a fine, dry powder without clumps.
    • ½ tsp garlic powder – Choose a light beige color for the best flavor.

    Step-by-Step Instructions

    Step 1: Gather Your Ingredients

    Begin by gathering all your spices. Having everything at hand makes the process seamless. Chef’s Tip: Ensure your spices are fresh for the best flavor. If they’ve been sitting in your pantry for over a year, consider replacing them.

    Step 2: Measure Precisely

    Using measuring spoons, carefully measure each ingredient. Precision is key here to maintain the balance of flavors. Combine 1 Tbsp dried thyme, 1 Tbsp dried basil, 1 Tbsp dried oregano, 1 Tbsp paprika, 2 tsp dried rosemary, 1 tsp onion powder, and ½ tsp garlic powder into a small mixing bowl.

    Step 3: Mix Thoroughly

    Using a small whisk or spoon, mix the ingredients until they are well combined. You should not see any distinct layers of color—everything should be a uniform blend. This ensures that every teaspoon you use later will have a balanced flavor.

    Step 4: Store Properly

    Transfer your seasoning blend into an airtight container. Store it in a cool, dark place away from direct sunlight and heat. This will help maintain its potency and freshness for up to six months. Chef’s Tip: Label the container with the date you made it so you can keep track of its freshness.

    Common Mistakes to Avoid

    While this recipe is straightforward, there are a few pitfalls to watch out for:

    • Using Stale Spices: Old spices can lead to a bland seasoning. Always check their freshness before mixing.
    • Incorrect Measurements: Even a slight deviation can alter the flavor balance. Use precise measurements.
    • Improper Storage: Exposure to light and air can degrade the spices. Always store in an airtight container.

    How to Store & Reheat

    This seasoning blend doesn’t require reheating, but proper storage is crucial for maintaining its flavor:

    • Storage: Keep your poultry seasoning in an airtight container in a cool, dark place. A pantry or cupboard works well.
    • Shelf Life: When stored correctly, this blend can last up to six months with its full flavor intact.

    Ingredient Substitutions

    If you’re missing some ingredients, here are safe substitutions:

    • Dried Thyme: Substitute with marjoram or savory.
    • Dried Basil: Swap with dried parsley or tarragon for a different twist.
    • Onion Powder: Granulated onion can be used in equal measure.
    • Garlic Powder: Granulated garlic is a fine substitute.

    Nutrition Facts

    • Calories: 6 per teaspoon
    • Protein: 0.2g
    • Fat: 0.1g
    • Carbohydrates: 1.3g
    • Serving Size: 1 teaspoon

    Frequently Asked Questions

    • Can I use fresh herbs instead of dried ones? While fresh herbs have a more vibrant flavor, they also contain moisture, which can affect the storage life of the blend. Stick with dried for this seasoning.
    • Is this seasoning blend gluten-free? Yes, all ingredients in this blend are naturally gluten-free.
    • Can I double the recipe? Absolutely! Just maintain the same proportions to keep the flavor balance intact.
    • How much seasoning should I use per pound of poultry? A good rule of thumb is 1 to 2 teaspoons per pound, depending on your taste preference.
    • Is this seasoning only for poultry? Not at all! Try it on roasted vegetables or as a rub for pork.

  • ZERO PREP: Happiness in a Hurry—Bread & Quick Dips!

    ZERO PREP: Happiness in a Hurry—Bread & Quick Dips!

    Introduction & My Personal Story

    There’s something deeply comforting about the simple pleasure of freshly toasted bread dipped in rich, flavorful oils. I remember the first time I encountered this delight—it was during a summer trip to a quaint coastal village in Italy. The air was filled with the aroma of the sea and fresh herbs, and the locals had a way of creating magic with the simplest of ingredients. One evening, after a long day of exploring, I wandered into a small family-owned trattoria. The owner, Nonna Maria, greeted me with a warm smile and a plate of crusty bread served with an assortment of olive oil dips. The flavors were vibrant and comforting, a perfect blend of spice, sweetness, and earthiness. That experience stayed with me and became a cherished memory.

    Fast forward to my bustling kitchen years later, I found myself recreating those dips with my own spin. In my 5 years of experience as a chef, I’ve learned that you don’t need elaborate preparations to enjoy a gourmet experience. This dish, “Happiness in a Hurry: Bread & Quick Dips,” is my homage to that Italian summer evening. Whenever I need a quick fix that doesn’t skimp on flavor, I turn to these zero-prep olive oil bread dips. They’re perfect for busy weeknights or as a delightful starter at gatherings. It’s a little piece of Italy that you can whip up in mere minutes.

    Why You’ll Love This Recipe

    • Quick & Easy: Ready in under 5 minutes with zero cooking required.
    • Minimal Cleanup: Just a couple of bowls and a spoon.
    • Versatile Flavors: Sweet, spicy, and savory options to please any palate.
    • Perfect for Entertaining: Impress guests with a gourmet appetizer that’s effortless.
    • Customizable: Easily adjust to suit your taste preferences.

    Detailed Ingredients

    For this recipe, you’ll need the following ingredients:

    • Olive Oil: ½ cup (use extra virgin for the best flavor)
    • Garlic: 2 cloves, minced (look for firm, plump cloves)
    • Salt: ¼ teaspoon
    • Crushed Red Pepper: ⅛ teaspoon
    • Black Pepper: ⅛ teaspoon
    • Balsamic Glaze: 1 tablespoon (thick and syrupy is best)
    • Parsley: ½ teaspoon, minced (fresh, vibrant green leaves)
    • Honey: 1 tablespoon (preferably raw or organic)
    • Bread: Your choice of crusty bread, such as ciabatta or baguette

    Step-by-Step Instructions

    Creating these dips is as simple as it gets, but let’s walk through each step to ensure perfection.

    Step 1: Prepare the Bowls

    Take two shallow bowls. The shallow design allows for easy dipping and ensures that the flavors distribute evenly. Place them on a clean, flat surface.

    Step 2: Add the Olive Oil

    Pour ¼ cup of olive oil into each bowl. Opt for a high-quality extra virgin olive oil, as it will be the base of your dips and should shine through with its rich, fruity flavor.

    Step 3: Infuse with Garlic

    Divide the minced garlic between the two bowls, adding one clove to each. Stir gently to begin infusing the oil with that aromatic garlic essence.

    Step 4: Season the Dips

    In one bowl, stir in ⅛ teaspoon of salt and ⅛ teaspoon of crushed red pepper for a spicy kick. In the other bowl, add ⅛ teaspoon of salt and ⅛ teaspoon of black pepper for a more classic flavor.

    Step 5: Add Sweet and Savory Elements

    To the bowl with black pepper, add 1 tablespoon of balsamic glaze and ½ teaspoon of minced parsley. This will give it a sweet, tangy, and herbaceous profile. In the red pepper bowl, add 1 tablespoon of honey to balance the heat with sweetness.

    Step 6: Let the Flavors Marry

    Allow the dips to sit for a few minutes. This resting period lets the flavors meld together beautifully. Meanwhile, toast or prepare your bread of choice. A crispy exterior with a soft interior is ideal for soaking up those luscious oils.

    Common Mistakes to Avoid

    • Using Low-Quality Olive Oil: The oil is the star of this dish. Invest in good quality extra virgin olive oil for the best results.
    • Overloading with Garlic: Too much garlic can overpower the delicate balance of flavors. Stick to the recommended amount.
    • Skipping the Resting Time: Allowing the dips to sit helps the flavors meld. Don’t rush this step.
    • Using Stale Bread: Freshly toasted or baked bread will enhance the overall experience.

    How to Store & Reheat

    If you have any leftovers, store them properly to maintain freshness:

    • Storage: Transfer the dips to airtight containers and refrigerate. Consume within 3 days for optimal flavor.
    • Reheating: Allow the dips to come to room temperature before serving. Avoid microwaving, as it can alter the texture of the oil.

    Ingredient Substitutions

    If you’re missing an ingredient or need to make a substitution, here are some safe swaps:

    • Olive Oil: Substitute with avocado oil or grapeseed oil, although the flavor will differ slightly.
    • Garlic: Use garlic powder if fresh garlic isn’t available, adjusting to taste.
    • Honey: Swap with maple syrup or agave nectar for a vegan alternative.
    • Balsamic Glaze: Create a quick reduction with balsamic vinegar and sugar if glaze isn’t available.

    Nutrition Facts

    • Calories: 150 per serving
    • Protein: 0.5g
    • Fat: 14g
    • Carbs: 5g
    • Serving Size: 2 tablespoons

    Frequently Asked Questions

    Can I make these dips ahead of time?

    Yes, you can prepare them a few hours in advance. Just store them in the refrigerator and bring them to room temperature before serving.

    What type of bread works best for dipping?

    A crusty bread like ciabatta or a baguette is perfect. The texture holds up well to the oils and provides a satisfying crunch.

    Can I add cheese to these dips?

    Absolutely! Grated Parmesan or crumbled feta can add an extra layer of flavor. Sprinkle on top just before serving.

    How can I make this gluten-free?

    Simply use a gluten-free bread option. The dips themselves are naturally gluten-free.

    Is there a way to make these dips spicier?

    Increase the amount of crushed red pepper or add a dash of hot sauce to turn up the heat.