Tag: focus boosting recipes

  • LATE NIGHT FUEL: The Easy Curry You’ll Crave!

    LATE NIGHT FUEL: The Easy Curry You’ll Crave!

    Introduction & My Personal Story

    Ah, the sweet aroma of a late-night curry simmering on the stove—there’s nothing quite like it. The first time I whipped up this easy curry, it was during my college years. Picture this: I was deep into a study session, notes scattered everywhere, and the clock striking midnight. My stomach growled louder than the thunderstorm raging outside. I needed something quick, something satisfying, and, most importantly, something that wouldn’t lull me into a food coma.

    I rummaged through my pantry and found a can of chickpeas, a can of coconut milk, and some spices. In my 5 years of experience as a chef, I’ve learned that the best recipes often come together when necessity meets creativity. With a little bit of this and a dash of that, my first late-night curry was born. It was a revelation—a dish that not only filled my belly but also fueled my brain for the long hours ahead. Since then, this curry has been my go-to recipe for those nights when work or creativity keeps me burning the midnight oil. Let me share this late-night gem with you.

    Why You’ll Love This Recipe

    • Quick and Easy: Ready in under 30 minutes.
    • Budget-Friendly: Uses pantry staples like **chickpeas** and **coconut milk**.
    • Vegan and Gluten-Free: Suitable for various dietary preferences.
    • Customizable: Swap out vegetables or adjust spices to suit your taste.
    • Perfect Late-Night Snack: Light yet satisfying enough to keep you energized.

    Detailed Ingredients

    Here’s what you’ll need to make this delicious late-night curry:

    • 1 onion (about 150g), diced
    • 2 garlic cloves, minced
    • 1 teaspoon fresh ginger, grated
    • 2 tablespoons olive oil
    • 1½ tablespoons curry powder
    • 1 teaspoon ground cumin
    • 2 cans (15 oz each) chickpeas, drained and rinsed
    • 8 oz tomato sauce
    • 1 can (13.5 oz) coconut milk
    • 4 oz kale (about 3 cups), chopped
    • Salt to taste (about ½ teaspoon)

    When selecting ingredients, look for fresh and firm **kale** leaves. For the **coconut milk**, opt for a full-fat version for a creamier texture.

    Step-by-Step Instructions

    Follow these steps to make the perfect late-night curry:

    Step 1: Prepare Your Ingredients

    Start by preparing your ingredients. Dice the **onion**, mince the **garlic**, and grate the **ginger**. If you haven’t already, chop the **kale** into bite-sized pieces. This prep work will make the cooking process smooth and quick.

    Step 2: Toast the Spices

    Heat a large skillet over medium heat. Add **1½ tablespoons of curry powder** and **1 teaspoon of cumin**. Toast the spices for about one minute, stirring frequently. You’ll know they’re ready when they release a fragrant aroma.

    Step 3: Sauté the Aromatics

    To the toasted spices, add **2 tablespoons of olive oil**, the diced **onion**, minced **garlic**, and grated **ginger**. Sauté for about 5 minutes or until the onion becomes soft and translucent. This forms the flavorful base of your curry.

    Step 4: Add Main Ingredients

    Once the aromatics are ready, add the drained **chickpeas**, **tomato sauce**, and **coconut milk** to the skillet. Stir everything together until well combined.

    Step 5: Simmer the Curry

    Increase the heat to medium-high to bring the curry to a simmer. Once simmering, reduce the heat to medium-low and let it cook for about 15 minutes. Stir occasionally to prevent sticking. You’re looking for a slightly thickened sauce.

    Step 6: Incorporate the Greens

    Finally, add the chopped **kale** to the skillet. Cook for an additional 5 minutes or until the kale has wilted. Season the curry with **salt** to taste, starting with about ½ teaspoon.

    Step 7: Serve Hot

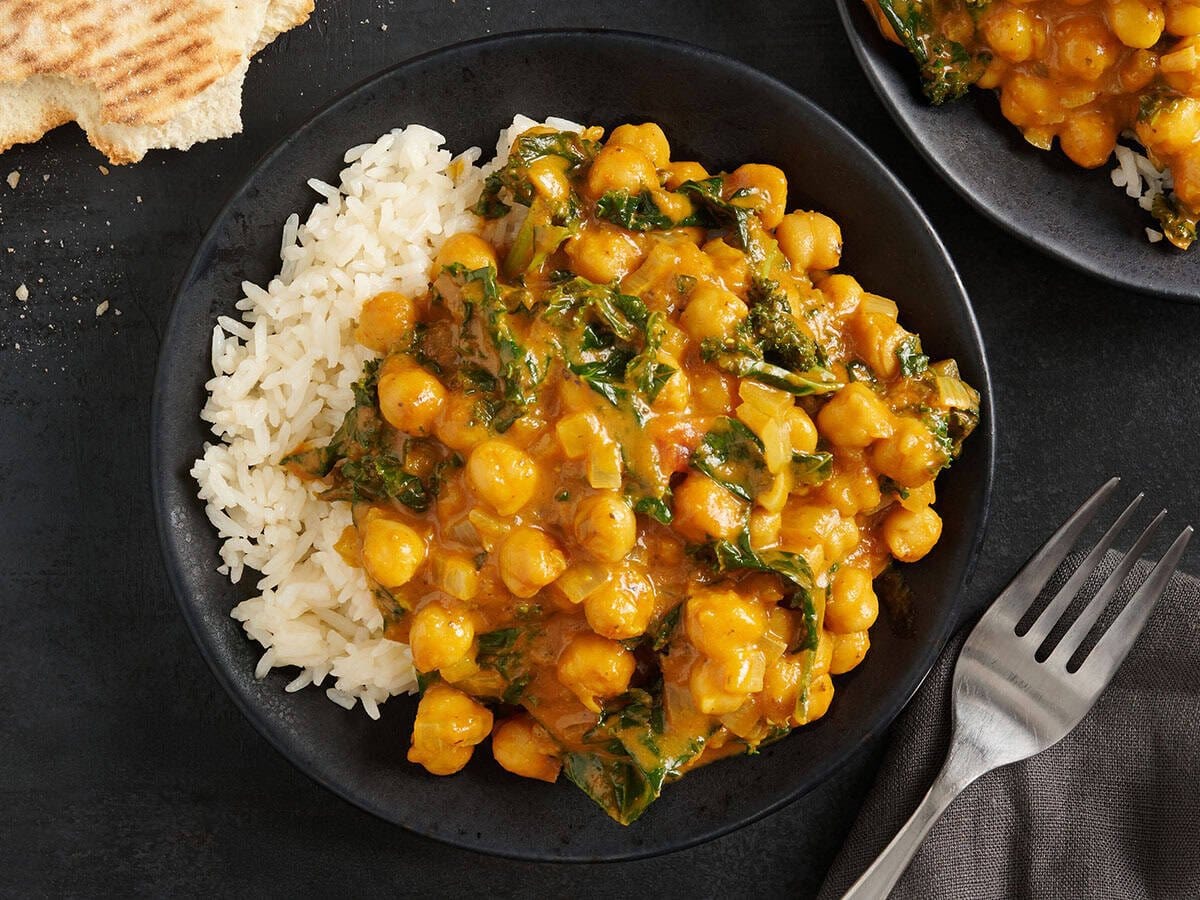
    Your late-night curry is ready to serve! It’s best enjoyed over rice, with bread, or even as a dip with tortillas. This dish is versatile and pairs well with many sides.

    Common Mistakes to Avoid

    Even the simplest recipes can go awry. Here are some common pitfalls to watch out for:

    • Not Toasting Spices: Skipping this step can result in a less flavorful curry.
    • Overcooking the Chickpeas: They should be tender but not mushy.
    • Adding Kale Too Early: It can become too soft; add it towards the end.
    • Skipping the Stirring: Stir occasionally to prevent sticking and ensure even cooking.

    How to Store & Reheat

    Storing and reheating this curry is a breeze:

    • Allow the curry to cool completely before transferring it to an airtight container.
    • Store in the refrigerator for up to 3 days.
    • For longer storage, freeze the curry for up to 2 months.
    • To reheat, warm on the stove over medium heat or microwave until heated through.

    Ingredient Substitutions

    Need to make a swap? Here are some safe substitutions:

    • Chickpeas: Use lentils or white beans for a different texture.
    • Coconut Milk: Substitute with almond milk for a lighter version.
    • Kale: Spinach or Swiss chard works well as a replacement.
    • Olive Oil: Coconut oil or vegetable oil can be used instead.

    Nutrition Facts

    • Calories: 320 per serving
    • Protein: 10g
    • Fat: 18g
    • Carbohydrates: 32g
    • Serving Size: 1 cup

    Frequently Asked Questions

    • Can I make this curry spicier?
      Add a pinch of red pepper flakes or a chopped chili for extra heat.
    • Is it okay to use canned tomatoes?
      Yes, canned tomatoes can be used in place of tomato sauce.
    • How can I thicken the curry?
      Simmer longer to reduce the liquid or add a slurry of cornstarch and water.
    • Can I double the recipe?
      Absolutely! Just make sure you have a large enough skillet.
    • What can I serve with this curry?
      Rice, naan bread, or quinoa are great options.

  • LATE NIGHT FUEL: Irresistibly Delicious Dan Dan Noodles

    LATE NIGHT FUEL: Irresistibly Delicious Dan Dan Noodles

    Introduction & My Personal Story

    Ah, Dan Dan Noodles. Just the thought of them takes me back to my late-night culinary adventures in bustling night markets of Chengdu. There’s something magical about the combination of spicy, savory, and nutty flavors that come together in this dish. During my travels in China, I found myself drawn to these aromatic bowls of noodles as the perfect remedy for those long days and even longer nights. In my 5 years of experience as a chef, I’ve learned that Dan Dan Noodles are more than just food; they’re a story in a bowl, a testament to the rich culinary heritage of Sichuan province. One chilly evening, after a particularly exhausting day of exploring, I stumbled upon a small street vendor. The vendor served me a steaming bowl of Dan Dan Noodles that were so delicious, they instantly revived my spirits. That experience stayed with me, and ever since, I’ve been on a mission to recreate that perfect bowl. Today, I’m excited to share my version of this dish, perfect for fueling those late-night grinds without the heavy food coma aftermath.

    Why You’ll Love This Recipe

    • Quick and easy to prepare – perfect for a late-night snack.
    • Packed with bold flavors and a satisfying kick of spice.
    • Versatile dish that can be enjoyed warm or cold.
    • High in protein and energy-boosting ingredients.
    • Light on the stomach, avoiding the dreaded food coma.

    Detailed Ingredients

    Here’s what you’ll need to make these irresistible Dan Dan Noodles:

    • Spaghetti Noodles: 200g, or any long pasta of your choice.
    • Ground Pork: 250g, look for well-marbled pieces for extra flavor.
    • Garlic: 3 cloves, minced finely.
    • Ginger: 1 tablespoon, freshly grated.
    • Soy Sauce: 4 tablespoons, opt for low-sodium to control saltiness.
    • Brown Sugar: 2 teaspoons, to balance the spice.
    • Spinach: 100g, fresh leaves washed and dried.
    • Rice Vinegar: 1 tablespoon, for a tangy punch.
    • Peanut Butter: 2 tablespoons, creamy or chunky based on preference.
    • Chili Crisp: 1 tablespoon, adjust to taste for heat preference.
    • Dry Roasted Peanuts: 50g, crushed for topping.
    • Green Onions: 2 stalks, sliced thinly.
    • Vegetable Oil: 2 tablespoons, for cooking.

    Step-by-Step Instructions

    Step 1: Prepare the Ingredients
    Before you start, gather all your ingredients. This will make the cooking process smooth and efficient. Chef’s Tip: Keep your workspace organized to maintain the momentum.

    Step 2: Cook the Noodles
    Bring a large pot of salted water to a boil. Add the **spaghetti noodles** and cook until just al dente, which is usually about 2 minutes less than the package directions suggest. Reserve 1 cup of the pasta water before draining the noodles. This starch-rich water is crucial for the sauce’s consistency.

    Step 3: Brown the Pork
    In a skillet, heat 2 tablespoons of **vegetable oil** over medium-high heat. Add the **ground pork** and let it brown without stirring for about 3 minutes. This allows a caramelized crust to form, enhancing the flavor. Once browned, stir to break it up into smaller pieces.

    Step 4: Add the Aromatics and Veggies
    To the browned pork, add the **minced garlic** and **grated ginger**. Stir in 2 tablespoons of **soy sauce**, 2 teaspoons of **brown sugar**, and the **spinach**. Cook for another 2 minutes until the spinach is wilted and the aromatics are fragrant.

    Step 5: Make the Sauce
    In a mixing bowl, combine the remaining 2 tablespoons of **soy sauce**, **rice vinegar**, **peanut butter**, **chili crisp**, **brown sugar**, and half of the reserved pasta water. Whisk until smooth. Chef’s Tip: Adjust the chili crisp according to your spice tolerance.

    Step 6: Combine Everything
    Toss the cooked noodles with the sauce, adding more pasta water if needed to achieve your desired consistency. Ensure the noodles are well-coated with the sauce for maximum flavor.

    Step 7: Serve
    Divide the noodles into bowls. Top with the pork mixture, sliced **green onions**, and **crushed peanuts**. Serve warm, or refrigerate for a refreshing cold noodle salad.

    Common Mistakes to Avoid

    • Overcooking the Noodles: Remember, the noodles will continue to cook slightly when mixed with the sauce, so undercook them slightly in the pot.
    • Not Reserving Pasta Water: This starchy water is key to achieving a creamy sauce consistency.
    • Skipping the Browning Step: Browning the pork adds depth to the flavor, so don’t skip this crucial step.
    • Overloading on Chili Crisp: Start with a small amount and adjust to avoid overpowering the dish with heat.

    How to Store & Reheat

    Once cooled, store any leftover noodles in an airtight container in the refrigerator. They should last for up to 3 days. To reheat, you can gently warm them in a skillet over medium heat, adding a splash of water to loosen the sauce. Alternatively, enjoy them cold as a noodle salad.

    Ingredient Substitutions

    • Ground Pork: Swap with ground chicken or turkey for a leaner option.
    • Spinach: Use kale or bok choy if spinach isn’t available.
    • Peanut Butter: Almond butter or tahini can be used for a different flavor profile.
    • Soy Sauce: Tamari is a great gluten-free alternative.

    Nutrition Facts

    • Calories: 550 per serving
    • Protein: 25g
    • Fat: 30g
    • Carbohydrates: 50g
    • Serving Size: 1 bowl

    Frequently Asked Questions

    • Can I make this dish vegetarian? Yes, simply omit the pork and increase the amount of spinach or add tofu for protein.
    • What type of noodles work best? While spaghetti works great, you can also use ramen or udon for a more traditional touch.
    • How spicy is this dish? The spice level is moderate but can be adjusted by altering the amount of chili crisp.
    • Can I freeze Dan Dan Noodles? It’s best enjoyed fresh, but you can freeze the pork mixture separately for up to a month.

  • LATE NIGHT FUEL: Dive into Filipino Chicken Adobo Tonight!

    LATE NIGHT FUEL: Dive into Filipino Chicken Adobo Tonight!

    Introduction & My Personal Story

    Growing up in a bustling Filipino household, our kitchen was always the heart of the home, especially late at night when the world outside had quieted down. My mother, a true culinary artist, would often prepare a pot of Filipino Chicken Adobo as the clock struck midnight. The aroma of garlic, soy sauce, and vinegar would fill the air, creating a sense of anticipation and comfort. It was during these late-night cooking sessions that I learned the art of creating a dish that was both simple and deeply satisfying. In my 5 years of experience as a professional chef, I’ve come to appreciate the simplicity and depth of flavors this dish offers. It’s not just a meal; it’s an experience that brings people together, even in the wee hours of the night. Today, I’m excited to share this recipe with you, hoping it will become a staple in your own late-night kitchen adventures.

    Why You’ll Love This Recipe

    • Easy to Prepare: Minimal ingredients and straightforward steps.
    • Rich Flavors: Bold and tangy, perfect for a satisfying meal.
    • Versatile: Pairs well with rice or noodles.
    • Great for Meal Prep: Tastes even better the next day.
    • Comfort Food: Brings warmth and nostalgia.

    Detailed Ingredients

    • 1 kg (2.2 lbs) of chicken pieces (thighs and drumsticks work best)
    • 1/2 cup (120 ml) of soy sauce
    • 1/2 cup (120 ml) of white vinegar
    • 2 tablespoons of honey
    • 2 tablespoons of vegetable oil
    • 6 cloves of garlic, minced
    • 3 bay leaves
    • 1 teaspoon of whole black peppercorns
    • Salt to taste (optional)

    Step-by-Step Instructions

    Step 1: Prepare the Marinade
    In a large bowl, whisk together the soy sauce, vinegar, honey, and garlic. Add the bay leaves and peppercorns. This will form the base of the adobo’s signature flavor. Chef’s Tip: For a deeper flavor, let the marinade sit for about 10 minutes before using it.

    Step 2: Marinate the Chicken
    Place the chicken pieces in a large resealable bag or shallow dish. Pour the marinade over the chicken, ensuring each piece is well coated. Seal the bag or cover the dish, then refrigerate for at least 2 hours or overnight for maximum flavor absorption.

    Step 3: Cook the Chicken
    Transfer the marinated chicken with the marinade into a large pot. Add just enough water to cover the chicken. Bring to a boil over medium-high heat, then reduce the heat to low. Cover and simmer for about 30 minutes, or until the chicken is tender and cooked through. Stir occasionally to prevent sticking.

    Step 4: Broil the Chicken
    Preheat your broiler. Transfer the cooked chicken pieces to a broiler pan, reserving the sauce in the pot. Broil the chicken for 5-10 minutes, turning once, until the skin is golden brown and crispy. Chef’s Tip: Keep a close eye on the chicken to prevent burning.

    Step 5: Reduce the Sauce
    While the chicken is broiling, bring the reserved sauce to a boil over medium heat. Let it simmer until it reduces by half, thickening and intensifying in flavor. This will be your glaze.

    Step 6: Glaze the Chicken
    Remove the broiled chicken from the oven and brush generously with the reduced sauce. Alternatively, you can toss the chicken in the sauce to coat it thoroughly.

    Step 7: Serve and Enjoy
    Serve your Filipino Chicken Adobo hot over steamed rice or noodles, letting the sauce soak into the grains for an extra burst of flavor.

    Common Mistakes to Avoid

    • Skipping the Marination: Don’t rush this step; it’s crucial for flavor.
    • Overcooking the Chicken: Keep an eye on the time to ensure the chicken remains juicy.
    • Too Much Vinegar: Balance is key; adjust to your taste preference.
    • Not Reducing the Sauce: This step is essential for a rich, concentrated glaze.

    How to Store & Reheat

    To store leftovers, place the chicken and sauce in an airtight container and refrigerate for up to 3 days. For freezing, store in a freezer-safe container for up to 2 months. To reheat, warm in a skillet over medium heat until heated through, adding a splash of water if necessary to loosen the sauce.

    Ingredient Substitutions

    • Soy Sauce: Use tamari or coconut aminos for a gluten-free option.
    • White Vinegar: Substitute with apple cider vinegar for a milder taste.
    • Honey: Replace with brown sugar or maple syrup for a different sweetness profile.
    • Chicken Pieces: Use boneless chicken thighs for quicker cooking.

    Nutrition Facts

    • Calories: 320 per serving
    • Protein: 28g
    • Fat: 18g
    • Carbs: 8g
    • Serving Size: 1 piece of chicken with sauce

    Frequently Asked Questions

    • Can I use other meats for adobo? Yes, pork or beef can be used, but cooking times will vary.
    • Is chicken adobo spicy? Traditional adobo is not spicy, but you can add chili for heat.
    • What sides go well with adobo? Steamed rice, vegetables, or a fresh salad pair well.
    • Can I skip the broiling step? Yes, but broiling adds a delightful crispiness to the chicken.
    • How can I make the dish less salty? Use low-sodium soy sauce and adjust to taste.