Tag: Creamy

  • Brain Fuel: Creamy Avocado Dressing

    Brain Fuel: Creamy Avocado Dressing

    Introduction & My Personal Story

    Ah, avocados! Just the mere mention of them brings a smile to my face. I remember the first time I tasted an avocado. I was visiting my grandmother in California, where her backyard was a veritable orchard of fresh produce. One sunny afternoon, she handed me a toast topped with a creamy, green spread, and I was hooked. The rich, buttery texture and subtle, nutty flavor were unlike anything I had tasted before. It was love at first bite.

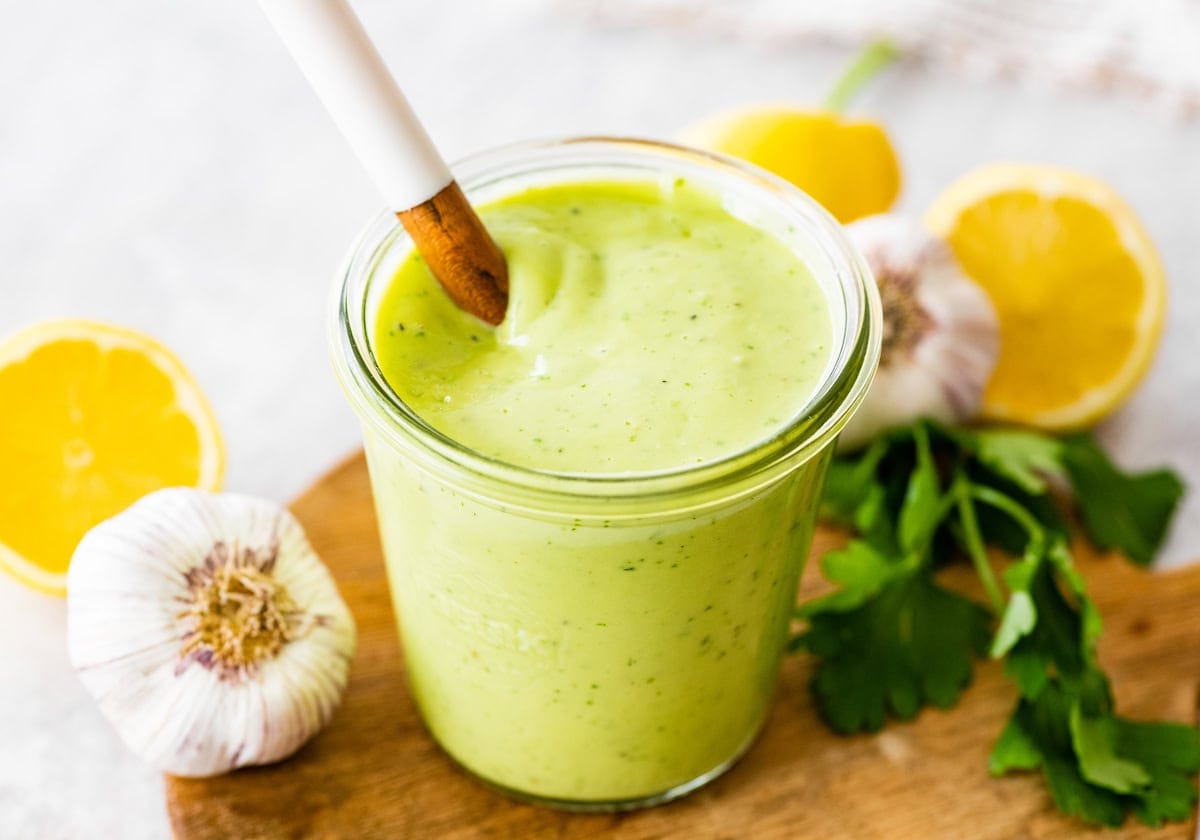
    Fast forward a few years, and avocados became my secret weapon in the kitchen. Among the many dishes I experimented with, the Creamy Avocado Dressing stood out as a game-changer. It was during my early days as a chef, when I was working long hours and needed a quick, nutritious boost. This dressing became my go-to for sprucing up salads, bowls, and even sandwiches. It was a revelation how something so simple could transform an ordinary meal into something extraordinary.

    In my 5 years of experience, I’ve come to appreciate how versatile and forgiving avocados are. They adapt beautifully to a variety of flavors and textures. This dressing is a testament to that versatility, combining the creamy richness of avocado with the tang of lemon and the fresh burst of herbs. It’s a recipe that’s not only delicious but also packed with brain-boosting nutrients. So, let’s dive into this delightful recipe and discover how to bring a touch of California sunshine to your kitchen!

    Why You’ll Love This Recipe

    • Quick & Easy: Ready in just 5 minutes with minimal cleanup.
    • Nutritious: Packed with healthy fats and Omega-3s for brain health.
    • Versatile: Perfect as a salad dressing, dip, or spread.
    • Customizable: Easily adjustable to suit dietary preferences.
    • Delicious: A creamy, flavorful addition to any meal.

    Detailed Ingredients

    • 1 ripe avocado (about 150g) – Look for avocados that yield slightly to gentle pressure, indicating ripeness.
    • ½ cup (120g) Greek yogurt – Opt for full-fat or 2% for a creamier texture.
    • 2 tablespoons (30ml) lemon juice – Freshly squeezed for the best flavor.
    • 2 tablespoons (30ml) olive oil – Choose extra virgin for a richer taste.
    • 1 clove garlic – Peeled and minced for a subtle kick.
    • ¼ cup (15g) fresh parsley – Or substitute with cilantro or basil for a different flavor profile.
    • Salt and pepper – To taste, for seasoning.
    • Water – As needed to adjust consistency.

    Step-by-Step Instructions

    Step 1: Prepare the Avocado

    Start by slicing the avocado in half and removing the pit. Using a spoon, scoop the flesh into a blender or food processor. Chef’s Tip: If the avocado is ripe, it should come out easily without much resistance.

    Step 2: Add Ingredients

    To the blender, add the Greek yogurt, lemon juice, olive oil, minced garlic, and chopped parsley. Season with a pinch of salt and pepper. These components will create a harmonious blend of creamy, tangy, and herby flavors.

    Step 3: Blend

    Process the mixture on high speed until it’s smooth and creamy. You may need to stop and scrape down the sides of the blender to ensure everything is well combined. The consistency should be thick but pourable. If it’s too thick, add a tablespoon of water at a time until you reach your desired consistency.

    Step 4: Taste and Adjust

    Give the dressing a taste and adjust the seasoning as necessary. You might want to add more salt or a splash of lemon juice for extra tang. Remember, flavors tend to mellow after chilling, so don’t be afraid to season boldly.

    Step 5: Store

    Transfer the dressing to an airtight container. To prevent browning, press a piece of parchment or plastic wrap directly onto the surface before sealing. Store in the refrigerator for up to 3-4 days.

    Common Mistakes to Avoid

    Using Unripe Avocados: An unripe avocado will result in a lumpy, bitter dressing. Ensure your avocado is ripe and creamy.

    Over-Blending: While you want a smooth consistency, over-blending can introduce too much air, making the dressing too fluffy. Blend just until combined.

    Incorrect Seasoning: Under-seasoning can lead to a bland dressing. Taste and adjust as necessary, keeping in mind that flavors develop over time.

    How to Store & Reheat

    Store the dressing in an airtight container in the refrigerator. To minimize browning, cover the surface with parchment or plastic wrap. It will keep fresh for 3-4 days. This dressing is best served cold and does not require reheating. If it thickens in the fridge, stir in a little water to loosen it up before serving.

    Ingredient Substitutions

    • Dairy-Free Option: Replace Greek yogurt with a coconut or cashew-based yogurt.
    • Spice it Up: Add a slice of jalapeño or a pinch of cayenne pepper for a spicy kick.
    • Citrus Twist: Swap lemon juice with lime juice for a different zest.
    • Thicker Version: Omit water if you prefer a thicker dip-like consistency.

    Nutrition Facts

    • Calories: 54 kcal per 2 tablespoons
    • Protein: 1g
    • Fat: 5g
    • Carbs: 3g
    • Serving Size: 2 tablespoons

    Frequently Asked Questions

    Can I freeze this dressing? Freezing is not recommended as the texture of the avocado may change upon thawing.

    What dishes pair well with this dressing? This dressing is versatile and works well with salads, grain bowls, wraps, and as a veggie dip.

    How can I prevent the dressing from turning brown? Cover the surface with a piece of parchment or plastic wrap before sealing the container.

    Is this dressing keto-friendly? Yes, it’s low in carbs and high in healthy fats, making it suitable for a keto diet.

    Can I use a hand blender? Yes, a hand blender will work, but ensure the avocado is very ripe for easy blending.

  • CHEAT DAY: Irresistibly Creamy Frozen Delight for Summer!

    CHEAT DAY: Irresistibly Creamy Frozen Delight for Summer!

    Introduction & My Personal Story

    There’s something magical about the simple pleasure of a frozen treat on a hot summer day. Growing up, my family had a tradition of making frozen desserts during the peak of summer. My favorite was the Chocolate-Covered Bananas. These were no ordinary treats; they were a delightful combination of creamy banana, rich chocolate, and a crunch from various toppings. I remember watching my mom prepare them, her hands expertly dipping each banana half into a glossy pool of melted chocolate. The anticipation of that first bite, the snap of the chocolate giving way to the soft banana underneath, was pure bliss.

    As a chef with over 5 years of experience, I’ve recreated and refined this childhood classic, ensuring it’s as indulgent as it is easy to make. It’s a perfect cheat day treat that feels like a reward without the guilt. Whether you’re lounging by the pool or enjoying a backyard barbecue, these frozen delights are guaranteed to be a hit. Let’s dive into this irresistibly creamy frozen delight and make your summer a little sweeter.

    Why You’ll Love This Recipe

    • Quick and easy to prepare with minimal ingredients.
    • No baking required – perfect for those hot summer days.
    • Customizable with your favorite toppings.
    • A healthy treat that satisfies your sweet tooth.
    • Great for kids and adults alike.

    Detailed Ingredients

    To make these Chocolate-Covered Bananas, you’ll need:

    • 4 medium ripe bananas (approximately 500g), peeled and halved.
    • 200g of dark chocolate chips (choose high-quality for best results).
    • 2 tablespoons of coconut oil (about 30ml) to help the chocolate set smoothly.
    • Optional toppings: crushed nuts, sprinkles, shredded coconut, or sea salt.
    • 8 bamboo skewers or popsicle sticks.

    When selecting bananas, opt for those that are ripe but not overly soft. The skin should be yellow with minimal brown spots, ensuring a sweet yet firm texture.

    Step-by-Step Instructions

    Step 1: Prepare Your Setup

    First, line a small baking sheet with parchment paper. This will prevent the bananas from sticking and make cleanup a breeze.

    Step 2: Prepare the Bananas

    Peel each banana and cut them in half. Insert a bamboo skewer or popsicle stick into the cut end of each banana half. Lay them out on the prepared baking sheet, ensuring they’re not touching each other. Place the tray in the freezer for about 1 hour or until the bananas are completely solid. This step is crucial as it allows the chocolate to set quickly upon dipping.

    Step 3: Melt the Chocolate

    In a microwave-safe bowl, combine the chocolate chips and coconut oil. Microwave on high for 1 minute, then stir. Continue heating in 30-second increments, stirring in between, until the chocolate is fully melted and smooth. Be cautious not to overheat as chocolate can burn easily. Chef’s Tip: If you prefer a stovetop method, melt the chocolate and coconut oil using a double boiler for more controlled heat.

    Step 4: Dip the Bananas

    Remove the bananas from the freezer. Working quickly, dip each frozen banana half into the melted chocolate, turning to coat evenly. Let any excess chocolate drip off. Immediately sprinkle your choice of toppings over the chocolate before it sets. Return each coated banana to the parchment-lined tray.

    Step 5: Set and Serve

    Once all bananas are coated, return the tray to the freezer for at least 15 minutes to allow the chocolate to set completely. Enjoy your Chocolate-Covered Bananas immediately for the best texture, or store them for later indulgence.

    Common Mistakes to Avoid

    Skipping the Freezing Step: Ensure the bananas are fully frozen before dipping. This helps the chocolate set quickly and prevents it from sliding off.

    Overheating Chocolate: Use gentle heat to melt the chocolate. Burnt chocolate is bitter and clumpy.

    Not Using Enough Coconut Oil: The oil helps the chocolate set smoothly. Without it, the chocolate may crack or become too thick.

    How to Store & Reheat

    To store your Chocolate-Covered Bananas, wait until the chocolate is fully set. Transfer them to a freezer-safe container lined with parchment paper. They will stay fresh for up to 3 months. To enjoy, simply take them out of the freezer and let them sit for a few minutes to soften slightly before biting in.

    Ingredient Substitutions

    If you need to make substitutions, here are some safe swaps:

    • Bananas: Try using strawberries or apple slices for a different fruit twist.
    • Dark Chocolate: Milk or white chocolate can be used, but keep in mind they are sweeter.
    • Coconut Oil: Substitute with butter or shortening if necessary, though the flavor and texture may vary slightly.

    Nutrition Facts

    • Calories: 180 per serving
    • Protein: 2g
    • Fat: 10g
    • Carbohydrates: 25g
    • Serving Size: 1 banana half

    Frequently Asked Questions

    Q: Can I use different fruits?

    A: Absolutely! Strawberries, apple slices, or even pineapple chunks work well.

    Q: How long can I keep these in the freezer?

    A: They can be stored for up to 3 months in a freezer-safe container.

    Q: What can I use instead of coconut oil?

    A: You can use butter or shortening, but it may alter the flavor slightly.

    Q: Can I make these vegan?

    A: Use vegan chocolate chips and ensure your toppings are also vegan-friendly.

    Q: Can I add spices to the chocolate?

    A: Yes, a pinch of cinnamon or cayenne pepper can add a delightful twist.

  • NO-BAKE REWARD: Indulge in Creamy Vegan Protein Ice Cream!

    NO-BAKE REWARD: Indulge in Creamy Vegan Protein Ice Cream!

    Introduction & My Personal Story

    There’s something magical about making a dessert that doesn’t require an oven. My journey with **vegan protein ice cream** began five years ago when I was looking for a guilt-free indulgence that could satisfy my sweet tooth without compromising my health goals. During a particularly hot summer, I was inspired to create a creamy, luscious treat that even my non-vegan friends would love. The first time I made this no-bake ice cream, it was like a revelation. I remember the delight on my friends’ faces as they tasted the rich, chocolaty flavors, complemented by the smooth, velvety texture. It quickly became a staple in my household, especially on those days when I wanted something sweet without the hassle. This recipe is a testament to the fact that indulgence and health can go hand in hand. So, join me as we dive into the world of creamy, dreamy vegan protein ice cream, a treat that’s as satisfying to make as it is to eat!

    Why You’ll Love This Recipe

    • Quick and easy to make, with no baking required.
    • Packed with protein to support fitness goals.
    • Vegan-friendly and dairy-free.
    • Customizable flavors to suit any palate.
    • Perfect for a refreshing treat on hot days.

    Detailed Ingredients

    To ensure the best results, it’s important to use high-quality ingredients. Here’s what you’ll need:

    • **4 ripe bananas**, sliced and frozen
    • **1 cup almond milk** (or any plant-based milk)
    • **2 tablespoons almond butter** (look for unsweetened)
    • **3 tablespoons cocoa powder** for the chocolate version
    • **1 scoop chocolate protein powder** (about 30g)
    • **1 teaspoon vanilla extract** for the vanilla version
    • **1 teaspoon ground cinnamon** for a hint of spice
    • Optional: **Cacao nibs or chocolate chips** for added texture

    Step-by-Step Instructions

    Chocolate Version

    Step 1: Start by placing your **frozen banana chunks** into a food processor or high-speed blender. Add in the **almond milk**, **almond butter**, **cocoa powder**, and **chocolate protein powder**.

    Step 2: Blend the ingredients on high until the mixture becomes smooth and creamy. This typically takes about 3-4 minutes. Be sure to pause occasionally to scrape down the sides of the blender to ensure everything is well-mixed.

    Step 3: If you like a bit of crunch, stir in some **cacao nibs** or **chocolate chips**. Pulse the blender a couple of times to incorporate them into the mixture.

    Step 4: You can enjoy the ice cream right away by spooning it into bowls. For a firmer texture, pour the mixture into a loaf pan lined with parchment paper and freeze for at least 2 hours before scooping.

    Vanilla Version

    Step 1: Place your **frozen banana chunks** into the blender, along with **almond milk**, **vanilla extract**, **ground cinnamon**, and **protein powder**.

    Step 2: Blend until smooth and creamy, again stopping to scrape down the sides as needed. This should take 3-4 minutes.

    Step 3: Spoon the mixture into bowls for immediate enjoyment, or pour it into a loaf pan lined with parchment paper. Freeze for at least 2 hours for a scoopable consistency.

    Common Mistakes to Avoid

    Even a simple recipe can have its pitfalls. Here’s how to avoid common mistakes:

    • **Not using ripe bananas**: Ensure your bananas are ripe before freezing them. This adds natural sweetness and a creamier texture.
    • **Over-blending**: Be careful not to over-blend the mixture, as it can become too runny. If this happens, simply freeze it longer.
    • **Skipping scraping**: Not scraping down the sides of the blender can lead to uneven mixing.

    How to Store & Reheat

    Store your vegan protein ice cream in an airtight container in the freezer. It can last for up to a week, but for the best texture, consume it within a few days. To serve, let it sit at room temperature for about 10 minutes to soften slightly before scooping.

    Ingredient Substitutions

    If you need to make substitutions, here are some safe swaps:

    • **Almond milk** can be replaced with any plant-based milk, such as soy or oat milk.
    • **Almond butter** can be swapped with peanut butter or sunflower seed butter for a nut-free option.
    • For a different flavor, try using **vanilla protein powder** instead of chocolate.

    Nutrition Facts

    • Calories: 250 per serving
    • Protein: 10g
    • Fat: 8g
    • Carbs: 35g
    • Serving Size: 1 cup

    Frequently Asked Questions

    Q: Can I use fresh bananas instead of frozen?

    A: For the best texture, use frozen bananas. Fresh bananas won’t give the same creamy consistency.

    Q: How can I make this recipe nut-free?

    A: Swap almond milk for oat milk and use sunflower seed butter instead of almond butter.

    Q: Can I add other flavors to the ice cream?

    A: Absolutely! Try adding a teaspoon of instant coffee for a mocha flavor or a handful of berries for a fruity twist.

    Q: What type of blender is best for this recipe?

    A: A high-speed blender or food processor works best to achieve a smooth, creamy texture.


  • NO-BAKE REWARD: Irresistibly Creamy Frozen Delight for Summer!

    NO-BAKE REWARD: Irresistibly Creamy Frozen Delight for Summer!

    Introduction & My Personal Story

    Ah, summer! The season of sun, fun, and frozen treats. One of my fondest memories as a child was spending lazy afternoons at my grandmother’s house, where she would whip up the most delightful, no-bake desserts. Her kitchen was a haven of creativity, and while she had a treasure trove of recipes, there was one that stood out – the frozen s’mores. These weren’t your ordinary s’mores. They were a creamy, chocolatey, and irresistibly cool version that required no fire or fuss. Just layers of crunchy graham crackers, rich chocolate, and a creamy filling that melted in your mouth. Fast forward to today, in my 5 years of experience as a chef, I’ve managed to recreate that magic with a modern twist. My version, the **No-Bake Protein Frozen S’mores**, is not only a nod to those nostalgic days but also a perfect treat for those who crave something sweet yet nutritious. This treat is perfect for a cheat day or just a sunny afternoon indulgence, offering a balance of flavor and protein-packed goodness.

    Why You’ll Love This Recipe

    • **No-Bake**: Perfect for hot days when you don’t want to turn on the oven.
    • **Protein-Packed**: A guilt-free indulgence that supports your fitness goals.
    • **Quick to Make**: Minimal preparation time with maximum reward.
    • **Customizable**: Easily adapt with your favorite flavors and add-ins.
    • **Kid-Friendly**: A fun and easy recipe to make with the little ones.

    Detailed Ingredients

    • **Graham Crackers**: 200g (about 20 crackers). Look for whole grain options for added fiber.
    • **Chocolate Chips**: 150g (about 1 cup). Choose high-quality dark chocolate for a richer taste.
    • **Coco Whip**: 250ml (1 cup), thawed. Opt for the unsweetened version if watching sugar intake.
    • **Vanilla Protein Powder**: 50g (about 1/2 cup). Use a brand with a creamy texture for best results.

    Step-by-Step Instructions

    Step 1: Prepare Your Pan

    Line an 8×8-inch baking dish with parchment paper, ensuring there’s enough overhang on the sides. This will make it easier to lift out the frozen bars later. Chef’s Tip: Secure the parchment with binder clips to keep it in place while assembling.

    Step 2: Layer the Graham Crackers

    Arrange your **graham crackers** in a single layer, upside down, to cover the bottom of the pan completely. Some slight overlapping is fine, but aim for a snug fit.

    Step 3: Melt the Chocolate

    In a microwave-safe bowl, melt the **chocolate chips** in 30-second intervals, stirring in between, until smooth. Alternatively, you can use a double boiler over low heat. Pour the melted chocolate over the graham crackers and spread evenly with a spatula.

    Step 4: Prepare the Filling

    In a medium bowl, combine the thawed **coco whip** and **vanilla protein powder**. Stir until smooth and fully incorporated. Gently spread this mixture over the chocolate layer, ensuring even coverage.

    Step 5: Add the Top Layer

    Place the remaining graham crackers over the filling, pressing down lightly to secure them in place. This will form the top layer of your frozen s’mores.

    Step 6: Freeze

    Freeze the assembled dish for at least 2 hours, or until firm. Chef’s Tip: For the best texture, allow it to freeze overnight.

    Step 7: Serve and Enjoy

    Use the parchment overhang to lift the bars out of the dish. Slice into squares and serve immediately. Store any leftovers in an airtight container in the freezer.

    Common Mistakes to Avoid

    • Skipping the Parchment Paper: This makes removing the bars a hassle. Always line your dish.
    • Overcooking Chocolate: Chocolate can seize if overheated. Use low heat and stir frequently.
    • Uneven Layers: Spread each layer evenly to ensure every bite has a balance of flavors.

    How to Store & Reheat

    Store the frozen s’mores in an airtight container, using parchment paper between layers to prevent sticking. They are best consumed within 2 weeks. If they become too firm, let them sit at room temperature for 2–5 minutes before enjoying.

    Ingredient Substitutions

    • Graham Crackers: Substitute with digestive biscuits for a similar texture.
    • Chocolate Chips: Use white or milk chocolate for a sweeter version.
    • Coco Whip: Replace with regular whipped cream if dairy is not a concern.
    • Vanilla Protein Powder: Choose chocolate or peanut butter flavored protein for a different twist.

    Nutrition Facts

    • Calories: 250 per serving
    • Protein: 8g
    • Fat: 12g
    • Carbs: 30g
    • Serving Size: 1 square (based on 16 servings)

    Frequently Asked Questions

    Q: Can I make these in advance?

    A: Absolutely! These can be made a day ahead and stored in the freezer until you’re ready to serve.

    Q: What if I don’t have protein powder?

    A: You can omit it, though the protein content will be lower. Consider adding a tablespoon of peanut butter for flavor and some protein.

    Q: Can I add nuts or other toppings?

    A: Yes! Chopped nuts, shredded coconut, or sprinkles can be added between layers for extra texture.

    Q: Is there a vegan option?

    A: Use vegan graham crackers, chocolate, and protein powder to make this recipe completely plant-based.

  • NO-BAKE REWARD: Irresistibly Creamy Pumpkin Delight!

    NO-BAKE REWARD: Irresistibly Creamy Pumpkin Delight!

    Introduction & My Personal Story

    Ah, the magic of autumn! There’s something undeniably comforting about this time of year, with its crisp air and vibrant foliage. It’s a season that calls for cozy gatherings and indulgent treats. One of my all-time favorites is the No-Bake Reward: Irresistibly Creamy Pumpkin Delight. This dessert isn’t just a recipe; it’s a cherished tradition that takes me back to my childhood kitchen, where my grandmother would whip up the most delightful pumpkin creations. I remember the warmth of the kitchen, the aromatic scent of spices, and the joy of sneaking a spoonful of the creamy filling when she wasn’t looking.

    In my 5 years of experience as a chef, I’ve come to appreciate the beauty of no-bake desserts. They’re perfect for those days when you crave something sweet but don’t want to spend hours in the kitchen. This pumpkin delight has become a staple in my repertoire, especially during the holiday season. It’s the kind of dessert that brings people together, sparking conversations and creating memories. Every time I make it, I’m reminded of those cherished moments with my grandmother, and I hope it brings the same warmth and joy to your home.

    Why You’ll Love This Recipe

    • Quick and easy to prepare, with no baking required.
    • Rich, creamy texture that melts in your mouth.
    • Packed with the warm flavors of autumn spices.
    • Perfect for holiday gatherings or a cozy night in.
    • Can be made ahead of time, saving you stress on busy days.

    Detailed Ingredients

    • 1 cup (240g) of **pumpkin puree** – Look for canned puree with no added sugar.
    • 1 cup (240g) of **cream cheese**, softened – Opt for full-fat for the creamiest texture.
    • 1 cup (240g) of **whipped topping** – Make sure it’s thawed if using frozen.
    • 1 teaspoon of **vanilla extract** – Pure extract for the best flavor.
    • 1 teaspoon of **pumpkin pie spice** – A blend of cinnamon, nutmeg, ginger, and cloves.
    • 1 package of **graham crackers** – Approximately 200g, for layering.
    • 1 cup (240ml) of **milk** – For dipping the graham crackers.
    • Additional whipped topping and crushed graham crackers for garnish (optional).

    Step-by-Step Instructions

    Step 1: Begin by preparing your pumpkin filling. In a large mixing bowl, combine 1 cup of **pumpkin puree**, 1 cup of **cream cheese**, and 1 cup of **whipped topping**. Use an electric mixer on medium speed to blend until the mixture is smooth and creamy. Chef’s Tip: Ensure your cream cheese is at room temperature to avoid lumps.

    Step 2: Add 1 teaspoon of **vanilla extract** and 1 teaspoon of **pumpkin pie spice** to the mixture. Blend again until the spices are well incorporated, and the filling is fragrant and evenly spiced.

    Step 3: In a shallow bowl, pour 1 cup of **milk**. Dip each **graham cracker** quickly into the milk, just enough to moisten but not soggy. Line the bottom of a 9×13-inch dish with a layer of these dipped crackers.

    Step 4: Spread half of the pumpkin mixture over the graham cracker layer. Use a spatula to evenly distribute and smooth the filling.

    Step 5: Repeat the process with another layer of dipped **graham crackers**, followed by the remaining pumpkin mixture. Smooth out the top layer with a spatula.

    Step 6: For a finishing touch, spread additional **whipped topping** over the top. If desired, sprinkle with crushed graham crackers for added texture and visual appeal.

    Step 7: Cover the dish with plastic wrap and refrigerate for at least 4 hours, or until the dessert is set and the flavors have melded together. Chef’s Tip: This dessert tastes even better when left overnight, allowing the crackers to soften and the spices to deepen.

    Step 8: Slice, serve, and savor each creamy, spiced bite!

    Common Mistakes to Avoid

    • **Over-soaking the graham crackers**: A quick dip is all that’s needed. Too much milk can make them mushy.
    • **Lumpy filling**: Ensure the cream cheese is fully softened before mixing to achieve a smooth consistency.
    • **Skipping chill time**: The dessert needs at least 4 hours to set properly and develop flavors.

    How to Store & Reheat

    To store the Pumpkin Delight, cover it tightly with plastic wrap or transfer to an airtight container. It will keep in the refrigerator for up to 3 days. While this dessert is best enjoyed cold, if you prefer a slightly warmer treat, allow it to sit at room temperature for about 15 minutes before serving.

    Ingredient Substitutions

    • **Dairy-free**: Substitute cream cheese and whipped topping with plant-based alternatives.
    • **Gluten-free**: Use gluten-free graham crackers for those with dietary restrictions.
    • **Low-sugar**: Opt for a sugar-free whipped topping and check the label on your pumpkin puree for added sugars.

    Nutrition Facts

    • Calories: 250 per serving
    • Protein: 3g
    • Fat: 15g
    • Carbs: 28g
    • Serving Size: 1 slice (approx. 1/12 of the recipe)

    Frequently Asked Questions

    • Can I use fresh pumpkin instead of canned? Yes, simply roast and puree fresh pumpkin for a homemade touch.
    • How far in advance can I make this? It’s best made a day ahead to allow flavors to meld and the dessert to set.
    • Can I freeze this dessert? Freezing is not recommended as it may alter the texture.
    • What can I use instead of graham crackers? Vanilla wafers or digestive biscuits work well as substitutes.

  • 5-MIN FUEL: Quick & Creamy Hollandaise Sauce Made Simple!

    5-MIN FUEL: Quick & Creamy Hollandaise Sauce Made Simple!

    Introduction & My Personal Story

    Every chef has a few go-to recipes tucked in their back pocket, and for me, it’s the **Quick & Creamy Hollandaise Sauce**. My love affair with this luscious sauce began during my culinary school days. Picture this: a bustling kitchen filled with the aroma of warm butter and the sound of sizzling pans. I was a wide-eyed student, eager to master the classics. One morning, our instructor demonstrated the magic of Hollandaise. I remember the smooth, velvety texture, the perfect balance of rich butter and tangy lemon. It was love at first taste.

    Years later, in my 5 years of experience as a chef, I’ve churned out countless variations of this sauce, fine-tuning it to perfection. The beauty of this recipe lies in its simplicity. With just a handful of ingredients and a few minutes, you can transform any dish into something extraordinary. Whether it’s drizzled over poached eggs for a classic Eggs Benedict or served alongside grilled asparagus, this sauce never fails to impress. Trust me, once you try it, you’ll understand why it’s a staple in my kitchen and why it should be in yours too.

    Why You’ll Love This Recipe

    • Ready in just 5 minutes – perfect for busy mornings or quick dinners.
    • Uses simple, everyday ingredients you likely already have.
    • Rich, creamy texture that enhances any dish.
    • Perfect for impressing guests without breaking a sweat.
    • Customizable to your taste with easy ingredient swaps.

    Detailed Ingredients

    To create this quick and creamy Hollandaise sauce, you’ll need:

    • 1 egg yolk – Look for fresh, free-range eggs for the best flavor.
    • 1 tablespoon water – Helps in emulsifying the sauce.
    • ½ tablespoon lemon juice – Freshly squeezed for a bright, tangy kick.
    • 4 tablespoons unsalted butter (56 grams) – Cut into small cubes for easy melting.
    • ⅛ teaspoon cayenne pepper – Adds a subtle heat.
    • Salt to taste – Elevates the flavors.

    Step-by-Step Instructions

    Creating a perfect Hollandaise sauce is easier than you might think. Just follow these steps:

    Step 1: Prepare the Base

    Start by separating the egg yolk from the white. Place the yolk in a small saucepan. Chef’s Tip: Save the whites for another recipe, like a meringue or omelet. Add **1 tablespoon of water** and **½ tablespoon of lemon juice** to the yolk. Whisk until smooth. This mixture forms the base of your sauce and will help with the emulsification.

    Step 2: Add the Butter

    Cut **4 tablespoons of unsalted butter** into small cubes. This ensures it melts evenly and quickly. Add the butter to the saucepan with the yolk mixture.

    Step 3: Heat and Whisk

    Place the saucepan over medium-low heat. Continuously whisk the mixture as the butter melts. You’ll notice the mixture starting to froth. This is a good sign! Keep whisking to prevent the eggs from scrambling.

    Step 4: Thicken the Sauce

    Continue to cook the sauce for about 3-5 minutes. You’re looking for a consistency similar to gravy. It should coat the back of a spoon. Once you reach this stage, remove the saucepan from the heat.

    Step 5: Season

    Stir in **⅛ teaspoon of cayenne pepper** and salt to taste. The cayenne adds a gentle warmth without overpowering the sauce. Taste and adjust the seasoning as needed.

    Common Mistakes to Avoid

    Making Hollandaise can be tricky, but here are some pitfalls to watch out for:

    • **Overheating:** If the heat is too high, the eggs can scramble. Keep it at medium-low.
    • **Not whisking continuously:** This can lead to uneven cooking and separation.
    • **Adding butter too quickly:** Add it gradually to ensure a smooth emulsion.

    How to Store & Reheat

    If you have leftovers, store the Hollandaise sauce in an airtight container in the refrigerator for up to 2 days. To reheat, place the sauce in a heatproof bowl over a pot of simmering water. Whisk gently until warmed through. Avoid microwaving, as it can cause the sauce to separate.

    Ingredient Substitutions

    Here’s how you can tweak the recipe if needed:

    • **Butter:** Use ghee for a nuttier flavor or margarine for a vegan option.
    • **Lemon Juice:** Substitute with lime juice or white wine vinegar for a different tang.
    • **Cayenne Pepper:** Try smoked paprika for a milder, smoky taste.

    Nutrition Facts

    Here’s the nutritional breakdown per serving (approx. 2 tablespoons):

    • Calories: 238 kcal
    • Protein: 1.7 grams
    • Fat: 25 grams
    • Carbohydrates: 0.5 grams
    • Serving Size: 2 tablespoons

    Frequently Asked Questions

    Q: Can I make Hollandaise sauce ahead of time?

    A: Yes, but it’s best served fresh. If needed, make it up to a day in advance and reheat gently.

    Q: What dishes pair well with Hollandaise sauce?

    A: It’s classic with Eggs Benedict, but also great over vegetables, fish, or steak.

    Q: How can I fix a broken Hollandaise sauce?

    A: Whisk in a splash of hot water or lemon juice to bring it back together.

    Q: Is there a way to make it spicier?

    A: Add more cayenne pepper or a dash of hot sauce for extra heat.

    Conclusion

    There you have it, a quick and creamy Hollandaise sauce that’s both simple and satisfying. Whether you’re a seasoned chef or a kitchen newbie, this recipe is sure to become a favorite. With its rich flavor and silky texture, you’ll find yourself reaching for it time and again. Happy cooking!