Tag: Cold

  • 5-MIN FUEL: Whip Up Starbucks-Style Protein Cold Foam!

    5-MIN FUEL: Whip Up Starbucks-Style Protein Cold Foam!

    Introduction & My Personal Story

    When I think back to my early days as a chef, the hustle and bustle of morning routines always fascinated me. People rushing to grab their morning coffee, the aroma of freshly brewed beans wafting through the air—it was an experience in itself. But it wasn’t just the coffee that caught my attention. It was the innovation around it. One particular creation that stood out was the Starbucks-style Protein Cold Foam. Imagine my delight when, after years of experimentation, I managed to whip up a quick and delicious version of this treat right at home.

    In my 5 years of experience as a chef, I’ve learned that the best recipes are those that combine efficiency with flavor. This Protein Cold Foam does exactly that. It takes me back to those early mornings when I’d sip on a frothy coffee, feeling energized and ready to conquer the day. The smooth, creamy foam paired with the robust flavor of cold brew is a match made in heaven. It’s not just a drink; it’s a morning ritual that sets the tone for a productive day.

    Creating this recipe has been a journey of discovery. From testing various protein powders to finding the perfect frothing technique, every step has been an adventure. Now, I’m thrilled to share this recipe with you, so you too can enjoy a Starbucks-style Protein Cold Foam in the comfort of your home, without the wait or the hefty price tag.

    Why You’ll Love This Recipe

    • Quick & Easy: Ready in just 5 minutes, perfect for busy mornings.
    • High in Protein: Gives you the energy boost you need to start your day.
    • Cost-Effective: Enjoy a premium coffee experience without breaking the bank.
    • Customizable: Adjust sweetness and flavor to your preference.
    • Healthy Alternative: Offers a nutritious start without excess calories.

    Detailed Ingredients

    • 1 cup Cold Brew Coffee: Opt for a strong, robust blend for the best flavor.
    • ½ cup Nonfat Milk: Alternatively, use almond or oat milk if you prefer a dairy-free option.
    • 1 scoop Protein Powder (about 30g): Choose a flavor that complements coffee, like vanilla or chocolate.
    • Optional Sweetener: Use a zero-calorie sweetener like stevia or monk fruit to taste.

    Step-by-Step Instructions

    Step 1: Prepare the Cold Brew

    Brew your cold coffee in advance or use a cold brew concentrate. Ensure it’s chilled and ready to go. Pour 1 cup of cold brew into a tall glass, leaving room for the foam.

    Step 2: Mix the Protein Foam

    In a blender, combine ½ cup of nonfat milk and 1 scoop of protein powder. For a richer texture, use a high-speed blender. Blend on high until the mixture is frothy and thick, about 30 seconds. Chef’s Tip: Make sure the protein powder is fully dissolved to avoid any grainy texture.

    Step 3: Froth to Perfection

    Check the consistency of your foam. It should be creamy and smooth. If you find it’s too runny, blend for an additional 10-15 seconds. The ideal foam should hold its shape for a few seconds after pouring.

    Step 4: Assemble Your Drink

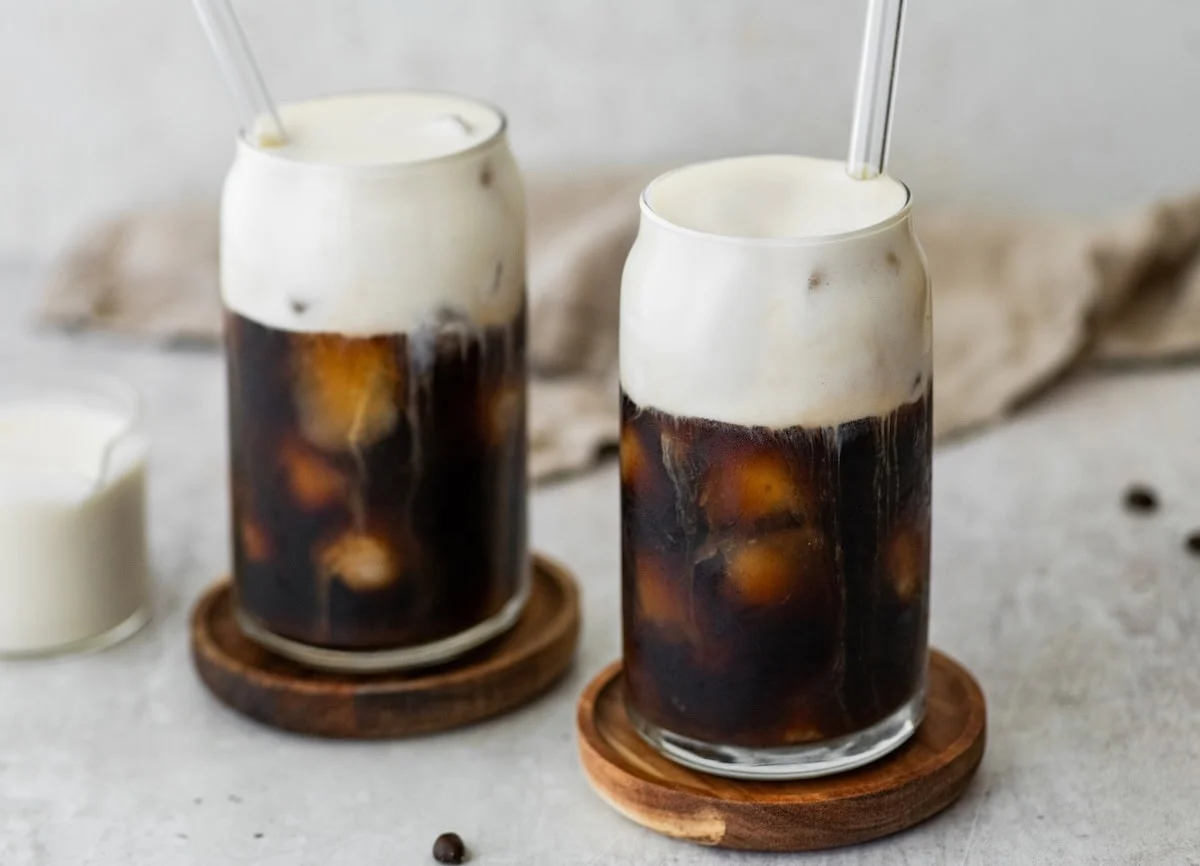
    Gently layer the protein foam over your cold brew coffee. Pour slowly to create a beautiful separation between the coffee and the foam. This layering not only looks impressive but ensures every sip is a delightful mix of coffee and foam.

    Step 5: Sweeten & Serve

    If desired, add your chosen sweetener and stir gently. Serve immediately and enjoy your homemade Starbucks-style Protein Cold Foam!

    Common Mistakes to Avoid

    • Using Warm Milk: Always use cold milk to help the foam stabilize better.
    • Over-Blending: This can break down the foam. Blend just until you achieve the right consistency.
    • Wrong Protein Powder: Some powders don’t dissolve well or alter the taste negatively. Choose a high-quality, complementary flavor.

    How to Store & Reheat

    This drink is best enjoyed fresh. However, if you need to store it, keep the coffee and foam separate. Store the cold brew in the fridge for up to 3 days. The foam can be stored in an airtight container for up to 24 hours, but it may lose some of its fluffiness. Re-blend before serving to restore texture.

    Ingredient Substitutions

    • Milk: Substitute with almond or coconut milk for a dairy-free option.
    • Protein Powder: Use plant-based protein if you prefer a vegan version.
    • Sweetener: Try honey or agave syrup if you’re not counting calories.

    Nutrition Facts

    • Calories: 100 kcal
    • Protein: 15g
    • Fat: 1g
    • Carbohydrates: 8g
    • Serving Size: 1 drink

    Frequently Asked Questions

    • Can I use flavored protein powder? Yes, flavors like vanilla or chocolate work well!
    • Is it necessary to use a blender? For the best foam texture, a blender is recommended.
    • Can I make this ahead of time? It’s best fresh, but you can store components separately.
    • How can I make it sweeter? Add more sweetener to taste, but do it gradually.

  • ZERO PREP: Studio-Approved Cold Brew in a Flash!

    ZERO PREP: Studio-Approved Cold Brew in a Flash!

    Introduction & My Personal Story

    Ah, cold brew coffee. Just the thought takes me back to those early mornings in my cozy little kitchen, where the sun barely peeked through the windows, and the world was still asleep. In my 5 years of experience as a chef and food blogger, I’ve come to appreciate the magic of a well-made cold brew. It’s not just coffee; it’s a ritual, a moment of peace before the hustle and bustle of the day begins.

    I remember the first time I attempted to make cold brew at home. I was skeptical, thinking it was going to be a complicated process, but I was pleasantly surprised by its simplicity. The rich aroma of freshly ground coffee filled the air as I mixed it with cold water, and I couldn’t help but feel a sense of accomplishment. It was a drink that not only woke me up but also became a cherished part of my morning routine.

    Over time, I’ve perfected the art of making cold brew, and it’s become a staple in my kitchen. Whether it’s a hot summer day or a chilly winter morning, a glass of cold brew never fails to bring comfort and joy. Now, I’m excited to share my studio-approved, zero-prep cold brew recipe with you. Let’s dive in!

    Why You’ll Love This Recipe

    • No heat required – perfect for hot days.
    • Minimal cleanup – less time washing, more time sipping.
    • Zero prep – just mix, shake, and wait.
    • Customizable strength – dilute as you like.
    • Rich, smooth flavor – no bitterness.

    Detailed Ingredients

    To make the perfect cold brew, you’ll need the following ingredients:

    • 1 cup coarsely ground coffee (about 85 grams): Look for a medium to dark roast for a robust flavor. If buying pre-ground, ensure it’s coarsely ground.
    • 5 cups cold water (about 1.2 liters): Filtered water is best for a clean taste.

    Step-by-Step Instructions

    Step 1: Grind Your Beans

    If you’re using whole beans, grind them to a coarse consistency. You want the grounds to be similar in texture to sea salt. This ensures a smooth brew without over-extraction. Chef’s Tip: Use a burr grinder for consistent results.

    Step 2: Mix and Shake

    Grab a large mason jar and add 1 cup of coarsely ground coffee. Pour in 4 cups of cold water. In a smaller jar, combine ¼ cup ground coffee with 1 cup cold water. Secure the lids and shake well to ensure all grounds are saturated.

    Step 3: The Waiting Game

    Place the jars in the refrigerator and let them steep for 24 hours. This slow brewing process extracts the rich flavors without the bitterness you get from hot brewing.

    Step 4: Strain and Store

    After 24 hours, strain the coffee through a fine mesh strainer or a nut milk bag to remove the grounds. Be patient and let gravity do the work for the best clarity. Pour the filtered coffee back into the jars for storage. Chef’s Tip: Double strain if you prefer a cleaner brew.

    Step 5: Serve It Up

    To enjoy, pour over ice. You can dilute with water or milk according to your taste. Add a splash of vanilla or a sprinkle of cinnamon for a little extra flavor.

    Common Mistakes to Avoid

    • Using fine grounds: This can lead to over-extraction and a bitter taste.
    • Not shaking enough: Ensure all grounds are saturated to avoid uneven brewing.
    • Steeping too long: More than 24 hours can result in a harsh flavor.
    • Skipping the strain: Always strain thoroughly to avoid gritty coffee.

    How to Store & Reheat

    Store your cold brew in an airtight container in the refrigerator. It will stay fresh for up to two weeks. If you prefer your coffee warm, gently heat it on the stove, but avoid boiling to preserve the flavor profile.

    Ingredient Substitutions

    • Decaf coffee: For a caffeine-free version, simply use decaf coffee beans.
    • Flavored coffee: Try hazelnut or vanilla-flavored beans for a twist.
    • Non-dairy milk: Substitute with almond, oat, or coconut milk for a creamy finish.

    Nutrition Facts

    • Serving Size: 1 cup
    • Calories: 2
    • Protein: 0g
    • Fat: 0g
    • Carbs: 0g

    Frequently Asked Questions

    • Can I use pre-ground coffee? Yes, but ensure it’s coarsely ground for best results.
    • How long can I keep cold brew in the fridge? Up to two weeks in an airtight container.
    • Is cold brew stronger than regular coffee? It can be, depending on the brew ratio. Dilute to your preference.
    • Can I sweeten my cold brew? Absolutely! Add simple syrup or your choice of sweetener.
    • Does cold brew have less acidity? Yes, it’s typically smoother and less acidic than hot-brewed coffee.