Tag: Budget

  • Fast Fuel: Irresistible Gingerbread Pancakes on a Budget!

    Fast Fuel: Irresistible Gingerbread Pancakes on a Budget!

    Introduction & My Personal Story

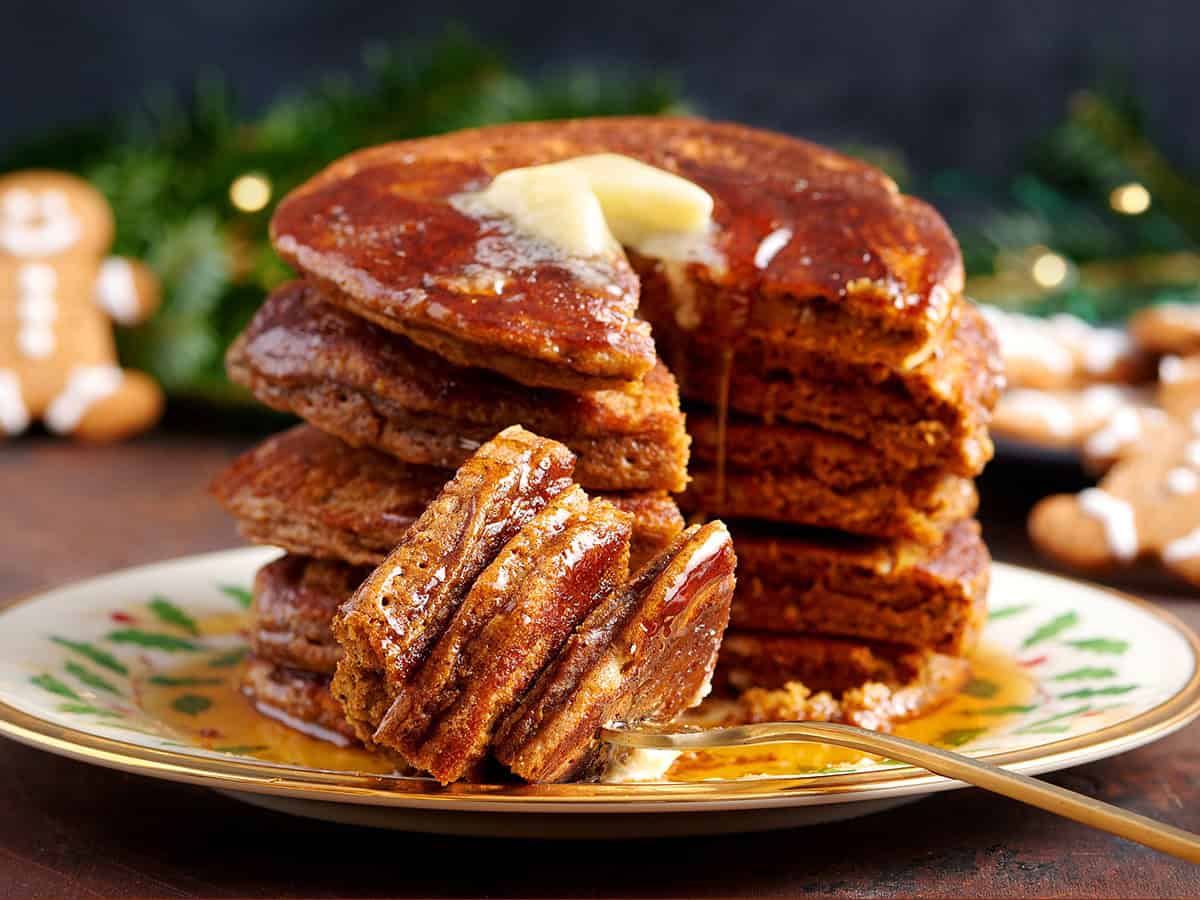
    There’s something truly magical about waking up on a brisk winter morning to the smell of freshly cooked gingerbread pancakes wafting through the house. Growing up, my mother had a knack for transforming the simplest of ingredients into a breakfast feast that could rival any holiday banquet. These gingerbread pancakes were always a family favorite, especially during the festive season. The warmth of the ginger paired with the sweetness of the molasses created a comforting start to our day. In my 5 years of experience as a chef, I’ve found few things that can lift the spirits quite like these pancakes. They’re more than just a meal; they’re a reminder of the cozy mornings spent with family, laughter echoing in the kitchen, and the joy of sharing something delicious with loved ones. Today, I bring you a recipe that captures that essence, one that is not only delightful but also budget-friendly, ensuring you can enjoy these treats without any stress on your wallet.

    Why You’ll Love This Recipe

    • Quick and easy to prepare, perfect for busy mornings.
    • Uses budget-friendly ingredients you likely have on hand.
    • Rich in flavor with a perfect balance of spices.
    • Provides a warm, comforting start to the day.
    • Great for the whole family, loved by kids and adults alike.

    Detailed Ingredients

    • 1 cup (120g) all-purpose flour
    • 1 teaspoon baking powder
    • 1/2 teaspoon baking soda
    • 1/4 teaspoon salt
    • 1 teaspoon ground ginger
    • 1 teaspoon ground cinnamon
    • 1/4 teaspoon ground nutmeg
    • 1/4 cup (50g) brown sugar
    • 3/4 cup (180ml) warm milk
    • 1 large egg
    • 2 tablespoons unsalted butter, melted
    • 2 tablespoons molasses
    • 1 teaspoon vanilla extract

    When shopping, look for fresh spices to ensure the flavors are robust and aromatic. Opt for unsulphured molasses for a more authentic taste.

    Step-by-Step Instructions

    Step 1: Prepare the Dry Ingredients
    In a large mixing bowl, combine the flour, baking powder, baking soda, salt, ground ginger, cinnamon, nutmeg, and brown sugar. Whisk these together until everything is well blended. This ensures that your pancakes will rise evenly and have a consistent flavor throughout.

    Step 2: Mix the Wet Ingredients
    In another bowl, whisk together the warm milk, egg, melted butter, molasses, and vanilla extract. The warm milk helps to integrate the molasses smoothly, preventing clumping. Chef’s Tip: Ensure the melted butter is not too hot; otherwise, it may start to cook the egg.

    Step 3: Combine Wet and Dry Mixtures
    Gently pour the wet ingredients into the dry ingredients. Stir just until combined; it’s okay if the batter is a little lumpy. Overmixing can lead to tough pancakes. Let the batter rest for 10-15 minutes. This resting period allows the flour to hydrate and the baking powder to activate, resulting in fluffier pancakes.

    Step 4: Cook the Pancakes
    Heat a non-stick skillet or griddle over medium heat. Lightly grease the surface with butter or cooking spray. Using a 1/4 cup measure, pour the batter onto the skillet. Cook until you see bubbles forming on the surface, about 1 minute. Flip and cook the other side until golden brown, approximately 30 seconds. Adjust the heat as necessary to prevent burning.

    Step 5: Keep Pancakes Warm
    As you finish cooking, place the pancakes on a plate and cover them with a clean towel or keep them in a warm oven (around 200°F) to maintain their warmth until all are ready to serve.

    Step 6: Serve and Enjoy
    Serve your pancakes with a dollop of butter, a drizzle of syrup, or a sprinkle of powdered sugar. Pair with your favorite hot beverage for a complete breakfast experience.

    Common Mistakes to Avoid

    One common mistake is overmixing the batter, which can result in dense pancakes. Remember, lumps are okay. Another pitfall is cooking on too high a heat, which can burn the outside while leaving the inside undercooked. Always keep your heat at medium. Finally, not letting the batter rest can lead to flat pancakes, as the resting time is crucial for fluffiness.

    How to Store & Reheat

    Store any leftover pancakes in an airtight container in the refrigerator for up to 3 days. To reheat, place them in a toaster or a preheated oven at 350°F for about 5 minutes until warmed through. You can also freeze them in a single layer on a baking sheet, then transfer to a freezer bag for up to 2 months. Reheat directly from frozen in the toaster or oven.

    Ingredient Substitutions

    If you’re out of an ingredient or need to cater to dietary restrictions, here are some swaps:

    • Flour: Use whole wheat flour for a heartier texture.
    • Milk: Substitute with almond milk or oat milk for a dairy-free version.
    • Egg: Replace with a flax egg (1 tablespoon flaxseed meal + 2.5 tablespoons water).
    • Molasses: Use honey or maple syrup, though the flavor will be slightly different.

    Nutrition Facts

    • Calories: 357 kcal per serving
    • Protein: 6g
    • Fat: 12g
    • Carbohydrates: 56g
    • Serving Size: 3 pancakes

    Frequently Asked Questions

    Q: Can I make the batter ahead of time?
    A: Yes, you can prepare the batter the night before and store it in the refrigerator. Just give it a good stir before cooking.

    Q: Can I double the recipe?
    A: Absolutely! This recipe doubles nicely. Just ensure you have a large enough bowl for mixing and a big enough skillet for cooking.

    Q: What can I serve with these pancakes?
    A: Fresh fruit, bacon, or sausage are great sides. A dollop of whipped cream can also add a festive touch.

    Q: Are these pancakes suitable for freezing?
    A: Yes, they freeze very well. Just be sure to separate them with parchment paper to prevent sticking.

  • 5-MIN FUEL: 17 Delicious Stir-Fry Recipes on a Budget!

    5-MIN FUEL: 17 Delicious Stir-Fry Recipes on a Budget!

    Introduction & My Personal Story

    Let me take you back to a time when I was just starting out in the bustling world of culinary arts. I was a novice chef, working my way through the ranks in a busy kitchen. It was during this period that I discovered the magic of the quick vegetable stir-fry. Picture this: a late night after a grueling shift, with only a handful of ingredients left in the pantry. I was hungry, tired, and in desperate need of a meal that would not only satisfy my hunger but also lift my spirits. That’s when I stumbled upon the idea of a simple stir-fry.

    Armed with a few bell peppers, some broccoli, and a carrot or two, I heated up a trusty skillet. I remember the sizzle of the oil as I tossed in the chopped vegetables, the vibrant colors coming to life in the pan. In just a few minutes, my kitchen was filled with the mouth-watering aroma of garlic and ginger mingling with soy sauce. That night, I learned the art of creating something extraordinary from the simplest of ingredients, and it was a revelation. The quick vegetable stir-fry became my go-to dish, a symbol of resourcefulness and culinary creativity. It’s a dish that has stayed with me over the years, and I’m thrilled to share it with you.

    Why You’ll Love This Recipe

    • Quick and easy: Ready in just 5 minutes.
    • Budget-friendly: Uses simple, affordable ingredients.
    • Healthy: Packed with vitamins and nutrients.
    • Versatile: Customize with your favorite vegetables.
    • Low-calorie: Perfect for those watching their intake, with an estimated 300 kcal.

    Detailed Ingredients

    Here’s what you’ll need for this delightful stir-fry:

    • **1 tablespoon vegetable oil** – Look for a neutral oil like canola or sunflower.
    • **1 cup bell peppers**, sliced – Choose a mix of red, yellow, and green for color.
    • **1 cup broccoli florets** – Fresh is best, but frozen works in a pinch.
    • **1/2 cup carrots**, julienned – Adds a touch of sweetness and crunch.
    • **2 tablespoons soy sauce** – Opt for low-sodium if preferred.
    • **2 cloves garlic**, minced – Fresh garlic enhances the flavor.
    • **1 teaspoon fresh ginger**, grated – Adds warmth and depth.

    Step-by-Step Instructions

    Let’s dive into the process of creating this vibrant stir-fry:

    Step 1: Prepare Your Vegetables

    Start by washing and slicing your **bell peppers**, **broccoli**, and **carrots**. Aim for uniform sizes to ensure even cooking. Chef’s Tip: Use a sharp knife to make prep quicker and safer.

    Step 2: Heat the Skillet

    Place a large skillet over medium-high heat and add **1 tablespoon of vegetable oil**. Allow the oil to heat up until it shimmers. This indicates it’s ready for the vegetables.

    Step 3: Stir-Fry the Vegetables

    Carefully add the sliced vegetables to the hot skillet. Stir them continuously for about 2-3 minutes. You’re looking for them to become slightly tender yet still vibrant in color.

    Step 4: Add Flavor

    In a small bowl, combine **2 tablespoons soy sauce**, **2 minced garlic cloves**, and **1 teaspoon grated ginger**. Pour this mixture over the vegetables in the skillet. Stir everything together for an additional minute, ensuring the vegetables are well-coated with the sauce.

    Step 5: Serve

    Transfer the stir-fry to a plate and serve it hot over a bed of cooked rice or quinoa for a complete meal. Chef’s Tip: Garnish with sesame seeds or chopped green onions for an added touch of flavor.

    Common Mistakes to Avoid

    • **Overcrowding the Pan:** This leads to steaming rather than stir-frying. Use a large enough skillet to allow the vegetables to cook evenly.
    • **Not Preheating the Oil:** Adding vegetables to cold oil results in a soggy texture. Ensure the oil is hot before adding your ingredients.
    • **Overcooking the Vegetables:** Stir-frying is quick. Keep an eye on the vegetables to maintain their crunch and color.

    How to Store & Reheat

    Store any leftovers in an airtight container in the refrigerator for up to 3 days. To reheat, simply place the stir-fry in a skillet over medium heat, stirring occasionally until warmed through. Alternatively, microwave it in a microwave-safe dish for 1-2 minutes.

    Ingredient Substitutions

    • **Vegetable Oil:** Swap with olive oil or sesame oil for a different flavor profile.
    • **Soy Sauce:** Tamari or coconut aminos are great gluten-free alternatives.
    • **Broccoli:** Cauliflower or snap peas can be used if you prefer.

    Nutrition Facts

    • Calories: 300 kcal
    • Protein: 5g
    • Fat: 10g
    • Carbohydrates: 45g
    • Serving Size: 1 cup

    Frequently Asked Questions

    Can I use frozen vegetables?

    Yes, frozen vegetables are a convenient option. Just be sure to thaw them before cooking to avoid excess moisture in the pan.

    What other vegetables can I add?

    Feel free to add mushrooms, zucchini, or snow peas for additional variety and flavor.

    Is this dish vegan?

    Yes, as long as you use a plant-based oil and soy sauce, this stir-fry is completely vegan.

    Can I add protein to the stir-fry?

    Absolutely! Tofu, chicken, or shrimp make excellent protein additions to this dish.

    How can I make it spicier?

    Add a dash of chili flakes or a splash of sriracha for a spicy kick.

  • 5-MIN FUEL: Crispy Air Fryer Broccoli on a Budget!

    5-MIN FUEL: Crispy Air Fryer Broccoli on a Budget!

    Introduction & My Personal Story

    There’s something magical about transforming a simple vegetable like **broccoli** into a crispy, flavorful delight. My journey with this humble green began five years ago during a busy weeknight when time was scarce, and my energy was dwindling. I needed something quick, nutritious, and satisfying. Enter the air fryer, a kitchen gadget that had been collecting dust on my countertop. It was then that I discovered the art of making **Crispy Air Fryer Broccoli**. The first bite was a revelation – the crispy edges, the tender inside, and the burst of flavor were enough to make this a staple in my weekly meal prep. This dish is not just a side; it’s a testament to how simple ingredients can create something extraordinary. Now, every time I make it, I’m reminded of that first bite and the joy of finding a recipe that perfectly balances speed and taste.

    Why You’ll Love This Recipe

    • **Quick and Easy**: Ready in just 5 minutes of cooking time.
    • **Budget-Friendly**: Uses simple, affordable ingredients.
    • **Nutritious**: Packed with vitamins and minerals.
    • **Versatile**: Perfect as a side dish or a healthy snack.
    • **Flavorful**: Combines the umami of soy sauce with the aroma of garlic and onion powder.

    Detailed Ingredients

    • 1 lb of **broccoli** florets (about 450 grams)
    • 1 tablespoon **olive oil**
    • 1 teaspoon **soy sauce**
    • ¼ teaspoon **garlic powder**
    • ¼ teaspoon **onion powder**
    • Optional: A pinch of **red pepper flakes** for some heat

    When shopping, look for bright green broccoli with firm stalks and compact florets. Avoid any yellowing or wilting.

    Step-by-Step Instructions

    Step 1: Preheat Your Air Fryer

    Set your air fryer to 400°F (200°C). Preheating ensures that the broccoli cooks evenly and achieves that desirable crispiness.

    Step 2: Prepare the Broccoli

    Cut the broccoli into uniform florets. This ensures even cooking. Chef’s Tip: Don’t discard the stems; they can be saved for soups or stir-fries.

    Step 3: Season the Broccoli

    In a large bowl, toss the broccoli florets with olive oil, soy sauce, garlic powder, and onion powder. Ensure each floret is well-coated. The soy sauce adds a depth of flavor, while the olive oil helps in achieving the crisp texture.

    Step 4: Arrange in the Air Fryer

    Place the seasoned broccoli in the air fryer basket in a single layer. Avoid overcrowding to allow the hot air to circulate and cook the broccoli evenly.

    Step 5: Cook to Perfection

    Air fry for 6 minutes, shaking the basket halfway through to ensure even cooking. For extra crunch, cook for an additional 2 minutes. Look for golden edges and tender stalks as visual cues of doneness.

    Step 6: Serve and Enjoy

    Transfer the crispy broccoli to a serving dish. Garnish with a sprinkle of red pepper flakes if desired. Enjoy immediately for the best texture and flavor.

    Common Mistakes to Avoid

    • **Overcrowding the Basket**: This prevents the broccoli from crisping properly. Cook in batches if necessary.
    • **Skipping the Preheat**: A cold air fryer can lead to uneven cooking. Always preheat for consistent results.
    • **Using Wet Broccoli**: Ensure the broccoli is dry before seasoning to avoid steaming instead of frying.

    How to Store & Reheat

    Store leftover broccoli in an airtight container in the refrigerator for up to 3 days. To reheat, place in the air fryer at 350°F (175°C) for 3-4 minutes to regain some crispness.

    Ingredient Substitutions

    • **Olive Oil**: Can be replaced with avocado oil or coconut oil for different flavor profiles.
    • **Soy Sauce**: Use tamari or coconut aminos for a gluten-free option.
    • **Garlic and Onion Powder**: Fresh minced garlic and onion can be used; adjust quantities to taste.

    Nutrition Facts

    • Calories: 71 kcal
    • Protein: 3g
    • Fat: 4g
    • Carbohydrates: 7g
    • Serving Size: 1 cup

    Frequently Asked Questions

    Q: Can I use frozen broccoli?

    A: Yes, but thaw and pat it dry first to avoid excess moisture.

    Q: What if I don’t have an air fryer?

    A: You can roast the broccoli in an oven at 400°F (200°C) for about 15-20 minutes.

    Q: How can I make it spicier?

    A: Add more red pepper flakes or a dash of hot sauce to the seasoning mix.

    Q: Is this recipe vegan?

    A: Yes, as long as you use vegan-friendly soy sauce or tamari.

    Q: Can I add cheese?

    A: Absolutely! Sprinkle some parmesan or nutritional yeast before serving for a cheesy twist.