Tag: Balls

  • CHEAT DAY: Decadent Oreo Balls with a Hidden Twist!

    CHEAT DAY: Decadent Oreo Balls with a Hidden Twist!

    Introduction & My Personal Story

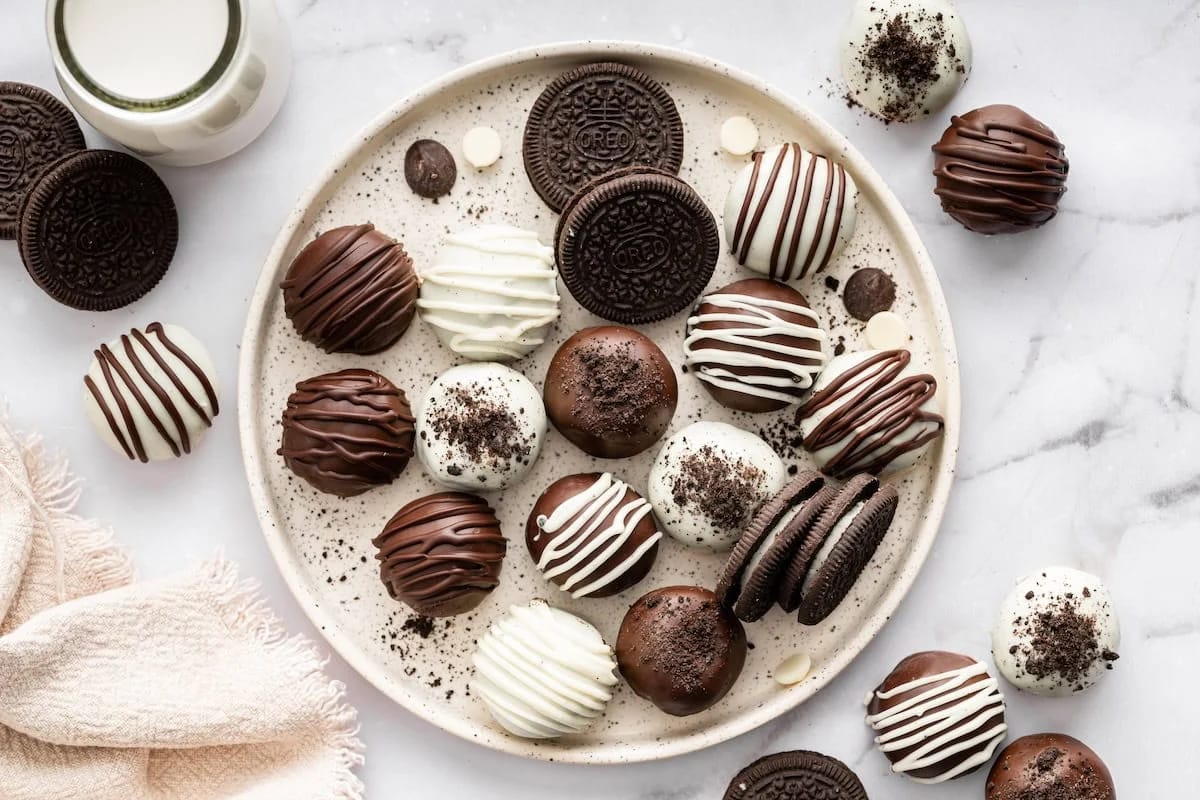
    Ah, the sweet allure of a cheat day. There’s something about indulging in a little decadence that makes all the hard work seem worth it. Let me take you back to a time when I stumbled upon my now-famous Decadent Oreo Balls with a Hidden Twist. It was a lazy Saturday afternoon, and I was in the mood for something sweet yet satisfying. I wanted to create a treat that was not only delicious but also had a surprise element—a hidden twist that would leave everyone guessing. My fondness for Oreos, combined with my love for experimenting in the kitchen, led to the birth of these delightful no-bake treats.

    In my 5 years of experience as a chef, I’ve learned that the best recipes often come from moments of spontaneous creativity. That day, I decided to incorporate a bit of cottage cheese into the mix—something I hadn’t seen done before. The result was a creamier, tangier filling that perfectly complemented the sweetness of the Oreos. These Oreo balls quickly became a family favorite, and now I’m thrilled to share this indulgent recipe with you. So, grab your apron, and let’s dive into this cheat day delight!

    Why You’ll Love This Recipe

    • No-Bake: No oven required, making it perfect for a quick treat.
    • Surprise Twist: The addition of cottage cheese adds a creamy tanginess.
    • Customizable: Top with your favorite toppings like sprinkles or crushed Oreos.
    • Simple Ingredients: Requires only a few pantry staples.
    • Quick Chill Time: Ready to enjoy in under an hour.

    Detailed Ingredients

    • Oreos: 36 cookies (about 300 grams), finely crushed.
    • Cream Cheese: 225 grams (8 oz), softened to room temperature.
    • Cottage Cheese: 100 grams, for that secret twist.
    • Chocolate Chips: 300 grams (10 oz), choose your favorite (dark, milk, or white).
    • Coconut Oil: 1 tablespoon, to help melt the chocolate smoothly.
    • Optional Toppings: Sprinkles, crushed Oreos, or sea salt.

    Step-by-Step Instructions

    Step 1: Prepare the Oreos

    Start by placing your Oreos in a food processor. Pulse them until they are finely ground. You want a consistency similar to sand. If you don’t have a food processor, a rolling pin and a ziplock bag will do the trick.

    Step 2: Blend the Mixture

    In a large mixing bowl, combine the crushed Oreos with the softened cream cheese and cottage cheese. Use a spatula or a stand mixer to blend until smooth. The mixture should be well combined with no visible chunks of cream cheese.

    Step 3: Form the Balls

    Scoop out about 1 tablespoon of the mixture and roll it into a ball using your hands. Place each ball on a baking sheet lined with parchment paper. Once all the balls are formed, place the tray in the freezer for about 30 minutes. This will help them firm up for dipping.

    Step 4: Melt the Chocolate

    In a microwave-safe bowl, combine the chocolate chips with the coconut oil. Microwave in 30-second increments, stirring in between, until the chocolate is completely melted and smooth. Alternatively, you can use a double boiler.

    Step 5: Dip the Balls

    Remove the Oreo balls from the freezer. Using a fork, dip each ball into the melted chocolate, ensuring it is fully coated. Let the excess chocolate drip off before placing it back on the parchment-lined sheet.

    Step 6: Add Toppings

    While the chocolate is still wet, sprinkle your choice of toppings—be it sprinkles, extra crushed Oreos, or a pinch of sea salt. This is where you can get creative and personalize each treat.

    Step 7: Final Chill

    Place the coated Oreo balls in the refrigerator for about 15–20 minutes, or until the chocolate is set. Then, they’re ready to serve!

    Common Mistakes to Avoid

    • Skipping the Chill: Don’t rush the chilling process; it’s crucial for firming up the balls before dipping.
    • Overheating Chocolate: Be careful not to burn the chocolate. Use short intervals when microwaving and stir often.
    • Too Much Filling: Avoid overfilling with cream cheese, which can make the balls too soft.

    How to Store & Reheat

    Once your Oreo balls are set, store them in an airtight container in the refrigerator. They will keep well for up to a week. If you prefer them warm, let them sit at room temperature for a few minutes before enjoying. However, they are best served chilled.

    Ingredient Substitutions

    • Oreos: Substitute with any chocolate sandwich cookie.
    • Cream Cheese: Use mascarpone for a richer taste.
    • Chocolate Chips: Use baking chocolate or candy melts as alternatives.

    Nutrition Facts

    • Calories: 150 per ball
    • Protein: 2 grams
    • Fat: 10 grams
    • Carbs: 15 grams
    • Serving Size: 1 ball

    Frequently Asked Questions

    Q: Can I make these Oreo balls in advance?

    A: Absolutely! They can be made a day or two in advance and stored in the fridge.

    Q: Can I use low-fat cream cheese?

    A: Yes, but the texture might be slightly different. Full-fat cream cheese gives the best results.

    Q: What if I don’t have a food processor?

    A: You can crush the Oreos using a rolling pin and a ziplock bag.

    Q: Can I freeze the Oreo balls?

    A: Yes, they can be frozen for up to a month. Thaw in the refrigerator before serving.

  • CHEAT DAY: Sinfully Delicious Snickerdoodle Protein Balls!

    CHEAT DAY: Sinfully Delicious Snickerdoodle Protein Balls!

    Introduction & My Personal Story

    Ah, the blissful aroma of cinnamon and sugar wafting through the kitchen. If there’s one cheat day indulgence that never fails to bring a smile to my face, it’s **Snickerdoodle Protein Balls**. My journey with these little bites of heaven began a few years ago when I was trying to find a way to satisfy my sweet tooth without completely derailing my fitness goals. In my 5 years of experience as a chef, I’ve learned that the key to enjoying your food is all about balance and creativity. So, I set out to craft a recipe that offers the best of both worlds: the nostalgic taste of a classic snickerdoodle cookie paired with the nutritious boost of a protein-packed snack.

    I remember my first attempt at these delightful treats. I was skeptical, unsure if I could truly capture the essence of a snickerdoodle in a healthy form. But as I rolled the dough into perfect little spheres and coated them in a cinnamon-sugar mix, I knew I was onto something special. The first bite was a revelation—a delightful, chewy texture with just the right amount of sweetness. These **Snickerdoodle Protein Balls** became an instant hit not only with me but with everyone I shared them with. Now, they’re a staple in my kitchen, especially when I need a quick, satisfying treat that doesn’t compromise my health goals.

    Why You’ll Love This Recipe

    • Quick and easy: No baking required, ready in under 30 minutes.
    • Nutritious: Packed with protein to fuel your day.
    • Customizable: Easily adjust ingredients to suit dietary needs.
    • Convenient: Perfect for meal prep and on-the-go snacking.
    • Delicious: All the flavors of a classic snickerdoodle in a guilt-free form.

    Detailed Ingredients

    • 1 cup rolled oats (100g) – Look for gluten-free if needed.
    • 1/2 cup oat flour (60g) – Provides a smooth texture.
    • 1/2 cup vanilla protein powder (60g) – Choose your favorite brand for best results.
    • 1/2 cup cashew butter (120g) – Creamy and rich, or swap with almond butter.
    • 1/4 cup maple syrup (60ml) – Adds natural sweetness.
    • 1 tsp vanilla extract – For that classic snickerdoodle flavor.
    • 1 tsp ground cinnamon – Essential for the snickerdoodle taste.
    • 1/4 tsp salt – Enhances all the flavors.
    • 2-3 tbsp almond milk – To adjust the dough consistency.
    • 1/4 cup coconut sugar (50g) – For the coating.

    Step-by-Step Instructions

    Step 1: Gather and Measure – Before you begin, gather all your ingredients and measure them out precisely. This will make the process smooth and ensure consistency in your protein balls.

    Step 2: Mix the Base – In a medium bowl, combine **rolled oats**, **oat flour**, **vanilla protein powder**, **cashew butter**, **maple syrup**, **vanilla extract**, **cinnamon**, and **salt**. Stir with a sturdy spoon until a thick dough forms. If the mixture feels too dry, gradually add **almond milk** until it comes together. The dough should be pliable but not sticky.

    Step 3: Form the Balls – Using a small cookie scoop or tablespoon, portion out the dough and roll it between your hands to form smooth balls, about 1 inch in diameter. This recipe should yield approximately 12-15 balls.

    Step 4: Prepare the Coating – In a shallow bowl, mix together **coconut sugar** and an extra dash of **cinnamon**. This will give your protein balls that iconic snickerdoodle finish.

    Step 5: Coat the Balls – Roll each **protein ball** in the cinnamon sugar mixture until fully coated. Ensure an even coating for the best flavor and texture.

    Step 6: Chill and Enjoy – Place the coated balls in the fridge for 15-20 minutes to firm up. This step is crucial for the flavors to meld together and for the balls to hold their shape.

    Common Mistakes to Avoid

    • Overmixing the dough: This can lead to a tough texture. Mix just until combined.
    • Skipping the chilling step: Without chilling, the balls may fall apart.
    • Using dry ingredients: Ensure your nut butter is creamy and fresh for the best consistency.

    How to Store & Reheat

    Refrigerate: Store your **Snickerdoodle Protein Balls** in an airtight container in the fridge for up to one week. This keeps them fresh and chewy.

    Freeze: For longer storage, place the balls in a freezer-safe container. They can be frozen for up to three months. To enjoy, simply thaw them in the fridge overnight or at room temperature for about 30 minutes.

    Ingredient Substitutions

    • Nut Butter: Swap cashew butter with almond or peanut butter for a different flavor profile.
    • Sweetener: Replace maple syrup with honey or agave for a different sweetness level.
    • Flour: Use almond flour instead of oat flour for a grain-free option.

    Nutrition Facts

    • Calories: 150 per ball
    • Protein: 5g
    • Fat: 7g
    • Carbohydrates: 18g
    • Serving Size: 1 ball

    Frequently Asked Questions

    • Can I make these vegan? Yes, use a plant-based protein powder and ensure your sweeteners are vegan-friendly.
    • How can I make this recipe gluten-free? Use certified gluten-free oats and oat flour.
    • What if I don’t have coconut sugar? Regular granulated sugar or brown sugar can be used for the coating.
    • Are these suitable for kids? Absolutely! They’re a great healthy snack option for children.
    • Can I double the recipe? Yes, this recipe scales well. Just ensure you have a large enough bowl for mixing.

  • CHEAT DAY: Sugar Cookie Protein Balls that Delight!

    CHEAT DAY: Sugar Cookie Protein Balls that Delight!

    Introduction & My Personal Story

    Ah, sugar cookies! They take me back to the comforting aroma of my grandmother’s kitchen. Every Sunday after church, she’d bake a batch of the most delightful sugar cookies, filling the house with a sweet, buttery fragrance that could only be described as pure joy. Fast forward a few decades, and as a professional chef with a passion for health-conscious cooking, I’ve found a way to enjoy the nostalgia of those sugar cookies while keeping my fitness goals in check. Enter the **Sugar Cookie Protein Balls**! These little delights are the perfect cheat day treat that won’t derail your health journey. In my 5 years of experience crafting protein-packed snacks, these protein balls are a standout. They offer the same satisfying sweetness and buttery flavor of traditional sugar cookies, but with the added benefit of muscle-building protein. Whether you’re a fitness enthusiast or just someone who loves a guilt-free treat, these no-bake wonders are sure to become a staple in your kitchen.

    Why You’ll Love This Recipe

    • Quick and easy – no oven required!
    • Packed with protein to support muscle recovery.
    • Perfect for a cheat day without the guilt.
    • Customizable with your favorite add-ins.
    • Kid-friendly and great for on-the-go snacking.

    Detailed Ingredients

    For the best **Sugar Cookie Protein Balls**, you’ll need the following ingredients:

    • 1 cup of sugar cookie protein powder: Look for a high-quality protein powder that mimics the taste of sugar cookies.
    • 1/2 cup of almond flour: Provides a nutty flavor and a nice texture. Ensure it’s finely ground.
    • 1/4 cup of natural sweetener: Options include stevia, monk fruit, or erythritol.
    • 1/4 cup of almond butter: Choose a creamy variety for smooth consistency.
    • 1/4 cup of unsweetened almond milk: Adds moisture and helps bind the ingredients together.
    • 1/4 cup of mini chocolate chips: For a touch of indulgence. Dark chocolate works best.

    Step-by-Step Instructions

    Step 1: Start by grabbing a large mixing bowl. Add **1 cup of sugar cookie protein powder**, **1/2 cup of almond flour**, and **1/4 cup of natural sweetener**. Mix these dry ingredients together until they are evenly combined.

    Step 2: Next, incorporate the wet ingredients. Add **1/4 cup of almond butter** and **1/4 cup of unsweetened almond milk** into the bowl. Using a spatula or your hands, mix everything together until a dough begins to form. The consistency should be slightly sticky but firm enough to hold its shape.

    Step 3: Time to add a bit of fun! Gently fold in **1/4 cup of mini chocolate chips**. Make sure they’re evenly distributed throughout the dough for a bite of chocolate in every ball.

    Step 4: Roll the dough into small balls, about 1 inch in diameter. Chef’s Tip: Lightly dampen your hands with water to prevent the dough from sticking.

    Step 5: Place the rolled balls onto a parchment-lined tray. Ensure they are not touching, as this will help them chill evenly.

    Step 6: Refrigerate the protein balls for at least 30 minutes. This allows them to firm up and enhances the flavors.

    Common Mistakes to Avoid

    • Using the wrong protein powder: Not all protein powders are created equal. Make sure to use one specifically flavored like sugar cookies for the best taste.
    • Skipping the chilling step: This is crucial for the balls to hold their shape and achieve the right texture.
    • Overmixing: Mixing too vigorously can make the dough too dense. Stir just until combined.
    • Inadequate binding: If the dough is too crumbly, add a touch more almond milk.

    How to Store & Reheat

    These protein balls are best stored in an airtight container in the refrigerator. They will stay fresh for up to a week. If you want to keep them longer, they can be frozen for up to 3 months. Just thaw them in the fridge overnight before enjoying. Since these are no-bake treats, there’s no need to reheat them. Simply grab and enjoy!

    Ingredient Substitutions

    • Almond flour: Can be replaced with oat flour for a different texture.
    • Almond butter: Swap with peanut butter or sunflower seed butter if you have allergies.
    • Almond milk: Any plant-based milk like soy or coconut milk will work.
    • Chocolate chips: Use white chocolate chips or dried fruit for variation.

    Nutrition Facts

    • Calories: 150 per ball
    • Protein: 10g
    • Fat: 7g
    • Carbs: 12g
    • Serving Size: 1 ball

    Frequently Asked Questions

    Q: Can I make these protein balls vegan?

    A: Absolutely! Just ensure your protein powder is plant-based and use vegan chocolate chips.

    Q: How many protein balls should I eat for a snack?

    A: One to two balls make for a satisfying snack that can help curb hunger between meals.

    Q: Can I use a different type of flour?

    A: Yes, just keep in mind that the texture and taste might vary slightly with different flours.

    Q: What if my dough is too sticky?

    A: Add a bit more almond flour until the desired consistency is achieved.

  • CHEAT DAY: Holiday Cookie-Inspired Gingerbread Protein Balls!

    CHEAT DAY: Holiday Cookie-Inspired Gingerbread Protein Balls!

    Introduction & My Personal Story

    Ah, the holidays — a time when the air is filled with the comforting aroma of gingerbread and every corner of my kitchen seems to beckon with the promise of sweet indulgence. My journey with gingerbread protein balls started quite by accident during a particularly hectic December, about five years ago. The festive season was in full swing, and I was knee-deep in cookie dough, trying to balance a healthy lifestyle with the irresistible allure of holiday treats.

    One snowy afternoon, as I was preparing a batch of gingerbread cookies, it struck me — why not create a healthier, protein-packed version of these beloved treats? And just like that, the idea for these gingerbread protein balls was born. In my 5 years of experience, I’ve found that these little delights perfectly encapsulate the cozy, spicy flavors of traditional gingerbread, but with an added boost of protein to keep me energized through the holiday hustle. Every time I make them, I’m transported back to that snowy day, the kitchen filled with the warm, spicy scent of ginger and cinnamon. It’s a smell that feels like a hug from the past, reminding me of the joy of creating something both delicious and nourishing.

    Why You’ll Love This Recipe

    • Quick and easy to prepare — no baking required.
    • Packed with protein to keep you full and satisfied.
    • Perfect for a post-workout snack or a midday energy boost.
    • Combines the nostalgic flavors of gingerbread with a healthy twist.
    • Great for meal prep — make a batch and enjoy throughout the week.

    Detailed Ingredients

    Here’s everything you’ll need to whip up these festive gingerbread protein balls:

    • 1 cup (100 grams) rolled oats
    • 1/2 cup (60 grams) **vanilla protein powder**
    • 1/2 cup (125 grams) **cashew butter**
    • 1/4 cup (60 ml) **maple syrup**
    • 2 tablespoons (30 ml) **molasses**
    • 1 teaspoon **vanilla extract**
    • 1 teaspoon ground **ginger**
    • 1 teaspoon ground **cinnamon**
    • 1/4 teaspoon ground **nutmeg**
    • 1/4 teaspoon ground **cloves**
    • 1/4 teaspoon **salt**
    • 1/2 cup (90 grams) **white chocolate chips**
    • 1 tablespoon (15 ml) **coconut oil**

    When shopping, look for fresh spices and high-quality protein powder to ensure the best flavor and texture.

    Step-by-Step Instructions

    Let’s dive into the process of creating these delightful gingerbread protein balls, step by step.

    Step 1: Mix Ingredients

    In a medium bowl, combine 1 cup of rolled oats, 1/2 cup of vanilla protein powder, 1/2 cup of cashew butter, 1/4 cup of maple syrup, 2 tablespoons of molasses, and 1 teaspoon of vanilla extract. Add in the spices: 1 teaspoon each of ground ginger and cinnamon, along with 1/4 teaspoon each of ground nutmeg and cloves. Don’t forget the 1/4 teaspoon of salt to balance the sweetness. Stir these ingredients together until they form a cohesive, soft dough. It should have a sticky texture but be firm enough to hold its shape. If the dough feels too dry, add a splash more of maple syrup or water.

    Step 2: Form Balls

    With the dough ready, use a small cookie scoop or a tablespoon to portion it out. Roll each portion between your palms to form smooth, round balls. Aim for uniformity to ensure even chilling and a consistent bite. Place the formed balls on a plate or baking sheet lined with parchment paper to prevent sticking.

    Step 3: Melt Chocolate

    In a microwave-safe bowl, combine 1/2 cup of white chocolate chips with 1 tablespoon of coconut oil. Microwave in 15-second intervals, stirring in between, until the chocolate is fully melted and smooth. Be cautious not to overheat, as white chocolate can scorch easily.

    Step 4: Drizzle & Chill

    Drizzle the melted chocolate over the protein balls using a spoon for an artistic touch. If you’re feeling fancy, use a piping bag for precision. Once drizzled, transfer the plate to the refrigerator and allow the balls to chill for at least 30 minutes. This step is crucial for the chocolate to set and the flavors to meld together. Once firm, they’re ready to enjoy!

    Common Mistakes to Avoid

    Even the simplest recipes can have their pitfalls. Here are some common mistakes to watch out for:

    • Dry Dough: If your dough is too dry, add a bit more maple syrup or water to reach the right consistency.
    • Overheating Chocolate: Melt the chocolate slowly to avoid scorching. Stir frequently to ensure even melting.
    • Skipping Chill Time: Chilling is essential for the balls to hold their shape and for the chocolate to set properly.

    How to Store & Reheat

    To store your gingerbread protein balls, place them in an airtight container. They will keep well in the refrigerator for up to a week. If you’d like to enjoy them later, they can also be frozen for up to a month. To thaw, simply transfer them to the fridge overnight. There’s no need to reheat these treats — they’re best enjoyed chilled or at room temperature.

    Ingredient Substitutions

    Need to make a swap? Here are some safe substitutions:

    • Cashew Butter: Swap with almond butter or peanut butter for a different flavor profile.
    • Maple Syrup: Use honey or agave syrup as an alternative sweetener.
    • White Chocolate Chips: Dark chocolate or milk chocolate chips can be used if you prefer a less sweet option.

    Nutrition Facts

    Here’s a breakdown of the nutritional content per serving (based on a batch of 20 balls):

    • Calories: 120
    • Protein: 5 grams
    • Fat: 7 grams
    • Carbohydrates: 10 grams
    • Serving Size: 1 ball

    Frequently Asked Questions

    • Can I use another type of protein powder? Yes, any protein powder should work, but it may alter the flavor slightly.
    • Are these gluten-free? If you use certified gluten-free oats and protein powder, they can be.
    • Can I add extras like nuts or seeds? Certainly! Chopped nuts or seeds can add texture and extra nutrition.
    • How long can I store them? Up to a week in the fridge, or a month in the freezer.
    • What if I don’t like gingerbread spices? You can adjust the spice levels to your taste or try a different flavor combination.


  • CHEAT DAY: Funfetti Birthday Cake Protein Bliss Balls

    CHEAT DAY: Funfetti Birthday Cake Protein Bliss Balls

    Introduction & My Personal Story

    There’s something about the scent of vanilla and the sight of colorful sprinkles that takes me back to my childhood birthday parties. The excitement of blowing out candles, the laughter of friends, and the joy of indulging in a sweet treat without a care in the world. Fast forward to today, and while my metabolism may not be as forgiving, my love for those nostalgic flavors remains. Enter the Funfetti Birthday Cake Protein Bliss Balls – a delightful twist on a classic indulgence that fits perfectly into a modern, health-conscious lifestyle.

    In my 5 years of experience as a chef and food blogger, I’ve seen countless trends come and go, but the demand for healthy, guilt-free treats has only grown stronger. These protein bliss balls are not just a nod to the past but a testament to how we can enjoy the flavors we love while staying on track with our fitness goals. I remember the first time I made these; the kitchen was filled with the sweet aroma of vanilla, and as I rolled each ball, I couldn’t help but feel a sense of accomplishment. Not only were they delicious, but they were also packed with protein, making them the perfect post-workout snack or a ‘cheat day’ delight.

    Whether you’re looking to satisfy a sweet craving or need a quick energy boost, these Funfetti Bliss Balls have got you covered. Join me on this culinary journey as we recreate a beloved classic with a healthy twist.

    Why You’ll Love This Recipe

    • Quick and easy to make – no baking required!
    • High in protein, perfect for post-workout recovery.
    • Deliciously nostalgic with the flavors of vanilla and sprinkles.
    • Customizable to fit dietary needs and preferences.
    • Perfect for meal prep – make a batch and enjoy all week long.

    Detailed Ingredients

    For this recipe, you’ll need the following ingredients. Make sure to use high-quality products for the best results:

    • **1½ cups old fashioned rolled oats** – Look for oats that are whole and not instant for better texture.
    • **1 cup cashew butter** – Creamy, unsalted, and without added sugar is best.
    • **2 scoops (50-60 grams) vanilla protein powder** – Choose a brand you trust for taste and quality.
    • **¼ cup maple syrup** – Pure maple syrup adds natural sweetness.
    • **½ teaspoon vanilla extract** – Pure extract for authentic flavor.
    • **½ teaspoon almond extract** – Adds a subtle, nutty aroma.
    • **¼ teaspoon salt** – Balances the sweetness.
    • **¼ cup sprinkles** – Go for naturally colored options if possible.

    Step-by-Step Instructions

    Step 1: In a large mixing bowl, combine the **rolled oats**, **cashew butter**, **vanilla protein powder**, **maple syrup**, **vanilla extract**, **almond extract**, and **salt**. Mix thoroughly until a thick, cohesive dough forms. The mixture should be slightly sticky but hold its shape when pressed. Chef’s Tip: If the dough feels too dry, add a teaspoon of water or more maple syrup.

    Step 2: Gently fold in the **sprinkles**. This step is crucial for distributing the colorful bits evenly throughout each ball, ensuring that every bite is a funfetti surprise.

    Step 3: Using a small cookie scoop or your hands, form the dough into bite-sized balls. Aim for uniform size so they chill evenly. If the dough is sticking to your hands, lightly dampen them with water.

    Step 4: Place the formed balls onto a baking sheet lined with parchment paper. Chill in the refrigerator for 15-20 minutes to set. If you’re in a hurry, you can enjoy them immediately, but chilling helps them firm up and enhances the flavors.

    Common Mistakes to Avoid

    • **Too Dry or Crumbly Dough:** Ensure you’re measuring ingredients accurately. If the dough is too dry, a touch more maple syrup or a splash of milk can help.
    • **Overmixing:** Be gentle when folding in the sprinkles to prevent them from bleeding color.
    • **Uneven Sizes:** Use a cookie scoop for consistency to ensure even chilling.

    How to Store & Reheat

    Store these bliss balls in an airtight container in the refrigerator for up to a week. For longer storage, freeze them for up to three months. To enjoy, simply thaw them at room temperature for about 10 minutes. Chef’s Tip: These are best served slightly chilled, which enhances their chewy texture.

    Ingredient Substitutions

    • **Nut Butter:** Swap cashew butter with almond or peanut butter if desired.
    • **Sweetener:** Use honey or agave syrup as alternatives to maple syrup.
    • **Protein Powder:** Choose a plant-based protein powder for a vegan version.

    Nutrition Facts

    • Calories: 120 per ball
    • Protein: 5g
    • Fat: 7g
    • Carbs: 10g
    • Serving Size: 1 ball

    Frequently Asked Questions

    Q1: Can I make these bliss balls vegan?

    A1: Absolutely! Use a plant-based protein powder and ensure your sweetener is vegan-friendly.

    Q2: What if I don’t have almond extract?

    A2: You can omit it or add a little extra vanilla extract for flavor.

    Q3: Can I use quick oats instead of rolled oats?

    A3: Quick oats can be used, but the texture will be softer. Rolled oats provide a chewier consistency.

    Q4: Are there any other toppings I can add?

    A4: Yes! Mini chocolate chips, chopped nuts, or dried fruit can be mixed in for variety.