Tag: 5MINUTE

  • Fast Fuel: 5-Minute Overnight Oats for a Boost!

    Fast Fuel: 5-Minute Overnight Oats for a Boost!

    Introduction & My Personal Story

    There’s something magical about waking up to a breakfast that’s ready to eat, especially when it’s as delightful and energizing as overnight oats. My journey with this dish started five years ago when I was constantly on the go, juggling early morning shifts and late-night recipe testing. I needed something quick yet nutritious to fuel my mornings. Enter overnight oats—a revelation in a jar.

    I remember my first attempt, which was a bit of a disaster. I used steel-cut oats instead of rolled oats, and the result was more like a chewy cereal than the creamy delight I was hoping for. But with a little trial and error, I found the perfect balance. Now, this recipe is a staple in my kitchen, especially when I need to tackle a busy day. It’s like having a personal chef who’s prepped my breakfast while I sleep. Every spoonful is a reminder of how a simple mix of ingredients can transform into something so satisfying and wholesome.

    Why You’ll Love This Recipe

    • Quick and Easy: Takes just 5 minutes to prepare.
    • Customizable: Endless flavor variations to suit your taste.
    • Nutritious: Packed with fibers, proteins, and essential vitamins.
    • Perfect for Meal Prep: Make several jars at once.
    • Portable: Ideal for on-the-go breakfasts.

    Detailed Ingredients

    • **1/2 cup rolled oats** (50g) – Look for organic, gluten-free options for the best quality.
    • **1/2 cup milk** (120ml) – Any type works: almond, soy, or cow’s milk.
    • **1/4 cup yogurt** (60g) – Greek yogurt for extra creaminess, or a non-dairy option if preferred.
    • **1 tbsp maple syrup** (15ml) – Or swap with honey for a different sweetness profile.
    • **1 tbsp chia seeds** (optional, 12g) – Adds a nutritional boost with omega-3s.
    • **Pinch of sea salt** – Enhances the flavors.
    • **1 tsp vanilla extract** (5ml) – Use pure vanilla for the best aroma.

    Step-by-Step Instructions

    Step 1: Combine Ingredients – In a medium-sized jar or bowl, mix together **1/2 cup of rolled oats**, **1/2 cup of milk**, and **1/4 cup of yogurt**. Stir until the oats are fully submerged.

    Step 2: Sweeten and Flavor – Add **1 tbsp of maple syrup**, **1 tsp of vanilla extract**, and a **pinch of sea salt**. These elements not only sweeten but also enhance the overall flavor profile. Stir well to blend.

    Step 3: Add Optional Boost – Stir in **1 tbsp of chia seeds** if using. These tiny seeds will expand and add a delightful texture while packing a nutritional punch.

    Step 4: Refrigerate – Cover the jar with a lid or plastic wrap and place in the refrigerator. For the best texture, let it chill overnight, or for at least 2-4 hours if you’re short on time.

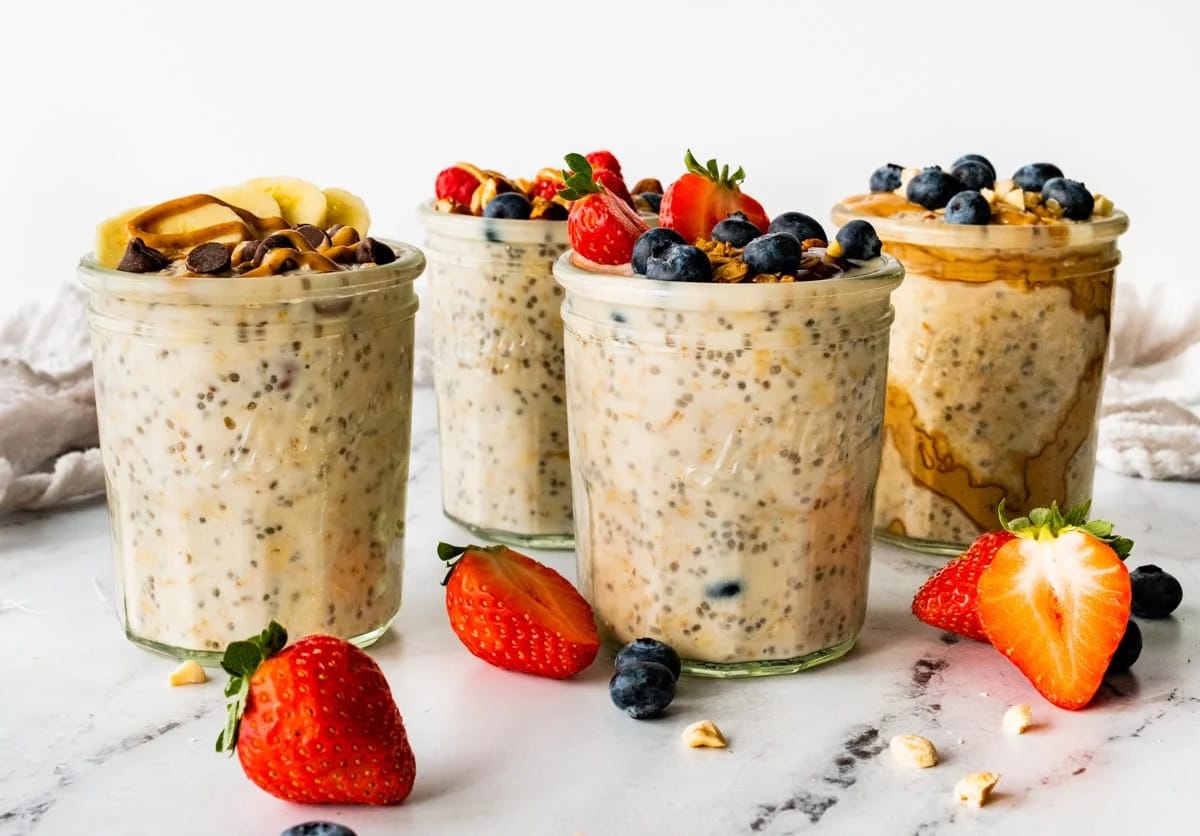
    Step 5: Serve – Before serving, give the oats a good stir. If the mixture is too thick, add a splash of milk to reach your desired consistency. Top with fruits, nuts, or any toppings you love.

    Common Mistakes to Avoid

    • Using the Wrong Oats: Steel-cut oats won’t soften properly overnight. Stick with rolled oats for the best texture.
    • Not Mixing Well: Ensure all ingredients are well combined to avoid uneven flavors.
    • Skipping the Salt: A pinch of salt brings out the sweetness and depth of the flavors.

    How to Store & Reheat

    Store your overnight oats in an airtight container in the refrigerator. They’re best enjoyed within the first 3 days, but they can last up to 5 days. If you prefer them warm, you can microwave them for about 30-60 seconds, stirring halfway through. Add a splash of milk if they seem too dry.

    Ingredient Substitutions

    • Milk: Substitute with any plant-based milk like almond or oat milk.
    • Yogurt: Use coconut or almond yogurt for a dairy-free option.
    • Maple Syrup: Swap with honey or agave syrup for a different taste.
    • Chia Seeds: If unavailable, flax seeds can be used for a similar texture and health benefits.

    Nutrition Facts

    • Calories: 272 kcal
    • Protein: 8g
    • Fat: 7g
    • Carbs: 45g
    • Serving Size: 1 jar

    Frequently Asked Questions

    • Can I prepare this with instant oats? Instant oats can become mushy, so it’s best to stick with rolled oats for the right texture.
    • Is it necessary to add sweetener? Not at all! You can skip it or use natural sweeteners like mashed bananas.
    • How can I make it gluten-free? Simply use certified gluten-free oats.
    • What are some good topping ideas? Fresh fruits, nuts, seeds, and a dollop of nut butter work wonderfully.
    • Can I make a larger batch? Absolutely, just multiply the ingredients and divide them into individual jars for convenience.

  • 5-MINUTE FUEL: Zucchini & Corn Salad – A Fresh, No-Cook Delight!

    5-MINUTE FUEL: Zucchini & Corn Salad – A Fresh, No-Cook Delight!

    Introduction & My Personal Story

    I remember the first time I stumbled upon the idea of a zucchini and corn salad. It was a hot summer afternoon, and I was searching for something refreshing yet satisfying. As a chef, I’m always on the lookout for recipes that offer maximum flavor with minimal fuss. This particular salad became a staple in my kitchen during those sweltering months. The crunch of fresh corn, the subtle sweetness of zucchini, and the nutty bite of toasted almonds create a harmony that’s hard to resist. In my 5 years of experience, I’ve learned that sometimes the simplest dishes can leave the most lasting impressions. This salad, requiring no cooking, is a testament to that. It’s perfect for those days when you want to enjoy the flavors of summer without breaking a sweat. I recall serving it at a family barbecue, and it was an instant hit. Everyone marveled at the freshness and the burst of flavors. Now, whenever I make this dish, it brings back memories of laughter, sunshine, and the joy of sharing good food with loved ones.

    Why You’ll Love This Recipe

    • Quick and easy – ready in just 5 minutes.
    • No cooking required, perfect for hot days.
    • Uses fresh, seasonal ingredients.
    • Minimal cleanup, saving you time and effort.
    • Customizable with various toppings and dressings.

    Detailed Ingredients

    • 2 medium-sized **zucchinis** (about 300g), fresh and firm.
    • 2 ears of **corn**, husked and kernels shaved off.
    • 1/2 cup **sliced almonds**, lightly toasted.
    • 1 **lemon**, juiced.
    • 1/4 cup fresh **mint**, finely chopped.
    • 1/4 teaspoon **chili flakes**.
    • 3 tablespoons **olive oil**.
    • Salt and pepper to taste.
    • Optional: 1/4 cup grated **Parmesan cheese** for added flavor.

    Step-by-Step Instructions

    Step 1: Prepare the Ingredients
    Start by washing the **zucchinis** thoroughly. Cut them into long planks about 1/4 inch thick, then slice these planks into bite-sized pieces. This ensures that each piece retains its crunch and blends well with the other ingredients.

    Step 2: Shuck the Corn
    Hold the **corn** vertically on a cutting board and use a sharp knife to shave the kernels off. Fresh corn adds a sweet crunch, but if you prefer, you can use canned or frozen corn as a substitute.

    Step 3: Toast the Almonds
    Chef’s Tip: Toasting enhances the almonds’ flavor. In a dry pan over medium heat, add the **sliced almonds** and stir frequently for about 3-5 minutes until they are golden and fragrant. Keep a close eye to prevent burning.

    Step 4: Make the Dressing
    In a small bowl, combine the juice of one **lemon**, **olive oil**, **chili flakes**, and chopped **mint**. Season with salt and pepper. Whisk until everything is well combined. This dressing is light yet vibrant, complementing the salad perfectly.

    Step 5: Assemble the Salad
    In a large serving bowl, combine the **zucchini**, **corn**, and **toasted almonds**. If using, add the grated **Parmesan cheese**. Pour the dressing over the salad and toss gently to ensure everything is coated evenly.

    Common Mistakes to Avoid

    Overcooking the Almonds: Toast them just until they’re golden. They can burn quickly if left unattended.

    Using Old Ingredients: Freshness is key for this salad. Ensure your **zucchini** and **corn** are fresh for the best flavor.

    Overdressing: Add the dressing gradually. You can always add more, but you can’t take it away.

    How to Store & Reheat

    Since this is a no-cook salad, it’s best enjoyed fresh. However, if you need to store it, place it in an airtight container and refrigerate for up to 2 days. The **zucchini** may release some water, so toss it again before serving.

    Reheating isn’t necessary, as this salad is meant to be served cold. If you want to freshen it up, add a squeeze of **lemon** juice before serving.

    Ingredient Substitutions

    • Almonds: Swap with walnuts or pecans if preferred.
    • Corn: Use canned or frozen corn when fresh is unavailable.
    • Lemon: Lime juice can be a zesty alternative.
    • Mint: Try basil or cilantro for a different flavor profile.

    Nutrition Facts

    • Calories: 210 per serving
    • Protein: 5g
    • Fat: 15g
    • Carbohydrates: 18g
    • Serving Size: Approximately 1 cup

    Frequently Asked Questions

    Can I make this salad ahead of time?
    Yes, you can prepare the ingredients and dressing separately, then combine them just before serving to maintain freshness.

    Is this salad vegan?
    Yes, as long as you omit the **Parmesan cheese** or use a vegan alternative.

    How can I add more protein?
    Consider adding chickpeas or grilled chicken for a protein boost.

    What other vegetables can I add?
    Try adding cherry tomatoes or cucumber for additional flavor and texture.

  • 5-MINUTE FUEL: Dreamy Chocolate Buttercream with Just 5 Ingredients!

    5-MINUTE FUEL: Dreamy Chocolate Buttercream with Just 5 Ingredients!

    Introduction & My Personal Story

    Chocolate buttercream frosting holds a special place in my heart. It takes me back to my grandmother’s kitchen, where the aroma of chocolate and the warmth of her love blended perfectly. Every Sunday, she would bake a batch of her famous chocolate cupcakes, always topped with this dreamy chocolate buttercream. As a child, I would eagerly wait for her to hand me the spoon to lick off the remnants of the sweet, creamy frosting. Fast forward to today, and I’ve spent the last five years mastering this deceptively simple yet utterly satisfying recipe. It’s a go-to for both beginners and seasoned bakers alike. The magic lies in its simplicity and the quality of ingredients. With just five ingredients, you can whip up a decadent frosting in mere minutes. Whether you’re a busy parent, a professional on the go, or someone who simply cherishes a quick yet delicious treat, this chocolate buttercream is your ticket to delightful indulgence. Let me guide you through this easy yet luxurious recipe that promises to transform your cakes, cupcakes, or even just a spoon into something extraordinary.

    Why You’ll Love This Recipe

    • Quick and easy: Ready in just 5 minutes.
    • Minimal ingredients: Requires only 5 pantry staples.
    • No cooking required: Perfect for hot days or quick fixes.
    • Versatile: Ideal for cakes, cupcakes, or as a dessert topping.
    • Rich and creamy: Delivers a luscious chocolate flavor every time.

    Detailed Ingredients

    • 1 cup (227g) unsalted butter, softened to room temperature. Look for a high-fat content butter for the creamiest texture.
    • 3 cups (375g) powdered sugar. Make sure it’s sifted to avoid lumps.
    • 1/2 cup (50g) cocoa powder. Use a high-quality unsweetened cocoa for the best flavor.
    • 2 teaspoons vanilla extract. Pure vanilla extract is recommended over imitation for a richer taste.
    • 2-4 tablespoons milk. Whole milk works best, but any milk can be used depending on preference and dietary needs.

    Step-by-Step Instructions

    Step 1: Begin by ensuring your butter is at room temperature. This is crucial for achieving the right texture. It should be soft enough to press a finger into, but not melted. In my 5 years of experience, I’ve found that this step can make or break your frosting.

    Step 2: In a large mixing bowl, beat the softened butter on high speed for about 2-3 minutes using a hand mixer or a stand mixer fitted with a paddle attachment. The butter should become pale and fluffy, a sign that it’s well-aerated.

    Step 3: Gradually add the powdered sugar and cocoa powder. It’s best to do this in small increments to prevent a sugary dust cloud. Start mixing on low speed until the ingredients are incorporated, then increase to medium speed. The mixture should start to come together and look thick and creamy.

    Step 4: Add the vanilla extract and half of the milk to the butter mixture. Mix on medium speed until everything is well combined. If the frosting seems too thick, add more milk, a tablespoon at a time, until you reach your desired consistency. The frosting should be smooth and spreadable.

    Step 5: Taste the frosting and adjust any ingredients if needed. Sometimes a pinch more cocoa or sugar might be required based on personal preference.

    Step 6: Your chocolate buttercream is now ready to use. Spread it generously over your cake, cupcakes, or even brownies. Chef’s Tip: Use an offset spatula for a smooth, professional finish.

    Common Mistakes to Avoid

    • Using cold butter: Butter that’s too cold won’t whip properly, resulting in a dense frosting.
    • Skipping the sifting of powdered sugar: This can lead to a lumpy frosting, which is not ideal for spreading.
    • Overmixing: While it’s important to mix until smooth, overmixing can incorporate too much air, making the frosting too airy.

    How to Store & Reheat

    Store any leftover buttercream in an airtight container in the refrigerator for up to one week. When you’re ready to use it again, let it come to room temperature. You may need to beat it again to restore its creamy texture. For longer storage, you can freeze the frosting for up to three months. Thaw in the refrigerator overnight and beat before using.

    Ingredient Substitutions

    • Butter: Margarine or vegan butter can be used for a dairy-free version.
    • Powdered sugar: For a less sweet option, reduce the amount by 1/2 cup and adjust cocoa to taste.
    • Cocoa powder: Dutch-processed cocoa can be used for a richer chocolate flavor.
    • Milk: Any milk alternative like almond, soy, or oat milk can replace regular milk.

    Nutrition Facts

    • Calories: 230 per serving
    • Protein: 1g
    • Fat: 12g
    • Carbs: 29g
    • Serving Size: 2 tablespoons

    Frequently Asked Questions

    Q: Can I make this frosting ahead of time?

    A: Absolutely! You can make it a day or two in advance and store it in the fridge. Just be sure to let it come to room temperature before using.

    Q: My frosting is too runny, what should I do?

    A: If your frosting is too runny, try adding more powdered sugar, a tablespoon at a time, until it thickens to your desired consistency.

    Q: How can I make the frosting more chocolatey?

    A: Add more cocoa powder for a deeper chocolate flavor. Start with an additional tablespoon and adjust to taste.

    Q: Can I use this frosting for piping?

    A: Yes, this frosting holds its shape well and is perfect for piping decorations on cakes and cupcakes.