Author: Muxudo

  • CHEAT DAY: Silky Chocolate Buttercream Bliss

    CHEAT DAY: Silky Chocolate Buttercream Bliss

    Introduction & My Personal Story

    Chocolate has always been my kryptonite. I remember as a child, sneaking into the kitchen late at night, hoping to get my hands on the leftover chocolate frosting from my mom’s baking sessions. It was always a special treat, the kind that made my eyes light up with joy. Fast forward a few years, and here I am, a chef with a passion for creating decadent treats. The Silky Chocolate Buttercream is a recipe that takes me back to those cherished moments. It’s a cheat day delight that brings out the kid in me every time I whip it up.

    In my 5 years of experience as a chef, I’ve learned that the secret to a perfect buttercream lies in the balance of ingredients and the technique of mixing. This recipe is an ode to my childhood, a blend of nostalgia and indulgence. It’s the kind of frosting that you can spread over cakes, cupcakes, or just eat by the spoonful. Whether you’re celebrating a special occasion or just treating yourself, this Silky Chocolate Buttercream Bliss is sure to become a favorite in your kitchen, just as it has in mine.

    Why You’ll Love This Recipe

    • Rich and creamy texture that’s irresistible.
    • No baking required, making it a quick and easy treat.
    • Perfect for any dessert, from cakes to cookies.
    • Customizable texture with simple ingredient variations.
    • A true indulgence for chocolate lovers.

    Detailed Ingredients

    • 1 cup (227g) unsalted butter, softened at room temperature.
    • 3 1/2 cups (420g) powdered sugar, sifted.
    • 1/2 cup (50g) unsweetened cocoa powder, sifted.
    • 1/4 cup (60ml) whole milk, room temperature.
    • 2 teaspoons vanilla extract.
    • A pinch of salt to enhance the chocolate flavor.

    Chef’s Tip: When buying cocoa powder, look for a rich, dark variety for a more intense chocolate flavor. Ensure that the butter is at room temperature for a smooth and creamy buttercream.

    Step-by-Step Instructions

    Step 1: Begin by placing your softened butter into a large mixing bowl. Using a hand mixer or a stand mixer fitted with a paddle attachment, beat the butter on medium speed for about 2-3 minutes until it is light and fluffy. This step is crucial for a creamy buttercream.

    Step 2: Gradually add the sifted powdered sugar, one cup at a time, mixing on low speed to prevent a sugar cloud. Once all the sugar is incorporated, increase the speed to medium and beat until smooth.

    Step 3: Add the sifted cocoa powder to the mixture. Mix on low speed until the cocoa is fully combined with the butter and sugar. The mixture should be rich and chocolaty.

    Step 4: Pour in the vanilla extract and a pinch of salt, mixing until well incorporated. The salt helps to balance the sweetness and enhance the chocolate flavor.

    Step 5: Gradually add the whole milk, one tablespoon at a time, until you reach your desired consistency. For a thicker frosting, use less milk; for a lighter, more spreadable frosting, add a bit more. Mix on medium speed for an additional 2 minutes for a silky finish.

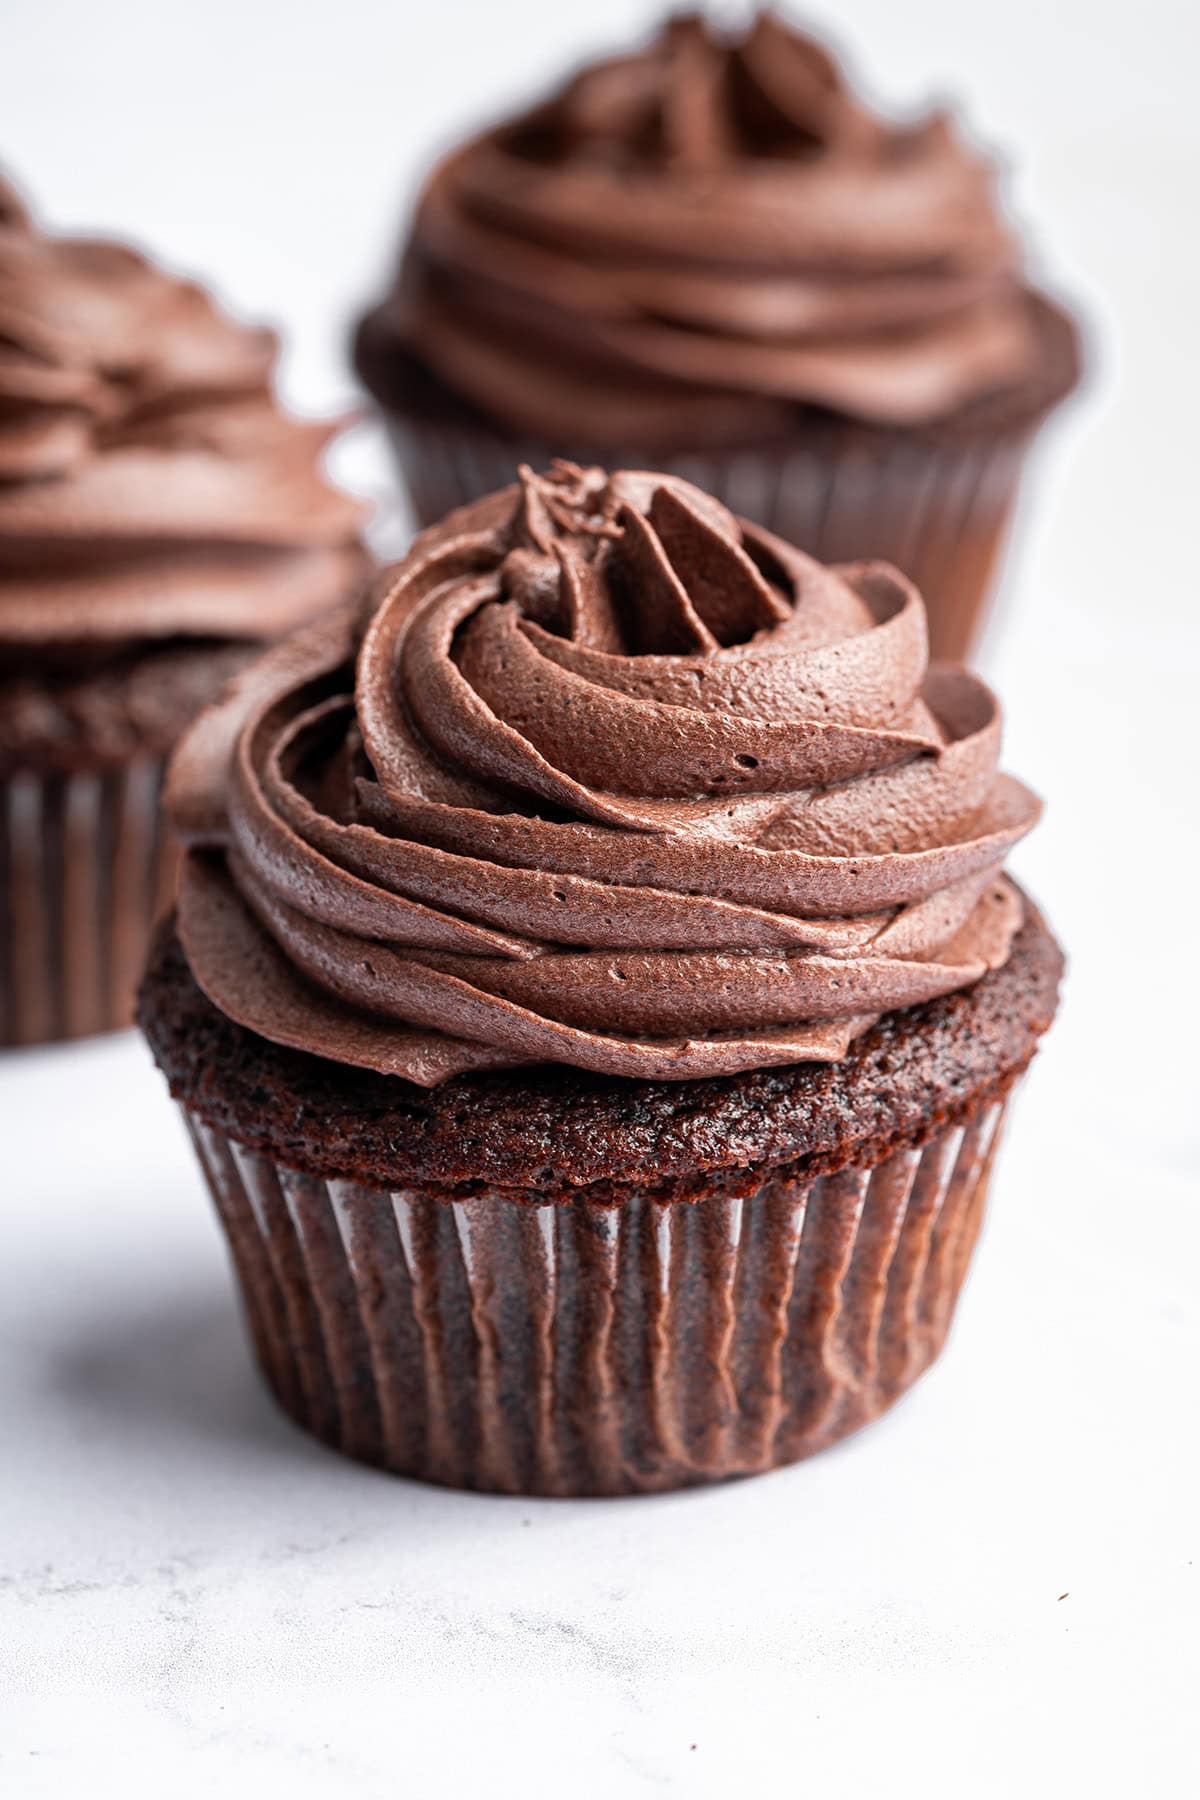
    Step 6: Your Silky Chocolate Buttercream is ready to be spread or piped onto your favorite desserts. Enjoy the indulgence!

    Common Mistakes to Avoid

    • Using cold butter: Always use softened butter at room temperature for a smooth texture.
    • Not sifting the powdered sugar and cocoa: This can lead to lumps in your buttercream.
    • Overbeating the mixture: This can cause the buttercream to become too airy and lose its creamy texture.
    • Adding too much milk at once: This can make the buttercream too runny. Add milk gradually.

    How to Store & Reheat

    Store your Silky Chocolate Buttercream in an airtight container in the refrigerator for up to 1 week. Before using, let it sit at room temperature for about 30 minutes and give it a quick mix to restore its creamy texture. If you need to reheat, do so gently in short bursts in the microwave, stirring in between to prevent melting.

    Ingredient Substitutions

    • Dairy-free option: Substitute the butter with a plant-based butter and the milk with almond or oat milk.
    • Less sweet option: Reduce the powdered sugar by 1/2 cup and add an extra tablespoon of cocoa powder for a richer chocolate taste.
    • Vanilla extract: Swap with almond extract for a nutty twist.

    Nutrition Facts

    • Calories: 250 per serving
    • Protein: 1g
    • Fat: 15g
    • Carbs: 30g
    • Serving Size: 2 tablespoons

    Frequently Asked Questions

    • Can I freeze the buttercream? Yes, you can freeze it in an airtight container for up to 3 months. Thaw in the refrigerator before using.
    • What if my buttercream is too thick? Add a bit more milk, one tablespoon at a time, until you achieve the desired consistency.
    • Can I use this buttercream for piping? Absolutely! It’s perfect for piping on cupcakes and cakes.
    • Is it safe to leave buttercream at room temperature? It can be left at room temperature for a few hours, but it’s best stored in the fridge if not used immediately.

  • 5-MIN FUEL: Apple Cinnamon Bliss Overnight Oats!

    5-MIN FUEL: Apple Cinnamon Bliss Overnight Oats!

    Introduction & My Personal Story

    One chilly autumn morning, I found myself rummaging through my pantry, craving something that would not only fuel my day but also embrace the flavors of the season. That’s when I stumbled upon the idea of creating Apple Cinnamon Bliss Overnight Oats. In my 5 years of experience as a chef, I’ve learned that the simplest ingredients often create the most profound flavors, and this recipe is a testament to that. As a child, my grandmother used to make warm apple pies, and the aroma would fill the entire house with a comforting scent of apples and cinnamon. Those memories inspired me to capture that essence in a quick and nourishing breakfast. This dish became my go-to when I needed a no-fuss, nutritious start to my day, allowing me to savor those nostalgic flavors in a modern, time-saving way. Join me as we dive into this delightful recipe that has been a staple in my kitchen for years.

    Why You’ll Love This Recipe

    • Quick and easy prep: Ready in just 5 minutes!
    • Perfect for busy mornings: No cooking required.
    • Nutritious and satisfying: Keeps you full until lunch.
    • Customizable: Easily adjust to your taste and dietary needs.
    • Meal prep friendly: Make multiple servings in advance.

    Detailed Ingredients

    • 1 cup thick-cut rolled oats (gluten-free if needed)
    • 1 cup unsweetened almond milk
    • 1/2 cup apple juice
    • 2 tablespoons almond butter
    • 1/4 cup dried apples, chopped
    • 1 teaspoon ground cinnamon
    • 1/4 teaspoon salt
    • Optional toppings: chopped nuts, fresh apple slices, or a drizzle of honey

    Step-by-Step Instructions

    Step 1: Blend the Ingredients

    Start by gathering your ingredients. In a blender, combine the almond butter, almond milk, and apple juice. Add in the chopped dried apples. Blend on high until the mixture is smooth and creamy. This will serve as the flavorful liquid base for your overnight oats.

    Step 2: Assemble the Oats

    In a mason jar or airtight container, add the thick-cut rolled oats. Pour the blended apple mixture over the oats. Sprinkle in the ground cinnamon and a pinch of salt. Stir well to ensure the oats are fully coated with the liquid and cinnamon is evenly distributed.

    Step 3: Chill Overnight

    Seal the container with a lid and place it in the refrigerator. Allow the oats to soak and absorb the flavors overnight, or for at least 6 hours. This is where the magic happens as the oats soften and the flavors meld together.

    Step 4: Serve and Enjoy

    The next morning, give your oats a good stir. If you prefer a looser consistency, add a splash of almond milk. Top with your choice of chopped nuts, fresh apple slices, or a drizzle of honey for added texture and sweetness. Enjoy your nutritious breakfast!

    Common Mistakes to Avoid

    Using Instant Oats: Instant oats can become mushy when soaked overnight. Use thick-cut rolled oats for the best texture.

    Skipping the Stir: Make sure to stir the oats before refrigerating to distribute flavors evenly.

    Not Sealing Properly: Ensure your container is airtight to prevent the oats from drying out.

    How to Store & Reheat

    Store the prepared overnight oats in an airtight container in the refrigerator. They will keep well for up to 3 days. If you need to reheat them, transfer to a microwave-safe bowl and microwave on medium power for 1-2 minutes, stirring halfway through. You may need to add a splash of almond milk to reach the desired consistency.

    Ingredient Substitutions

    Oats: For a gluten-free option, ensure your oats are certified gluten-free.

    Almond Milk: Substitute with any plant-based milk such as soy, oat, or coconut milk.

    Almond Butter: Peanut butter or sunflower seed butter are excellent alternatives.

    Dried Apples: Use fresh apple slices if preferred, but note they may release more liquid.

    Nutrition Facts

    • Calories: 221 kcal
    • Protein: 6 g
    • Fat: 9 g
    • Carbs: 31 g
    • Serving Size: 1 cup

    Frequently Asked Questions

    Can I make this recipe vegan?

    Absolutely! This recipe is already vegan since it uses plant-based milk and almond butter.

    How can I make this recipe nut-free?

    Use sunflower seed butter and a nut-free milk alternative like oat or rice milk.

    Can I sweeten the oats?

    Yes, if you prefer sweeter oats, add a tablespoon of maple syrup or honey.

    Are overnight oats safe to eat cold?

    Yes, they are safe and delicious to eat cold, especially in the warmer months.

    Can I add protein powder?

    Certainly! Stir in a scoop of your favorite protein powder for an extra protein boost.

  • Brain Fuel: Choco-Chia Mousse

    Brain Fuel: Choco-Chia Mousse

    Introduction & My Personal Story

    When I think of comfort food that’s also a brain booster, my mind drifts to the creamy, delightful flavors of Chocolate Chia Mousse. My journey with this recipe began a few years back during a particularly hectic week. I was juggling a new job, late-night deadlines, and trying to maintain a healthy lifestyle. In the midst of the chaos, I stumbled upon the magic of chia seeds and their incredible nutritional benefits. It was then that I decided to marry them with my love for chocolate, creating a dessert that was not only indulgent but also packed with nutrients.

    In my 5 years of experience as a chef, I have found that the best recipes are those that balance taste with health benefits. This mousse became my go-to recipe for a quick yet satisfying dessert that didn’t leave me feeling guilty. I remember the first time I served it to friends, their eyes widened with surprise at how something so delicious could be so healthy. The secret? The Omega-3s and fiber from the chia seeds, combined with the rich taste of cocoa, created a dessert that was both satisfying and energizing.

    Now, every time I make this mousse, I am reminded of those hectic days and how a simple dish can bring a sense of calm and focus. It’s a recipe that’s close to my heart, and I’m thrilled to share it with you. Whether you’re looking to boost your productivity or simply indulge in a tasty treat, this Choco-Chia Mousse is sure to become a staple in your kitchen.

    Why You’ll Love This Recipe

    • Quick and easy to prepare with minimal ingredients.
    • Packed with Omega-3s and fiber for brain health.
    • Rich chocolate flavor without the guilt.
    • Perfect for breakfast, dessert, or a mid-day snack.
    • Customizable with your favorite toppings.

    Detailed Ingredients

    • 1 cup (240 ml) unsweetened almond milk
    • 1/3 cup (60 g) chia seeds
    • 2 tablespoons (30 ml) pure maple syrup
    • 2 tablespoons (10 g) unsweetened cocoa powder
    • 1 teaspoon (5 ml) vanilla extract
    • Pinch of salt

    When shopping, look for fresh, plump chia seeds and high-quality cocoa powder for the best flavor. Organic maple syrup is recommended for its pure taste.

    Step-by-Step Instructions

    Step 1: Blend Ingredients

    Begin by pouring 1 cup of unsweetened almond milk into a high-powered blender. Add 1/3 cup of chia seeds, 2 tablespoons of pure maple syrup, 2 tablespoons of cocoa powder, 1 teaspoon of vanilla extract, and a pinch of salt. Start blending at a low speed, gradually increasing to high. Blend until the chia seeds are nearly undetectable, and the mixture is smooth and silky. Scrape down the sides of the blender as needed to ensure everything is well incorporated.

    Step 2: Set and Chill

    Once blended, the mousse should be thick and creamy. If you prefer it chilled, transfer the mixture to a resealable container. Cover and refrigerate for 3-4 hours, allowing the chia seeds to absorb the liquid and thicken the mousse further. Chef’s Tip: For a quicker set, place the mousse in the freezer for 30 minutes before refrigerating.

    Step 3: Serve and Enjoy

    Once the mousse has set, give it a quick stir to ensure a consistent texture. Serve in individual bowls or glasses, and feel free to top with fresh berries, a sprinkle of nuts, or a dollop of whipped cream if you’re feeling indulgent. Enjoy this nutritious treat as a dessert or a pick-me-up snack!

    Common Mistakes to Avoid

    • Not blending long enough: Ensure the chia seeds are fully broken down for a smooth texture.
    • Using low-quality cocoa: Opt for high-quality cocoa powder for the best chocolate flavor.
    • Skipping the chill time: Allow the mousse to set properly for the best consistency.

    How to Store & Reheat

    Store any leftover mousse in an airtight container in the refrigerator for up to 5 days. If you wish to enjoy it warm, gently reheat in the microwave on low power for 20-30 seconds, stirring in between to maintain its creamy texture. However, this mousse is best enjoyed chilled.

    Ingredient Substitutions

    • Almond milk: Substitute with any plant-based milk like coconut or oat milk.
    • Maple syrup: Use honey or agave syrup if preferred.
    • Cocoa powder: Swap with cacao powder for a more intense chocolate flavor.

    Nutrition Facts

    • Calories: 233 kcal (per 1/3 recipe)
    • Protein: 6g
    • Fat: 12g
    • Carbohydrates: 25g
    • Serving Size: 1/3 of the recipe

    Frequently Asked Questions

    • Can I make this recipe vegan? Yes! This recipe is naturally vegan as it uses plant-based milk and maple syrup.
    • How can I make the mousse thicker? Add an additional tablespoon of chia seeds if you prefer a thicker consistency.
    • Can I use regular milk instead of almond milk? Absolutely, but keep in mind this will change the nutritional profile slightly.
    • Is this recipe gluten-free? Yes, all ingredients used are naturally gluten-free.
    • Can I add protein powder? Yes, a scoop of chocolate or vanilla protein powder can be added for extra protein.

  • CHEAT DAY: Decadent Chocolate Cottage Cheese Mousse Delight

    CHEAT DAY: Decadent Chocolate Cottage Cheese Mousse Delight

    Introduction & My Personal Story

    Ah, the indulgence of a cheat day! It’s a concept that many of us hold dear—a day to let go of dietary restrictions and relish in the flavors we’ve been craving. For me, that indulgence often takes the form of a rich, creamy dessert that feels like a hug in a bowl. Enter the Decadent Chocolate Cottage Cheese Mousse Delight. A dessert that not only satisfies the sweet tooth but also sneaks in a bit of protein, courtesy of its secret ingredient—cottage cheese.

    In my 5 years of experience as a chef, I’ve experimented with numerous mousse recipes. But this one holds a special place in my heart. It was born out of a late-night craving and a nearly empty fridge. I remember that night vividly. I had a tub of cottage cheese, a jar of cocoa powder, and a bottle of maple syrup. Hesitant but hopeful, I blended them together, and to my surprise, the result was a silky, chocolatey mousse that was as indulgent as any traditional version.

    This recipe is a testament to creativity in the kitchen and the joy of finding unexpected flavors in familiar ingredients. The combination of the creamy cottage cheese with the rich cocoa creates a dessert that’s both decadent and slightly tangy, offering a unique twist on classic chocolate mousse. It’s become a staple in my kitchen, not just for cheat days, but for any day I need a sweet pick-me-up. I hope it becomes a beloved treat in your home too.

    Why You’ll Love This Recipe

    • Quick and easy to make—no baking required.
    • Rich in protein, thanks to the cottage cheese.
    • Decadent chocolate flavor with a healthy twist.
    • Perfect for satisfying sweet cravings without guilt.
    • Customizable with your favorite toppings.

    Detailed Ingredients

    • Full-fat cottage cheese: 2 cups (about 480 grams). Look for a creamy, smooth texture.
    • Unsweetened cocoa powder: 1/2 cup (about 50 grams). Choose high-quality cocoa for the best flavor.
    • Maple syrup: 1/3 cup (about 80 ml). Opt for pure maple syrup for natural sweetness.
    • Vanilla extract: 1 teaspoon for added depth of flavor.
    • Pinch of salt: Enhances the chocolate flavor.

    Step-by-Step Instructions

    Step 1: Gather Your Ingredients

    Begin by assembling all your ingredients. This includes the cottage cheese, cocoa powder, maple syrup, vanilla extract, and salt. Having everything ready will make the process smooth and enjoyable.

    Step 2: Blend the Ingredients

    In a high-powered blender, combine the cottage cheese, cocoa powder, maple syrup, vanilla extract, and a pinch of salt. Blend on high speed until the mixture is completely smooth. This should take about 2-3 minutes. You’re looking for a creamy, homogenous mixture with no visible lumps of cottage cheese. Chef’s Tip: If your blender struggles, add a tablespoon of milk to help it along.

    Step 3: Chill the Mousse

    Transfer the blended mixture into a serving bowl or individual dessert cups. Cover with plastic wrap and refrigerate for at least 2 hours. This chilling time allows the mousse to firm up and the flavors to meld together beautifully.

    Step 4: Serve and Enjoy

    Once chilled, your mousse is ready to serve. You can enjoy it as is or top it with fresh berries, a dollop of whipped cream, or a sprinkle of chocolate shavings for an added touch of elegance. Indulge in your Decadent Chocolate Cottage Cheese Mousse Delight and savor each rich, creamy bite.

    Common Mistakes to Avoid

    • Using low-fat cottage cheese: This can result in a less creamy texture. Full-fat is key for the best results.
    • Not blending enough: Ensure the mixture is fully smooth to avoid a gritty texture.
    • Skipping the chill time: The mousse needs time to set and develop its full flavor.
    • Over-blending: While a smooth texture is essential, over-blending can incorporate too much air, affecting the consistency.

    How to Store & Reheat

    Store any leftovers in an airtight container in the refrigerator for up to 3 days. While this mousse is best enjoyed chilled, if you prefer a softer texture, let it sit at room temperature for 10-15 minutes before serving. Reheating isn’t necessary, as this is a no-bake dessert meant to be enjoyed cold.

    Ingredient Substitutions

    • Cottage cheese: Swap with Greek yogurt for a tangier flavor.
    • Maple syrup: Honey or agave syrup can be used as alternatives.
    • Cocoa powder: Use Dutch-processed cocoa for a deeper chocolate flavor.
    • Vanilla extract: Almond extract can provide a nutty twist.

    Nutrition Facts

    • Calories: 250 per serving
    • Protein: 12 grams
    • Fat: 9 grams
    • Carbohydrates: 30 grams
    • Serving Size: 1/2 cup

    Frequently Asked Questions

    Can I use a food processor instead of a blender?

    Yes, a food processor will work, though it may take a bit longer to achieve a smooth consistency.

    Is it possible to make this mousse dairy-free?

    Absolutely! Substitute the cottage cheese with a dairy-free yogurt and ensure your cocoa powder is also dairy-free.

    Can I add other flavors to this mousse?

    Definitely! Consider adding a teaspoon of instant coffee for a mocha flavor or a pinch of cinnamon for warmth.

    How can I make the mousse sweeter?

    If you prefer a sweeter mousse, simply increase the amount of maple syrup according to your taste.

    Can I freeze this mousse?

    While it’s possible to freeze, the texture may change. It’s best enjoyed fresh and refrigerated.


  • 5-MIN FUEL: Raspberry Cottage Cheese Power Oatmeal!

    5-MIN FUEL: Raspberry Cottage Cheese Power Oatmeal!

    Introduction & My Personal Story

    Growing up, breakfast was always a cherished ritual in my family. My mother would whip up hearty meals that not only filled our bellies but also fueled us for the day ahead. One of my fondest memories was the comforting aroma of baked oatmeal wafting through the house on chilly mornings. This particular recipe, Raspberry Cottage Cheese Power Oatmeal, holds a special place in my heart. It was born out of my need for a quick, nutritious breakfast that could keep up with my hectic lifestyle. In my 5 years of experience as a chef, I have learned that simplicity doesn’t have to compromise flavor or nutrition.

    On a particularly busy morning, I remember having just a few minutes to prepare breakfast before a long day in the kitchen. I had some fresh raspberries, oats, and cottage cheese on hand, and a lightbulb moment led to the creation of this dish. The first bite was a revelation—a perfect balance of creamy, tangy, and sweet. It was like a warm hug in a bowl, and I couldn’t wait to share it with others. This quick and delicious meal has since become a staple in my household and is a favorite among my friends and family.

    Why You’ll Love This Recipe

    • Ready in just 5 minutes, perfect for busy mornings.
    • High in protein and fiber for sustained energy.
    • Uses simple ingredients that you likely have on hand.
    • Customizable to suit your taste and dietary needs.
    • Delicious hot or cold, making it versatile for any season.

    Detailed Ingredients

    • 1 cup (90g) rolled oats – Look for whole grain oats for maximum fiber.
    • 1/2 cup (120g) cottage cheese – Choose a low-fat variety for a lighter option.
    • 1 cup (240ml) almond milk – Unsweetened is best to control sweetness.
    • 1/2 cup (75g) fresh raspberries – Pick firm, bright red berries.
    • 1 tablespoon (15ml) maple syrup – Adds a natural sweetness.
    • 1 tablespoon (10g) ground flaxseed – Provides extra fiber and omega-3s.
    • 1 teaspoon (4g) baking powder – Helps the oatmeal rise and become fluffy.
    • 1/2 teaspoon (1g) ground cinnamon – Adds warmth and depth to the flavor.
    • Pinch of salt – Balances the sweetness and enhances flavors.

    Step-by-Step Instructions

    Step 1: Preheat and Prepare
    Preheat your oven to 375°F (190°C). Grease an 8×8-inch baking dish with a bit of oil or non-stick spray. This ensures your oatmeal doesn’t stick and makes cleanup a breeze.

    Step 2: Mix Dry Ingredients
    In a large bowl, combine the rolled oats, ground flaxseed, baking powder, cinnamon, and a pinch of salt. Stir them together until evenly mixed. Chef’s Tip: Mixing dry ingredients first ensures even distribution of baking powder, which is key for a uniform rise.

    Step 3: Blend Wet Ingredients
    In a blender or food processor, blend the cottage cheese, maple syrup, almond milk, and a splash of vanilla extract until smooth. This creates a creamy base that will bind the oats together.

    Step 4: Combine and Fold
    Pour the wet mixture into the bowl with the dry ingredients. Fold in the fresh raspberries gently to avoid crushing them. Ensure everything is well mixed but avoid overmixing, which can make the oats dense.

    Step 5: Pour and Swirl
    Pour the oatmeal mixture into the prepared baking dish, smoothing the top with a spatula. For an extra touch, add dollops of more cottage cheese and a few teaspoons of warmed raspberry jam on top, swirling them gently with a knife for a marbled effect.

    Step 6: Bake
    Place the dish in the oven and bake for 40-50 minutes or until the top is golden brown and firm to the touch. Let it cool for a few minutes before slicing. Chef’s Tip: A toothpick inserted into the center should come out clean when it’s done.

    Common Mistakes to Avoid

    • Overmixing: This can lead to a dense texture. Mix just until combined.
    • Using expired baking powder: Fresh baking powder is crucial for a proper rise.
    • Skipping the grease: Ensure your baking dish is well-greased to prevent sticking.
    • Not preheating the oven: A properly preheated oven ensures even cooking.

    How to Store & Reheat

    Store any leftovers in an airtight container in the refrigerator for up to 5 days. For longer storage, freeze individual portions wrapped in plastic wrap and placed in a freezer bag for up to 3 months.

    To reheat, simply microwave a portion on high for 1-2 minutes or until warmed through. If frozen, thaw overnight in the refrigerator before reheating.

    Ingredient Substitutions

    • Oats: Use quick oats if you’re short on time; they’ll cook faster.
    • Cottage Cheese: Greek yogurt can be used for a similar creamy texture.
    • Almond Milk: Substitute with any milk of your choice, such as cow’s milk or oat milk.
    • Maple Syrup: Honey or agave syrup are great alternatives.
    • Raspberries: Blueberries or strawberries can be used for a different flavor profile.

    Nutrition Facts

    • Calories: 299 kcal per serving
    • Protein: 12g
    • Fat: 5g
    • Carbs: 50g
    • Serving Size: 1/6 of the dish

    Frequently Asked Questions

    • Can I make this oatmeal ahead of time?
      Yes, you can prep the mixture the night before and bake it in the morning for a fresh breakfast.
    • Is this recipe gluten-free?
      Ensure your oats are certified gluten-free to make this dish suitable for those with gluten sensitivities.
    • Can I use frozen raspberries?
      Yes, but thaw and drain them first to prevent excess moisture.
    • What can I serve with this oatmeal?
      A dollop of yogurt or a sprinkle of nuts adds extra protein and crunch.
    • How do I make it vegan?
      Swap cottage cheese with a plant-based yogurt and use a vegan milk alternative.

  • Brain Fuel: Fig Tahini Bars

    Brain Fuel: Fig Tahini Bars

    Introduction & My Personal Story

    Growing up in a bustling household, I often found myself searching for snacks that were both nutritious and delicious. My mother, a culinary enthusiast herself, introduced me to the wonders of figs and tahini at a young age. She would often prepare these delectable bars as a quick energy boost for us kids during our study sessions. Fast forward to my years as a professional chef, I revisited this childhood favorite with a twist, creating what I now call “Brain Fuel: Fig Tahini Bars”. These bars are a nostalgic nod to my past, yet a modern take on fueling the mind and body. In my 5 years of experience as a chef, I’ve come to appreciate how certain ingredients can significantly impact our focus and energy levels. The combination of figs, rich in fiber, and tahini, packed with healthy fats, creates a perfect balance for sustained energy. Whether you’re gearing up for a busy workday or need a mid-afternoon pick-me-up, these bars are a testament to how food can be both functional and flavorful. Let me walk you through this recipe that has been a staple in my kitchen and hopefully, will become a staple in yours too.

    Why You’ll Love This Recipe

    • Quick and Easy: No baking required, ready in just 15 minutes.
    • Nutritious: Packed with Omega-3s, fiber, and healthy fats.
    • Customizable: Easily swap ingredients to suit dietary needs.
    • Great for On-the-Go: Perfect for busy mornings or a quick snack.
    • Kid-Friendly: A healthy treat that children will love.

    Detailed Ingredients

    For these bars, you’ll need to gather the following ingredients. Be sure to select quality produce for the best results.

    • 1 cup old-fashioned rolled oats (100g) – Look for oats that are whole and not instant for better texture.
    • 1 cup dried figs, chopped (150g) – Ensure they are soft and pliable for easy mixing.
    • ½ cup pepitas (pumpkin seeds) (65g) – These should be fresh and free of any added salt.
    • ½ cup tahini (120ml) – Choose a smooth, well-mixed tahini for even consistency.
    • ¼ cup honey (60ml) – Opt for raw honey if possible for a richer flavor.
    • 2 tbsp ground flaxseed (14g) – Provides essential Omega-3 fatty acids.
    • 2 tbsp chia seeds (24g) – Adds a nutritional punch with fiber and protein.
    • 1 tsp vanilla extract (5ml) – Pure vanilla extract will impart the best aroma.
    • ½ tsp cinnamon (1g) – Freshly ground cinnamon will enhance the sweetness.
    • ¼ tsp sea salt (1g) – Balances the flavors beautifully.
    • ½ cup chocolate chips (optional) (90g) – Use dark chocolate for a healthier option.
    • 1 tsp coconut oil (optional) (5ml) – Helps in melting the chocolate smoothly.

    Step-by-Step Instructions

    Now that you have your ingredients ready, let’s dive into the preparation of these bars.

    Step 1: Prepare the Pan

    Line a loaf pan with parchment paper, allowing some overhang on the sides. This will make it easier to lift the bars out once set. A 9×5 inch pan works perfectly for this recipe.

    Step 2: Combine Ingredients

    In a large mixing bowl, add the **rolled oats**, **chopped figs**, **pepitas**, **tahini**, **honey**, **ground flaxseed**, **chia seeds**, **vanilla extract**, **cinnamon**, and **sea salt**. Using a sturdy spatula, mix all the ingredients until they are well combined. The mixture should be sticky and hold together when pressed.

    Step 3: Form the Bars

    Transfer the combined mixture into the prepared loaf pan. Use the back of a spoon or your hands to press the mixture firmly and evenly into the pan. It’s important to compact it well to ensure the bars hold together.

    Step 4: Melt Chocolate (Optional)

    If you’re adding a chocolate layer, place the **chocolate chips** and **coconut oil** in a microwave-safe bowl. Heat in 30-second intervals, stirring after each, until the chocolate is fully melted and smooth.

    Step 5: Add Topping

    Pour the melted chocolate over the pressed mixture in the pan. Use the back of a spoon to spread it evenly across the surface. This will create a delicious chocolate layer on top of the bars.

    Step 6: Chill and Cut

    Place the pan in the refrigerator for about 30 minutes to allow the bars to set. Once they are firm, lift them out of the pan using the parchment paper and cut into 8 equal bars.

    Step 7: Storage

    Store these bars in an airtight container in the refrigerator for up to a week. They taste best when enjoyed cold or at room temperature.

    Common Mistakes to Avoid

    • Not pressing the mixture firmly enough: This can cause the bars to crumble. Make sure to compact the mixture well in the pan.
    • Using instant oats: These can make the bars too soft. Stick to old-fashioned rolled oats for the right texture.
    • Skipping the chilling step: Allowing the bars to set in the fridge is crucial for them to hold their shape.
    • Forgotten parchment paper: This makes removing the bars difficult. Always line your pan.

    How to Store & Reheat

    To keep your Fig Tahini Bars fresh, store them in an airtight container in the refrigerator. They will stay fresh for up to a week. If you prefer them warm, you can let them sit at room temperature for a few minutes before eating. However, avoid microwaving as it can melt the chocolate topping and alter the texture.

    Ingredient Substitutions

    Whether you’re out of an ingredient or need to adjust for dietary preferences, here are some substitutions you can make:

    • Dried figs: Swap with dried apricots or dates for a different flavor.
    • Tahini: Use almond butter or sunflower seed butter for a nutty twist.
    • Honey: Agave syrup or maple syrup can work as vegan alternatives.
    • Pepitas: Substitute with sunflower seeds or chopped nuts.

    Nutrition Facts

    • Calories: 241 kcal per bar
    • Protein: 7g
    • Fat: 12g
    • Carbohydrates: 28g
    • Serving Size: 1 bar

    Frequently Asked Questions

    • Can I freeze these bars? Yes, you can freeze them for up to 3 months. Wrap each bar individually and store in a freezer-safe bag.
    • Are these bars gluten-free? Yes, as long as you use certified gluten-free oats, these bars are gluten-free.
    • Is there a way to make these bars less sweet? You can reduce the amount of honey or use a less sweet dried fruit like apricots.
    • Can I omit the chocolate topping? Absolutely, the bars are delicious even without the chocolate layer.
    • What’s the best way to cut the bars? Use a sharp knife and clean it between cuts for neat edges.

  • CHEAT DAY: Irresistible High Protein Dunkaroo Dip!

    CHEAT DAY: Irresistible High Protein Dunkaroo Dip!

    Introduction & My Personal Story

    Let me take you back to a time when I was a kid, heart racing with excitement as I tore open those little packs of Dunkaroos. Those tiny cookies and sweet, creamy frosting were the highlight of my lunchbox. Fast forward to today, with my 5 years of experience as a chef and food blogger, I’ve recreated that nostalgic delight with a modern twist: the High Protein Dunkaroo Dip. This recipe was born out of a desire to enjoy the flavors of my childhood while adhering to a more grown-up, protein-packed lifestyle.

    It all started one rainy afternoon when I was looking for a quick, satisfying snack that wouldn’t derail my fitness goals. I wanted something that would not only taste indulgent but also provide a good amount of protein. After a few experiments in my kitchen, I found the perfect balance. The creamy texture of Greek yogurt, the rich flavor of vanilla protein powder, and the colorful sprinkles that brought back memories of those cherished lunchbox treats. Now, it’s become my go-to cheat day indulgence, and I can’t wait to share it with you!

    Why You’ll Love This Recipe

    • Quick and easy to prepare – ready in just 10 minutes.
    • No baking required – perfect for those hot summer days.
    • Packs a protein punch – perfect for post-workout recovery.
    • Customizable – add your favorite toppings or mix-ins.
    • Brings back childhood memories with a healthy twist.

    Detailed Ingredients

    • 1 cup Greek yogurt (plain, unsweetened – look for a brand with high protein content)
    • 1 scoop vanilla protein powder (approximately 30 grams – choose a quality brand you enjoy)
    • 1 teaspoon vanilla extract (pure, not imitation)
    • 2 tablespoons rainbow sprinkles (or more if you love them as much as I do!)
    • Optional: Graham crackers or fresh fruit for dipping

    Step-by-Step Instructions

    Step 1: Mix Ingredients

    Grab a medium-sized mixing bowl and add in the Greek yogurt and vanilla protein powder. Using a spoon or a whisk, stir until the mixture is smooth and creamy. You want to make sure there are no lumps of protein powder left. Chef’s Tip: If the mixture seems too thick, add a tablespoon of milk to achieve the desired consistency.

    Step 2: Add Vanilla Extract

    Pour in the vanilla extract. This will enhance the flavor profile and bring out the sweetness naturally present in the yogurt and protein powder. Mix until everything is well combined.

    Step 3: Fold in Sprinkles

    Gently fold in the rainbow sprinkles. Be careful not to over-mix, as the colors from the sprinkles can start to bleed into the yogurt. The key here is to maintain that fun, colorful look that makes this dip so special.

    Step 4: Chill (Optional)

    If you have the patience, refrigerate the dip for about 15 minutes. This will allow the flavors to meld together and the dip to thicken slightly, giving you a more satisfying texture when served. However, if you’re in a rush, you can enjoy it right away!

    Step 5: Serve

    Serve your High Protein Dunkaroo Dip with a side of graham crackers or fresh fruit. I personally love using apple slices or strawberries, as they add a refreshing contrast to the creamy dip. Enjoy!

    Common Mistakes to Avoid

    • Using flavored yogurt: This can throw off the taste and add unnecessary sugar. Stick to plain, unsweetened Greek yogurt.
    • Not mixing thoroughly: Ensure the protein powder is completely dissolved to avoid a gritty texture.
    • Over-mixing the sprinkles: This can cause the colors to bleed, resulting in a less appealing appearance.
    • Skipping the chill time: While optional, chilling enhances the texture and flavor.

    How to Store & Reheat

    Store any leftover dip in an airtight container in the refrigerator. It will keep well for up to 3 days. Before serving again, give it a quick stir. If the dip has thickened too much, simply add a splash of milk to loosen it up. This dip is best served cold, so there’s no need to reheat.

    Ingredient Substitutions

    • Greek yogurt: Can be replaced with plain, unsweetened almond or coconut yogurt for a dairy-free option.
    • Vanilla protein powder: Use a plant-based protein powder if you prefer a vegan alternative.
    • Vanilla extract: Swap with almond extract for a different flavor profile.
    • Sprinkles: Use mini chocolate chips or crushed nuts for a different texture.

    Nutrition Facts

    • Calories: 150 per serving
    • Protein: 15 grams
    • Fat: 4 grams
    • Carbohydrates: 18 grams
    • Serving Size: About 1/2 cup

    Frequently Asked Questions

    • Can I make this dip ahead of time? Yes, you can prepare it up to a day in advance. Just store it in the fridge and give it a stir before serving.
    • What if I don’t have protein powder? You can skip it, but the dip will have less protein. Consider adding a bit of sweetener to taste if needed.
    • Are there any other toppings I can add? Absolutely! Try adding shredded coconut, chopped nuts, or even a drizzle of honey.
    • Is this recipe gluten-free? The dip itself is gluten-free. Just ensure your dipping items, like graham crackers, are also gluten-free.
    • Can I use flavored yogurt? It’s best to stick with plain yogurt to control the sugar content and flavor profile.

  • 5-MIN FUEL: Blueberry Bliss Cottage Cheese Bake!

    5-MIN FUEL: Blueberry Bliss Cottage Cheese Bake!

    Introduction & My Personal Story

    Let me take you back to a crisp, breezy morning. It was one of those days when the alarm jolted me awake, and I realized I had exactly 20 minutes before heading out the door. With my chef’s hat slightly askew and my mind racing through possibilities, I needed something quick, nutritious, and undeniably delicious. That’s when the Blueberry Bliss Cottage Cheese Bake came to life in my kitchen.

    In my 5 years of experience as a chef, I’ve come to appreciate the beauty of a recipe that not only fuels the body but also soothes the soul. This dish, with its creamy, tangy cottage cheese, sweet bursts of blueberries, and the comforting aroma of cinnamon, quickly became a staple in my morning routine. Not only does it come together in a flash, but it also offers a delightful balance of flavors and textures.

    This recipe is a nod to the busy hustlers who, like me, crave a breakfast that doesn’t sacrifice taste for speed. Whether you’re a student racing to class, a professional dashing to the office, or a parent juggling morning chaos, this bake is your morning’s saving grace. Let me guide you through this culinary gem that feels like a warm hug on a chilly morning.

    Why You’ll Love This Recipe

    • Quick and easy: Ready in under 10 minutes of prep.
    • High in protein: Thanks to the **cottage cheese** and **eggs**.
    • Rich in antioxidants: Packed with **blueberries**.
    • Minimal cleanup: One bowl and a blender are all you need.
    • Perfect for meal prep: Make ahead and enjoy all week.

    Detailed Ingredients

    • 1 cup (226g) **cottage cheese** – Look for full-fat for creaminess.
    • 2 large **eggs** – Fresh, free-range for the best flavor.
    • 3 tablespoons **maple syrup** – Pure, not imitation, for natural sweetness.
    • 1 teaspoon **vanilla extract** – Adds depth to the flavor.
    • 1/2 cup (60g) **oat flour** – Gluten-free option, or sub with whole wheat flour.
    • 1 teaspoon **baking powder** – Ensures a light, fluffy bake.
    • 1/2 teaspoon **cinnamon** – For warmth and spice.
    • Pinch of **salt** – Balances the sweetness.
    • 1 cup (150g) **blueberries** – Fresh or frozen, but fresh gives the best texture.

    Step-by-Step Instructions

    Step 1: Preheat and Prepare
    Start by preheating your oven to 350°F (175°C). Lightly grease an 8×8-inch baking dish with butter or non-stick spray. This helps the bake come out smoothly without sticking, ensuring a perfect slice every time.

    Step 2: Blend the Base
    In a blender, combine the **cottage cheese**, **eggs**, **maple syrup**, and **vanilla extract**. Blend until the mixture is smooth and creamy. This step is crucial for integrating the ingredients, giving the bake its signature fluffy texture.

    Step 3: Mix the Dry Ingredients
    Add the **oat flour**, **baking powder**, **cinnamon**, and **salt** to the blender. Blend again until everything is just combined. Be careful not to over-blend, as this can result in a dense bake.

    Step 4: Incorporate the Blueberries
    Gently stir in the **blueberries** using a spatula. Reserve a handful to sprinkle on top. This ensures that every bite is bursting with juicy, sweet berries.

    Step 5: Bake to Perfection
    Pour the batter into your prepared baking dish. Sprinkle the reserved blueberries over the top. Bake in the preheated oven for 35-40 minutes, or until the top is golden and a toothpick inserted into the center comes out clean. Chef’s Tip: The edges should be slightly pulling away from the sides of the dish.

    Step 6: Cool and Serve
    Allow the bake to cool for at least 5 minutes before slicing. Serve warm, optionally drizzled with a little extra **maple syrup** for added sweetness.

    Common Mistakes to Avoid

    While this recipe is straightforward, a few common mistakes can trip you up:

    • Over-blending: Mixing too long can make the bake dense.
    • Using low-fat cottage cheese: Opt for full-fat to achieve a richer texture.
    • Skipping the preheat: Make sure your oven is fully preheated to ensure even cooking.
    • Not greasing the dish: This step is crucial to prevent sticking.

    How to Store & Reheat

    Store any leftovers in an airtight container in the refrigerator for up to 5 days. To reheat, simply microwave individual slices for about 20-30 seconds. If you prefer a crispy top, you can also reheat in a preheated oven at 350°F for 5-10 minutes.

    Ingredient Substitutions

    If you’re out of certain ingredients or have dietary restrictions, here are some substitutions:

    • Cottage cheese: Swap with ricotta cheese for a similar texture.
    • Oat flour: Use almond flour for a nutty flavor or regular flour if gluten isn’t an issue.
    • Maple syrup: Honey or agave syrup can be used as alternatives.
    • Blueberries: Try raspberries or chopped strawberries for a twist.

    Nutrition Facts

    Here’s the nutritional breakdown per serving (1 slice, assuming 9 slices):

    • Calories: 248 kcal
    • Protein: 12g
    • Fat: 8g
    • Carbohydrates: 30g
    • Serving Size: 1 slice

    Frequently Asked Questions

    • Can I use frozen blueberries?
      Yes, but be sure to thaw and drain them to prevent excess moisture in the bake.
    • Is this recipe gluten-free?
      Yes, if you use oat flour or any gluten-free flour alternative.
    • How can I make it vegan?
      Substitute eggs with flaxseed eggs and use a dairy-free cottage cheese alternative.
    • Can I add other fruits?
      Absolutely! Feel free to experiment with your favorite fruits, such as peaches or apples.
    • What’s the best way to serve this?
      It’s delicious on its own or paired with a dollop of Greek yogurt or a sprinkle of nuts.

  • Brain Fuel: Almond Butter Bliss

    Brain Fuel: Almond Butter Bliss

    Introduction & My Personal Story

    There’s something truly magical about the comforting aroma of roasted almonds wafting through the kitchen. It takes me back to my childhood, sitting at the kitchen counter, watching my grandmother meticulously prepare her famous almond butter. She always said it was her secret weapon for staying sharp and energetic throughout the day. As I grew older and embarked on my culinary journey, I realized just how right she was. Almond butter isn’t just delicious; it’s a powerhouse of nutrients that fuels both body and mind.

    In my 5 years of experience as a chef, I’ve experimented with countless variations of almond butter, but nothing quite compares to the pure, unadulterated bliss of homemade. It’s a simple process, yet incredibly rewarding. Each batch holds a special place in my heart, much like the fond memories of those afternoons with my grandmother. Today, I’m excited to share with you my perfected recipe for Almond Butter Bliss—a true brain fuel that will elevate your daily routine.

    Why You’ll Love This Recipe

    • **Superior Flavor**: Homemade almond butter offers a rich, nutty taste that store-bought versions simply can’t match.
    • **One Ingredient Wonder**: Made with just raw almonds, it’s as pure as it gets.
    • **Versatile Uses**: Perfect for spreading on toast, blending into smoothies, or even baking.
    • **Nutrient-Packed**: High in healthy fats, protein, and essential vitamins.
    • **Customizable**: Adjust the texture and flavors to suit your preferences.

    Detailed Ingredients

    To create your own Almond Butter Bliss, you’ll need the following ingredients:

    • Raw Almonds: 4 cups (approximately 600 grams). Look for fresh, high-quality almonds with a uniform color and no visible blemishes.
    • Neutral Oil: Optional, 1-2 teaspoons (e.g., avocado oil or coconut oil) for achieving the desired smoothness.
    • Optional Add-ins: Maple syrup, honey, cinnamon, vanilla extract, or cocoa powder for added flavor.

    Step-by-Step Instructions

    Let’s dive into the step-by-step process of making Almond Butter Bliss:

    Step 1: Preheat and Roast

    Begin by preheating your oven to 350°F (175°C). Spread the raw almonds evenly on a baking sheet. Roast them for 8-10 minutes, keeping a close eye to ensure they don’t burn. You’ll know they’re ready when they turn a light golden brown and emit a warm, nutty aroma. Allow them to cool to room temperature before moving to the next step.

    Step 2: Process the Almonds

    Transfer the cooled almonds to a food processor fitted with the S blade. Process the almonds for 15-25 minutes. Initially, the almonds will break down into a coarse meal. As you continue, they’ll form a ball, and eventually, a smooth almond butter will emerge. Stop periodically to scrape down the sides of the processor to ensure even blending. Patience is key here!

    Step 3: Adjust Texture with Oil

    If after 20 minutes your almond butter is still grainy, add 1 teaspoon of neutral oil at a time until you achieve the creamy texture you desire. Remember, the goal is a silky smooth consistency that spreads easily.

    Step 4: Blender Alternative

    If you have a high-powered blender like a Vitamix, you can achieve the same results with less processing time. Blend the full 4 cups of almonds, adding oil as needed, until smooth. This method is quicker but requires a powerful blender to handle the task.

    Common Mistakes to Avoid

    Making almond butter is straightforward, but there are a few pitfalls to watch out for:

    • Over-Roasting: Be cautious not to roast the almonds too long, as burnt almonds will result in a bitter butter.
    • Impatience: Processing time can vary. Don’t rush the process; let the almonds blend until smooth.
    • Adding Oil Prematurely: Only add oil if necessary, as almonds naturally release their own oils.

    How to Store & Reheat

    To keep your Almond Butter Bliss fresh and ready to use:

    • Storage: Transfer the almond butter to an airtight container and store it in the refrigerator. It will last for up to two weeks.
    • Reheating: If your almond butter becomes too firm in the fridge, let it sit at room temperature for a few minutes before using.

    Ingredient Substitutions

    Here are some safe substitutions if you’re looking to tweak the recipe:

    • Raw Almonds: You can use roasted almonds, but reduce the roasting time to avoid overcooking.
    • Neutral Oil: Substitute with any mild-flavored oil, such as grapeseed or light olive oil.
    • Flavor Add-ins: Experiment with different spices or sweeteners to suit your taste.

    Nutrition Facts

    Here’s a breakdown of the nutrition per 2-tablespoon serving:

    • Calories: 106 kcal
    • Protein: 3g
    • Fat: 9g
    • Carbs: 4g
    • Serving Size: 2 tablespoons

    Frequently Asked Questions

    • Can I use a blender instead of a food processor? Yes, but ensure it’s a high-powered blender to handle the dense almonds.
    • How can I make the almond butter sweeter? Add a teaspoon of maple syrup or honey during processing.
    • Is it necessary to add oil? Not always. Almonds release their own oils, but a small amount can help achieve a smoother texture.
    • Can I freeze almond butter? Yes, it can be frozen for up to 3 months. Thaw it in the refrigerator before use.
    • What if my almond butter is too thick? Gradually add oil, one teaspoon at a time, until the desired consistency is reached.

  • CHEAT DAY: Decadent High-Protein Strawberry Bliss Mousse

    CHEAT DAY: Decadent High-Protein Strawberry Bliss Mousse

    Introduction & My Personal Story

    Oh, the memories that come rushing back whenever I think of this High-Protein Strawberry Bliss Mousse. It was a chilly weekend afternoon when I first experimented with this recipe, driven by a craving for something sweet yet guilt-free. I remember standing in my kitchen, strawberries in one hand, a tub of cottage cheese in the other, pondering how to create a dessert that could satisfy my sweet tooth without derailing my fitness goals. In my 5 years of experience as a chef, I’ve learned that some of the best recipes are born out of necessity, and this mousse is no exception.

    My journey with this dish began when I was training for a marathon. I needed something that would offer me the indulgence of a cheat day while packing a punch of protein. The first bite was a revelation—a silky, creamy texture with the subtle sweetness of strawberries. It was like tasting a cloud, and I knew immediately that this would become a staple in my repertoire. Over time, I’ve shared this recipe with many friends and family members, each of whom has fallen in love with its simplicity and flavor.

    There’s something magical about combining the creamy richness of full-fat cottage cheese with the fresh, juicy burst of strawberries. It’s a match made in dessert heaven, perfect for those who are mindful of their macros but still want to indulge. Let me take you through the process of creating this delightful treat, ensuring that your next cheat day is nothing short of blissful.

    Why You’ll Love This Recipe

    • High in protein, making it perfect for muscle recovery.
    • No baking required—just blend, chill, and enjoy.
    • Rich, creamy texture with a fresh strawberry flavor.
    • Low effort, high reward—ideal for busy days.
    • Perfect for satisfying your sweet cravings without guilt.

    Detailed Ingredients

    • 200 grams (1 cup) of full-fat cottage cheese – Look for a creamy texture without too much liquid.
    • 300 grams (2 cups) of fresh strawberries – Choose ripe, red strawberries for maximum sweetness and flavor.
    • 150 grams (1 cup) of Cocowhip – A dairy-free whipped topping that adds lightness to the mousse.
    • 2 tablespoons of honey or a sweetener of choice – Adjust based on your sweetness preference.
    • 1 teaspoon of vanilla extract – Enhances the overall flavor of the mousse.

    Step-by-Step Instructions

    Step 1: Prepare the Strawberries

    Start by washing the strawberries thoroughly under cold water. Remove the stems and cut them into halves. Chef’s Tip: For an extra burst of flavor, let the strawberries sit at room temperature for about 15 minutes after cutting. This helps to bring out their natural sweetness.

    Step 2: Blend the Base

    Add the strawberries and full-fat cottage cheese into a high-speed blender. Blend on high until the mixture is smooth and creamy, which should take about 1-2 minutes. You’ll know it’s ready when there are no visible chunks of strawberries.

    Step 3: Sweeten and Flavor

    Add honey and vanilla extract to the blender. Blend for an additional 30 seconds to ensure everything is well incorporated. Taste the mixture and adjust the sweetness if necessary.

    Step 4: Fold in the Cocowhip

    Transfer the strawberry-cottage cheese mixture into a large mixing bowl. Gently fold in the Cocowhip using a spatula. Be careful not to deflate the Cocowhip, as it helps to give the mousse its airy texture.

    Step 5: Chill and Set

    Divide the mixture into two serving containers or ramekins. Cover with plastic wrap and refrigerate for at least 2-4 hours, or preferably overnight. This chilling time allows the mousse to set and the flavors to meld together beautifully.

    Step 6: Serve and Enjoy

    Once set, serve the mousse straight from the fridge. You can garnish with sliced strawberries or a sprinkle of grated dark chocolate if you’re feeling fancy. Enjoy this delightful treat, knowing it’s as nutritious as it is delicious.

    Common Mistakes to Avoid

    • Not blending the strawberries and cottage cheese thoroughly, resulting in a lumpy texture.
    • Deflating the Cocowhip while folding it into the mixture, which can make the mousse dense.
    • Skipping the chilling step, which is crucial for the mousse to set properly.
    • Using unripe strawberries, leading to a less flavorful mousse.

    How to Store & Reheat

    Store any leftovers in an airtight container in the refrigerator for up to 3 days. This mousse is best enjoyed cold, so there’s no need to reheat. If you find it has thickened too much, let it sit at room temperature for about 10 minutes before serving.

    Ingredient Substitutions

    • If you’re dairy-free, substitute the cottage cheese with a plant-based equivalent.
    • For a vegan option, replace honey with maple syrup or agave nectar.
    • Cocowhip can be substituted with any other whipped topping, keeping in mind dietary preferences.

    Nutrition Facts

    • Calories: 250 per serving
    • Protein: 15 grams
    • Fat: 8 grams
    • Carbohydrates: 30 grams
    • Serving Size: 1 container (serves 2)

    Frequently Asked Questions

    • Can I use frozen strawberries? Yes, but make sure to thaw them completely and drain any excess liquid to avoid a watery mousse.
    • Is there a way to make this mousse more keto-friendly? You can use a keto-friendly sweetener instead of honey and ensure the cottage cheese is low-carb.
    • How can I make this mousse thicker? Reduce the amount of Cocowhip or add a bit of gelatin dissolved in water to the mixture before chilling.
    • Can I add other fruits? Absolutely, try adding raspberries or blueberries for a mixed berry mousse.
    • What if I don’t have a blender? You can use a food processor or even an immersion blender to achieve a smooth texture.